- Page 7 and 8: Glenair Composite ThermoplasticConn
- Page 9 and 10: Glenair Composite ThermoplasticConn
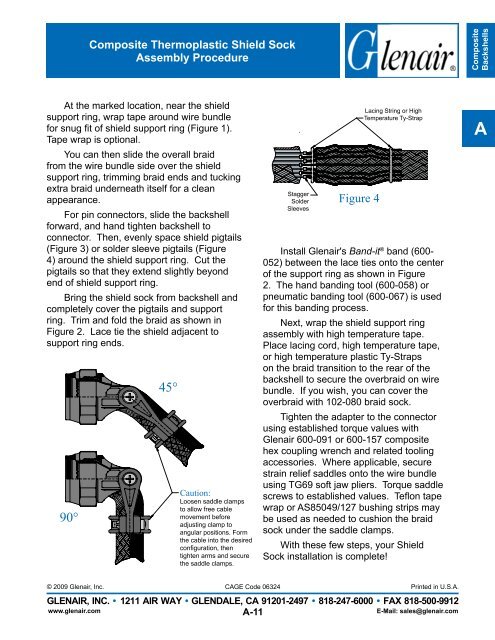
- Page 11 and 12: Glenair Composite ThermoplasticConn
- Page 13 and 14: Glenair Composite ThermoplasticConn
- Page 15 and 16: Glenair Composite ThermoplasticConn
- Page 17 and 18: Glenair Composite Connector and Acc
- Page 19 and 20: Glenair Composite Connector and Acc
- Page 21 and 22: Glenair Composite Connector and Acc
- Page 23 and 24: RoHS Compliant Plating OptionIntrod
- Page 25 and 26: Common Interface StandardsIntroduct
- Page 27 and 28: Military Standard Connector IndexIn
- Page 29 and 30: Military Standard Connector IndexIn
- Page 31 and 32: Connector-BackshellInterface IndexI
- Page 33 and 34: Connector Manufacturers ReferenceIn
- Page 35 and 36: Connector Manufacturers ReferenceIn
- Page 37 and 38: Connector ManufacturersAlpha-Numeri
- Page 39 and 40: Composite Backshellsand Other Conne
- Page 41 and 42: 310-045Composite Shrink Boot Adapte
- Page 43 and 44: 311-034Composite Lamp Base ThreadEM
- Page 45 and 46: 311-019Composite Lamp Base ThreadEM
- Page 47: 311-063Composite Lamp Base ThreadEM
- Page 51 and 52: 319-064Composite Swing-Arm Backshel
- Page 53 and 54: 319-120Composite EMI/RFI Backshellw
- Page 55 and 56: 319-134Composite EMI/RFI Ultra Low-
- Page 57 and 58: 319-136Composite EMI/RFI Shield Soc
- Page 59 and 60: The Right Backshellfor the Job.....
- Page 61 and 62: 319-137Composite Shield Sock Strain
- Page 63 and 64: 319-138"Wide Mouth" Composite Swing
- Page 65 and 66: 327-060Extender Backshellwith Self-
- Page 68 and 69: CompositeBackshellsSeries 360 Non-E
- Page 70 and 71: CompositeBackshells360-014Composite
- Page 72 and 73: CompositeBackshells360-015Composite
- Page 74 and 75: CompositeBackshellsSeries 370 Envir
- Page 76 and 77: CompositeBackshells370-016Composite
- Page 78 and 79: CompositeBackshells370-017Composite
- Page 80 and 81: CompositeBackshells377-040Composite
- Page 82 and 83: CompositeBackshellsSeries 380 EMI/R
- Page 84 and 85: CompositeBackshells380-099Composite
- Page 86 and 87: CompositeBackshells380-100Composite
- Page 88 and 89: CompositeBackshellsKnit Braid Backs
- Page 90 and 91: CompositeBackshells380-130Composite
- Page 92 and 93: CompositeBackshells380-132Composite
- Page 94: CompositeBackshellsSeries 380 (Type
- Page 97 and 98: 387-083Composite Multi-Shield Cone
- Page 99 and 100:
Series 390 (Single Shield) EMI/RFIE
- Page 101 and 102:
390-052Composite Cone and Ring Styl
- Page 103 and 104:
440-087Ultra Lightweight Banding St
- Page 105 and 106:
440-088 and 440-089Self-Locking Rot
- Page 107 and 108:
Banding Backshell with Qwik-TyAssem
- Page 109 and 110:
440-143Composite Ultra Low Profile
- Page 111 and 112:
440-144Composite Ultra Low Profile
- Page 113 and 114:
447-325Composite Standard Profile E
- Page 115 and 116:
447-326Composite Standard Profile E
- Page 117 and 118:
447-327Composite Standard Profile E
- Page 119 and 120:
447-328Composite Standard Profile E
- Page 121 and 122:
447-329Composite EMI/RFI Environmen
- Page 123 and 124:
447-330Composite Non-Environmental
- Page 125 and 126:
447-331Composite EMI/RFI Dual-Bandi
- Page 127 and 128:
447-711Composite EMI/RFI Banding Ba
- Page 129 and 130:
450-030Composite Qwik-Ty ® Strain-
- Page 131 and 132:
450-034Composite Qwik-Ty ® Strain-
- Page 133 and 134:
507-088Composite RFI/EMI Banding Ba
- Page 135 and 136:
557-186Composite RFI/EMI Banding Ba
- Page 137 and 138:
620-042Composite Strain-Relief Clam
- Page 139 and 140:
627-122Composite Swing-Arm Strain R
- Page 141 and 142:
627-142Composite Swing-Arm Strain R
- Page 143 and 144:
770-00190° Shrink BootHeat Shrink
- Page 145 and 146:
Glenair Environmental Shrink-BootAd
- Page 147 and 148:
ProtectiveCoversDimensional TablesP
- Page 149 and 150:
ProtectiveCovers660-047 • 660-048
- Page 151 and 152:
ProtectiveCovers660-077 • 660-078
- Page 153 and 154:
ProtectiveCovers650-025Composite Du
- Page 155 and 156:
ProtectiveCovers667-118Composite Re
- Page 157 and 158:
Custom Conduit AssembliesWired, Ter
- Page 159 and 160:
ConvolutedTubingIntroduction to Con
- Page 161 and 162:
ConvolutedTubingIntroduction to Con
- Page 163 and 164:
ConvolutedTubingSeries 74Helical Co
- Page 165 and 166:
ConvolutedTubing120-103Series 74 He
- Page 167 and 168:
ConvolutedTubing121-101Series 74 He
- Page 169 and 170:
ConvolutedTubing121-103Series 74 He
- Page 171 and 172:
ConvolutedTubing377-041Composite Fi
- Page 173 and 174:
ConvolutedTubing710-318Composite Sp
- Page 175 and 176:
ConvolutedTubing710-320Composite Sp
- Page 177 and 178:
ConvolutedTubing712S269Composite Sh
- Page 179 and 180:
ConvolutedTubing712S271Composite Du
- Page 181 and 182:
ConvolutedTubing712-419Composite Co
- Page 183 and 184:
Glenair Composite BraidDoesn't Make
- Page 185 and 186:
103-026100% AmberStrand ® Composit
- Page 187 and 188:
CompositeShielding102-051PEEK Tubul
- Page 189 and 190:
Glenair Announces:140 Series EMI/RF
- Page 191 and 192:
CompositeJunctionBoxesGlenair CostS
- Page 193:
CompositeJunctionBoxesGlenair CostS
- Page 196 and 197:
Glenair CostSaverComposite EMI/RFI
- Page 198 and 199:
Glenair CostSaverComposite EMI/RFI
- Page 200 and 201:
Glenair CostSaverComposite EMI/RFI
- Page 202 and 203:
Glenair CostSaverComposite EMI/RFI
- Page 204 and 205:
Glenair CostSaverComposite EMI/RFI
- Page 206 and 207:
Series 140-074Ultra-Miniature Junct
- Page 208 and 209:
Series 140-100Mini Junction BoxComp
- Page 210 and 211:
Series 140-101Small Junction BoxCom
- Page 212 and 213:
Series 140-102Medium Junction BoxCo
- Page 214 and 215:
Series 140-103Large Junction BoxCom
- Page 216 and 217:
Series 140-104Small Low-Profile Box
- Page 218 and 219:
Series 140-105Medium Low-Profile Ju
- Page 220 and 221:
Series 140-106Small Three-Legged Ju
- Page 222 and 223:
Series 140-107Jumbo Junction BoxCom
- Page 224 and 225:
Series 140-20312 Port Rectangular J
- Page 226:
630-030Composite Thru-Box, Panel an
- Page 229 and 230:
CompositeJunctionBoxes637-094Compos
- Page 231 and 232:
CompositeJunctionBoxes687-466Termin
- Page 233 and 234:
CompositeJunctionBoxes687-467Slotte
- Page 235 and 236:
A New Way to Make Ends MeetGlenair
- Page 237 and 238:
EnvironmentalConnectorsSeries IIISe
- Page 239 and 240:
EnvironmentalConnectorsAlternate Ke
- Page 241 and 242:
EnvironmentalConnectorsCrimp Tools
- Page 243 and 244:
EnvironmentalConnectorsMIL-DTL-3899
- Page 245 and 246:
EnvironmentalConnectors233-105-00,
- Page 247 and 248:
EnvironmentalConnectors233-105-07MI
- Page 249 and 250:
EnvironmentalConnectors233-105-05MI
- Page 251 and 252:
EnvironmentalConnectors233-105-G6MI
- Page 253 and 254:
High VoltageElectrical Power Distri
- Page 255 and 256:
AssemblyToolsComposite Connector Ac
- Page 257 and 258:
Stop Toolin' AroundFinding the righ
- Page 259 and 260:
AssemblyTools600-091Composite Conne
- Page 261 and 262:
AssemblyToolsTG70Strap WrenchA6.50
- Page 263 and 264:
AssemblyTools600-164Large Broad Bla
- Page 265 and 266:
AssemblyTools600-058 and 600-061Han
- Page 267 and 268:
AssemblyTools600-056, 600-062, 600-
- Page 269 and 270:
Cad-Free Ni-PTFEPlating: NowFrom Gl
- Page 271:
Composite ThermoplasticCompositePro