Zodiac Baracuda G3 - Home - Swimming Pool Parts Filters Pumps ...
Zodiac Baracuda G3 - Home - Swimming Pool Parts Filters Pumps ...
Zodiac Baracuda G3 - Home - Swimming Pool Parts Filters Pumps ...

You also want an ePaper? Increase the reach of your titles
YUMPU automatically turns print PDFs into web optimized ePapers that Google loves.
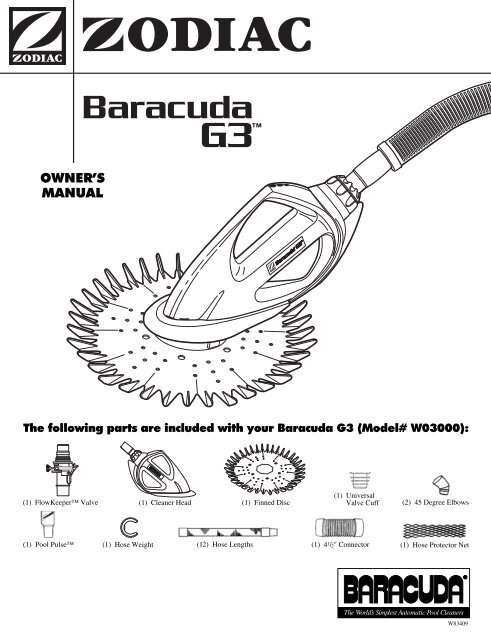
OWNER’SMANUALThe following parts are included with your <strong>Baracuda</strong> <strong>G3</strong> (Model# W03000):(1) FlowKeeper Valve(1) Universal(1) Cleaner Head (1) Finned DiscValve Cuff (2) 45 Degree Elbows(1) <strong>Pool</strong> Pulse(1) Hose Weight (12) Hose Lengths (1) 4 1 /2" Connector (1) Hose Protector NetW83409
THANK YOU FOR PURCHASING BARACUDA ® <strong>G3</strong> .YOUR BARACUDA <strong>G3</strong> HAS BEEN DESIGNED AND MANUFACTURED TO BE EASILYINSTALLED AND TO PROVIDE YEARS OF LOW MAINTENANCE OPERATION.PRIOR TO INSTALLING YOUR NEW BARACUDA <strong>G3</strong>, PLEASE DO THE FOLLOWING:1) Complete and return the warranty card.2) Record your purchase information on the spaces provided below.3) Attach your invoice (or a copy) to this page.These actions will insure prompt warranty service, should it be required. Simply present your owner’s manual, along with the invoice at any of ourauthorized warranty centers nationwide.RECORD YOUR BARACUDA <strong>G3</strong> POOL CLEANER DATA HERE:Date of Purchase ___________ Purchased From ________________________________________ Serial Number: ______________________________(located on underside of machine head)City __________________________________________________ State_______________________________ Zip Code _________________________BARACUDA <strong>G3</strong> LIMITED WARRANTYThis BARACUDA <strong>G3</strong> was carefully inspected before shipment from our warehouse. Upon unpacking, if any part proves defective or missing, please notify <strong>Zodiac</strong><strong>Pool</strong> Care, Inc. immediately. Please consult owner’s manual for complete instructions on the installation and operation of your BARACUDA <strong>G3</strong>.ZODIAC POOL CARE, INC. WARRANTS THE BARACUDA <strong>G3</strong> POOL CLEANER AGAINST ALL MANUFACTURING DEFECTS AND ALL WEAR ANDTEAR FOR (2) YEARS. ALL WARRANTIES ARE EFFECTIVE FROM THE DATE OF PURCHASE.Should this product prove defective in workmanship, materials or wear during the applicable warranty period, the consumer’s sole and exclusive remedy shall besuch repair or replacement of the product as provided below.THE LIMITED WARRANTY PROVIDED HEREIN IS THE SOLE AND EXCLUSIVE WRITTEN WARRANTY WITH RESPECT TO THEBARACUDA <strong>G3</strong> POOL CLEANER. ALL IMPLIED WARRANTIES IMPOSED BY APPLICABLE LAW, INCLUDING ANY IMPLIED WARRANTY OFMERCHANTABILITY OR FITNESS FOR A PARTICULAR PURPOSE, ARE LIMITED TO THE DURATION OF THE EXPRESS LIMITEDWARRANTY. SOME STATES DO NOT ALLOW LIMITATIONS ON HOW LONG AN IMPLIED WARRANTY LASTS, SO THE ABOVELIMITATION MAY NOT APPLY TO YOU.THIS LIMITED WARRANTY EXCLUDES THE FOLLOWING:1. Discoloration of the BARACUDA <strong>G3</strong> pool cleaner. This is caused by reaction to ultraviolet rays and the chemicals used in the pool water. Discoloration does notaffect the operating ability of the BARACUDA <strong>G3</strong>. Therefore, this Limited Warranty does not cover the replacement of discolored parts.2. Damage to or malfunction of the unit resulting from excess chlorination or improper water chemistry balance.3. Replacement of parts which fail or become defective as a result of improper installation, negligence, misuse, abuse or tampering by unauthorized repair personnel.4. Age, pool water imbalance, and improper installation can cause vinyl pool liners to become brittle or unduly wrinkled. Corrosion of the supporting walls and/orirregularities in the pool base may also cause liner failure. The use of this product in such an environment is at the pool owner’s risk. Therefore, the pool ownerhereby releases the manufacturer from any and all claims for damage where these conditions exist.5. The BARACUDA <strong>G3</strong> is designed for use in inground pools only. If unit is used in any other application, the pool owner hereby releases the manufacturer from anyand all claims. This misuse will void all warranty on the unit.6. In no event shall <strong>Zodiac</strong> <strong>Pool</strong> Care, Inc. be liable in contract or in tort, or under any other legal theory, for lost profits or revenues, loss of use or similar economicloss, or for indirect, special, incidental, consequential or similar damages, even if it has been advised of the possibility of such claim. Some states do not allow theexclusion or limitation of incidental or consequential damages, so the above limitation or exclusion may not apply to you.IMPORTANT WARRANTY NOTICES FOR VINYL LINER POOL OWNERS• Certain vinyl liner patterns are particularly susceptible to rapid surface wear or pattern removal caused by objects coming into contact with the vinyl surface,including pool brushes, pool toys, floats, fountains, chlorine dispensers, and automatic pool cleaners.• Some vinyl liner patterns can be seriously scratched or abraded simply by rubbing the surface with a pool brush. Ink from the pattern can also rub off during theinstallation process or when it comes into contact with objects in the pool. <strong>Zodiac</strong> is not responsible for, and the Limited Warranty does not cover, patternremoval, abrasion or marking on vinyl liners.• Vinyl liners are subject to deterioration or damage due to age, the effect of chemicals, corrosion or failure of the supporting walls; as well as improper installation,maintenance or cleaning of the supporting walls or base.• Before installing the <strong>Baracuda</strong> <strong>G3</strong>, examine the interior of your pool carefully. If your vinyl liner is brittle or has stones, wrinkles, roots or metal corrosion in contactwith the underside of the liner, or has damage to the base material or supporting walls, do not install the <strong>Baracuda</strong> <strong>G3</strong> before having a qualified professional performthe necessary repairs.ZODIAC POOL CARE, INC. WILL NOT BE RESPONSIBLE FOR LINER DAMAGE CAUSED BY (1) A BARACUDA <strong>G3</strong> CLEANER WHICH IS INDISREPAIR, (2) PATTERN REMOVAL FROM A VINYL LINER, OR (3) A BARACUDA <strong>G3</strong> CLEANER USED IN A POOL HAVING AN AGED ORDETERIORATED LINER.WARRANTY PROCEDURESNo claim under this Limited Warranty will be recognized unless the registration card, included in your box, is completed and returned within fifteen (15) days of thepurchase date. Only the original purchaser may submit a claim under this Limited Warranty. Purchaser’s claims against <strong>Zodiac</strong> <strong>Pool</strong> Care, Inc., shall be limitedto those claims which may be asserted under the Limited Warranty relating to any defect, malfunction or wear of the BARACUDA <strong>G3</strong>.To obtain warranty replacements or repair, call (888) 786-7797 for authorization. When submitting a claim, always supply serial number, evidence of purchase date,retailer and a brief description of the problems/defects encountered. <strong>Zodiac</strong> <strong>Pool</strong> Care, Inc. reserves the right to repair or replace all defective or worn parts covered bythis Limited Warranty and return same to purchaser, freight collect.<strong>Zodiac</strong> <strong>Pool</strong> Care, Inc. assumes no responsibility for any warranties or representations made by other individuals or businesses beyond the express terms containedin this Limited Warranty.This warranty gives you specific legal rights, and you may also have other rights which vary from state to state.For sale and use in the United States, Canada and Mexico only. This pool cleaner is not warranted or guaranteed outside of the United States, Canada or Mexico.This pool cleaner is covered by one or more of the following Canadian and U.S. patents and Canadian registered design:U.S. patent nos. 4642833, 4742593, 5421054 and 5450645. Canadian patent nos. 1254105 and 1256262. Other Patents Pending.
INGROUND AUTOMATIC POOL CLEANERINSTALLATION GUIDE<strong>Pool</strong> Preparation .......................................................................................................................... 2Assembly ....................................................................................................................................... 3Hose Assembly................................................................................................................................3Balance............................................................................................................................................4Removing Air From Hose..............................................................................................................4Installation......................................................................................................................................5Achieving Proper Flow ..................................................................................................................6Adjustments....................................................................................................................................7Troubleshooting..............................................................................................................................7Accessories......................................................................................................................................8HOW YOUR ZODIAC AUTOMATIC POOL CLEANER WORKS• Your pool pump pulls water from the main drain and the skimmer through a strainer basket, then pushes the water through thefilter system and back into the pool through the return inlets.• The <strong>Zodiac</strong> Automatic <strong>Pool</strong> Cleaner connects to the skimmer or dedicated vacuum line with the hose sections provided. Waterflows through the diaphragm of the cleaner at a rate of 14 to 19 gallons per minute.• Diverting or re-directing the return inlets downward breaks up the circulation pattern of water within the pool. This allowsrandom cleaning around the pool.• Most common problems can be eliminated, by reading through the entire manual before installing your new <strong>Zodiac</strong>.POOL COMPONENTSDEDICATEDVAC LINEPUMPSTRAINERBASKETRETURN INLET/SKIMMER& MAIN DRAIN VALVESPUMPFILTERRETURNINLETRETURNINLETSKIMMERMAINDRAIN• Please become familiar with the components of your pool shown.• All diagrams are provided for reference of terminology used throughout this manual. Your pool may vary.W83342
Thank you for purchasing this automatic pool cleaner from <strong>Zodiac</strong>. Prior to installing your pool cleaner,review the parts and warranty information and insure that all parts shown are included with your unit.Although the appearance of your model <strong>Zodiac</strong> <strong>Pool</strong> Cleaner may differ slightly from somedrawings shown in this installation guide, installation steps remain the same.STEP 1 - POOL PREPARATION• Before installing the <strong>Zodiac</strong> Automatic <strong>Pool</strong> Cleaner, examine the interior of your pool carefully. If your vinyl liner is brittle orhas stones, wrinkles, roots or metal corrosion in contact with the underside of the liner, or has damage to the base material orsupporting walls, do not install the pool cleaner before having a qualified professional perform the necessary repairs.• Close the main drain. This allows the flow to be regulated by the Flowkeeper.• Manually vacuum the pool. This eliminates unnecessary adjustment later.• Clean the pool filter and empty the skimmer and pump strainer baskets. Filter pressure rises as debris is cleaned from the water,thus reducing flow.• Divert the pool return inlets downward - (IMPORTANT!). Your <strong>Zodiac</strong> Automatic <strong>Pool</strong> Cleaner must move randomly throughoutthe pool. Water circulating at the surface will influence the hose and limit coverage.• To adjust the return inlet: loosen the lock ring and redirect the eyeball downward, then retighten the lock ring. If the eyeball isdifficult to adjust, insert a screwdriver inside the eyeball and gently adjust downward.• If the return inlets cannot be pointed downward, then you MUST install <strong>Zodiac</strong> return line diverters. They are available throughyour <strong>Zodiac</strong> dealer.BEFORE ADJUSTMENTTOP VIEWSIDE VIEWAFTER ADJUSTMENTTOP VIEWFOR POOLS WITH RETURN INLETDIRECTIONAL FITTINGSReplace the directional eyeballwith <strong>Zodiac</strong> retrofit eyeball returnline diverter and reinstall eyeballretaining ring.Part #W90153 for1 1 /2" return linesPart #W90155 for2" return linesSIDE VIEWIF UNABLE TO ADJUST RETURN INLETSOR FOR POOLS WITHOUT RETURN INLETDIRECTIONAL FITTINGSUse <strong>Zodiac</strong> universal returnline diverter (Part #W24100).Pinch wires together andinsert fully into return inlet.2
FINNED DISC INSTALLATIONSTEP 2 - ASSEMBLYSlide the finned disc over the foot pad. Insure the disc fits properly in the grooves provided and rotates freely on the foot pad.The fins on the disc face upward.FINS FACEUPWARDBOTTOM VIEWREAR VIEWWHEEL DEFLECTOR INSTALLATION (Only used on some pool cleaners.)Some <strong>Zodiac</strong> <strong>Pool</strong> Cleaner models require a wheel deflector for proper performance. If your model includes one, slide the wheeldeflector over the extension pipe and secure between the two lowest pipe ridges. Make sure the top clips of the wheel deflector areseated in the groove. The wheel deflector should rotate freely.GROOVEGROOVESTEP 3 - HOSE ASSEMBLYFOR CORNER OR END INSTALLATIONSIf your skimmer or wall vacuum fitting is located at the corneror end of your pool, use enough hose sections to reach thefarthest point in the pool, plus one (1) section.SKIMMER / WALLVACUUM FITTINGSKIMMER / WALLVACUUM FITTINGFOR CENTER INSTALLATIONSIf your skimmer or wall vacuum fitting is located at the center ofyour pool, use enough hose sections to reach the farthest point inthe pool, plus two (2) sections.SKIMMER / WALLVACUUM FITTINGSKIMMER / WALLVACUUM FITTINGNote: You may not need to use all or you may need more hose sections,with either installation method, depending upon your pool size.3
STEP 4 - BALANCE<strong>Zodiac</strong> Automatic <strong>Pool</strong> Cleaners require a specific number of hose weights to compensate for the buoyancy of the hose dependingon the cleaner model. A properly balanced pool cleaner hose will create a 45-degree angle from the cleaner head and the bottom ofthe pool as shown below.FOLLOW THE GUIDELINES BELOW FOR YOUR SPECIFIC CLEANER MODEL.(Model number is stated on the cover of the manual.)MODEL# W83251 - Hose weight is not required for this model cleaner in most pools. As a troubleshooting technique toimprove coverage or prevent the cleaner from climbing the walls excessively, snap (1) hose weight onto the first hose section,one meter from the cleaner head.MODEL# W03000 - Snap (1) hose weight onto the middle of the first hose section, 1 /2 meter from the cleaner head.MODEL# W83215 & W83216 - Snap (2) hose weights onto the middle of the second hose section,1 1 /2 meters from the cleaner head.INCORRECT CORRECT INCORRECTNote: For pools 8 1/2 feet or deeper, please refer to page 7 of this manual for balancing instructions.STEP 5 - REMOVING AIR FROM HOSE• Turn the filtration system off.• Attach the cleaner head to the female end of the hose.• Turn on the filtration system.• Fill the hose with water by placing the end over a return inlet.RETURNINLET4
STEP 7 - ACHIEVING PROPER FLOWIDEAL TOO HIGH TOO LOWPOOL PULSE ®The <strong>Pool</strong> Pulse is a flow meter that measures the volume of water flowing through your <strong>Zodiac</strong> cleaner. It must be used to properly setthe flow and can be used as a diagnostic tool when the cleaner isn't running properly.For the following steps, using 2 people is recommended; one poolside and the other at the plumbing manifold. Vacuum and skimmervalves are located at your plumbing manifold.• Remove the cleaner head.• Attach the <strong>Pool</strong> Pulse ® to the end of the hose and keep it under water as shown in Figure 1.• Turn on the filtration system.• For pools with one skimmer, flow is automatically regulated by the Flowkeeper Valve. Insure the blue indicator of the <strong>Pool</strong>Pulse is in the ideal range (when viewed from the side).• For pools with two or more skimmers, leave the selected skimmer open and slowly close the other skimmer(s) until the blueindicator of the <strong>Pool</strong> Pulse moves into the ideal range (when viewed from the side).• For pools with a wall vacuum fitting, leave the wall vacuum fitting fully open and slowly close the skimmer valve until the blueindicator of the <strong>Pool</strong> Pulse moves into the ideal range (when viewed from the side).• Keeping the hose under water, remove the <strong>Pool</strong> Pulse. Submerge the cleaner head, and when the bubbles stop coming from theextension pipe, attach the hose end. Your installation is now complete.SAMPLE PLUMBINGMANIFOLDNOTE: Plumbing manifolds vary bypool. Refer to your pool builder forquestions regarding your plumbingmanifold configuration.If the flow is in the low range, review the installation procedures. A dirty pool filter, clogged baskets and improperly set valves areusually the main cause of low flow. Other types of hydraulic problems may require a professional pool repairman.If the flow is in the high range, review the installation procedures. Confirm that the valves controlling these lines are properly set.Lower the setting on the Flowkeeper Valve. Slightly open the main drain as a last option if flow is still excessive.6Figure 1
ADJUSTMENTSBALANCE - POOLS THAT ARE 8 1/2 FEET OR DEEPERFOLLOW THE GUIDELINES BELOW FOR YOUR SPECIFIC CLEANER MODEL.MODEL# W83251 - Snap (1) hose weight onto the first hose section, one meter from the cleaner head.MODEL# W03000, W83215, and W83216 - An additional hose weight (#W83247) may be necessary to balance the <strong>Zodiac</strong> <strong>Pool</strong>Cleaner head. If the cleaner is not balanced correctly in the deep end of the pool (as shown on page 4), turn off the pump and add anadditional hose weight approximately 5 to 8 feet away from the cleaner head. Place the pool cleaner in the deep end, turn on thepump and determine whether the correct balance has been achieved. If not, re-position the additional hose weight accordingly.Additional hose weights may be purchased from your <strong>Zodiac</strong> dealer if required.IMPROVING COVERAGENormally it is undesirable for the return line water flow to affect the natural movement of the pool cleaner hose. However, thefollowing illustration shows how return line pressure can be used to balance cleaning coverage or to guide the cleaner away from stepareas with “V” shaped corners.A return line located anywherealong the shaded area can beutilized to gently push the hoseallowing the pool cleaner to freeitself from in-pool obstacles.TechniquePosition the return linedirectional so that you canonly detect water movementon the surface 8 feet out fromthe wall, and aim it at thecenter of the opposite wall.PROBLEMCleaner stops & startsCleaner is patterningCleaner isn't coveringopposite end of poolCleaner stuck at stepsCleaner stuck under ladderCleaner flips overCleaner won't climb wallsCleaner doesn't moveCleaner won't leave edgeor rim of poolSolar blanket installationSOLUTIONTROUBLESHOOTINGCheck diaphragm for blockage or damage. Use <strong>Pool</strong> Pulse ® to determine proper flow.Add return diverters or divert return inlets downward. Lay hose in a straight line in the sun to relaxmemory. Confirm proper hose length - add 1 to 2 hose sections.Add return diverters or divert return inlets downward. Use flow to move cleaner to opposite end.Move hose weight away from cleaner head slightly. In deep pools add additional weight.Utilize return flow (see adjustments). Confirm proper hose length. Adjust flow to cleaner. Adjust hoseweight. Install wheel deflector.Install ladder guard (#W24000).Contact tech services for local warranty station.Cleaner may not climb walls of some vinyl pools. Use <strong>Pool</strong> Pulse and raise flow. Confirm proper hoselength. Adjust hose weight.Use <strong>Pool</strong> Pulse to insure proper flow. Clean baskets & filter. Check diaphragm for damage. Check hosesections for leaks by lifting each section above water.Use <strong>Pool</strong> Pulse to lower flow. Utilize return flow to move cleaner. Adjust hose weight.Coverage will be limited due to blanket.NOTE: In cold water of 60˚ or less, water flow through the cleaner must be increased to compensate for the reducedflexibility of the hose and diaphragm.IF ASSISTANCE IS REQUIRED, PLEASE CALL US AT 1-888-786-77977
ZODIAC ACCESSORIES1PART ILLUSTRATION PART NO. DESCRIPTION1. W24000 Ladder GuardAlways use on stainless steelin-pool ladders22. W24100 Return Line DiverterUse when no otherreturn inlet directionalfittings exist.3A3B3A. W90153 Retrofit Eyeball Return(for 1 1 /2" return inlet)Line DiverterUse to replace standard3B. W90155 directional inlet eyeballs.(for 2" return inlet)44. W26705 The Leaf Catcherwith 4 1 /2" Hose ConnectorUse when heavy debris orleaf situations exist.55. W83247 Additional 37g Hose WeightMay be required to properlybalance the <strong>Zodiac</strong> cleaner head.ZODIAC POOL CARE, INC.2028 N.W. 25th AvenuePompano Beach, FL 330691-888-786-7797www.zodiacpoolcare.com
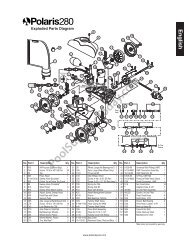
BARACUDA <strong>G3</strong> PARTS DIAGRAM10516171162131819209218422232425731214151PART NO. DESCRIPTION QTY.1. W69541 Left <strong>G3</strong> Main Body 12. W69542 Right <strong>G3</strong> Main Body 13. W56124 Float - <strong>Baracuda</strong> <strong>G3</strong> 14. W41079 Weight - <strong>Baracuda</strong> <strong>G3</strong> 15. W69545 Retaining Collar - <strong>Baracuda</strong> <strong>G3</strong> 16. W69559 Cassette Chambers Upper and Lower 17. W69698 Long Life Diaphragm 18. W81600 Retaining Ring 19. W56525 Inner Extension Pipe 110. W69540 Cassette Outer Extension Pipe w/ Handnut 111. W74000 Compression Ring 112. W69732 Foot Flange 113. W69526 Bumper Fin - <strong>Baracuda</strong> <strong>G3</strong> 114. W72880 Foot Pad - Teal 115. W46666 Finned Disc - Teal 116. W60050 FlowKeeper Valve 117. W33160 4 1/2" Connector - Aqua 118. W44800 <strong>Pool</strong> Pulse ® 119. W90146 45º Elbow 120. W63900 Inground Valve Cuff 121. W33800 Hose Protector Net 122. W83247 Hose Weight 123. W83140 Long-Life Hose Kit - 12x1 Meter - Aqua 124. W33411 Wheel Deflector (Optional Accessory) 125. W41721 Wheel Adapter (Optional Accessory) 1ZODIAC POOL CARE, INC.2028 N.W. 25th AvenuePompano Beach, FL 330691-888-786-7797www.zodiacpoolcare.com