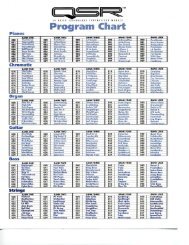
Updating The ML9600 Masterlink Operating System - Alesis
Updating The ML9600 Masterlink Operating System - Alesis
Updating The ML9600 Masterlink Operating System - Alesis

You also want an ePaper? Increase the reach of your titles
YUMPU automatically turns print PDFs into web optimized ePapers that Google loves.
<strong>Updating</strong> the <strong>ML9600</strong> <strong>Masterlink</strong> <strong>Operating</strong> <strong>System</strong>In order to update the system software on your <strong>Masterlink</strong>, you will need to obtain or create a<strong>System</strong> Software CD. If you already have a <strong>System</strong> Software CD, proceed to the UpdateProcedures section below.How To Create A <strong>System</strong> Software CD1. Determine what year your <strong>Masterlink</strong> was manufactured by reading the product serialnumber on the back of the unit. In the serial number, the 3rd and 4th characters after(21) represent the production year.For example a <strong>Masterlink</strong> with a serial number beginning with (21)A108... wasmanufactured in 2008.2. Download the appropriate OS for your <strong>Masterlink</strong>.2a. If your <strong>Masterlink</strong> was manufactured in 2008 or later:1. Go to: http://www.alesis.com/masterlink2. Click on, Docs & Downloads3. Click on the link titled: <strong>Masterlink</strong> OS v3.024. On the page that opens, you'll be asked to enter some basic contactinformation. Once completed, click Submit.5. On the next page, click the link titled:<strong>Masterlink</strong> OS v3.022b. If your <strong>Masterlink</strong> was manufactured before 2008:1. Go to: http://www.alesis.com/masterlink2. Click on, Docs & Downloads3. Click on the link titled: <strong>Masterlink</strong> OS v2.214. On the page that opens, you'll be asked to enter some basic contactinformation. Once completed, click Submit.5. On the next page, click the link titled:<strong>Masterlink</strong> OS v2.213. Once downloaded to your computer, uncompress the file titled MLOS_v302.zip (orMLOS_v221.zip). <strong>The</strong> file you’ll download is a .zip file that needs to be uncompressed,or un-zipped. Many computers come with a utility pre-installed to un-zip .zip files. Simplydouble-clicking on the .zip file will often open the utility and allow you to uncompress thefile.Windows Users:If double-clicking the file does not automatically uncompress it, try right-clicking the file,and selecting Explore, or Extract. <strong>The</strong>se options should allow you to access thecontents of the file.If needed, you can download a free un-zipping utility for the PC called WinRar atdownload.com
Macintosh Users:Macintosh users of OS 10.3 or later can simply double-click the file to un-zip it.Macintosh users of earlier operating systems can download a free unzipping utility calledStuffit Expander at http://www.stuffit.com/mac/expander/trial.htmlOnce un-zipped, you’ll have an .iso file which needs to be burned as an ISO CDR. <strong>The</strong>file will be called mlos_v302.iso (or mlos_v221.iso).4. Burn an ISO formatted CD from the mlos_v302.iso (or mlos_v221.iso) file. Althoughthis specially formatted CD-R can be created using standard CD-R disks, Most CDburning programs cannot burn CDRs in ISO format.Windows Users:You can download a free program for the PC that can burn ISO CDs at:http://www.burn4free.comThis will allow you to burn the OS file to an ISO formatted CD-R disk.1. When you launch Burn For Free for the first time, it will ask you if you want toopen the program in Easy Mode or Expert Mode. Choose Expert Mode.2. In Burn4Free, click on the icon that says Burn ISO. If you don’t see this icon,click on the View menu at the top of the screen and select Switch to ExpertMode. You should then see the Burn ISO icon.3. You will be prompted to locate the .iso file to be burned to disk. Use this windowto navigate to the mlos_v302.iso (or mlos_v221.iso) file, double-click it andthen select Open.When you burn the disk, do so at the slowest speed possible. It is a small file, andwon’t take long to burn.Macintosh Users:You can use the program Disk Utility to burn .ISO disks.1. Open the Disk Utility which is located in the Utilities Folder inside yourApplications folder.2. Click on the Images menu at the top of the screen, and choose Burn.3. In the Select Image to Burn window that opens, navigate to the mlos_v302.iso(or mlos_v221.iso) file which you downloaded. Highlight it and click Burn.4. Insert a blank CD-R into your computer, and click Burn.When you burn the disk, do so at the slowest speed possible. It is a small file, andwon’t take long to burn.NOTE: If also replacing the hard drive, you can use any IDE drive from 40G to 100G (as long asyou have the most current compatible OS installed). It will only utilize 32G of the total capacityhowever. Before you swap hard drives, please ensure that you have any important Playlistsbacked up to CD. <strong>The</strong>re is a Playlist Back-up feature within the [UTILITY] menu of theMasterLink.
Update Procedures<strong>The</strong>re are two ways to install or update the <strong>Operating</strong> <strong>System</strong> on your <strong>Masterlink</strong>. You canperform just the installation/update, or you can perform the installation/update and format (erase)your <strong>Masterlink</strong> hard disk.<strong>Operating</strong> <strong>System</strong> Installation/Update OnlyNOTE: This procedure will NOT erase your recordings or format your harddrive.1. Turn off the <strong>Masterlink</strong>.2. Turn the unit back on while holding down the [HD / CD] and the [Utility] buttons. Holdthe two buttons down until the display reads OS Loader. Load OS?3. Press the [UP/YES] button.4. <strong>The</strong> CD tray will open. Place the <strong>System</strong> Software CD in the <strong>Masterlink</strong>’s tray and pressthe [OPEN/CLOSE] button to close the tray.5. <strong>The</strong> display will change to Validating CD. If the CD is a valid OS disk, the display willchange to Loading <strong>ML9600</strong> v2.216. When finished, the tray will open, and the display will change to Please Remove CD. OKTo Continue?7. Remove the CD from the tray.8. Press the [UP/YES] button.9. <strong>The</strong> tray will close and the <strong>Masterlink</strong> will restart itself and restore the factory defaultsettings.<strong>Operating</strong> <strong>System</strong> Installation/Update With Hard Disk FormatNOTE: This procedure will COMPLETELY ERASE all of your recordings.Any data on your hard disk will be permanently erased. If possible, backup your data by burning CD24 disks according to the instructionsbeginning on p.35 of the <strong>Masterlink</strong> Reference Manual.1. Turn off the <strong>Masterlink</strong>.2. Turn the unit back on while holding down the [HD / CD] and the [TRACK END] buttons.Hold the two buttons down until the display reads OS Loader. Load OS?3. Press the [UP/YES] button.4. <strong>The</strong> CD tray will open. Place the <strong>System</strong> Software CD in the <strong>Masterlink</strong>’s tray and pressthe [OPEN/CLOSE] button to close the tray.5. <strong>The</strong> display will change to Validating CD. If the CD is a valid OS disk, the display willchange to Loading <strong>ML9600</strong> v2.216. When finished, the tray will open, and the display will change to Please Remove CD. OKTo Continue?7. Remove the CD from the tray.8. Press the [UP/YES] button.9. <strong>The</strong> tray will close and the <strong>Masterlink</strong> will restart itself and restore the factory defaultsettings.