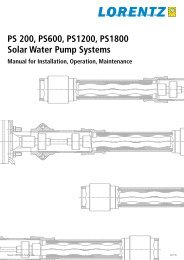
SOLAR ELECTRIC MODULE ES-124 & ES-62T Owners Manual and ...
SOLAR ELECTRIC MODULE ES-124 & ES-62T Owners Manual and ...
SOLAR ELECTRIC MODULE ES-124 & ES-62T Owners Manual and ...

You also want an ePaper? Increase the reach of your titles
YUMPU automatically turns print PDFs into web optimized ePapers that Google loves.
MountingMounting holes on thealuminum frame of themodules are provided thatfit 7mm (¼ inch) diameterfasteners (see Figure 1 <strong>and</strong>2). Mount the <strong>ES</strong>-<strong>124</strong>module using eight (8)fasteners with lockwashers <strong>and</strong> nuts. Mountthe <strong>ES</strong>-62 module usingfour (4) fasteners with lockwashers <strong>and</strong> nuts.Clearance between themodule <strong>and</strong> the mountingsurface can be theminimum necessary toprevent wire chafing.When installing moduleson a building, use st<strong>and</strong>offor rack methods. Contactyour United Solar Ovonicdistributor for details.OrientationPick a location with themaximum exposure tosunlight. Avoid shadows,especially during themiddle of the day (i.e.“peak sun hours”, 09:30 to16:30). Orient the moduleso that the surface willreceive the maximum sunexposure over the year foryour particular site.Typically this is achievedby tilting the moduletoward the equator at anangle equal to the latitudeof the site. For optimumsummer performance,reduce the tilt angle by 15degrees below the latitudeangle. To increase winterperformance, increase thetilt angle 15 degrees abovethe latitude angle. The tiltangle should always begreater than 10º to ensureadequate rain watercleaning of the module.Wiring With St<strong>and</strong>ard“Quick Connect”Terminals:The <strong>ES</strong> Series PV modulesare wired to your balanceof-systemcomponents orto other <strong>ES</strong> Series PVmodules using theexterior-rated, insulatedwires <strong>and</strong> “quick-connect”terminals. There is apositive wire with terminal<strong>and</strong> a negative wire withterminal. Modules can bewired in series up to 1000VDC max (TUV) & 600VDC per UL by pluggingthe male terminal into thefemale terminal, positiveto negative. The “quickconnect”wire terminalsare not designed to bedisconnected while themodule is producingpower. If the “quickconnect”terminals mustbe pulled apart while themodule is in the sun, thetechnician must cover thesolar module beforedisconnecting theterminals.Wiring With OptionalJunction Boxes:The <strong>ES</strong> Series modulescan also be ordered withst<strong>and</strong>ard Junction Boxes.The junction box is locatedon the rear of eachmodule. To access thejunction box, loosen thefour (4) screws <strong>and</strong> lift offthe cover. The junctionbox is equipped with four(4) knockouts that willaccept either electricalconduit (13mm, ½ inchtrade size) or strain relieffittings. It is notrecommended to run wiresAA4 3699-01