Multifactor RSM Tutorial (D-optimal design) - Statease.info
Multifactor RSM Tutorial (D-optimal design) - Statease.info
Multifactor RSM Tutorial (D-optimal design) - Statease.info
- No tags were found...

Create successful ePaper yourself
Turn your PDF publications into a flip-book with our unique Google optimized e-Paper software.
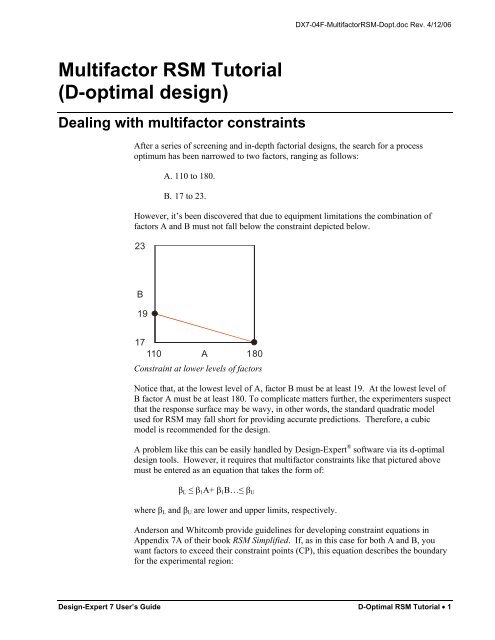
DX7-04F-<strong>Multifactor</strong><strong>RSM</strong>-Dopt.doc Rev. 4/12/06<strong>Multifactor</strong> <strong>RSM</strong> <strong>Tutorial</strong>(D-<strong>optimal</strong> <strong>design</strong>)Dealing with multifactor constraintsAfter a series of screening and in-depth factorial <strong>design</strong>s, the search for a processoptimum has been narrowed to two factors, ranging as follows:A. 110 to 180.B. 17 to 23.However, it’s been discovered that due to equipment limitations the combination offactors A and B must not fall below the constraint depicted below.23B1917110 A 180Constraint at lower levels of factorsNotice that, at the lowest level of A, factor B must be at least 19. At the lowest level ofB factor A must be at least 180. To complicate matters further, the experimenters suspectthat the response surface may be wavy, in other words, the standard quadratic modelused for <strong>RSM</strong> may fall short for providing accurate predictions. Therefore, a cubicmodel is recommended for the <strong>design</strong>.A problem like this can be easily handled by Design-Expert ® software via its d-<strong>optimal</strong><strong>design</strong> tools. However, it requires that multifactor constraints like that pictured abovemust be entered as an equation that takes the form of:β L ≤ β 1 A+ β 1 B…≤ β Uwhere β L and β U are lower and upper limits, respectively.Anderson and Whitcomb provide guidelines for developing constraint equations inAppendix 7A of their book <strong>RSM</strong> Simplified. If, as in this case for both A and B, youwant factors to exceed their constraint points (CP), this equation describes the boundaryfor the experimental region:Design-Expert 7 User’s Guide D-Optimal <strong>RSM</strong> <strong>Tutorial</strong> • 1
A −LLAB −LLB1≤ +CP − LL CP − LLA A B Bwhere LL is the lower level. In this case, the lower levels are 110 for A and 17 for B.These factors’ CPs are 180 for A and 19 for B (the endpoints on the diagonal constraintline shown in the figure above). Plugging in these values produces this equation:1 A −110 B −17≤ +180 − 110 19 − 17However, the software requires formatting as a linear equation. This can be dealt withvia some simple arithmetic:A −110 B −171≤ +70 2( 70)( 2)( 1) ≤2( A − 110) + 70( B −17)140 ≤2A − 220 + 70B −11901550 ≤ 2A + 70BDesign the ExperimentStart Design-Expert and initiate the <strong>design</strong> process by clicking the blank-sheet icon onthe left of the toolbar or select File, New Design.Main menu and tool barClick on the Response Surface folder tab, select D-<strong>optimal</strong> for the <strong>design</strong> and enterthe lower and upper limits as shown belowEntering factor levels for d-<strong>optimal</strong> <strong>design</strong>2 • D-Optimal <strong>RSM</strong> <strong>Tutorial</strong> Design-Expert 7 User’s Guide
DX7-04F-<strong>Multifactor</strong><strong>RSM</strong>-Dopt.doc Rev. 4/12/06Press the Edit Constraints button at the bottom of the screen and, as shown below,enter the multifactor equation derived at the outset of this tutorial: 1550 ≤ 2A + 70B .Notice from the screen shot that lower case letters are acceptable for the factors.Selecting the number of blocksPress OK to accept this constraint. Then press Continue to specify the d-<strong>optimal</strong><strong>design</strong> via Point Exchange – the default choice (the optional Coordinate Exchange willbe explored later). Next, press the Edit Model button and upgrade the default model ofquadratic to Cubic.Cubic model specifiedThen press Create candidate points.Candidate points enumeratedDesign-Expert 7 User’s Guide D-Optimal <strong>RSM</strong> <strong>Tutorial</strong> • 3
The program now identifies 29 candidate points at various locations in the experimentalregion, from which it will select d-<strong>optimal</strong>ly the 10 points needed at a minimum for thecubic model. It will then fill remaining spaces with 5 points for lack of fit testing.Finally, it chooses 5 of these 13 points for replication. For details on how the softwaredoes all this, select Help, Contents and work down the Contents tree to the topic on<strong>RSM</strong> D-<strong>optimal</strong> Design.Help on how Design-Expert does d-<strong>optimal</strong> <strong>design</strong>Scroll down to the bottom of this topic to see how Design-Expert picks points for its d-<strong>optimal</strong> <strong>design</strong>. At the end of this Help topic, you can link to more detail on thealgorithm employed for picking model points (“D-<strong>optimal</strong> Algorithm (Advanced).”After absorbing as much as this <strong>info</strong>rmation as you would like, press the X button andclose out the Help screen.As noted in the Help referenced above, Design-Expert creates a number of d-<strong>optimal</strong><strong>design</strong>s via random bootstraps. Click the Options button to see the <strong>design</strong> parametersthat can be adjusted by users.Options for d-<strong>optimal</strong> <strong>design</strong> buildBecause of the random element in the build, <strong>design</strong>s may vary somewhat, but all will beessentially as good by d-<strong>optimal</strong> criterion. See what you get by now pressing Continue4 • D-Optimal <strong>RSM</strong> <strong>Tutorial</strong> Design-Expert 7 User’s Guide
DX7-04F-<strong>Multifactor</strong><strong>RSM</strong>-Dopt.doc Rev. 4/12/06to move on to the response entry (leave defaults) and another Continue again to bringup the <strong>design</strong> template. Then to see the selection of points, right-click the header for theStd column and select Display Design ID.Display <strong>design</strong> IDThen right-click the header for the Id column (formerly “Std”), but this time select Sortby Design ID. Finally, right-click the header for the Block column and selectDisplay Point Type. You should now see a list of <strong>design</strong> points that are identified andsorted. Due to the random bootstraps, it may vary from that shown below.Design layout – point type shown (your <strong>design</strong> may vary)It’s hard to assess whether these combinations of factors meet the equipment limitationsnoted at the start of this tutorial and if they provide sufficient <strong>info</strong>rmation to fit a cubicmodel. This can be determined by clicking the Evaluation node.Design-Expert 7 User’s Guide D-Optimal <strong>RSM</strong> <strong>Tutorial</strong> • 5
Design evaluation for cubic modelBased on the d-<strong>optimal</strong> specification, the program automatically chooses the cubic orderfor evaluation. Press Results to see how well it <strong>design</strong>ed the experiment. (We went toView and turned off the Annotated Evaluation option before making the screen shotbelow, but you may want to keep this <strong>info</strong>rmative feature enabled.)Results of <strong>design</strong> evaluation (your’s may vary)No aliases are found: That’s a good start! The degrees of freedom appear adequate.However, you may be surprised at the low power statistics and how they vary by term.This is fairly typical for d-<strong>optimal</strong> <strong>design</strong>s, which are set up to keep runs to a minimum.6 • D-Optimal <strong>RSM</strong> <strong>Tutorial</strong> Design-Expert 7 User’s Guide
DX7-04F-<strong>Multifactor</strong><strong>RSM</strong>-Dopt.doc Rev. 4/12/06Feel free to scroll down and look over the leverage results. If you would also like to seematrix measures, go back to the Model screen and change the Options.Press the Graphs button to see where your points are located. How do they differ fromwhat our random bootstraps generated in the screen shot below? (Probably not much.)Standard error plotOur points appear to be well-spaced and the choices for replication (points labeled “2”)seem reasonable. Select View, 3D Surface to see the surface for standard error. Tilt itdown a bit by clicking on the Rotation wheel.Response surface for standard errorDesign-Expert 7 User’s Guide D-Optimal <strong>RSM</strong> <strong>Tutorial</strong> • 7
Rebuilding the D-<strong>optimal</strong> Design with Coordinate ExchangeClick the blank-sheet icon on the left of the toolbar (or select File, New Design) torebuild this <strong>design</strong> using an optional algorithm for d-<strong>optimal</strong> point selection called“coordinate exchange”. (For details on this “candidate-free approach for exact <strong>optimal</strong><strong>design</strong>s”, see the similarly-titled sidebar at the end of Chapter 7 in <strong>RSM</strong> Simplified.)When asked to save changes, click No.No to save changesBut click Yes to use previous <strong>design</strong> ‘<strong>info</strong>’.Yes to use previous <strong>design</strong> <strong>info</strong>rmationYou should now see the <strong>design</strong> set at the D-Optimal <strong>design</strong>.Re-building the D-<strong>optimal</strong> <strong>design</strong>Your <strong>design</strong> selection and factor entries should remain preserved as before. If not, recreatewhat you did earlier in this tutorial.Press Continue and select the option for Coordinate Exchange.8 • D-Optimal <strong>RSM</strong> <strong>Tutorial</strong> Design-Expert 7 User’s Guide
DX7-04F-<strong>Multifactor</strong><strong>RSM</strong>-Dopt.doc Rev. 4/12/06Selecting coordinate exchangeThis is a candidate-free approach so these points now disappear (total zero). PressContinue to the response entry screen and Continue again to the <strong>design</strong>.The coordinate exchange algorithm in Design-Expert includes random selectionelements that cause each <strong>design</strong> to differ somewhat, even though they will all beessentially the same according to d-<strong>optimal</strong> criterion. Therefore your <strong>design</strong> may varyfrom what we show. Take a look by going to the Evaluation and clicking the Graphsbutton.Standard error plot for d-<strong>optimal</strong> <strong>design</strong> done via coordinate exchange (may vary)This looks like a reasonable alternative to the <strong>design</strong> created via point exchange.However, what if you have other ideas on where points should be located and whichones should be replicated? This can be easily remedied with Design-Expert software.Design-Expert 7 User’s Guide D-Optimal <strong>RSM</strong> <strong>Tutorial</strong> • 9
Modifying the <strong>design</strong>Click the point at 110 A and 19 B. (Recall that this is the equipment limitation.) Noticethat the program identifies the run by standard order.Identifying a point (in this <strong>design</strong> – replicated)If you see a “2” by this point, click it again to identify its replicate.Click back to the Design, right-click the header for the Std column and select Sort byStandard Order.Sorting <strong>design</strong> by standard orderNext, right-click the header for the Block column and select Display Point Type.Displaying point typeNow you see standard order 2 identified as a vertex. Since this <strong>design</strong> was created bycoordinate exchange, non-vertex points are located more freely than by the candidaterestrictedpoint exchange used for the initial d-<strong>optimal</strong> <strong>design</strong>, so they cannot beidentified (shown as Type “??”).10 • D-Optimal <strong>RSM</strong> <strong>Tutorial</strong> Design-Expert 7 User’s Guide
DX7-04F-<strong>Multifactor</strong><strong>RSM</strong>-Dopt.doc Rev. 4/12/06Now that you know how to identify points, feel free to delete or duplicate them to seewhat this does for your <strong>design</strong> properties.Let’s assume that the standard operating condition is (110, 20) for (A,B); respectively.This setup must be included in the experiment as a control point. Right-click the box tothe left of the first row and select Insert Row.Inserting a new rowEnter 110 for A and 20 for B as shown below.New point added to experimental <strong>design</strong>Re-Randomizing Run OrderWhenever you add runs like this, you should re-randomize the run order beforebeginning experimentation. This can be done via a right-click on the Run column andselecting “Randomize”.Randomizing run orderThe program pops up options on what it will randomize.Design-Expert 7 User’s Guide D-Optimal <strong>RSM</strong> <strong>Tutorial</strong> • 11
Randomization optionsIn this case there’s only a single block, so simply pressing OK will get the job done.Re-Evaluating the Modified DesignYou are now on your own: Go back and evaluate the <strong>design</strong>. Check the 3D view ofstandard error and notice how much lower it becomes at the point you just inserted.12 • D-Optimal <strong>RSM</strong> <strong>Tutorial</strong> Design-Expert 7 User’s Guide