Owner's Manual - Casablanca Fan
Owner's Manual - Casablanca Fan
Owner's Manual - Casablanca Fan
- No tags were found...

You also want an ePaper? Increase the reach of your titles
YUMPU automatically turns print PDFs into web optimized ePapers that Google loves.
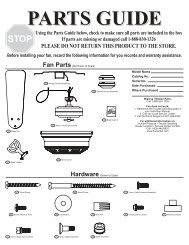
34 O CEILINGMounting Optionswww.<strong>Casablanca</strong><strong>Fan</strong>Co.com 1.888.227.2178WALLIf you have a flat ceiling:Hang your fan by a standard downrod (included).StandardMountingOPTION 1SupportStructureSupportStructureIf you have an angled ceiling:1. You will need a longer downrod (sold separately).2. If your ceiling angle is greater than 34°, you willalso need an Angled Mounting Kit (sold separately).AngledMountingUse the three steps below to determine if your ceiling angle is greater than 34°OPTION 2StandardMountingStyleCeilingOutlet Box(required)AngledMountingStyleCeilingOutlet Box(required)12 334°FOLDon dotted linePLACEagainst wallSLIDEtoward ceilingSITUATION 1Guide TouchesBOTH Ceiling & WallYou need ONLYa LongerDownrod*most commonSITUATION 2Guide Touches Wallbut NOT CeilingYou need BOTHa LongerDownrod &an AngledMounting KitUse Standard Mountingor Low-Profile Mountingto hang the fan from a flat ceiling.Use Angled Mountingto hang the fan from avaulted or angled ceiling.4M6005-01 • 03/12/13 • © <strong>Casablanca</strong> <strong>Fan</strong> Company
Downrodwww.<strong>Casablanca</strong><strong>Fan</strong>Co.com 1.888.227.2178Option 1StandardDownrodfor ceilings 8-10’ highIf you need a different downrod length follow these steps:skip to next pageIncluded(pre-assembled)Option 3LongerDownrodfor angledceilings orceilings 10’ orhigherSteps 1-5 to remove standard downrod pipe1 2 3 4 5Option 2ShorterDownrodfor fans installedclose to ceilingSlideSlideIncludedSold Separately109Steps 6-10 to reassemble with new pipe8767M6005-01 • 03/12/13 • © <strong>Casablanca</strong> <strong>Fan</strong> Company
Downrod (continued)www.<strong>Casablanca</strong><strong>Fan</strong>Co.com 1.888.227.21783/8”CUT& STRIPKEEP!8”(not to scale)KEEP!Remove the pre-installedsetscrew so that the downrodcan be inserted.Hand tighten the downrod (atleast 4-5 full turns) until it stops.The wires can be cut, butleave at least 8” extendingfrom the top of the downrod.Tighten the setscrewwith pliers. DO NOTHAND TIGHTEN.8” 3/8”8M6005-01 • 03/12/13 • © <strong>Casablanca</strong> <strong>Fan</strong> CompanyIf the setscrew is not tightenedsecurely, the fan may fall.
Downrod (continued)www.<strong>Casablanca</strong><strong>Fan</strong>Co.com 1.888.227.2178Put the wires and downrod through the canopy.Let the canopy sit loosely on top of the fan.DO NOT PICK THE FAN UP BY THECANOPY OR WIRES. Place the downrodball into the slot in the ceiling bracket.9M6005-01 • 03/12/13 • © <strong>Casablanca</strong> <strong>Fan</strong> Company
Wiringwww.<strong>Casablanca</strong><strong>Fan</strong>Co.com 1.888.227.2178FROM CEILINGNote: To connect the wires,hold the bare metal leadstogether and place a wireconnector over them, then twistclockwise until tight.FROM RECEIVERFROM CEILINGFROM FANUsing an orange wireconnector fromthe hardware bag,connect the threegrounding wires(green, green/yellowstripe, or bare copper)coming from the ceiling,downrod, and hangingbracket.green/yellow stripegreen/yellow stripe(grounding)green/yellow stripeFROM CEILING BRACKETUsing the blue wireconnectors from the remotecontrol hardware bag,connect the white wirefrom the receiver (marked“common out”) to the whitewire from fan. Connect theblack wire from the receiver(marked “fan out”) to theblack wire from the fan.Connect the blue wire fromthe receiver (marked ”lightout”) to the blue wire fromthe fan. The red wire fromthe receiver will not be used,it has a pre-installed wireterminator.blue (light out)black (fan out)white (common out)blueblackwhiteF RO M FA NUsing an orange wireconnector fromthe hardware bag,connect the black wire(ungrounded) from theceiling to the black wirefrom the receiver (marked“live in”). Connect thewhite wire (grounded)from the ceiling tothe white wire fromthe receiver (marked“neutral in” or“common in”).black (ungrounded)black (live in)white (grounded) white (neutral in)FROM RECEIVERRefer to CAUTION c.1 on pg. 210M6005-01 • 03/12/13 • © <strong>Casablanca</strong> <strong>Fan</strong> CompanyTurn the splices upward and push them carefully back through the hanger bracketinto the outlet box. Spread the wires apart, with the grounded wires on one side ofthe outlet box and the ungrounded wires on the other side of the outlet box.
Wiring (continued)www.<strong>Casablanca</strong><strong>Fan</strong>Co.com 1.888.227.2178BeforeBeforeBeforeBeforeAfter removing the switch platecover, remove all wiring fromthe switch.Push all connections to the back of the switch box. Spread thewires apart, with the grounded wires on one side of the switch boxand the ungrounded wires on the other side of the switch box.After After After AfterUsing orange wire connectors,connect the two black wires(ungrounded) from the outletbox. Also connect the two greenor bare wires (grounding) fromthe outlet box with the groundingwire from the wall control.11Insert the wall control intothe outlet box and secure thetwo screws using a Phillipshead screwdriver.M6005-01 • 03/12/13 • © <strong>Casablanca</strong> <strong>Fan</strong> CompanyInstall the cover plate using aPhillips Head screwdriver tosecure the two cover plate screws.This device complies with Part 15 of the FCC Rules. Operation is subject tothe following conditions: (1) this device may not cause harmful interference,and (2) this device must accept any interference received, includinginterference that may cause undesired operation.
Canopywww.<strong>Casablanca</strong><strong>Fan</strong>Co.com 1.888.227.2178ScrewHolesPosition the canopy so that, whenlifted into place, the canopy fits intothe hanging bracket as shown.Lift the canopy into place so thatthe screw holes are aligned.Insert the two canopy screwsfound in the hardware bag.12M6005-01 • 03/12/13 • © <strong>Casablanca</strong> <strong>Fan</strong> CompanyNote: <strong>Fan</strong> style may vary.
Switch Housingwww.<strong>Casablanca</strong><strong>Fan</strong>Co.com 1.888.227.2178Screw two housing assembly screwsfrom the hardware bag halfway intothe motor housing. It does not matterwhich two screw holes you choose.Feed the wire plug through the centerhole of the upper switch housing, thenwrap keyhole slots around the screws andtwist counterclockwise.theInsert the third screw, found inhardware bag, into place and thentighten all three screws.14M6005-01 • 03/12/13 • © <strong>Casablanca</strong> <strong>Fan</strong> CompanyMake sure the upper switch housing is securelyattached to the mounting plate. Failure to properlysecure all 3 assembly screws could result in the switchhousing fixture falling.
Switch Housing (continued)www.<strong>Casablanca</strong><strong>Fan</strong>Co.com 1.888.227.2178CONGRATULATIONS!YOU’RE DONE!Connect the plugs from the upper andlower switch housings. Make sure toline up the colored markings on theconnectors.Lift the lower switch housing up until theholes line up with the screw holes in theupper switch housing. Install the threeswitch housing screws, found inthe hardware bag.15M6005-01 • 03/12/13 • © <strong>Casablanca</strong> <strong>Fan</strong> CompanyMake sure the lower switch housing is securely attached to theupper switch housing. Failure to properly secure all 3 assemblyscrews could result in the switch housing fixture falling.
Operationwww.<strong>Casablanca</strong><strong>Fan</strong>Co.com 1.888.227.2178BatteryHolderBatteryDoorBatteryONTurn PowerOnce the poweris turned on, theremote must bepaired withinthree minutes.Pairing is onlyrequired onceafter initialinstallation.4<strong>Fan</strong>Power<strong>Fan</strong>SpeedLightsDownReverseBatteryHolder(Low)(High)<strong>Fan</strong>SpeedLightsUp<strong>Fan</strong>PowerBefore operating the wall control,press on the battery door to eject it.Unscrew the battery holder. Insert thebattery, found in the control hardwarebag, with the positive (+) side facingdownward. Reinstall the batteryholder and reinsert the battery doorinto the wall control.The fan must be paired beforeit will operate. Press the “4”button and the fan powerbutton simultaneously for atleast three seconds. The fanwill turn at the lowest speedsignifying that the remotepairing process is complete.Quickly press the up or down arrowto turn the lights off and on. Holdthe up or down arrow to dim orraise the light level. The reversebutton changes the direction thatthe blades turn. The power buttonturns the fan off and on.16M6005-01 • 03/12/13 • © <strong>Casablanca</strong> <strong>Fan</strong> Company
Maintenance & Cleaningwww.<strong>Casablanca</strong><strong>Fan</strong>Co.com 1.888.227.2178(a)ONReverseButtonTurn PowerBattery(b)BatteryDoorThe reverse button on the wallcontrol changes the air flowdirection. In warm weather, use(a) downward air flow pattern.In cold weather, use (b) upwardair flow pattern.To change the battery, push onthe battery door to eject it. Removethe battery using a small Phillip’shead screwdriver. Replace withsame type battery, making surethe (+) side is facing down. Replacebattery holder and battery door.For cleaning the fan, use softbrushes or cloths to preventscratching. Cleaning productsmay damage the finishes.17M6005-01 • 03/12/13 • © <strong>Casablanca</strong> <strong>Fan</strong> Company
Troubleshootingwww.<strong>Casablanca</strong><strong>Fan</strong>Co.com 1.888.227.2178<strong>Fan</strong> doesn’t workExcessive wobblingNoisy OperationRemote doesn’t work• Press a fan speed button (1-4).• Check the circuit breaker toensure the power is turned on.• Check the wall control battery.• Make sure that you have pairedthe wall control.• Tighten all of the blade andblade iron screws until theyare snug.• Turn the power off, supportthe fan carefully, and checkthat the hanger ball isproperly seated.• Tighten the blade and bladeiron screws until they are snug.• Check to see if any of theblades are cracked. If so, replaceall of the blades.• Install a fresh battery in the wallcontrol.• Make sure you have paired theremote.• Make sure the blades spin freely.• Turn off power from the circuitbreaker, then loosen the canopyand check all the connectionsaccording to the wiring diagramon page 10-11.• Use the provided balancingkit and instructions to balancethe fan.• Check the plug connection inthe switch housing.18M6005-01 • 03/12/13 • © <strong>Casablanca</strong> <strong>Fan</strong> CompanyAUTHORIZED SERVICE CENTERSFor the most updated listing of <strong>Casablanca</strong> AuthorizedService Centers, visit www.<strong>Casablanca</strong><strong>Fan</strong>Co.com orcall toll free 1-888-227-2178.