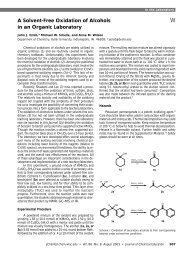
PARTICIPATING IN WEBBOARD CONFERENCES
PARTICIPATING IN WEBBOARD CONFERENCES
PARTICIPATING IN WEBBOARD CONFERENCES

Create successful ePaper yourself
Turn your PDF publications into a flip-book with our unique Google optimized e-Paper software.
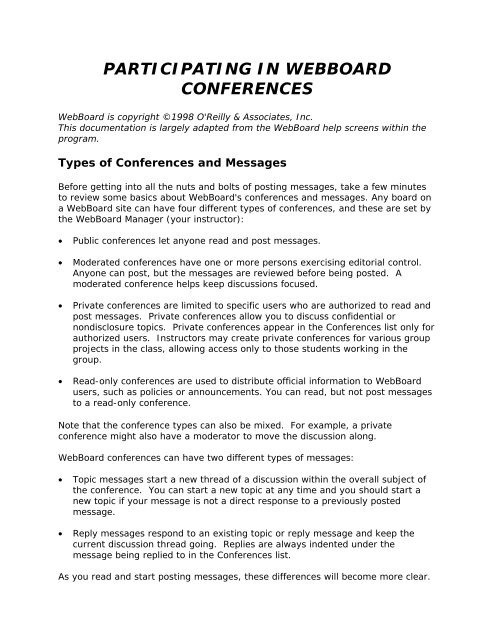
<strong>PARTICIPAT<strong>IN</strong>G</strong> <strong>IN</strong> <strong>WEBBOARD</strong><strong>CONFERENCES</strong>WebBoard is copyright ©1998 O'Reilly & Associates, Inc.This documentation is largely adapted from the WebBoard help screens within theprogram.Types of Conferences and MessagesBefore getting into all the nuts and bolts of posting messages, take a few minutesto review some basics about WebBoard's conferences and messages. Any board ona WebBoard site can have four different types of conferences, and these are set bythe WebBoard Manager (your instructor):• Public conferences let anyone read and post messages.• Moderated conferences have one or more persons exercising editorial control.Anyone can post, but the messages are reviewed before being posted. Amoderated conference helps keep discussions focused.• Private conferences are limited to specific users who are authorized to read andpost messages. Private conferences allow you to discuss confidential ornondisclosure topics. Private conferences appear in the Conferences list only forauthorized users. Instructors may create private conferences for various groupprojects in the class, allowing access only to those students working in thegroup.• Read-only conferences are used to distribute official information to WebBoardusers, such as policies or announcements. You can read, but not post messagesto a read-only conference.Note that the conference types can also be mixed. For example, a privateconference might also have a moderator to move the discussion along.WebBoard conferences can have two different types of messages:• Topic messages start a new thread of a discussion within the overall subject ofthe conference. You can start a new topic at any time and you should start anew topic if your message is not a direct response to a previously postedmessage.• Reply messages respond to an existing topic or reply message and keep thecurrent discussion thread going. Replies are always indented under themessage being replied to in the Conferences list.As you read and start posting messages, these differences will become more clear.
2Posting a Topic MessageWhen you post to a conference, you are either adding to a current topic or startinga new topic. If you have something to contribute to the general theme of aconference (say, to ask others for good afternoon tea spots), but it doesn't relate tothe existing topic, then you can start a new topic. If you are the first visitor to aconference, you will also need to post a new topic message. This section describeshow to post a new topic message. Responding to existing messages is describedlater.To post a new topic, follow these steps:1. Select a conference by clicking the conference name or expansion box (+ to theleft of the conference name). Here is what a typical conference listing lookslike:2. Choose from one of three ways to display the Post form.• From the WebBoard menubar, click Post.• From an open message, click Post on the message menu. This is located asa hyperlink directly above the message itself, as shown below:• From the WebBoard menubar, click More to display the More Options menu,as shown below:
3On this menu, click Conference Profiles to display a list of all conferences.Click the conference to which you want to add a new topic. From theconference profile, click Post a message to this conference. Needless to say,this is the most cumbersome method to post a new topic!After doing any of the above, you will see the following screen on the rightside (if you are using frames):
43. Enter the new topic name in the Topic field. Keep the topic name short.4. Choose any of the following options by checking the appropriate box(es) in themenu at the top of the message posting form:• Convert line breaks to HTML breaks to automatically turn line breaks intocarriage returns or blank lines. If you deselect this option, all lines in yourmessage are run together.• Preformatted text (No HTML) to turn off HTML features. This setting ishelpful when you are inserting text from another source. However, youshould leave this box unchecked if you want to include a Web address withinthe body of your message. (For example, you want your readers to checkout Yahoo! at http://www.yahoo.com.) Including a Web address willautomatically create a hyperlink that your readers can click on.• Anonymous to post anonymously. Your name is not attached to theposting. Not recommended for a class-related discussion group!• Preview message to review your message before you post it. It's highlyrecommended you click on this box if the next choice is disabled--it's alwaysgood to take one last look at a message before posting it.
5• Preview/Spell check to review and spell check your message-this is thedefault setting.• Attach File to attach a file to your message. (Explained in more detailbelow.)5. Type in your message. You can include HTML tags for formatting as well as linksto other web pages and images. Note that any links you include must have thefull URL, such as http://www.myserver.com/linked.html. SomeWebBoards may not allow active links in messages. If you have a questionabout this feature, contact the WebBoard administrator.6. When you complete your message, click Post. Depending on which options youhave selected, WebBoard either posts your message immediately or allows youto preview it (with or without spell checking). Previewing and spell checking arediscussed in the following sections.In a moderated conference your message may not be posted until the moderatorreviews and verifies it.When the new message is posted, the Conferences list refreshes automatically,showing the new topic. WebBoard users subscribing by to the conference's mailinglist also receive the message the next time they check their email.Previewing your MessageYou can preview messages before you post them to ensure that they say what youreally intended. Message preview comes in two flavors: without spell checking andwith spell checking. Previewing without spell checking allows you to see any HTMLproperly converted, while previewing with spell checking allows you to catch andcorrect misspelled words.To preview your message without spell checking, follow these steps:1. Check Preview on the Post message form.2. Enter the topic name, your message, and click Post. WebBoard displays yourmessage exactly as it will appear to other users on WebBoard.3. If you are dissatisfied with your message and want to change it, click Back onyour browser. If you are using a Netscape browser, you can also right-click yourmouse, and click Back to get to the previous frame.4. Once you are satisfied with the appearance of your message, click Post. Yourmessage is immediately posted to the conference and WebBoard displays it inthe Message window.
6Spell-Checking Your MessageYou can spell-check any message you post on WebBoard by using WebBoard'sbuilt-in dictionary. Each instance of a misspelled word is flagged as a link, whichdisplays a list of suggested replacements. You can select a replacement or enter adifferent word. If you change misspelled words, you will see another preview ofyour message before posting it.To spell-check your message, follow these steps:1. Check Preview/Spell check on the Post message form. This is the default option.2. Enter your message, and click Post. The Message Preview window opens. Yourmessage is spell-checked, with each occurrence of misspelled words beingflagged as a link.Spell-checking does not convert HTML tags to HTML (as plain Preview does).Rather, many HTML tags are flagged as misspelled words. You should ignorethese during spell checking. To preview the HTML in your message, use Previewwithout spell checking enabled.3. Click on each misspelled word to see WebBoard's suggestions for corrections.You can either select a word from the list or enter a new one in the textbox.4. Click Done to return to the message preview. The corrected word is shown inthe message. Repeat Steps 4 and 5 if necessary.If you are a WebBoard administrator, manager, or moderator, the spellingcorrection form also includes a button allowing you to add the misspelled wordto the dictionary. This feature is handy for adding words such as proper names,HTML tags, or abbreviations.5. If you are dissatisfied with your message after correcting the spelling errors andwant to change it, click Back on your browser to redisplay the original Messageform.6. Once you are satisfied with your message, click Post. Your message is posted tothe conference.If you are still confused about posting, you may want to check our Webbasedversion of this document, which links to a viewlet that guides youstep-by-step through how to post a message. The Web-based version ofthis document is at:http://domin.dom.edu/documents/webboard/webconfs.htm
7Attaching Files to Your MessageAttaching files to your WebBoard messages is a handy way to give users readyaccess to information that doesn't fit well in a text message. For example, you maywant to provide a spreadsheet or video clip for other WebBoard users to review.You can attach one or more files to a message posting.Your browser must support file attachment capability (Netscape Navigator 2.0 orhigher; Microsoft Internet Explorer 3.0 with plug-in or higher) for uploading files.Almost any browser can download file attachments. Additionally, those who wantto open the files must have the same or similar applications to open them. Keep inmind, for example, that if you posting a document formatted with Microsoft Wordthat your recipients must also have Microsoft Word in order to view the attachment.A better option may be to post a duplicate of your attachment in plain ASCII (textonly)format if possible, which anyone will be able to retrieve and read.File attachment capability is not available at all WebBoard sites or for allconferences. The WebBoard administrator determines whether or not fileattachments are allowed and can also restrict the number of attachments perposting and the size of attachments. If you have difficulty, contact the WebBoardadministrator.To attach a file to your message, follow these steps:1. Check Attach file on the Post message form, as shown below:2. Type in your message, and click Post. If you selected Preview/Spell check orPreview, complete the preview and click Post. The Attach a File form opens, asshown below:
83. Click the appropriate Category radio button for the file you wish to attach. Thecategory you select causes WebBoard to display the corresponding icon next tothe file attachment link in your posting, which gives other users a quick idea ofthe file type. The categories are as follows:• Unknown if you do not know what type of file this is. Experience has shown usthat this is actually the safest option to click--even if you are well aware of whattype of file it is you are posting. In most cases, assuming you have not changedthe three-letter extension to a file name (such as .doc for Word documents, or.avi for video files), your recipients will have no difficulty with the file.• Document if this is a text file.• Image if this is a graphics file.• Audio if this is a sound file.• Multimedia if this is a multimedia file.• Application if this is an application.4. Enter the name of the file in the File to upload field.NOTE: It is safest to not use spaces in file names when you are attachingmessages to WebBoard. We have found through experience that spaces infile names can cause problems! The pound sign (#) in file names likewisecauses difficulties, so it's best to avoid using it!
9OR - Click Browse to select the attachment you want to upload from yourdirectories. A File Upload dialog opens. Navigate through your directories to selectthe attachment. If there is no Browse button, your browser does not support fileattachments. Click Open to continue, or click Cancel to cancel the upload, whichhas the effect of immediately posting your message.5. Enter the description of the file attachment in the File description field. It shouldbe fairly descriptive, such as Homework assignment in Microsoft Word format.6. If you want to attach more files, click the Upload another radio button.7. Click Upload Now to attach the file to your message. Depending on the size ofthe file and speed of your connection, this process may take a few minutes. Yourmessage is immediately posted to the conference. The attachment appears as ahyperlink at the end of the message. An icon indicates the file type.8. If you clicked Upload another, the Attach a File form appears again. Repeatsteps 3-7 for each file attachment you want to upload.If you are still confused about posting attachments--or reading them--youmay want to check our Web-based version of this document, which links toviewlets that guides you step-by-step through how to post attachments andretrieve them. The Web-based version of this document is at:http://domin.dom.edu/documents/webboard/webconfs.htmPosting a Reply MessageYou can post a reply to any message within a topic. For example, if a topic has 10messages, you can reply to the first message or to the tenth message. Wheneveryou reply to a message, your new message is indented under that message in theConferences list to show other readers the thread of the conversation. Replies aredisplayed chronologically within each topic. You can also reply to a postingprivately, by sending an email message to the original message poster. Thissection describes these two types of replies: public and private. In addition, notethat posting a reply message uses many of the same basic steps as posting a topicmessage; these steps were the topic of the previous section.To post a public replyTo reply publicly to the message you are currently reading, use one of the followingoptions:• Select Reply from the menu at the top of the message you wish to respond to.
10• Select Reply/Quote from the menu to include text from the original message.Both of these options are shown in the same message below:WebBoard displays a message creation form for you to complete. The form is thesame as the one for posting a new topic except the topic from the current messageis displayed. You can use this topic or change it. Otherwise the form works thesame as described in "Posting a Topic Message" earlier in this chapter. Please referto that section for details.To send a private replyRather than post a reply to the whole conference, you may prefer to send a replyonly to the individual who posted the message. Some replies need to be sharedwith all the participants of a conference, while others are appropriate only for theindividual who posted the message. WebBoard lets you reply privately to themessage author by email. Note that if a message was posted anonymously, youcan not send a private response.To reply to the author privately to the message you are currently reading, use oneof the following options:• Select Email Reply from the menu at the top of the message you wish to replyto.• Click the poster's email address link in the From field of the message.WebBoard launches the email program associated with your browser with therecipient's email address included (but not the topic or any text from the messageposting). You must enter a subject and your response. You may also wish to cutand paste the WebBoard posting to provide context for the recipient.Sending email replies uses your web browser's email capability. Your browser mustbe set up to send email; WebBoard itself does not provide this email capability.
11If you have questions about WebBoard, contact Dominican's WebBoardAdministrator, Ken Black, at ext. 6512 (from off campus: 708-524-6512),or via email at kblack@email.dom.edu .WebBoard is copyright ©1998 O'Reilly & Associates, Inc.This documentation is largely adapted from the WebBoard help screens within theprogram.