Chatsworth Assembly Sheet.qxd - Taylors Garden Buildings
Chatsworth Assembly Sheet.qxd - Taylors Garden Buildings
Chatsworth Assembly Sheet.qxd - Taylors Garden Buildings
- No tags were found...

Create successful ePaper yourself
Turn your PDF publications into a flip-book with our unique Google optimized e-Paper software.
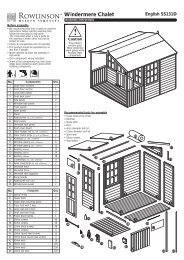
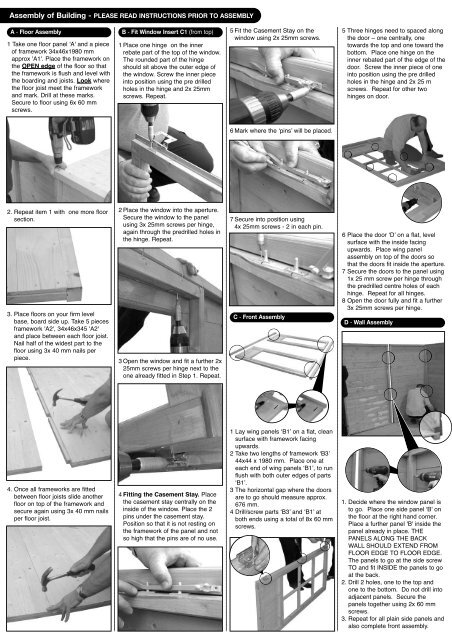
<strong>Assembly</strong> of Building - PLEASE READ INSTRUCTIONS PRIOR TO ASSEMBLYA - Floor <strong>Assembly</strong>1 Take one floor panel 'A' and a pieceof framework 34x46x1980 mmapprox 'A1'. Place the framework onthe OPEN edge of the floor so thatthe framework is flush and level withthe boarding and joists. Look wherethe floor joist meet the frameworkand mark. Drill at these marks.Secure to floor using 6x 60 mmscrews.B - Fit Window Insert C1 (from top)1 Place one hinge on the innerrebate part of the top of the window.The rounded part of the hingeshould sit above the outer edge ofthe window. Screw the inner pieceinto position using the pre drilledholes in the hinge and 2x 25mmscrews. Repeat.5 Fit the Casement Stay on thewindow using 2x 25mm screws.5 Three hinges need to spaced alongthe door – one centrally, onetowards the top and one toward thebottom. Place one hinge on theinner rebated part of the edge of thedoor. Screw the inner piece of oneinto position using the pre drilledholes in the hinge and 2x 25 mscrews. Repeat for other twohinges on door.6 Mark where the ‘pins’ will be placed.2. Repeat item 1 with one more floorsection.3. Place floors on your firm levelbase, board side up. Take 5 piecesframework 'A2', 34x46x345 'A2'and place between each floor joist.Nail half of the widest part to thefloor using 3x 40 mm nails perpiece.2 Place the window into the aperture.Secure the window to the panelusing 3x 25mm screws per hinge,again through the predrilled holes inthe hinge. Repeat.3 Open the window and fit a further 2x25mm screws per hinge next to theone already fitted in Step 1. Repeat.7 Secure into position using4x 25mm screws - 2 in each pin.C - Front <strong>Assembly</strong>6 Place the door ‘D’ on a flat, levelsurface with the inside facingupwards. Place wing panelassembly on top of the doors sothat the doors fit inside the aperture.7 Secure the doors to the panel using1x 25 mm screw per hinge throughthe predrilled centre holes of eachhinge. Repeat for all hinges.8 Open the door fully and fit a further3x 25mm screws per hinge.D - Wall <strong>Assembly</strong>4. Once all frameworks are fittedbetween floor joists slide anotherfloor on top of the framework andsecure again using 3x 40 mm nailsper floor joist.4 Fitting the Casement Stay. Placethe casement stay centrally on theinside of the window. Place the 2pins under the casement stay.Position so that it is not resting onthe framework of the panel and notso high that the pins are of no use.1 Lay wing panels ‘B1’ on a flat, cleansurface with framework facingupwards.2 Take two lengths of framework ‘B3’44x44 x 1980 mm. Place one ateach end of wing panels ‘B1’, to runflush with both outer edges of parts‘B1’.3 The horizontal gap where the doorsare to go should measure approx.676 mm.4 Drill/screw parts ‘B3’ and ‘B1’ atboth ends using a total of 8x 60 mmscrews.1. Decide where the window panel isto go. Place one side panel 'B' onthe floor at the right hand corner.Place a further panel 'B' inside thepanel already in place. THEPANELS ALONG THE BACKWALL SHOULD EXTEND FROMFLOOR EDGE TO FLOOR EDGE.The panels to go at the side screwTO and fit INSIDE the panels to goat the back.2. Drill 2 holes, one to the top andone to the bottom. Do not drill intoadjacent panels. Secure thepanels together using 2x 60 mmscrews.3. Repeat for all plain side panels andalso complete front assembly.