README MultiMix FW Updates - Win - Jan 2008
README MultiMix FW Updates - Win - Jan 2008
README MultiMix FW Updates - Win - Jan 2008

Create successful ePaper yourself
Turn your PDF publications into a flip-book with our unique Google optimized e-Paper software.
<strong>MultiMix</strong> FireWireFirmware and <strong>Win</strong>dows Driver Update information32-bit <strong>Win</strong>dows XP and <strong>Win</strong>dows Vista<strong>Jan</strong>uary, <strong>2008</strong>Contents:A. Before You Begin1. About these updates2. Verify your <strong>Win</strong>dows version3. Verify that your version of <strong>Win</strong>dows contains components required by the updateB. Software Drivers versus Firmware – What’s the Difference?C. Fresh Installation – <strong>MultiMix</strong> FireWire without Alesis IO|14 or IO|26(For computers which have never had a <strong>MultiMix</strong> FireWire or an Alesis IO|14 or IO|26 installed)1. Install the software drivers onto your computer2. Attach your <strong>MultiMix</strong> to your computer to finish the driver installation.3. Upgrade your <strong>MultiMix</strong>’s firmware to version 2.0.D. Upgrade Installation - <strong>MultiMix</strong> FireWire without Alesis IO|14 or IO|26(For computers on which a <strong>MultiMix</strong> FireWire has previously been installed, and on which anAlesis IO|14 or IO|26 has never been installed)1. Attach your <strong>MultiMix</strong> to your computer. Turn on both the <strong>MultiMix</strong> and your computer.2. Using Device Manager, uninstall your current driver.3. Use Add/Remove Programs to remove the current driver from your computer4. Detach the <strong>MultiMix</strong> from your computer, and re-start your computer5. Install Software Drivers onto your computer6. Attach your <strong>MultiMix</strong> to your computer to finish the driver installation.7. Upgrade your <strong>MultiMix</strong>’s firmware to version 2.0.E. Upgrade Installation - <strong>MultiMix</strong> FireWire with Alesis IO|14 or IO|26(For computers on which both a <strong>MultiMix</strong> FireWire and an Alesis IO|14 or IO|26 have previouslybeen installed)1. Understanding the <strong>MultiMix</strong>, IO14/26 shared driver.2. Learn your current IO|14 or IO|26 driver version.3. Attach your <strong>MultiMix</strong> to your computer. Turn on both the <strong>MultiMix</strong> and your computer.4. Using Device Manager, uninstall your current driver.5. Detach the <strong>MultiMix</strong> from your computer, and re-start your computer.6. Install the <strong>MultiMix</strong> software drivers onto your computer.7. Attach your <strong>MultiMix</strong> to your computer to finish the driver installation.8. Upgrade your <strong>MultiMix</strong>’s firmware to version 2.0.Page 1 of 18
F. Fresh Installation – <strong>MultiMix</strong> FireWire along with Alesis IO|14 or IO|26(For computers which have never had a <strong>MultiMix</strong> FireWire or Alesis IO|14 or IO|26 installed andwhich are being set up for the first time to use both products)1. Do not attach any of your Alesis devices to your computer yet.2. Install the IO|14/26 Software Drivers onto your computer.3. Learn your current IO|14 or IO|26 driver version.4. Now, uninstall the drivers, but leave the Hardware Direct Monitor application installed.5. Detach your IO|14 or IO|26 from your computer, and re-start your computer.6. Install the <strong>MultiMix</strong> software drivers onto your computer.7. Attach your <strong>MultiMix</strong> to your computer to finish the driver installation.8. Upgrade your <strong>MultiMix</strong>’s firmware to version 2.0.G. Techniques for Optimizing PerformanceH. In Case of DifficultyPage 2 of 18
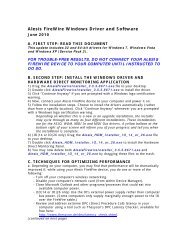
A. BEFORE YOU BEGINPlease review the following information carefully. A few minutes spent now may save you anhour or two of troubleshooting down the road.1. About these updatesThese updates enhance audio stability and performance as compared to the prior release.2. Verify your <strong>Win</strong>dows versionThese updates require <strong>Win</strong>dows XP or <strong>Win</strong>dows Vista.If you are using <strong>Win</strong>dows XP, both <strong>Win</strong>dows Installer and <strong>Win</strong>dows .NET 1.1 (or later) mustalready be installed on your machine.If you are using <strong>Win</strong>dows XP Service Pack 2 or later, these components have already beeninstalled.64-bit <strong>Win</strong>dows is not supported.If you have not updated <strong>Win</strong>dows in a while, we recommend that you go towww.<strong>Win</strong>dowsUpdate.com and install the available updates.3. Verify that your version of <strong>Win</strong>dows contains components required by the updateIf you are using <strong>Win</strong>dows XP Service Pack 2 or later or <strong>Win</strong>dows Vista, you may skip this section.If you are not using <strong>Win</strong>dows XP Service Pack 2 or later, you must check that necessarycomponents are installed:From the “Start” menu, choose “Control Panel” and then “Add or Remove Programs.”Look for the following items in the list:Microsoft .NET Framework 1.1 (or later)<strong>Win</strong>dows Installer 3.1 (or later)If one or both of these items does not appear, you must go to www.<strong>Win</strong>dowsUpdate.com anddownload them before you can continue.B. SOFTWARE DRIVERS VERSUS FIRMWARE – WHAT’S THEDIFFERENCE?Software Drivers are the pieces of code that are stored within your computer. Software Driverstell your computer how to communicate with your mixer.Firmware is the code that is stored within your mixer. Firmware tells your mixer how to operate.Page 3 of 18
C. FRESH INSTALLATION(For computers which have never had a <strong>MultiMix</strong> FireWire installed or an Alesis IO|14 or IO|26installed)DO NOT CONNECT YOUR MULTIMIX TO YOUR COMPUTERUNTIL REACHING STEP 2, BELOW.1. INSTALL THE SOFTWARE DRIVERS ONTO YOUR COMPUTERa. Copy the software driver installation program (called Alesis_<strong>MultiMix</strong>_Install.msi, inside the folder2--Alesis_<strong>MultiMix</strong>_install_WIN_3_0_81_1080.zip) to your desktop.b. Double-click the .MSI file to run the installer. Follow the prompts. Click “Continue Anyway” if<strong>Win</strong>dows pops up any “logo certification” warnings.c. When the update has finished, the installer will tell you that you can attach your device at anytime. Click OK to exit the installer. You can now delete the .MSI file on your desktop.2. ATTACH YOUR MULTIMIX TO YOUR COMPUTER TO FINISH THEDRIVER INSTALLATIONa. Connect the <strong>MultiMix</strong> to your computer using a Firewire cable. Turn the <strong>MultiMix</strong> on.Wait a few moments for <strong>Win</strong>dows to find your <strong>MultiMix</strong>; then follow the prompts to finishinstalling the drivers. Your computer may cycle through a few different “found new hardware”installation cycles.In every case:i. Choose not to search <strong>Win</strong>dowsUpdate for newer drivers (if your computer prompts youfor this search—not all <strong>Win</strong>dows computers do so.)ii. Choose to install the drivers automatically. Do not choose to search for the drivers ina specific location.Click “Continue Anyway” if <strong>Win</strong>dows pops up any “logo certification” warnings.3. UPDATE YOUR MULTIMIX’S FIRMWARE TO VERSION 2.0a. Copy the firmware update program (named <strong>FW</strong>Update.exe from the zip folder3--2_0_FwUpdate_MMX_WIN_3_0_81_1080.zip) to your desktop.b. Double-click the firmware update program to run it. Follow the prompts to automaticallyupdate your <strong>MultiMix</strong> FireWire’s firmware.If your current firmware version is already 2.0, you can cancel this installation and proceed tostep d.c. Once the firmware updater has finished running (allow a minute or so), press OK on screento reset your device.d. Now that you are finished with it, delete the firmware update program from your desktop.Page 4 of 18
D. UPGRADE INSTALLATION – MULTIMIX FIREWIRE WITHOUTALESIS IO|14 OR IO|26(For computers on which a <strong>MultiMix</strong> FireWire has previously been installed, and on which anAlesis IO|14 or IO|26 has never been installed)1. ATTACH YOUR MULTIMIX TO YOUR COMPUTER. TURN ON BOTH THEMULTIMIX AND YOUR COMPUTER.a. For these next steps to work, your <strong>MultiMix</strong> must be attached to and “seen” by yourcomputer.2. USING DEVICE MANAGER, UNINSTALL YOUR CURRENT DRIVERa. Find My Computer either on your desktop or in the <strong>Win</strong>dows START menu. Right-click it andchoose PROPERTIES.b. Choose the HARDWARE tab, followed by the DEVICE MANAGER button.Page 5 of 18
c. Find and expand the SOUND, VIDEO, AND GAME CONTROLLERS section. Within it, rightclick “Alesis 1394.” Then, click “Uninstall.”Click “OK” when prompted.d. Once the software has been uninstalled, close these windows.Page 6 of 18
3. USE ADD/REMOVE PROGRAMS TO REMOVE THE CURRENT DRIVERFROM YOUR COMPUTERa. From the START menu, navigate to the CONTROL PANEL and choose ADD OR REMOVEPROGRAMS. Look for every instance that starts with “Alesis <strong>MultiMix</strong>,” “<strong>MultiMix</strong>” or“<strong>Win</strong>dows Driver Package - Alesis.” For each one in the list, click REMOVE (orCHANGE/REMOVE, and then remove it).Page 7 of 18
4. DETACH THE MULTIMIX FROM YOUR COMPUTER, ANDRESTART YOUR COMPUTERa. Now that the old drivers have been removed, detach the <strong>MultiMix</strong> from your computer.b. Re-start your computer to begin a fresh installation.5. INSTALL THE SOFTWARE DRIVERS ONTO YOUR COMPUTERa. Copy the software driver installation program (called Alesis_<strong>MultiMix</strong>_Install.msi, inside the folder2--Alesis_<strong>MultiMix</strong>_install_WIN_3_0_81_1080.zip) to your desktop.b. Double-click the .MSI file to run the installer. Follow the prompts. Click “Continue Anyway” if<strong>Win</strong>dows pops up any “logo certification” warnings.c. When the update has finished, the installer will tell you that you can attach your device at anytime. Click OK to exit the installer. You can now delete the .MSI file on your desktop.6. ATTACH YOUR MULTIMIX TO YOUR COMPUTER TO FINISH THEDRIVER INSTALLATIONa. Connect the <strong>MultiMix</strong> to your computer using a Firewire cable. Turn the <strong>MultiMix</strong> on.Wait a few moments for <strong>Win</strong>dows to find your <strong>MultiMix</strong>; then follow the prompts to finishinstalling the drivers. Your computer may cycle through a few different “found new hardware”installation cycles.In every case:i. Choose not to search <strong>Win</strong>dowsUpdate for newer drivers (if your computer prompts youfor this search—not all <strong>Win</strong>dows computers do so.)ii. Choose to install the drivers automatically. Do not choose to search for the drivers ina specific location.Click “Continue Anyway” if <strong>Win</strong>dows pops up any “logo certification” warnings.7. UPDATE YOUR MULTIMIX’S FIRMWARE TO VERSION 2.0a. Copy the firmware update program (named <strong>FW</strong>Update.exe from the zip folder3--2_0_FwUpdate_MMX_WIN_3_0_81_1080.zip) to your desktop.b. Double-click the firmware update program to run it. Follow the prompts to automaticallyupdate your <strong>MultiMix</strong> FireWire’s firmware.c. Once the firmware updater has finished running (allow a minute or so), press OK on screento reset your device.d. Now that you are finished with it, delete the firmware update program from your desktop.Page 8 of 18
E. UPGRADE INSTALLATION – MULTIMIX FIREWIRE WITHALESIS IO|14 OR IO|26(For computers on which both a <strong>MultiMix</strong> FireWire and an Alesis IO|14 or IO|26 have previouslybeen installed)1. UNDERSTANDING THE MULTIMIX, I|O14/26 SHARED DRIVERBoth the <strong>MultiMix</strong> FireWire and the IO14/26 are powered by the same DICE II Firewire chip. As aresult, they share the same software drivers. Their firmware is different, but their drivers are thesame.As of this release, the current driver for <strong>MultiMix</strong> FireWire, IO|14, and IO|26 is version 3.0.41.5.The steps that follow will help you ensure that you are using the latest and greatest driver.2. LEARN YOUR CURRENT IO|14 OR IO|26 DRIVER VERSIONa. Detach all of your <strong>MultiMix</strong> FireWires, IO|14s, and IO|26s from your computer.b. Look for the “Alesis Firewire Control Panel” from your desktop. If it’s there, then open it,choose the “Help” menu, and from there choose “About.”c. If the “Version” indicated is 3.0.81.1080 or above, your driver is already up to date. In thiscase, skip ahead to step 9.If the “Version” indicated is anything below 3.0.81.1080, continue to step 3.If the “Alesis Firewire Control Panel” is not available on your desktop (perhaps you seesomething like “<strong>MultiMix</strong> Control Panel” on your desktop instead), then also continue to step 3.Page 9 of 18
3. ATTACH YOUR MULTIMIX TO YOUR COMPUTER. TURN ON BOTH THEMULTIMIX AND YOUR COMPUTERa. For these next steps to work, your <strong>MultiMix</strong> must be attached to and “seen” by yourcomputer.4. USING DEVICE MANAGER, UNINSTALL YOUR CURRENT MULTIMIXDRIVERa. Find My Computer either on your desktop or in the <strong>Win</strong>dows START menu. Right-click it andchoose PROPERTIES.Page 10 of 18
. Choose the HARDWARE tab, followed by the DEVICE MANAGER button.Page 11 of 18
c. Find and expand the SOUND, VIDEO, AND GAME CONTROLLERS section. Within it, rightclick “Alesis 1394” or “Alesis Firewire” (whichever appears up on your particular system). Then,click “Uninstall.”Click “OK” when prompted.d. Once the software has been uninstalled, close these windows.Page 12 of 18
5. USE ADD/REMOVE PROGRAMS TO REMOVE THE CURRENT DRIVERFROM YOUR COMPUTERd. From the START menu, navigate to the CONTROL PANEL and choose ADD OR REMOVEPROGRAMS. Look for every instance that starts with “Alesis <strong>MultiMix</strong>,” “<strong>MultiMix</strong>” or“<strong>Win</strong>dows Driver Package - Alesis.” For each one in the list, click REMOVE (orCHANGE/REMOVE, and then remove it).6. DETACH THE MULTIMIX FROM YOUR COMPUTER, ANDRESTART YOUR COMPUTERa. Now that the old drivers have been removed, detach the <strong>MultiMix</strong> from your computer.Re-start your computer to begin a fresh installation.Page 13 of 18
7. INSTALL THE MULTIMIX AND IO SOFTWARE DRIVERS ONTO YOURCOMPUTERa. Retrieve the latest IO|14 and IO|26 drivers from www.alesis.com and install that driverpackage. Only that package contains the Alesis Hardware Direct Monitoring softwareneeded to control direct monitor levels and routing for your IO|14 or IO|26.8. ATTACH YOUR MULTIMIX TO YOUR COMPUTER TO FINISH THEDRIVER INSTALLATIONa. Connect the <strong>MultiMix</strong> to your computer using a Firewire cable. Turn the <strong>MultiMix</strong> on.Wait a few moments for <strong>Win</strong>dows to find your <strong>MultiMix</strong>; then follow the prompts to finishinstalling the drivers. Your computer may cycle through a few different “found new hardware”installation cycles.In every case:i. Choose not to search <strong>Win</strong>dowsUpdate for newer drivers (if your computer prompts youfor this search—not all <strong>Win</strong>dows computers do so.)ii. Choose to install the drivers automatically. Do not choose to search for the drivers ina specific location.Click “Continue Anyway” if <strong>Win</strong>dows pops up any “logo certification” warnings.9. UPDATE YOUR MULTIMIX’S FIRMWARE TO VERSION 2.0a. Copy the firmware update program (named <strong>FW</strong>Update.exe from the zip folder3--2_0_FwUpdate_MMX_WIN_3_0_81_1080.zip) to your desktop.b. Double-click the firmware update program to run it. Follow the prompts to automaticallyupdate your <strong>MultiMix</strong> FireWire’s firmware.c. If your current firmware version is already 2.0, you can cancel this installation and proceed tostep d.d. Once the firmware updater has finished running (allow a minute or so), press OK on screen toreset your device.e. Now that you are finished with it, delete the firmware update program from your desktop.Page 14 of 18
F. FRESH INSTALLATION – MULTIMIX FIREWIRE ALONG WITHALESIS IO|14 OR IO|26(For computers which have never had a <strong>MultiMix</strong> FireWire or Alesis IO|14 or IO|26 installed andwhich are being set up for the first time to use both products)1. DO NOT ATTACH ANY OF YOUR ALESIS DEVICES TO YOURCOMPUTER YET2. INSTALL THE IO|14/26 SOFTWARE DRIVERS ONTO YOUR COMPUTERa. Find the latest IO|14/26 installation package at www.alesis.com. Perform that installation,including attaching your IO|14/26 to complete the installation.(First install the software, then attach your IO|14 or IO|26 to your computer to complete theinstallation. Do not attach your <strong>MultiMix</strong> FireWire yet.)3. ATTACH YOUR MULTIMIX TO YOUR COMPUTER TO FINISH THEDRIVER INSTALLATIONa. Connect the <strong>MultiMix</strong> to your computer using a Firewire cable. Turn the <strong>MultiMix</strong> on.Wait a few moments for <strong>Win</strong>dows to find your <strong>MultiMix</strong>; then follow the prompts to finishinstalling the drivers. Your computer may cycle through a few different “found new hardware”installation cycles.In every case:i. Choose not to search <strong>Win</strong>dowsUpdate for newer drivers (if your computer prompts youfor this search—not all <strong>Win</strong>dows computers do so.)ii. Choose to install the drivers automatically. Do not choose to search for the drivers ina specific location.Click “Continue Anyway” if <strong>Win</strong>dows pops up any “logo certification” warnings.4. UPDATE YOUR MULTIMIX’S FIRMWARE TO VERSION 2.0a. Copy the firmware update program (named <strong>FW</strong>Update.exe from the folder3--2_0_FwUpdate_MMX_WIN_3_0_81_1080.zip) to your desktop.b. Double-click the firmware update program to run it. Follow the prompts to automaticallyupdate your <strong>MultiMix</strong> FireWire’s firmware.c. If your current firmware version is already 2.0, you can cancel this installation and proceed tostep e.d. Once the firmware updater has finished running (allow a minute or so), press OK on screen toreset your device.e. Now that you are finished with it, delete the firmware update program from your desktop.Page 15 of 18
G. TECHNIQUES FOR OPTIMIZING PERFORMANCEa. Depending on your computer, you may find that performance will be dramatically improved if,while using your IO|14 or IO|26, you do one or more of the following:- Turn off your computer’s wireless networking.- Disable your computer’s network card (from within Device Manager).- Close Microsoft Outlook and other programs/processes that could eat into availablecomputer power.- Use the IO’s external power supply rather than computer bus power. (Somecomputers only supply marginally enough power to the IO over the Firewire cable.)- Review and address extreme DPC (Direct Procedure Call) latency in your computerusing a tool such as Thesycon’s DPC Latency Checker, available for free here:http://www.thesycon.de/deu/latency_check.shtml.b. You may find that the channel names show some corruption in your DAW or while managingyour Input and Output channel configurations in the Control Panel. If so, change your device’snickname in its Control Panel tab. Choose a nickname of no more than twenty characters.H. FEATURES OF THE ALESIS FIREWIRE CONTROL PANELApplications allowed to change the sample rateIf you want to ensure that neither <strong>Win</strong>dows nor some auxiliary program can seize control of theaudio driver and change the sample rate, select an appropriate option here.“any”:“ASIO only”:“none”:<strong>Win</strong>dows System and ASIO applications can change the sample rate.<strong>Win</strong>dows System Sound (WDM) applications cannot change the samplerate.The sample Rate can only be changed via the Alesis Firewire ControlPanel.System SoundsEnable or disable the <strong>Win</strong>dows system sounds (startup, shutdown, trash, error, “you have mail”etc.) here.When working with ASIO audio, it is generally best to disable the <strong>Win</strong>dows system sounds.When working with WDM applications, sounds must be enabled.(Continued on next page.)Page 16 of 18
System Sounds ConfigurationThese options allow you to map your inputs and outputs in accordance with the various soundschemes (5.1, 7.1 wide, etc.) that <strong>Win</strong>dows supports. (You can see these different schemeswithin <strong>Win</strong>dows by going to "Sound and Audio Devices," choosing the "Audio" tab, pressing"Advanced" under "Sound playback," and then exploring the options available under "SpeakerSetup.")Troubleshooting your system sounds configurationIf you find that, when using these mapping features, you cannot create the mapping that youwant, it is because some other configuration (quad or 7.1 or one of the others) is using the audiochannel you want. To solve the problem, switch over to the other "Multichannel configs" andremap the location using the channel you want to another channel.System Latency Compensation<strong>Win</strong>dows works on an "interrupt" basis. Every piece of hardware and every process in yoursystem "interrupts" <strong>Win</strong>dows to ask for attention. The hardware and processes wait for a replyfrom <strong>Win</strong>dows and then continue their tasks.Some hardware, and some hardware/software combinations, require significant time to processthese interrupt requests. If the time becomes long enough, it can interrupt your audio, leading todropouts and glitches.If you experience such dropouts, the first and best approach for you to try is to close nonessentialapplications. Also, disable your wireless and wired networking cards using <strong>Win</strong>dows'Device Manager. If this doesn't solve the problem, or if it is impractical for you to do so, thenexperiment with the System Latency Compensation settings. These settings add progressivelymore "safety buffers" to the Alesis drivers to overcome any long interrupt cycles caused by otherpieces of your system.Like Goldilocks, you're looking for the sweet spot for your system. A system that works great witha "low" setting may not work so well with a "high" setting. Experiment to find the bestcombination of buffer size and System Latency Compensation for your computer. And don'tworry about sample alignment in your DAW: whatever setting you choose here will be accuratelyreported to your DAW software. Note that a slightly larger buffer size is preferable to the nexthigher System Latency Compensation.Advanced Users will find the following information useful while using a latency checking tool:System Latency Compensation SettingnoneLowMediumHigh (last resort)Latency Compensation14mSPage 17 of 18
I. IN CASE OF DIFFICULTYIf you have difficulties installing the driver on top of an existing installation, go to Control Paneland then Add/Remove Programs. Remove every Alesis reference; then install the softwareagain.If problems persist, disable any spyware/malware protection programs. Depending on how youhave them configured, these might block the Alesis software and driver installation process.Alesis’s customer support team is available for further troubleshooting and consultation. Call(401) 658-5760.Thank you for using Alesis products. Best of luck to you in all your creative endeavors!The Alesis TeamPage 18 of 18