Model Y/11DM Pneumatic Differential Pressure ... - Yokogawa
Model Y/11DM Pneumatic Differential Pressure ... - Yokogawa
Model Y/11DM Pneumatic Differential Pressure ... - Yokogawa

Create successful ePaper yourself
Turn your PDF publications into a flip-book with our unique Google optimized e-Paper software.
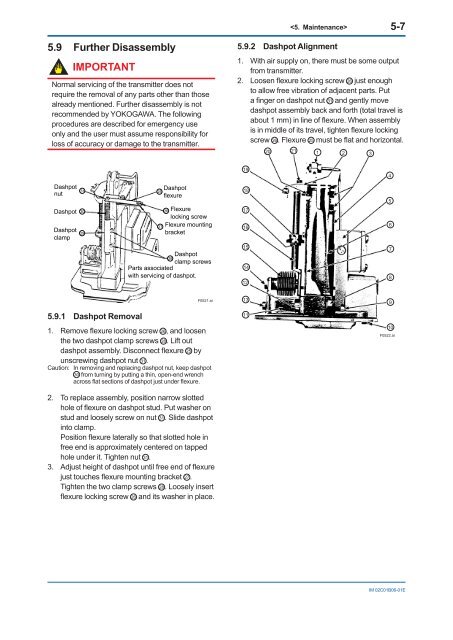
5-75.9 Further DisassemblyIMPORTANTNormal servicing of the transmitter does notrequire the removal of any parts other than thosealready mentioned. Further disassembly is notrecommended by YOKOGAWA. The followingprocedures are described for emergency useonly and the user must assume responsibility forloss of accuracy or damage to the transmitter.5.9.2 Dashpot Alignment1. With air supply on, there must be some outputfrom transmitter.2. Loosen flexure locking screw 26 just enoughto allow free vibration of adjacent parts. Puta finger on dashpot nut 31 and gently movedashpot assembly back and forth (total travel isabout 1 mm) in line of flexure. When assemblyis in middle of its travel, tighten flexure lockingscrew 26. Flexure 25 must be flat and horizontal.20 211 2 3194DashpotnutDashpotDashpotclamp3130292527Dashpotflexure26 Flexurelocking screwFlexure mountingbracket18171656Dashpot28clamp screwsParts associatedwith servicing of dashpot.15141278F0521.ai1395.9.1 Dashpot Removal1. Remove flexure locking screw 26, and loosenthe two dashpot clamp screws 28. Lift outdashpot assembly. Disconnect flexure 25 byunscrewing dashpot nut 31.Caution: In removing and replacing dashpot nut, keep dashpot30 from turning by putting a thin, open-end wrenchacross flat sections of dashpot just under flexure.2. To replace assembly, position narrow slottedhole of flexure on dashpot stud. Put washer onstud and loosely screw on nut 31. Slide dashpotinto clamp.Position flexure laterally so that slotted hole infree end is approximately centered on tappedhole under it. Tighten nut 31.3. Adjust height of dashpot until free end of flexurejust touches flexure mounting bracket 27.Tighten the two clamp screws 28. Loosely insertflexure locking screw 26 and its washer in place.1110F0522.aiIM 02C01B06-01E