You also want an ePaper? Increase the reach of your titles
YUMPU automatically turns print PDFs into web optimized ePapers that Google loves.
7.12 Spark Advance Variation Curve 697.13 Evaporative emission system 70Checking the CO Concentration 717.14 SAS (Secondary Air System) 737.14.1 General 737.14.2 Description 737.14.3 Removing the SAS 748 Troubleshooting 778.1 Engine 778.1.1 Poor Performance 778.1.2 Rear Wheel Spins at Idle 788.1.3 Rich Mixture 788.1.4 Weak Mixture 798.1.5 Low Compression 798.1.6 Starting Problems 808.1.7 Excessive Oil Consumption/Excessive Smoke from Exhaust 818.1.8 Insufficient Lubrication Pressure 818.1.9 Engine Tends to Cut Out at Full Throttle 828.1.10 Engine Tends to Stop at Idle 828.1.11 Excessive Fuel Consumption 838.2 Transmission and Brakes 838.2.1 Irregular Clutch Operation or Grapping 838.2.2 Poor Braking Performance 848.2.3 Brakes Overheating 848.3 Electrical System 858.3.1 Battery 858.3.2 Turn Signal Lights Not Working 858.4 Steering Controls and Suspension 858.4.1 Excessive Steering Stiffness 858.4.2 Excessive Steering Play 856
8.4.3 Noisy Suspension 868.4.4 Suspension Oil Leaking 86Electrical System 879.1 Electrical Diagrams 899.1.1 Ignition Section 899.1.2 Turn Signal Lights, Horn, Services and Accessory Pre-Wiring 909.1.3 Level Indicators and Safety Switches929.1.4 Battery Recharge and Starting Section 939.1.5 Headlight and Automatic Choke Section 949.2 Electrical Equipment 959.2.1 Electronic Ignition (Immobilizer System) 959.2.2 Un-Coded Electronic Ignition System979.2.3 Diagnostic Codes 989.2.4 2-Flash Diagnostic Code 989.2.5 3-Flash Diagnostic Code 999.2.6 Ignition System 999.2.7 Spark Plug Power Supply Failure 1009.2.8 Battery Charging System 1019.2.9 Checking the Voltage Regulator 1029.2.10 Stator check 1029.2.11 Checking the Regulator 1039.2.12 Checking the Automatic Choke Section 1039.2.13 Turn Signal Lights Fail to Operate 1049.2.14 Fuses 1059.2.15 Instrument Panel 1069.2.16 Battery 1079.2.16.1 Preparing the Battery 1079.2.16.2 Checking the Electrolyte Level 1079.2.16.3 Checking the Electrolyte Density 1079.2.16.4 Checking the Battery Charge Level1087
9.2.16.5 Cleaning the Battery 1089.2.16.6 Installing the Battery 10810 Engine 11110.1 Disassembling the Engine from the Frame 11110.2 Removing the Silencer 11610.3 Refitting the Engine onto the Frame 11610.4 Removing the Rocker Cover 11710.5 Refitting the Rocker Cover 11710.6 Checking the Compression 11710.7 Transmission 11810.7.1 Removing the Transmission Cover11810.7.2 Removing the Fan Case 11810.7.3 Removing the Transmission Cooling Intake 11910.7.4 Removing the Driven Pulley Shaft Bearing 11910.7.5 Fitting the Driven Pulley Shaft Bearing 11910.7.6 Removing the Belt Support Roller 12010.7.7 Refitting the Belt Support Roller 12010.7.8 Removing the Driving Pulley 12110.7.9 Removing the Driven Pulley 12110.7.10 Inspecting the Clutch Drum 12210.7.11 Checking the Clutch Drum Surface Eccentricity 12210.7.12 Removing the Clutch 12310.7.13 Disassembling the Fixed Driven Half-Pulley Bearings 12310.7.14 Checking the Fixed Driven Half-Pulley 12410.7.15 Checking the Moving Driven Half-Pulley 12510.7.16 Fitting the Fixed Driven Half-Pulley Bearings 12510.7.17 Refitting the Driven Pulley 12610.7.18 Checking the Moving Driven Half-Pulley Spring 12710.7.19 Checking the Drive Belt 12710.7.20 Checking the Clutch Friction Material1288
10.7.21 Fitting the Clutch 12810.7.22 Checking the Moving Driving Half-Pulley 12910.7.23 Fitting the Fixed Driving Half-Pulley and Bushing Assembly 13010.7.24 Fitting the Moving Half-Pulley Assembly 13110.7.25 Fitting the Clutch Drum 13210.7.26 Fitting the Transmission Cover 13310.7.27 Removing the Rear Hub Cover 13310.7.28 Removing the Rear Wheel Axle 13410.7.29 Checking the Hub Casing Bearings13410.7.30 Removing the Wheel Axle Bearing from the Cover 13510.7.31 Removing the Driven Pulley Shaft 13610.7.32 Checking the Hub Cover 13610.7.33 Fitting the Hub Casing Bearings 13610.7.34 Fitting the Wheel Axle Bearing on the Cover 13710.7.35 Checking the Hub Shafts 13810.7.36 Fitting the Hub Gears 13910.7.37 Fitting the Hub Cover 13910.8 Flywheel 14010.8.1 Removing the Flywheel Cover Assembly 14010.8.2 Removing the Flywheel 14310.8.3 Removing the Stator 14410.8.4 Checking the Stator 14410.8.5 Checking the Low Oil Pressure Switch 14510.8.6 Checking the Pick-Up 14510.8.7 Checking the Flywheel 14510.8.8 Fitting the Stator Assembly 14510.8.9 Fitting the Flywheel 14610.8.10 Fitting the Flywheel Cover Assembly 14610.9 Checking the Secondary Air Box Valve 14810.9.1 Checking the One-Way Valve 1499
10.10 Lubrication Circuit 15110.10.1 Checking the Oil Pressure 15210.10.2 Removing the Oil Sump and Pressure Adjusting By-Pass Valve 15310.10.3 Checking the By-Pass Valve 15310.10.4 Removing the Oil Pump 15410.10.5 Checking the Oil Pump 15510.10.6 Fitting the Oil Pump 15610.10.7 Fitting the Chain Cover Oil Seal 15710.10.8 Fitting the By-Pass and the Oil Sump 15910.10.9 Removing the Intake Manifold 15910.10.10 Thermostat Removal 16010.10.11 Removing the Timing Chain Sprockets 16010.10.12 Removing the Camshaft and Rockers 16110.10.13 Removing the Cylinder Head 16210.10.14 Removing the Valves 16310.10.15 Removing the Cylinder and Piston Assembly 16310.10.16 Inspecting the Small End 16410.10.17 Inspecting the Wrist Pin Diameter16510.10.18 Inspecting the Piston and Cylinder Diameters 16510.10.19 Inspecting the Piston 16610.10.20 Checking the Piston Ring Gap 16710.10.21 Fitting the Piston 16810.10.22 Choosing the Base Gasket Thickness16810.10.23 Fitting the Piston Rings 17010.10.24 Fitting the Cylinder 17010.10.25 Inspecting the Cylinder Head 17110.10.26 Checking the Valve Seals 17110.10.27 Inspecting the Valve Seats 17210.10.28 Inspecting the Valves 17210.10.29 Testing the Valve Seals 17410
10.10.30 Checking the Valve Spring Plates and Half-cones 17410.10.31 Fitting the Valves 17410.10.32 Inspecting the Timing Components17510.10.33 Inspecting the Camshaft 17610.10.34 Fitting the Cylinder Head 17710.10.35 Fitting the Timing Components 17810.10.36 Fitting the Thermostat 18110.10.37 Fitting the Intake Manifold 18110.11 Crankshaft 18210.11.1 Preparing the Engine for Crankcase Separation 18210.11.2 Separating the Crankcase Halves 18310.11.3 Checking the Crankshaft 18410.11.4 Checking the Crankcase Halves 18610.11.5 Checking the Main Bearings 18710.11.6 Assembling the Crankcase Halves 18810.11.7 Fitting the Starter Motor 19010.11.8 Removing the Carburetor 19110.11.8.1 Kehin CVK 30 Carburetor 19110.11.8.2 Walbro WVF-7P Carburetor 19710.11.9 Re-assembling the carburetor 20410.11.9.1 Kehin CVK 30 Carburetor 20410.11.9.2 Walbro WFV-7P Carburetor 20610.11.10 Checking the Float Height 20810.11.10.1 Kehin CVK 30 Carburetor 20810.11.10.2 Walbro WVF-7P Carburetor 21010.11.11 Checking the Vacuum Valve and the Needle 21210.11.11.1 Kehin CVK 30 Carburetor 21210.11.11.2 Walbro WVF-7P Carburetor 21410.11.12 Checking the Automatic Choke Device 21510.11.12.1 Kehin CVK 30 Carburetor 21511
10.11.12.2 Walbro WVF-7P Carburetor 21710.12 Cooling System 21910.12.1 Cooling Circuit 21910.12.2 Removing the Water Pump 22010.12.3 Checking the Components 22110.12.4 Fitting the Water Pump 22210.12.5 Checking the Thermostat 22411 Suspensions 22511.1 Removing and Refitting the Front Wheel 22611.2 Removing and Refitting the Rear Wheel 22611.3 Removing the Steering Column 22711.4 Removing the Front Wheel Hub 23011.5 Front Wheel Hub Overhaul 23011.6 Removing the Front Brake Caliper-Shock Absorber Bracket 23211.7 Front Brake Caliper-Shock Absorber Bracket Overhaul 23311.8 Removing the Front Shock Absorber23511.9 Front Swing Arm Overhaul 23511.10 Steering Column Ball-Cage Bearings Overhaul 23711.11 Removing the Rear Shock Absorber-Silencer Bracket 24011.12 Rear Shock Absorbers 24111.12.1 Removing the Rear Shock Absorbers 24111.12.2 Refitting the Rear Shock Absorbers 24211.13 Central Stand 24211.14 Inspecting the Rear Swing Arm 24211.15 Swing Arm Overhaul 24511.16 Silent-Block Overhaul 24712 Bodywork 25012.1 Removing the Seat 25012.2 Removing the Steering Column Cover 25012.3 Removing the Front Handlebar Cover25012
12.4 Removing the Rear Handlebar Cover25112.5 Removing the Instrument Panel 25112.6 Removing the Glove-box Panel 25212.7 Removing the Battery Compartment Cover 25412.8 Removing the Side Fairings 25412.9 Removing the Footrest 25412.10 Removing the Luggage Carrier 25612.11 Removing the Taillight 25712.12 Removing the Helmet Compartment25712.13 Removing the Front Fender 25812.14 Removing the Fuel Tank 25812.15 Removing the Radiators and the Cooling Fan 26012.16 Removing the Rear Mudguard 26112.17 Removing the Turn Signal Lights 26112.18 Removing the Electrical Opening Seat System 26213 Pre- Delivery Inspections 26413.1 Checking the Vehicle Appearance 26413.2 Checking the Tightening Torques 26413.3 Checking the Electrical Circuit 26413.4 Checking the Levels 26513.5 Road Test 26513.6 Static Test 26513.7 Functional Check 266Time Sheets 26714.1 Engine 26714.2 Crankcase 26714.3 Crankshaft 26714.4 Piston-Cylinder Assembly 26814.5 Cylinder Head and Valves 26814.6 Camshaft 26813
14.37 Saddle and Rear Rack 28314.38 Locks and Immobilizer 28314.39 Mirrors, Electric Controls, and Instrument Panel 28414.40 Lights 28514.41 Electrical Devices 28614.42 Front Wheel 28714.43 Rear Wheel 28715
1 <strong>Vespa</strong> GT 200This manual has been prepared by Piaggio USA, Inc., a subsidiary of Piaggio & C. S.p.A., foruse in the workshops of authorized Piaggio ® dealers and sub-agentsIt is assumed that the person utilizing this manual for servicing or repairing Piaggio® vehicleshas a knowledge of the principles of mechanics and standard procedures required for generalvehicle repair, therefore information regarding routine procedures has been deliberatelyomitted. Any relevant changes concerning the vehicle characteristics or specific repairoperations will be divulged in the form of updates to this manual.Satisfactory repair or service cannot be achieved without the necessary equipment and tools.Refer to the pages of this manual concerning specific tools and equipment and the special toolscatalogue.16
2 CharacteristicsThis section describes the general characteristics of the vehicle.2.1 Various2.1.1 Workshop SafetyFor tests performed with the engine running ensure the work is carried out in a well-ventilatedplace and, if necessary, using appropriate extractors. Never run the engine in an enclosedspace; exhaust gases are toxic.Some types of battery use sulphuric acid as an electrolyte. Protect eyes, clothing and skin.Sulphuric acid is highly corrosive; if it comes into contact with the eyes or the skin, rinsethoroughly with water and seek immediate medical attention.The battery produces hydrogen gas, which is extremely explosive. Do not smoke and do notallow flames or sparks near the battery, especially whilst it is being recharged.Gasoline is extremely flammable and, under certain conditions, explosive. Do not smoke and donot allow flames or sparks in the work area.Cleaning of brake shoes, drums and pads should be done in a well-ventilated area, aimingcompressed air so as to avoid inhaling the dust produced by wear in the friction material. Eventhe dust from asbestos-free linings can damage the health.2.1.2 Service RecommendationsUse genuine Piaggio ® spare parts and recommended lubricants. Use of non-genuine spareparts may damage the vehicle.For operations requiring special tools, use only those designed specifically for this engine.Always replace seals, gaskets and split pins with new ones, during reassembly.After removing components, clean them with a non-flammable or high flash-point solvent.Lubricate all contacting surfaces, inspect for taper fit couplings, before reassembling.Check all components have been correctly fitted and test that they work properly afterreassembly.Use only Metric -sized tools for removing, repairing and refitting operations. Metric screwfasteners, nuts and bolts are not interchangeable or compatible with Imperial-sized fasteners.Use of Imperial-sized tools or fasteners can damage the vehicle.For repairs that involve disconnecting the vehicle’s electrics, test the connections afterreassembly, especially those to ground and to the battery.17
2.2 Vehicle Identification2.2.1 Frame No.VehicleGranturismo 200 ccFrame prefixZAPM31200000010012.2.2 Engine No.VehicleGranturismo 200 ccEngine prefixM312M100118
2.3 Technical Specifications2.3.1 Weight and DimensionsCharacteristicsDry weightWidth (at handgrips)LengthWheel baseSaddle heightDescriptions308 lbs. (140 Kg)2.48 ft. (755 mm)6.36 ft. (1,940 mm)4.58 ft. (1,395 mm)2.62 ft. (800 mm)19
2.4 Engine2.4.1 GeneralCharacteristicsTypeTiming systemBoreStrokeDescriptionsSingle-cylinder, four-stroke, four-valve, liquidcooledSingle overhead camshaft driven by chain onL.H., 3-arm rockers with threaded adjuster2.83 in. (72.0 mm)1.91 in. (48.6 mm)Piston displacement 12.06 cu. in. (197.775 cm 3 )Compression ratio 11-12: 1Walbro carburetorWVF-7PKeihin carburetor CVK 30Engine idle1650±50 rpmCO value 3.8±0.7%Air filter Sponge air filter, soaked in fuel-oil mixture (50%gasoline - 50% oil)Starter systemElectric starter motor with torque limiter20
LubricationFuel systemMax power (shaft)Max speedBy chain driven lobe pump in crankcase, meshstrainer and cartridge filterGasoline supplied by carburetor with vacuumpump21 hp (15.4 kW) @ 8,500 rpm75 mph (120 km/h)2.4.2 Walbro carburetorCharacteristicsVacuum typePrinting on bodyCUT-OFF deviceDescriptionsWVF-7P*7PPresentMax jet 95Slow running jet 33Main air jet 120Idling air jet 55Throttle valve spring 0.264 lbs (1.18 N)Initial opening of idle speed mixtureadjusting screw2±½Conical needle 495Notches from top of conical needle 2Diffuser nozzleFuel inlet holeØ 0.106 in (2.7 mm)Ø 0.059 in (1.5 mm)Starting air jet 200Starting diffuser jet 110Starter jet 45Starter pin diameterStarter device resistanceVenturi tubeThrottle valveTube maximum chokeØ 0.070 in (1.78 mm)~40 OØ 1.142 in (29.0 mm) - (30.3×27.0 mm)Ø 1.299 in (33.0 mm)Ø 1.890 in (48.0 mm)21
2.4.3 Kehin carburetorCharacteristicsDescriptionsVacuum type CVK 30Printing on bodyCUT-OFF deviceCVKpresentMax jet 92Slow running jet 38Main air jet 70Idling air jet 115Throttle valve spring 0.330–0.551 lbs (1.47–2.45 N)Initial opening of idle speed mixtureadjusting screwConical needleNotches from top of conical needleDiffuser nozzleFuel inlet hole2¼±¼NDAASingle-notch needleØ 1.969 in (5.0 mm)Ø 0.059 in (1.5 mm)Starting air jet -Starting diffuser jet -Starter jet 42Choke pin diameter -Choke device resistanceVenturi tubeThrottle valve~ 20 OØ 1.142 in (29.0 mm) (47×30.9 mm)Ø 1.201 in (30.5 mm)Tube maximum choke -*The identification letter may vary every time the carburetor is updated.22
2.5 TransmissionCharacteristicsTransmissionDescriptionsBy automatic variator, with expanding pulleys,torque converter, V-belt, automatic clutch, gearreducer and transmission compartment cooledby forced air circulation2.6 CapacitiesCharacteristicsDescriptionsEngine oil ~1.06 quarts (~1,000 cm 3 )(recommended oil: Selenia HI Scooter 4 Tech)Fuel tank(including reserve ~0.5 gal)~2.5 gallons (~9.5 liters)Rear hub ~0.16 quarts (~150 cm 3 )(recommended oil: TUTELA ZC 90)Cooling system fluid~0.55-0.57 gallons (~2.10–2.15 liters)(recommended: PARAFLU 11FE (diluted))2.7 Electrical ComponentsCharacteristicsIgnition typeDescriptionsElectronic ignition by capacitive discharge, withvariable advance and separate H.T. coilVariable ignition advance(before T.D.C.)Fromto10°±1° @ 2,000 rpm32°±1° @ 6,500 rpmSpark plugBatteryChampion RG 6 YC12V-12AhFuses 1×15A, 1×10A, 3×7.5A, 2×5AGeneratorIn alternating current (AC)23
2.8 Frame, Suspensions, Brakes and Tires2.8.1 Frame and SuspensionCharacteristicsTypeFront suspensionFront shock absorber travelRear suspensionRear shock absorber travelDescriptionsPressed steel, mono-coque typeSingle-arm suspension equipped with dual-effecthydraulic shock absorber with coaxial spring3.4 in (86.5 mm)Engine mounted on oscillating fork pivoted to theframe by means of an arm with 2 degrees offreedom. Pair of dual effect hydraulic shockabsorbers and coaxial springs with 3 preloadadjustment positions3.52 in (89.5 mm)2.8.2 BrakesCharacteristicsFrontRearDescriptionsØ 8.66 in (220 mm) disc and hydraulicallyoperated floating caliper (via RH lever) with twoØ 0.98 in (25 mm) pistonsØ 8.66 in (220 mm) disc and hydraulicallyoperated floating caliper (via LH lever) with twoØ 1.18 in (30 mm) pistons2.8.3 Wheels and TiresCharacteristicsDescriptionsAluminum alloy rims Front: 3.00×12”Rear: 3.00×12”Tires Front: 120/70-12” TubelessRear: 130/70-12” TubelessTire pressure (when cold): Front: 26.1 psi (1.8 bars)Rear (rider only):29.0 psi (2.0 bars)Rear (rider + passenger): 31.9 psi (2.2 bars)Note: The tire inflation pressure should be checked and adjusted when the tires are atambient temperature. Pressure should be adjusted according to the weight of the driver,accessories, and/or passenger.24
3 Tightening Torques3.1 Steering UnitComponent Qty Torque [lbs·ft (N·m)]Steering upper ring nut 1Steering lower ring nut 1Handlebar clamping screw (*) 1Handlebar control unit U-bolts fixing screws 222.1–29.5(30–40)5.9–7.4(8–10)33.1–36.8(45–50)5.1–7.4(7–10)3.2 FrameComponent Qty Torque [lbs·ft (N·m)]Swing arm-engine pivot nut 1Swing arm-frame pivot nut 1Frame –engine link nut 1Silent-block support plate bolt 2Center stand bolt 147.1–53.0(64–72)56.0–61.1(76–83)24.3–30.2(33–41)30.9–38.3(42–52)18.4–22.1(25–30)3.3 Front SuspensionComponent Qty Torque [lbs·ft (N·m)]Shock absorber plate–caliper fixing screw 2Wheel axle nut 1Wheel screw 5Mudguard–fork fixing screw 314.7–19.9(20–27)55.2–66.3(75–90)14.7–18.4(20–25)3.7–4.8(5-6.5)25
3.4 Front BrakeComponent Qty Torque [lbs·ft (N·m)]Pump–oil tube connection 1Caliper-oil tube connection 1Caliper-shock absorber plate fixing screw 213.7–18.4(20–25)13.7–18.4(20–25)13.7–18.4(20–25)Disk clamping screw (°) 6 4.4 (6)Oil bleeder screw 1Pad clamping pin 2Brake pump basin screw 28.8–11.8(12–16)13.6–18.4(19.6-25)9.6–13.7(15–20)3.5 Rear SuspensionComponent Qty Torque [lbs·ft (N·m)]L.H. side shock absorber support platecrankcasefixing screw213.7–18.4(20–25)Shock absorber top fastening 2Shock absorber bottom fastening 2Rear wheel axle 1Wheel–hub fixing screw 513.7–18.4(20–25)24.3–30.2(33–41)76.5–92.6(104–126)13.7–18.4(20–25)Silencer-shock absorber support arm screws onengine (*)213.7–18.4(20–25)26
3.6 Rear BrakeComponent Qty Torque [lbs·ft (N·m)]Pipe-oil tube connection 1Caliper–oil tube connection 2Rear disk clamping screw (°) 6Oil bleeder screw 1Caliper–engine fixing screw 2Brake pump basin screw 2Caliper coupling screw 213.7–18.4(20–25)13.7–18.4(20–25)8.1–9.6(11–13)8.8–11.8(12–16)13.7–18.4(20–25)11.0–14.7(15–20)22.1–24.3(30–33)3.7 SilencerComponent Qty Torque [lbs·ft (N·m)]Silencer heat shield fixing screw 4Exhaust gas inlet screw 1Silencer–support arm fixing screw 33.7–4.4(5–6)9.6–11.0(13–15)13.7–18.4(20–25)3.8 Hydraulic ComponentsComponent Qty Torque [lbs·ft (N·m)]Hub oil bleeder cap 1Oil filter–crankcase fixing screw 1Engine oil-net filter bleeder cap 111.0–12.5(15–17)19.9–24.3(27–33)17.7–22.1(24–30)27
Oil filter 1Oil pump cover screw 2Oil pump –crankcase fixing screw 2Oil pump control rim screw 1Oil pump cover plate screws 2Oil sump screw 7Minimum oil pressure sensor 15.9–7.4(8–10)5.2–6.6(7–9)3.7–4.4(5–6)7.4–10.3(10–14)2.9–4.4(4–6)7.4–10.3(10–14)8.8-10.3(12–14)3.9 Cylinder HeadComponent Qty Torque [lbs·ft (N·m)]Spark plug 1Head cover screw 5Head-cylinder fixing nut (*) ( § ) 4Head fixing side screw 2Start up mass screw 1Adjustment tappet lock-nut 2Intake manifold screw 2Timing chain tightening sliding block screw 1Start up mass bell screw 1Timing belt tightening support screw 28.8–10.3(12–14)4.4–5.2(6–7)5.2±0.7 +½ rotation(7±1 +180°)8.1–9.6(11–13)5.2–6.3(7-8.5)4.4–5.9(6–8)8.1–9.6(11–13)7.4–10.3(10–14)8.1–11.0(11–15)8.1–9.6(11–13)28
Timing belt tightening central screw 1Camshaft retain plate screw 23.7-4.4(5–6)2.9–4.4(4–6)3.10 TransmissionComponent Qty Torque [lbs·ft (N·m)]Belt support roller screw 1Clutch assy. nut 1Driving pulley nut 1Transmission cover screw 13Driven pulley axle nut 1Rear hub cover screw 78.1–9.6(11–13)40.5–44.2(55–60)55.2–61.1(75–83)8.1–9.6(11–13)39.8–44.4(54–60)17.7–19.9(24–27)3.11 FlywheelComponent Qty Torque [lbs·ft (N·m)]Flywheel cover fixing screw 4Stator unit screw (°) 2Flywheel nut 1Pick-up fixing screw 23.7–4.4(5–6)2.2–2.9(3–4)38.3–42.7(52–58)2.2–2.9(3–4)3.12 Engine Crankcase and ShaftComponent Qty Torque [lbs·ft (N·m)]Engine crankcase inside head screws(transmission side half shaft)22.9–4.4(4–6)Engine crankcase coupling screws 118.1–9.6(11–13)29
Starter motor screws 2Crankcase timing chain cover screw (°) 38.1–9.6(11–13)2.5-3.2(3.5-4.5)3.13 CoolingComponent Qty Torque [lbs·ft (N·m)]Water pump impeller cover 3Water pump impeller driving joint screws 3Thermostat cover screws 22.2–2.9(3–4)2.2–2.9(3–4)2.2–2.9(3–4)30
4 Assembly Clearances4.1 Piston–Cylinder Mating1.3 in (33mm)1.3 in (33mm)[in (mm)]PartDimensionsCoupling ClassesClass Cylinder PistonAssemblyClearanceCylinderPiston+ 0.00072 . 835−00003.A2.8342–2.8345(71.990-71.997)+0.018( 72.00 − 2.8345–2.83470.010)B(71.997-72.004)2.833( 71.97± 0.0005± 0.014)C2.8347–2.8350(72.004-72.011)D2.8350–2.8353(72.011-72.018)2.8327–2.8330(71.953-71.960)2.8330–2.8333(71.960-71.967)2.8333–2.8336(71.967-71.974)2.8336–2.8338(71.974-71.981)0.00118–0.00173(0.030-0.044)31
4.2 O Rings[in (mm)]PartDimensionsClearanceClassAssemblyClearanceCompression ring2.834×0.059(72.0×1.5)A0.005–0.011(0.15-0.30)Scraper ring2.834×0.039(72.0×1.0)A0.007–0.015(0.20-0.40)Scraper ring2.834×0.098(72.0×2.5)A0.007–0.015(0.20-0.40)32
4.3 Compression Ratio Limiting Shimming System: (11-12:1)1. Measure «A» (with piston at T.D.C.).Note: Measure «A» must be taken without any gasket installed between the crankcase and thecylinder and after resetting the comparator, complete with support, on a rectified surface.2. Install according to the measure «A» taken.Note: The «A» value to be measured is referred to the piston recess. It indicates the amountby which the surface formed by the piston crown lowers, compared to the surface formed bythe cylinder upper part. The more the piston descends into the cylinder, the less the basegasket to be applied (to recover the compression ratio) will be and vice versa.[in (mm)]Measure «A»Gasket thickness(1.7-1.6) 0.015±0.0019 (0.4±0.05)(1.6-1.4) 0.023±0.0019 (0.6±0.05)(1.4-1.3) 0.031±0.0019 (0.8±0.05)33
4.4 Crankshaft End-PlayStandard clearance:Crankshaft/crankcase axial clearance(engine cold)0.005-0.015 in(0.15-0.40 mm)[in (mm)]PartDimensionsClearanceClassAssemblyClearanceHalf-shaft transmission side+ 0.00000 . 653−0.0019+0.000( 16.60 − 0.050)AHalf-shaft flywheel sideConnecting rod+ 0.00000 . 653−0.0019+0.000( 16.60 − 0.050)−0.00590 . 708−0.0040−0.150( 18.00 − 0.100)BCD= 0.007–0.019(0.20-0.50)Spacing tool+ 0.00102 . 023−00000.−0.150( 18.00 − 0.100)D34
4.5 Crankshaft AlignmentMeasure the diameters on both X and Y axesClass1Standard diameter (mm)1.1416–1.1418(28.998-29.004)21.1418–1.1421(29.004-29.010)Maximum allowable misalignment:A = 0.15 mmB = 0.01 mmC = 0.01 mmD = 0.10 mmSpecific tools and equipment:Support and comparator 020335YCrankshaft aligning tool 020074YCrankcase – Crankshaft – Half crankshaft bearingsCrankcaseHalfcrankshaftbearingClass 1 Class 21.2973–1.2978(32.953–32.963)A type - Red B type - Blue C type - Yellow0.0776–0.0777(1.970–1.973)0.0777–0.0778(1.973–1.976)0.0778–0.779(1.976–1.979)Note: Spare crankcases are selectedwith half-crankcases of the samecategory and mounted with categoryB bearings (blue colored).Match the shaft with two category 1shoulders with category 1 crankcase(or cat. 2 with cat. 2).A spare crankcase cannot becombined with a crankshaft withmixed categories. Spare shafts havehalf-shafts of the same category.Half-crankcase Half crankshaft BearingCat. 1 Cat. 1 BCat. 2 Cat. 2 BCat. 1 Cat. 2 ACat. 2 Cat. 1 C35
5 Recommended LubricantsUse Characteristics Recommended ProductRear hubAir filter spongeBrake levers, throttle handgripEngine oilBrake fluidCoolantGrease for driven pulley shaftcompensating ring andmoveable driven pulley slidingseatGrease for wheel bearings, pivothousings and swing armSAE 80W/90 oil, exceedingAPI GL3 specificationsMineral oil with specificadditives to increaseadhesion ISO VG 150Complex calcium soapgrease NLGI 1-2SAE 5W/40 synthetic oil,exceeding API SJspecificationsSynthetic fluid SAE J1703,NHTSA 116 DOT 4,ISO 4925Monoethylene glycol-basedanti-freezer,CUNA NC 956-16Molybdenum disulphidegreaseLithium soap and zinc oxidegrease NLG12 for theoscillating armTUTELA ZC 90SELENIA Air Filter OilSYSTEM TW 249 AREXONSSELENIA HI Scooter 4TechTUTELA TOP 4PARAFLU 11 FE (Diluted)MONTBLANCMOLYBDENUM GREASE(498345)TUTELA ZETA 236
6 Special Tools6.1 Steering Bearing Seat Installer – 001330YDescription Notes Part No.Steering bearing seat installer; tobe fitted with parts:001330Y009- For bottom housing001330Y010- For top housingNECESSARY001330Y6.2 Pliers – 001467Y014Description Notes Part No.0.59 in (15mm) Pliers NECESSARY001467Y0146.3 Bell – 001467Y017Description Notes Part No.BellNECESSARY001467Y0176.4 Steering Column Ball-Cage Bearing Removing Punch – 020004YDescription Notes Part No.Punch for removing steeringcolumn ball-cage bearings fromsteering headRECOMMENDED020004Y37
6.5 Front Suspension Overhaul Tool – 020021YDescription Notes Part No.Front suspension overhaul tool NECESSARY 020021Y6.6 Punch – 020036YDescription Notes Part No.Punch NECESSARY 020036Y6.7 Punch - 020038YDescription Notes Part No.Punch NECESSARY 020038Y6.8 Ring Nut Spanner - 020055YDescription Notes Part No.Steering column ring nut spanner NECESSARY 020055Y38
6.9 Crankshaft Aligner - 020074YDescription Notes Part No.Crankshaft aligning tool RECOMMENDED 020074Y6.10 Heat Gun Support - 020150YDescription Notes Part No.“Metabo hg 1500/2” hot air gunsupportRECOMMENDED020150Y6.11 Heat Gun - 020151YDescription Notes Part No.“Metabo hg 1500/2” hot air gun RECOMMENDED 020151Y6.12 Oil Pressure Gauge - 020193YDescription Notes Part No.Oil pressure gauge NECESSARY 020193Y39
6.13 Crankcase Detacher - 020262YDescription Notes Part No.Crankcase detachment plate RECOMMENDED 020262Y6.14 Half-Pulley Assembler - 020263YDescription Notes Part No.Half pulley assembly sheath NECESSARY 020263Y6.15 Fitting Punch - 020306YDescription Notes Part No.Retaining ring fitting punch NECESSARY 020306Y6.16 Vacuum Pump - 020329YDescription Notes Part No.Mitivac-like vacuum pump RECOMMANDED 020329Y40
6.17 Timing Light - 020330YDescription Notes Part No.Timing light for two and fourstrokeenginesRECOMMANDED020330Y6.18 Digital Multimeter - 020331YDescription Notes Part No.Digital multimeter RECOMMANDED 020331Y6.19 Digital Tachometer - 020332YDescription Notes Part No.Digital tachometer RECOMMANDED 020332Y41
6.20 Single Battery Charger - 020333YDescription Notes Part No.Single battery charger RECOMMANDED 020333Y6.21 Multiple Battery Charger - 020334YDescription Notes Part No.Multiple battery charger RECOMMANDED 020334Y6.22 Dial Gauge - 020335YDescription Notes Part No.Dial gauge (0.001 mm) withmagnetic standRECOMMANDED020335Y42
6.23 Adapter (42×47 mm) - 020359YDescription Notes Part No.42×47 mm Adapter NECESSARY 020359Y6.24 Adapter (52×55 mm) - 020360YDescription Notes Part No.52×55 mm Adapter NECESSARY 020360Y6.25 Guide (20 mm) - 020363YDescription Notes Part No.20 mm guide NECESSARY 020363Y6.26 Guide (25mm) - 020364YDescription Notes Part No.25 mm guide NECESSARY 020364Y43
6.27 Guide (22 mm) - 020365YDescription Notes Part No.22 mm guide NECESSARY 020365Y6.28 Adapter (28×30 mm) - 020375YDescription Notes Part No.28×30 mm adapter NECESSARY 020375Y6.29 Handle - 020376YDescription Notes Part No.Handle for adapters NECESSARY 020376Y6.30 Valve Half-Cone Remover - 020382YDescription Notes Part No.Tool for valve half-cone removal NECESSARY 020382Y6.31 Bushing - 020382Y011Description Notes Part No.44
Bushing (for valve removal)NECESSARY020382Y0116.32 Piston Assembly Band - 020393YDescription Notes Part No.Piston assembly band NECESSARY 020393Y6.33 Multimeter Adapter - 020409YDescription Notes Part No.Multimeter adapter (peak voltagemeasurement)RECOMMENDED020409Y45
6.34 Guide (15 mm) - 020412YDescription Notes Part No.15 mm guide NECESSARY 020412Y6.35 Clutch Drum Lock Wrench - 020423YDescription Notes Part No.Clutch drum lock wrench NECESSARY 020423Y6.36 Punch - 020424YDescription Notes Part No.Driven pulley-roller housinginstalling punchNECESSARY020424Y6.37 Punch - 020425YDescription Notes Part No.Oil seal (flywheel-side) punch NECESSARY 020425Y46
6.38 Piston Fitting Fork - 020426YDescription Notes Part No.Piston fitting fork NECESSARY 020426Y6.39 Piston Support - 020428YDescription Notes Part No.Piston projection support NECESSARY 020428Y6.40 Valve O-Ring Remover - 020431YDescription Notes Part No.Valve o-ring removing tool NECESSARY 020431Y6.41 Oil Pressure Gauge - 020434YDescription Notes Part No.Oil pressure gauge NECESSARY 020434Y47
6.42 Guide (17 mm) - 020439YDescription Notes Part No.17 mm guide for shock absorbersupport bearing assemblyNECESSARY020439Y6.43 Water Pump Overhaul Tool - 020440YDescription Notes Part No.Water pump overhaul tool NECESSARY 020440Y6.44 Adapter (26×28 mm) - 020441YDescription Notes Part No.26×28 mm adapter NECESSARY 020441Y6.45 Stop Wrench - 020442YDescription Notes Part No.Driving pulley wrench NECESSARY 020442Y48
6.46 Driven Pulley Spring Tool - 020444YDescription Notes Part No.Driven pulley spring compressingtoolNECESSARY020444Y6.47 Guide (30 mm) - 020483YDescription Notes Part No.30 mm guide for hub bearingassemblyNECESSARY020483Y6.48 Pivot Retainers Installer - 020488YDescription Notes Part No.Pivot retainers installation tool NECESSARY 020488Y6.49 Hub Cover support - 020489YDescription Notes Part No.Hub cover support tool kit NECESSARY 020489Y49
6.50 Flywheel Wrench - 020565YDescription Notes Part No.Adjustable wrench for flywheelfixingNECESSARY020565Y6.51 Engine Support - 002095YDescription Notes Part No.Engine support; to be fitted withparts:002095Y015 – Tube002095Y022 – Cross member002095Y023 – Nut002095Y044 – Plate002095Y046 - ClampRECOMMENDED002095Y6.52 Pliers - 002465YDescription Notes Part No.Snap-ring pliers RECOMMENDED 002465Y6.53 Punch - 06029YDescription Notes Part No.Steering column ball-cage bearinginstalling punchRECOMMENDED006029Y50
6.54 Flywheel Extractor - 08564YDescription Notes Part No.Flywheel removing tool NECESSARY 008564Y6.55 Gas Analyzer - 494929Description Notes Part No.Exhaust gas analyzer RECOMMENDED 49492951
7 MaintenanceThis section provides information on periodical maintenance.7.1 Maintenance Schedule×625 miles(×1,000 km)1 6 1218243036424854606672Months4 122436- - - - - - - - -Check: VReplacement: SEngine oil - Check level/Top up V Every 1,875 mile (3,000 km)Engine oil – Replace S S S S S S S S S S S S SHub oil level - Check/Replace S V V V S V V V S V V V SSpark plug/Electrodes distance - Check/ReplaceV S V S V S V S V S V SAir filter – Clean V V V V V V V V V V V VSecondary air filter (external internal) – CleanEvery 2 yearsOil filter – Replace S S S S S S S S S S S S SValve clearance - Check V V V V VIdle speed (*) – Adjust V V V V V V VGas control – Adjust V V V V V V VVariator rollers – Check/Replace V V V V V V V V V V V VDriving belt - Check/Replace V S V S V S V S V S V SCooling fluid level - Check V V V V V V V V V V V VCooling fluid – ReplaceEvery 2 yearsRadiator – Clean exterior/Check V V V VSteering – Adjust V V V V V V VBrake levers – Lubricate V V V V V V VBrake pads - Check condition and wear V V V V V V V V V V V V VBrake fluid piping – Replace S SBrake fluid level - Check V V V V V V V V V V V V VBrake fluid - ReplaceEvery 2 years52
Transmissions- Lubricate V V V V V VSafety locks – Check V V V V V V VSuspensions – Check V V V V V VElectrical system and Battery - Check V V V V V V V V V V V V VHeadlight - Check/Adjust V V V V V VTires pressure and wear - Check V V V V V V V V V V V VVehicle and braking system performance - RoadtestV V V V V V V V V V V V VLabor time 70' 130' 135' 140' 150' 90' 245' 90' 150' 140' 135' 90' 260'Safety tightenings: refer to the chapter “Pre-delivery Operations”.(*) See rules53
7.2 Carburetor- Disassemble all carburetor components, accuratelywash them in solvent, and then drythem with compressed air. To ensurethorough cleaning, pay particular attentionto the passages in the carburetor body.- Carefully check the conditions of eachcomponent.- The throttle valve must slide freely into thechamber; in case of excessive play due towear, replace the valve.- Replace the carburetor if the chamber showsexcessive signs of wear as to preclude thevalve’s regular seal or free sliding (even ifnew).- Gaskets should be replaced every time thecarburetor is reassembled.Warning - Fuel is highly explosive. Always replacegaskets to prevent leakage.1. Diaphragm cover - 2. Throttle valve spring -3. Conical needle support - 4. Conical needlespring -5. Conical needle - 6. Throttle valvediaphragm - 7. Automatic choke - 8. Idle speedadjusting screw - 9. Return valve rockers -10. Idle mixture adjusting screw - 11. Float pin- 12.Return pump unit - 13. Float - 14. Floatchamber - 15. Idling jet - 16.Main jet -17. Diffuser - 18. Float chamber drain screw.54
7.3 Checking and Replacing the Spark PlugWarning – Remove the spark plug when theengine is cold. Replace the spark plug every7,500 miles (12,000 km). The use of nonconformingignition controllers, and sparkplugs other than those prescribed canseriously damage the engine.Recommended spark plug:Champion RG6YC- Rest the vehicle on the central stand- Open the saddle and extract the helmetcompartment- Disconnect the spark plug H.T. cable cap.- Unscrew the spark plug, using the spannerprovided.- Inspect the spark plug, to ensure that theinsulator is in good conditions and no signsof cracks are visible. Also check thecondition of the seal washer and make surethat the electrodes are not worn out orexcessively sooty.- Measure the spark gap with a suitablethickness gaugeStandard dimension:Spark gap0.028-0.031 in.(0.7–0.8 mm)- If necessary adjust the spark gap bycarefully bending the side electrode.- If the spark plug shows any of the defectsmentioned above, replace it with a plug ofthe recommended type.- Insert the spark plug with the properinclination, and screw it thoroughly byhand, then tighten it using the suppliedspanner.Tightening torque:Spark plug8.9-10.3 lbs·ft(12-14 N·m)Insert the cap over the spark plug thoroughlyand proceed to the reassembly55
7.4 Air FilterNote: Every 3,726 miles (6,000 km) it isnecessary to check the air filter and blow it, ifrequired. The jet should be directed from theinside outwards of the filter (i.e., opposite to theair flow direction during normal engineoperation).- Remove the left hand-side fairing by releasingthe two screws, as shown in the figure- Remove the helmet compartment- Remove the three fastening screws that canbe reached after the removal of the helmetcompartment, from inside the frame- Remove the five fixing screws shown in thefigure- Remove the filtering element.- Replace the air filter with a new one.56
Note: Every 3,726 miles (6,000 km), duringservicing, it is necessary to remove the stopsand the rubber caps located below the filterbox, as shown in the figure, and drain any oilaccumulation.Cleaning (Every 7,452 miles, or 12,000 km):- Wash with water and shampoo.- Dry with light jets of compressed air and wipe with a clean cloth.- Soak with a 50% fuel-oil mixture (use SELENIA AIR FILTER OIL).- Let the filtering element drip and squeeze it with hands without wringing.- Replace the filtering element.Caution – If the vehicle is mostly used on dusty roads, the air filter must be cleaned morefrequently than what indicated in the scheduled maintenance table.Caution – Never let the engine run without air filter. This would cause an excessive wear ofcylinder and piston and would damage the carburetor.57
7.5 Engine OilEngine oil is used in 4-stroke engines to lubricate the valve gear components, thecrankshaft bearings and the power plant. An insufficient quantity of oil can causeserious damage to the engine itself.In all 4-stroke engines, oil deterioration and consumption are, to some extent, normal,especially during running-in. Consumption partly depends on the riding style (e.g.: whenriding constantly at full throttle, oil consumption increases).7.5.1 Checking the Engine Oil LevelPerform the following operations when theengine is cold:- Rest the vehicle on the central stand andon a flat surface.- Unscrew dipstick «A», dry it with a cleancloth and reinsert it, by screwing itcompletely.- Remove the dipstick again and check thatthe level is between the MAX and MINlevels; top up, if required.The MAX level mark means that in the enginethere is an oil quantity of approximately1.164 quarts (1,100 cm 3 ).Note: The level will be lower if checked afterusing the vehicle (i.e. when the engine ishot). To obtain a correct indication of the oillevel, wait at least 10 minutes after switchingoff the engine.58
7.5.2 Topping-Up the Engine OilThe oil should be topped up after havingchecked the level and in any case by addingoil without ever exceeding the MAX mark.Restoring the level between MIN and MAXrequires a quantity of oil of ~0.4 quarts(~400 cm 3 ).Oil pressure warning lightThe vehicle is equipped with a warning lighton the instrument panel which comes onwhen the ignition key is turned to the “ON”position. However, this light should switch offonce the engine has started.Note: Should the light turn on while braking,idling or cornering, check the oil level and thelubrication system as soon as possible.7.5.3 Replacing the Oil and Oil Filter- Oil and filter should be replaced every3,726 mi (6,000 km). The engine shouldbe emptied by draining the oil from thepre-filter drainage tap «B» of the net prefilteron the flywheel side. To facilitate theoil drainage, loosen dipstick «A». Oncethe oil has been drained from the drainagetap, loosen the oil filter cartridge «C» andremove it as described below.- Check that the O-rings of the pre-filter anddrainage cap are not worn out and in goodconditions.59
- Lubricate the O-rings and replace net filterand oil drainage cap; tighten at theprescribed torque.- Install the new cartridge filter afterlubricating the O-ring.- Fill with fresh engine oil.- Since a certain quantity of oil still remainsin the circuit, the fill-up should be carriedout with about 0.64 quarts (600-650 cm 3 )of oil from cap «A». Subsequently, startup the engine, let it idle for a few minutesand then switch it off. After about 5minutes, check the level and top up ifnecessary without ever exceeding theMAX mark. The cartridge filter must bereplaced every time the oil is changed. Fortop ups and replacements, use freshSelenia HI Scooter 4 Tech oil.Note: Engine oil should be replaced when theengine is hot.Tightening torque:Engine oil drainage cap17.6-22.1 lbs·ft(24-30 N·m)Recommended oil:Selenia HI Scooter 4 Tech60
7.6 Hub Oil7.6.1 Checking the Hub Oil Level- Position the vehicle on its central stand ona flat surface- Unscrew the oil dipstick «A», dry it with aclean cloth and reinsert it, screwing it incompletely.- Pull out the dipstick and check that the oillevel reaches the lower notch (see figure);if the level is below the MAX mark, restorethe proper amount of oil in the hub.- Reinsert the dipstick and screw it tightly.The notches on the hub oil dipstick, with theexception of the MAX mark, refer to otherPIAGGIO models and have no specificfunction as far as this vehicle is concerned.7.6.2 Replacing the Hub Oil- Remove oil filler cap «A».- Unscrew oil drain cap «B» and let the oildrain out completely.- Retighten the oil drain cap and then fill thehub with fresh oilRecommended oil: TUTELA ZC 90Oil capacity:Rear hubTightening torques:Hub oil draining screw~0.16 quarts(~150 cm 3 )11.0-12.5 lbs·ft(15-17 N·m)61
7.7 Topping-Up the Engine Cooling LiquidNote: The liquid level inspection should becarried out every 3,726 mi. (6,000 km) whenthe engine is cold. The following steps shouldbe followed:- Rest the vehicle on its central stand levelground.- Loosen the screw shown in the figure andremove the plastic flap on the right handside of the vehicle’s leg-shield, in order toaccess the cooling liquid expansion tank- Remove the expansion tank cap and topup, if the coolant level is below or near theMIN level in the expansion tank. The fluidlevel should always be between the MINand MAX marks.- The coolant consists of a 50% mixture ofdemineralized water and antifreezesolution with a base of ethylene glycol andcorrosion inhibitors.Warning – To prevent leaks of the coolingfluid from the expansion tank during the useof the vehicle, never exceed the MAX markupon filling.62
7.8 Brake Fluid7.8.1 Checking the Brake Fluid LevelThe front and rear brake fluid reservoirs arelocated on the pumps installed on thehandlebar.In order to check the brake fluid level in thereservoirs, follow these steps:- Rest the vehicle on its central stand onlevel ground and turn the handlebar to thecentral position.- Remove the brake pump cover.- Check the fluid level through the sightshown in the figure.Note: A certain decrease in the level of thefluid occurs as a result of pad wear.63
7.8.2 Topping-Up the Brake Fluid LevelCaution - Only use brake fluid classified asDOT 4.- If the level is below minimum, loosen thetwo screws shown in the figure.- Remove the reservoir cap, remove thegasket and top up, only using theprescribed fluid and without exceeding themaximum level.Recommended brake fluid:TUTELA TOP 4Warning – Keep the brake fluid away fromthe skin, the eyes and clothing. In case ofcontact, rinse thoroughly with water.Warning – The brake fluid is highlycorrosive. Do not let it come into contact withthe paintworks.Warning – The brake fluid is hygroscopic, i.e.it absorbs humidity from the surrounding air.If the concentration of humidity in the fluidexceeds a certain value, the braking actionbecomes insufficient.Warning - Never use braking fluid drawnfrom open or partly empty containers.In normal climatic conditions, the fluid shouldbe replaced every 12,420 mi (20,000 km) orin any case every 2 years.Note: Change brake fluid and bleed systemas described in chapter “Braking System”.Tightening torqueReservoir screws:11.0-14.7 lbs·ft(15-20 N·m)64
7.9 Removing the Steering Lock7.9.1 Removing the Steering Lock when on «OFF» Position- Remove the leg-shield as described inchapter “Bodywork”.- Remove the immobilizer antenna shown inthe figure.- Disconnect the wiring.- Pull out the retaining spring shown in thefigure and remove the ignition switch.65
- Push the bolt lightly and extract theretainer from the milled part shown in thefigure.- Extract the bolt assembly from the lockbody.- To refit, follow the reverse procedure.7.9.2 Removing the Steering Lock when on «LOCK» PositionThe bolt retaining spring is not accessible inthe «LOCK» position. It is then necessary todrill the bolt as shown in the figure to eject it.Note: To refit the bolt from this position, firstdisengage the steering lock by putting thelock body (inner and outer part) in the OFFposition.To refit, proceed as described in the previousparagraph.66
7.10 Headlight Adjustment- Place the unloaded vehicle on a flatsurface, 32.8 ft (10 m) from a half lit whitescreen, with the tires inflated to theprescribed pressure. Ensure that the axisof the vehicle is perpendicular to thescreen.- Trace a horizontal line on the screen 27.2-28.3 in (67-70 cm) above ground.- Remove the steering cover by looseningthe screw shown in the figure.- Switch on the headlight, turn on the lowbeam and check that the horizontal line,which separates the lighted area from thedark area, is not above the line previouslydrawn on the screen. To shift theheadlight, operate on the adjusting screwimmediately below the headlight, as shownin the figure.67
7.11 Checking the Spark Advance- To check the spark advance, use thestroboscopic light with the induction clampconnected toe the spark plug feeder cable.- Connect the induction clamp payingattention to the polarity (the arrow on theclamp must be facing the spark plug).- Set the lamp selector to the central position(1 spark = 1 crankshaft revolution as in 2stroke engines).- Start the engine and check that the lampworks properly and that the revolutioncounter can also read high engine speeds(e.g. 8,000 rpm).- If flashing or rpm reading instabilities arenoted, increase the resistive load on thespark plug feeder cable (10-15 kO in serieswith the H.T. cable).- Remove the plastic cover from the slottedhole on the flywheel cover.- Using the lamp flash phase shift corrector,align the reference mark on the flywheelcover with the level on the water pumpdrive. Read the degrees of advance on thestroboscopic light.- Check the revolving speed corresponding tothe degrees of advance in the tables below.- If any discrepancy is found, check the pickupand the control unit feeders (positivenegative).If necessary, replace the controlunit.- An un-programmed control unit preventsthe engine from exceeding 2,000 rpm.- A programmed control unit allows theengine to revolve within the prescribedlimits.Spark advance:fromto10°±1° @ 2,000 rpm32°±1° @ 6,000 rpmSpecific tools and equipment:Timing Light020330Y68
7.12 Spark Advance Variation CurveRev limiterFirst thresholdFirst thresholdTripping threshold 9,900±50 rpm 9,900±50 rpmRestore threshold 9,800±50 rpm 9,800±50 rpmSpark suppression 1 spark out of 7 2 sparks out of 369
7.13 Evaporative emission systemA = CanisterB = Uni-directional valveC = Air intake membraneD = Cylinder headE = CarburetorF = Air intake float chamberG = PumpH = Fuel outputI = Fuel tankL = PlugM = Fuel breather pipe70
N = Roll-over valveO = Union “T”P = EnviornmentChecking the CO ConcentrationThis test may be re quired when engine operation is irregular or while adjusting the idle.The test must be carried out after washing all carburetor components and making sure that theair filter is clean and the spark plug is in good condition.- Remove the side fairing and then the transmissioncooling air inlet duct so as to easilyreach the flow adjustment screw.- Remove the gas cap on the exhaust.- Using the original washer, install the exhaustgas collection kit onto the exhaust.- Suitably orientate all the components.- Close the gas outlet terminal of the tool.- Start the engine and let it warm up until theelectric fan activates.- Stop the engine.- Disconnect the SAS (Secondary Air System)check valve vacuum pipe from the ‘T’connection shown in the figure.71
- Seal the connection using a cap or a pipeportion with conical a cap.- Connect the Mitivac vacuum pump to thecontrol pipe and to the SAS valve.- Start the vacuum pump up to a pressure of-8.7 ÷ -11.6 psi (-0.6 ÷ -0.8 bar) so as toclose the valve and cut off the SAS system.Remove the exhaust gas collection kit closing cap and connect the analyzer properly preheated.Check the conditions displayed by the analyzer and the engine rpm and adjust the COvalue to:3.8±0.7 @ 1,650±50 rpmSpecial equipment and tools:Mityvac-like vacuum pumpDigital tachometerExhaust gas analyzer020329Y020332Y494929YNote: Check that the result is obtained with the gas valve in the closest position.Also check that the carburetion adjustment is obtained with the flow screw open by 2 to 4turns.If not, check the fuel level adjustment in the basin and check the fuel circuit.In case of unsteady CO, check the carburetor cleaning, the feeding system efficiency andthe vacuum seals.In case of unburnt hydrocarbons (HC) > of 1,000 p.p.m., check the ignition system, thetiming, the valve clearance and the drainage valve seal.72
7.14 SAS (Secondary Air System)7.14.1 GeneralThe Secondary Air System (SAS) on the 200ccL.E.AD.E.R. engines is similar, in principle, to theSAS employed on PIAGGIO’s 2-stroke engines.Here, however, the secondary air enters directlyinto the exhaust duct from the head.The bleed valve found on the 2-stroke engine is here replaced by a membrane. The unit,indicated by an arrow in the figure, is provided with a cut-off connected to the vacuum inleton the intake manifold to shut the air inlet during deceleration, to prevent explosions in thesilencer.7.14.2 DescriptionAir is sucked through hole «A» and flows throughthe first filter into hole «B».Passing through the hole indicated in the figure,air reaches the second filter «B».At this point, the filtered air enters into themembrane device to be channeled towards thehead.73
Flowing through a stiff duct, flanged to the head,the secondary air reaches the exhaust duct thusproviding oxygen addition to the unburnt gasesjust before they enter the catalytic converter. Theefficiency of he catalyzing process is thereforeincreased.7.14.3 Removing the SASWarning – This operation must be performedwith the engine cold.Remove the silencer.Remove the R.H. fairing.Loosen the clamps and remove the cooling fluidinlet and outlet sleeves from the pump cover anddrain the cooling system.Remove the top strip fixing the SAS valveconnection sleeve to the drainage as shown in thefigure.Remove the 2 fixing screws, the gasket and thepipe connecting the SAS valve to the head. Then,remove the pipe.74
Release the electric wiring fixing from theflywheel cover as shown in the figureDisconnect the vacuum pipe from the SAS valveRemove the pump support bracket and the fuelfilterRemove the flywheel cover with the SAS valve byreleasing the 4 hexagon screws as shown in thefigure75
Remove the two SAS valve fixing screws andremove the valve with the O-ring from thesupportRemove the plastic support with the gasketCheck that the secondary air box valve plasticsupport is free from cracks and deformationsCheck the integrity of the gasketWarning - An impaired seal between secondaryair box valve and flywheel cover causes anincrease of noise of the system.Carefully clean the internal and external filter. Ifthey exhibit damages or abnormal deformations,proceed to the replacement.Check that the sleeve connecting the secondaryair to the head exhibits no cracks ordeformations. Replace them, if necessary. Checkthat the metal duct is free from cracks.For re-assembly, perform the operations forremoval in the reverse order respecting theorientation of the rubber sleeve connecting theSAS valve to the exhaust system.76
8 TroubleshootingThis section provides troubleshooting guidance. All faults are provided with a list of possiblecauses and remedies.8.1 Engine8.1.1 Poor PerformanceSymptom Possible Cause OperationPoorperformanceCarburetor dirty. Fuel pump orone-way valve faultyTiming failure or timing systemparts wornExhaust blockedAir filter clogged or dirtyAutomatic choke failureClutch slippingRemove, wash with solvent and drywith compressed air, or replaceReset timing phase or replace anyworn partsReplaceRemove the sponge, wash it in waterand shampoo, and then soak it in a50% mixture of fuel and oil(recommended: Selenia Air FilterOil). Squeeze the sponge withouttwisting, allow it to drip and thenreplace itCheck the mechanical sliding and theelectrical connection and ensure thatpower is supplied. Replace ifnecessaryCheck and if necessary replace theclutch assembly and/or the clutchdrum housingAutomatic transmission faulty Check correct pulley sliding androllers. Replace any faultycomponents and lubricate themovable driven pulley guide withMontblanc Molybdenum GreaseWorn driving beltLow compression: piston rings,cylinder, valves and valve seatswornEngine oil level exceeding MAXmarkReplaceReplace any worn partsFind out the cause and adjust the oillevel77
8.1.2 Rear Wheel Spins at IdleSymptom Possible Cause OperationRear wheel spinsat idleIdle speed too highFaulty clutchAdjust the engine idle speed and, ifnecessary, the CO concentrationCheck clutch springs/weights8.1.3 Rich MixtureSymptom Possible Cause OperationRich mixtureCalibrated air holes oncarburetor clogged orobstructedFloat valve faultyLevel in float bowl too highAutomatic choke remainsactivatedAir filter clogged or dirtyRemove, wash in solvent and drywith compressed air.Check the proper sliding of the floatand the operation of the valve.Restore the level in the float chamberby bending the fuel inlet needlethrust blade on the float so that thefloat is parallel to the chambersurface when the carburetor is in anupside-down position.Check the correct sliding of themechanical component and theelectrical connection and ensure thatpower is supplied. If necessaryreplace.Remove the sponge, wash it in waterand shampoo, and then soak it in a50% mixture of fuel and oil(recommended: Selenia Air FilterOil). Squeeze the sponge withouttwisting, allow it to drip and thenreplace it.78
8.1.4 Weak MixtureSymptom Possible Cause OperationWeak mixtureCarburetor jets cloggedFloat valve faultyLevel in float bowl too lowTank breather cloggedFeed pipes choked or throttleIntake manifold cracked orclamps poorly tightenedRemove, wash in solvent and drywith compressed air.Check the proper sliding of the floatand the operation of the valve.Restore the level in the float bowlbending the fuel inlet needle thrustblade on the float so that the float isparallel to the chamber surface whenthe carburetor is in an up-side downposition.Restore proper tank aeration.Restore proper fuel flow.Replace the intake connection andcheck for any abnormal air leakage.8.1.5 Low CompressionSymptom Possible Cause OperationIncorrect valve adjustmentAdjust valve clearanceLowcompressionValves overheatedValve seat deformed/wornCylinder worn; piston ringsworn or brokenRemove the cylinder head and thevalves, then grind or replace thevalvesReplace the head assemblyReplace cylinder-piston assembly orpiston rings79
8.1.6 Starting ProblemsSymptom Possible Cause OperationStartingproblemsFlat batteryCarburetor dirty or fuel pumpfaultySpark plug faulty or sparkadvance incorrectAir filter clogged or dirtyAutomatic choke failureEngine floodedIncorrect valve seal or wrongvalve adjustmentStarting speed too low orstarting system and motorfaultyAltered fuel characteristicsCheck the battery charge level. If thebattery shows any sign of sulphation,replace it with a new oneRemove, wash with solvent and drywith compressed air, or replaceReplace the spark plug or check theignition circuit componentsRemove the sponge, wash it in waterand shampoo, and then soak it in a50% mixture of fuel and oil(recommended: Selenia Air FilterOil). Squeeze the sponge withouttwisting, allow it to drip and thenreplace itCheck the mechanical sliding and theelectrical connection and ensure thatpower is supplied. Replace ifnecessaryOpen the throttle wide and try tostart the engine. If the engine doesnot start, remove the spark plug, dryit and, before replacing it, crank theengine to expel the excess of fuel,keeping the cap connected to thespark plug and the latter to earth. Ifthe fuel has run out, refuel and thenstart the engineInspect the head and/or set thecorrect clearanceCheck starter motor, starting systemand torque limiterDrain worn fuel and refuel80
8.1.7 Excessive Oil Consumption/Excessive Smoke from ExhaustSymptom Possible Cause OperationExcessive oilconsumption/excessive smokefrom exhaustPiston rings worn or broken orimproperly fittedOil leaks from joints or gasketsOil retainer wornValve guides wornReplace cylinder-piston assembly orpiston ringsCheck and replace the gaskets orrestore the joint sealReplace valve oil retainerCheck and, if necessary, replace thehead assembly8.1.8 Insufficient Lubrication PressureSymptom Possible Cause OperationInsufficientlubricationpressureOil level too lowOil filter excessively dirtyOil pump play excessiveBy-pass re mains open.Restore to the required level bytopping up with fresh oil(recommended oil: Selenia HIScooter 4 Tech)Replace the cartridge filterPerform dimensional checks on the oilpump componentsCheck the by-pass and replace ifrequired. Carefully clean the by-passarea81
8.1.9 Engine Tends to Cut Out at Full ThrottleSymptom Possible Cause OperationEngine tends tocut out at fullthrottleMain jet dirty; lean carburetionWater in carburetorFloat level incorrectFuel supply circuit faultyWash the jet in solvent and dry withcompressed airEmpty the float chamber by using thedrain screwRestore the level in the float chamberby bending the fuel inlet needlethrust blade on the float so that thefloat is parallel to the chambersurface when the carburetor is in anup-side down positionCheck and, if necessary, replace thefuel pump. Check the vacuum intakeand the duct seal8.1.10 Engine Tends to Stop at IdleSymptom Possible Cause OperationIdling jet dirty Wash in solvent and dry withcompressed airEngine tends tostop at idleChoke device remains activatedSpark plug faulty or sparkadvance incorrectCompression end pressure toolowIdle adjustment incorrectCut-off device faultyIncorrect timingCheck: electrical connections, circuitcontinuity, mechanical sliding andpower supply; replace if requiredReplace the spark plug or check theignition circuit componentsCheck thermal unit seals and replaceworn componentsAdjust using a rev counterCheck the operation of the valve,membrane and spring; check if theair adjusters and the sponge filter arecleanRestore correct timing and checktiming system components82
8.1.11 Excessive Fuel ConsumptionSymptom Possible Cause OperationExcessive fuelconsumptionAir filter clogged or dirtyAutomatic choke device faultyFuel pump faultyJets looseFloat levelRemove the sponge, wash it in waterand shampoo, and then soak it in a50% mixture of fuel and oil(recommended: Selenia Air FilterOil). Squeeze the sponge withouttwisting, allow it to drip and thenreplace it.Check electrical connections, circuitcontinuity, mechanical sliding, andpower supplyCheck vacuum duct sealCheck that the main and idling jetsare securely seatedRestore the level in the float chamberby bending the fuel inlet needlethrust blade on the float so that thefloat is parallel to the chambersurface when the carburetor is in anup-side down position8.2 Transmission and Brakes8.2.1 Irregular Clutch Operation or GrappingSymptom Possible Cause OperationFaulty clutchCheck that the clutch weights arefree from greaseClutch irregularoperation orgrappingCheck that the contact surface of theclutch weights with the drum housingis mainly at the centre and equivalentfor the three weightsCheck that the drum housing exhibitsno abnormal wear or scratches83
8.2.2 Poor Braking PerformanceSymptom Possible Cause OperationPads or disk excessively worn;brake fluid quantity insufficientor hydraulic system faultyCheck the pads wear;MIN allowable dimension:Brake pads wear0.06 in(1.5 mm)Ensure that the brake disks are notworn, scratched or deformedCheck the brake fluid level in thepumps and, if necessary, replace thebrake fluidPoor brakingperformanceCheck that there is no air in thecircuit and bleed as necessaryCheck that the front brake calipermoves correctly along the front diskaxisBrake disk loose or distortedBrake fluid leakage from thehydraulic systemCheck the tightening of the brakedisk screws. Using a comparator andwith the wheel mounted onto thevehicle, measure the disk’s axialdeviationReplace faulty flexible connections,piston, or brake pump gaskets asnecessary8.2.3 Brakes OverheatingSymptom Possible Cause OperationDefective piston sliding Check caliper and replace anydamaged partsBrakesoverheatingBrake disk loose or distortedPump compensation holescloggedRubber gaskets swollen orsealedCheck the tightening of the brakedisk screws. Using a comparator andwith the wheel mounted onto thevehicle, measure the disk’s axialdeviationClean thoroughly and blow withcompressed airReplace gaskets84
8.3 Electrical System8.3.1 BatterySymptom Possible Cause OperationThe battery requires regular maintenance.BatteryIf the vehicle is not used for long periods (1 month or more), the batterymust be charged from time to time. Over a period of disuse of 3 months,the battery will discharge completely. When installing the battery, makesure the black ground lead is connected to the negative terminal and thered lead to the positive terminal8.3.2 Turn Signal Lights Not WorkingSymptom Possible Cause OperationTurn signallights notworkingElectronic control unit faultyWith the ignition switch set to «ON»,jumper contacts 1 (Blue-Black) and 5(Red-Blue) on the electronic controlunit connector. If turn indicators donot light up and stay lit when therelated switch is operated, replacethe regulator, otherwise check thewiring and the switch8.4 Steering Controls and Suspension8.4.1 Excessive Steering StiffnessSymptom Possible Cause OperationExcessivesteeringstiffnessIrregular tighteningCheck the tightening of the upperand lower ring nuts. If steeringrotation is still uneven, check thebearing ball rolling seats. Replace ifthe seats appear to be recessed or ifthe balls are flattened8.4.2 Excessive Steering PlaySymptom Possible Cause OperationExcessivesteering playIrregular tightening.As above85
8.4.3 Noisy SuspensionSymptom Possible Cause OperationNoisysuspensionAnomalies in the suspensionsystemIf the front suspension is noisy, checkthe operation of the front shockabsorber, the condition of the ballbearings and of the related locknuts,the rubber stops and the slidingbushesAlso check the tightening torques ofthe wheel hub, the brake caliper, thedisk and the shock absorber on thehub and steering column connections8.4.4 Suspension Oil LeakingSymptom Possible Cause OperationSuspension oilleakingFaulty sealReplace the shock absorberCheck the wear of the steering capsand adjusters86
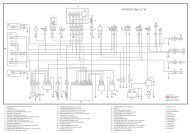
9 Electrical System1 Front left-hand side turn signal light(with 2 bulbs)2 Rear brake light switch3 Headlight switch4 Turn signal lights switch5 Horn button6 Radio-intercom fitting7 Saddle opener button8 Thermostat9 Electric fan10 Saddle opening actuator11 Voltage regulator12 Rear left-hand side turn signal light(with bulb)13 Number plate light (with bulb)14 Complete tail light (with low beambulb and 6 brake light bulbs)15 Rear right-hand side turn signal light(with bulb)16 Fuel level transmitter17 Engine earth18 Starter motor19 Oil pressure sensor20 Magneto flywheel21 Automatic choke device22 Thermostat23 H.T. coil24 Starting relay25 Fuse holder with 2 fuses87
26 Battery 12V 12Ah27 Anti-theft alarm fitting28 Immobilizer antenna29 Key switch30 Start-up button31 Horn32 Front right-hand side turn signal light(with 2 bulbs)33 Analogue instrument panel with 9bulbs, warning lights, fuel reservewarning light, oil pressure warninglight, upper beam indicator, RH turnsignal light indicator, LH turn signallight indicator, LED for immobilizer, 3bulbs for instrument illumination34 Relay switch35 Complete right or left-handasymmetric headlight with bulb forheadlight and 1 bulb for position36 Fuse holder box37 Anti-theft alarm fitting38 Electronic ignition device (CDI)39 Engine stop deviator40 L.H. lever brake light switch88
9.1 Electrical Diagrams9.1.1 Ignition Section1 Pick-up 5 Spark plug2 Flywheel magneto 6 H.T. coil3 15A Fuse (No. 7) 7 Voltage regulator4 Electronic ignition device (CDI) 8 12V-12Ah Battery89
9.1.2 Turn Signal Lights, Horn, Services and Accessory Pre-Wiring90
1 Direction indicators 12V-2W 12 Ignition switch contact23No. 4 Front turn signal light bulbs12V-5WNo. 2 Rear turn signal light bulbs12V-10W13 Ignition switch contact14 7.5A Fuse4 Horn 12V 15 Anti-theft alarm pre-wiring5 Saddle opening button 16 Radio-intercom pre-wiring6 Horn button 17 10A Fuse7 Turn signal lights switch 18 Immobilizer LED8 Saddle opening actuator 19 Battery (12V-12Ah)9 7.5A Fuse 20 15A Fuse10 7.5A Fuse 21 Immobilizer antenna11 Anti-theft alarm pre-wiring 22 Electronic ignition device (CDI)91
9.1.3 Level Indicators and Safety Switches1 Cooling fluid temperature indicator 7 Oil pressure sensor2 Fuel level indicator 8 Fuse 7.5A3 Fuel level transmitter 9 Key switch contacts4 Thermostat 10 Battery 12V-12Ah5 Fuel indicator 12V–1.2W 11 Fuse 15A6 Oil pressure indicator 12V–1.2W 12 Electronic ignition device92
9.1.4 Battery Recharge and Starting Section1 Engine stop deviator 8 No. 8 bulbs for stop light 12V–2.3W2 Key switch contacts 9 Fuse 15A3 Fuse 5A 10 Battery 12V / 12Ah4 Stop buttons 11 Electronic ignition device5 Start-up button 12 Voltage regulator6 Starter motor 13 Magneto flywheel7 Starting relay 14 Pick-up93
9.1.5 Headlight and Automatic Choke Section1 Starting relay 7 Fuse 8A2 Light switch 8 Key switch contacts3Dipped beam/upper bulb 12V-55/60W9 Automatic starter4 Upper beam indicator 12V–1.2W 10 Fuse 15A56No. 3 bulbs for instrument lighting +side/taillights indicator 12V-2WNo. 3 number plate position bulbs12V-5W11 Battery 12V-12Ah12 Electronic ignition device94
9.2 Electrical Equipment9.2.1 Electronic Ignition (Immobilizer System)The electronic ignition system is DC-fed andis equipped with an immobilizer antitheftsystem built into the electronic control unit.The ignition system consists of:- Electronic control unit (CDI)- Immobilizer antenna- Master and service key with built-intransponder- H.T. coil- Diagnostic LED1 = Un-programmed control unit2 = Programmed control unit3 = LED on4 = LED offNote: The diagnostic LED also works as a deterring blinker. This function is activated everytime the ignition switch is turned to the «OFF» position, or the emergency cut-off switch isset to «OFF». It remains activated for 48 hours in order not to affect the battery charge.When the ignition switch is turned to the «ON» position the deterring blinker function isdeactivated. Subsequently, a flash confirms the switching to the «ON» status.This duration of the flash depends on the programming of the electronic control unit prog(see figure above).If the LED is off and stays off even when theignition switch is turned to «ON», check if:- Battery voltage is present, i.e. the batteryis not flat- The fuses are in working order; main fuse15A (no. 7)If both battery and fuses are workingproperly and the deterring LED still remainsoff, diskonnect the electronic control unitconnector and follow these steps to checkthat power is supplied to the electroniccontrol unit:Rs = RedNe = Black- Ensure that the potential differencebetween terminal no. 4 (red/black) andground (see figure) is equal to the batteryvoltage95
- Check that battery voltage is presentbetween terminals no. 4 (red/black) andno. 8 (black), as shown in the figureRs = RedNe = Black- Check that battery voltage is presentbetween terminals no. 5 (green/white) andno. 8 (black) with the ignition switchturned to the «ON» position and theemergency cut-off switch set to «RUN»(see figure).If no faults are found, replace the controlunit; otherwise, check the wiring and thefollowing components:If no malfunction is found, replace the controlunit and, otherwise check the wiring and thefollowing components:- Engine stop relay switch- Emergency cut-off switchBi = WhiteVe = GreenNe = Black- Ignition switch contacts96
9.2.2 Un-Coded Electronic Ignition SystemWhen the ignition system is not coded, the engine can be run at a maximum speed of 2,000rpm. Any attempt to rev up causes the engine to misfire.To code the system, set the emergency cut-off switch to the «RUN» position and use theMASTER (brown) and SERVICE (black) keys as follows:- Insert the MASTER key; turn the ignition switch to the «ON» position for approximately 2seconds (strictly between 1 and 3 seconds) and then turn it back to the «OFF» position- Insert all the SERVICE keys available in succession, each time turning the ignition switchto «ON» for 2 seconds- Insert the MASTER key again and turn it to «ON» for 2 secondsNote: The time needed to change keys must not exceed 10 seconds.Note: A maximum of three SERVICE keys can be programmed within the same codingsession.It is essential to observe the sequence and time limits as described above. If at any timeduring the programming session these are not observed, the procedure will have to berestarted from the beginning.Once the control unit has been coded, an unbreakable relation is created between thecontrol unit and the MASTER key transponder.This relation allows new SERVICE keys to becoded in case of loss, replacement, etc. Eachnew storing operation cancels the previousone.Should the SERVICE keys lose the data storedin them it is essential to carefully check theshielding of the high-voltage system:Standard resistance:Shielded cap~5 kOThe use of resistive spark plugs isrecommended (see figure).97
9.2.3 Diagnostic CodesAfter the flash that denotes the switching to the «ON» status, the system may output anumber of malfunction codes.The LED stays initially off for 2 seconds, and then the diagnostic codes are displayed in theform of 0.5-second flashes.Once the malfunction code has been displayed, the LED turns on to indicate that ignition isimpossible (see graph below).2-Flash codeExample – electronic control unit programmed,transponder absent and/or antennamalfunctioning.Ignition disabled – Vehicle immobilized3-Flash codeExample - electronic control unit programmed,aerial in working conditions andtransponder code unknown.Ignition disabled – Vehicle immobilized1 = LED on2 = LED off3 = LED remains lit9.2.4 2-Flash Diagnostic CodeIf the 2-flash diagnostic code is displayed, check if the malfunction persists when the key(including the MASTER key) is changed. If the anomaly persists with any key, detach thecontrol unit aerial connector and check the continuity of the antenna by using therecommended multimeter 020331Y.Standard resistance:Immobilizer antenna~ 7-9 OIf the value is not as specified, replace the antenna.If no anomaly is found, replace the control unit.Warning – Before performing the storing procedure on the new control unit, check that nomalfunction code is signaled. This is precaution is needed to avoid wasting a new controlunit.98
9.2.5 3-Flash Diagnostic CodeIf the 3-flash diagnostic code is displayed, check if the anomaly persists even after insertingthe MASTER key into the ignition switch.If the malfunction disappears when the MASTER key is used, proceed to a new coding of theSERVICE (black) keys.If the anomaly persists, then the MASTER key and the control unit are not matched. In thatcase, replace the control unit and proceed to code the keys.The immobilizer system is in working order when, after turning the ignition switch to «ON»,a single 0.7-second flash is emitted (see graph below).In that case, ignition is possible.Example – electronic control unitprogrammed, transponder present keyprogrammed and aerial in working order.Ignition enabled(standard operating conditions)1 = LED on2 = LED off3 = No flashing4 = LED remains off9.2.6 Ignition SystemOnce the immobilizer system has been enabled, it is possible to obtain a spark at the plugthrough the H.T. coil and the signals coming from the pick-up.The basic power supply is represented by the battery. The system is calibrated in such away that any voltage drops in the battery are detected by the starting system and istherefore virtually harmless to the ignition system.The pick-up is connected to the control unit by a single wire. As a result, the pick-up groundis connected to the control unit through the frame and the earth wire from the engine.To avoid hampering the ignition system during the starting process, it is important that theengine/frame ground connection is as efficient as possible.99
9.2.7 Spark Plug Power Supply FailureIf no power is supplier to the spark plug and theLED signals that ignition is possible, follow thesesteps:- Run a pick-up check: detach the control unitconnector and check continuity betweenterminals no. 2 (green) and no. 8 (black). Thischeck involves the pick up and its supply:Standard resistance:Pick-Up105-124 OVe = Green, Ne = BlackIf the circuit is interrupted, repeat the check between the flywheel connector and the engineground (see engine manual). If the measured values are not as specified, replace the pickup,otherwise repair the wiring.If, on the other hand, the values are as specified, try replacing the control unit (withoutprogramming it) and ensure that the problem has been solved by checking that a spark isproduced at the plug, then proceed to program the control unit.H.T. coil primary circuit checkDetach the control unit connector and checkcontinuity between terminals no. 3 and no. 8 (seefigure).Standard resistance:H.T. coil secondary circuit0.4-0.5OIf the resistance is not as specified, repeat the checkdirectly on the positive and negative terminals of theH.T. coil primary circuit.If the measured resistance is as specified, proceed byrepairing the wiring or restoring the connections,otherwise replace the H.T. coil.Vi = PurpleNe = BlackH.T. coil secondary circuit checkDisconnect the spark plug cap from the H.T. cableand measure the resistance between the end of theH.T. cable and the negative terminal of the H.T. coil(see figure).Standard resistance:H.T. coil secondary circuit~3,000±300 OIf the measured values are not as specified, replacethe H.T. coil. To obtain a more accurate diagnosisproceed to verify the peak voltage using themultimeter adaptor.1 = Black cap2 = Green capSpecific equipment and tools:Multimeter adaptor020409Y100
Pick-UpDetach the control unit connector and connect thepositive terminal to connector no. 2 and the negativeterminal to connector no. 8 (see figure).Crank the engine by operating the starter motor andmeasure the voltage produced by the pick-up.Standard voltage:Pick-up >2VIf the voltage is not as specified, replace the pick-up.Ve = GreenNe = BlackNote: The output is in DC; hence the multimetermust be set on DC in order to carry out themeasurements.H.T. coilWith control unit and H.T. coil normally connected,measure the voltage of the coil primary circuit duringthe starting test using the peak voltage adaptor andconnecting the positive terminal to earth and thenegative terminal to the coil positive connectorStandard voltage:H.T. coil >100VIf the voltage is not as specified, replace the controlunit.Vi = PurpleNe = BlackNote: The positive terminal of the H.T. coil primarycircuit is black, while the negative terminal is green.9.2.8 Battery Charging SystemThe battery recharge system consists of a three-phase generator and a permanent-magnetflywheel. The generator is directly connected to the voltage regulator. The latter is in turndirectly connected to earth and to the battery positive terminal via the 15A protection fuse.The system is therefore not connected to the ignition switch. The system allowsconsiderable recharging power, and at low rpm offers a good compromise between suppliedpower and idle speed stability. For this reason, it is essential that the slow running speed isadjusted as specified.101
9.2.9 Checking the Voltage RegulatorWith a fully charged battery and all lights off,measure the voltage at the battery terminals (seefigure) with the engine running at high speed.Standard voltage:Voltage regulator
9.2.11 Checking the RegulatorConnect the induction nippers of an ammeter to thepositive cable of the voltage regulator. Measure thebattery voltage and, after turning the lights onwithout starting the engine, wait until voltage readingsettles at about 12V. Start the engine and measurethe current supplied by the system with the lights onand the engine running at high speed.If the supplied current is less than 10A, repeat thetest using a new regulator and/or stator.Rs = Red, Ne = Black9.2.12 Checking the Automatic Choke SectionFor information on how to carry out the functionaland resistive check of the component, refer theengine section of this manual. Regarding theautomatic choke device power supply, keep thesystem connector attached and check that batteryvoltage is present between the two terminals, whilethe engine is running (see figure).If there is no voltage, connect the multimeternegative terminal to ground and the positive terminalto the orange wire on the automatic choke devic e.With the ignition switch turned onto the «ON»position, check for the presence of battery voltage. Ifno voltage is detected, check the wiring connectedwith the ignition switch and the two fuses 15A (no.8).If voltage is present, repeat the check from theignition control unit connector.103
After disconnecting the choke device, start the engineand keep it idling. Check for the presence of voltageby connecting the multimeter positive terminal to theterminal no. 5 (light blue) and its negative terminal toterminal no. 7 (white/black) (see figure).If no voltage is detected, replace the control unitafter verifying the integrity of the fuses, otherwisecheck the wiring between the choke and theelectronic control unit, and if necessary proceed byreplacing the choke device.Bi/Ne = White/BlackAz = Light blue9.2.13 Turn Signal Lights Fail to OperateIf the turn signal lights fail to operate, proceed asfollows:- Detach the control unit connector and check forpotential difference at terminal no. 4 (red/black)with respect to ground (p.d. must be equal tobattery voltage).- Check that the same p.d. (battery voltage) ispresent between terminals no. 4 and no. 8 (black).- Repeat the same check between terminals no. 5(light blue) and no. 8 (black) with the ignitionswitch turned to the «ON» position, and theemergency cut -off switch in the «RUN» position.Rs/Ne = Red/BlackNe = BlackIf no voltage is detected, check the wiring, theconnections and the integrity of the main 15A fuse;otherwise proceed as follows:- Jumper terminals no. 1 (black/blue) and no. 4(red/black) as shown in the figure. Acting on theturn signal switch, ensure that the turn signallights come on- If so, the control the control unit is defective andmust be replaced. Otherwise check the wiringbetween the control unit and the turn signalswitch, and then repeat the testNe/Bl = Black/BlueRs/Ne = Red/Black- If the wiring is intact and the turn signal lights stillfail to operate correctly, replace the turn signalswitch.104
9.2.14 FusesThe electrical equipment is protected by:1. Six fuses (marked as «A» in the picture on theright) located inside the glove-box, on the lefthand-side2. One 15A fuse («B» in the picture below) placedunderneath the helmet compartment bucketWarning - Before replacing a blown fuse, alwaystrace and eliminate the fault that caused the blowing.Never try to replace a fuse using different material(e.g. a piece of electric wire) or a fuse having greateramperage than prescribed.The following table shows the positions andspecifications of the fuses installed on the vehicle.Fuse no. Amperage Protected circuits1 5ATaillight bulb, number plate bulb, instrument lighting andinstrument light indicator.2 5A Brake-light bulb, starting relay switch inhibitor3 7.5ARadio-intercom pre-wiring, antitheft alarm pre-wiring,cooling liquid temperature indicator, fuel reserve indicator,oil pressure warning light and fuel reserve warning light4 7.5A Horn5 7.5A6 10ARadio-intercom pre-wiring, antitheft alarm pre-wiring,diagnostic LEDElectric saddle opener, headlight (high/low beam), fullheadlight indication light7 15A General105
9.2.15 Instrument PanelA = Digital clock with calendarB = Coolant temperatureC = RH direction indicator switchD = Fuel level indicatorE = Light indicatorF = Upper beam indicatorG = Low oil pressure indicatorH = Fuel reserve indicatorI = SpeedometerL = OdometerM = Left turn signal indicatorN = Immobilizer LED‘A’ connector1- Fuel level indicator signal2- Upper beam indicator3- Oil indicator4- Power supply (+)‘B’ connector1- Ground (-)2- LH turn signal indicator3- RH turn signal indicator4- Temperature signal5- Reserve light6- Lighting106
9.2.16 Battery9.2.16.1 Preparing the Battery- Remove the cap from the bleeder, shown in thefigure, and then carefully pour sulphuric acid intoeach element.Note: the acid must have a density of 78.7lbs·ft - 3 (1,260 kg·m - 3 ), equivalent to 30 BE at aminimum temperature of 59°F (15°C) until theupper level is reached.- Let the battery rest at least 2 hours, and thenrestore the level by pouring additional sulphuricacid as required.- Recharge the battery using the recommendedbattery charger 020333Y (single) or 020334Y(multiple) at an intensity of about 1/10 of thebattery’s nominal capacity and until the aciddensity is about 79.3 lbs·ft - 3 (1,270 kg·m - 3 ),corresponding to 31 BE and such values becomesteady.- After charging, level the acid (adding distilledwater). Close and clean carefully.- After performing the above operations, installthe battery on the vehicle following the stepsdescribed in “Battery recharge” section of thismanual.9.2.16.2 Checking the Electrolyte LevelThe electrolyte level must be checked frequently and must reach the upper mark. If thelevel is too low, it can be restored only by using distilled water. If water toppings arerequired too often, check the vehicle electrical system as this inconvenient is usually asymptom that the battery is working over-charged and is subject to quick wear.9.2.16.3 Checking the Electrolyte DensityAfter restoring the electrolyte level, check its density by using the density gauge.When the battery is charged, density should be equal to 30÷32 BE, corresponding to aspecific weight of 78.7-79.9 lbs·ft - 3 (12.4-12.6 kN·m - 3 ) at a minimum temperature of 59°F(15° C).If density is below 20 BE, the battery is fully discharged and it is therefore necessary torecharge it.If the vehicle is not used for a certain period (1 month or more), the battery must be107
periodically recharged. Within a period of inactivity of approximately tree months, atstandard atmospheric conditions, the battery should be completely discharged. Whenreinstalling the battery on the vehicle, pay attention not to invert the connections,considering that the ground wire (black and marked with a (-) sign) must be connected tothe negative terminal, whereas the two red wires, marked as (+), must be connected to thepositive terminal.9.2.16.4 Checking the Battery Charge LevelWarning – Before recharging the battery, remove the plugs from each element. Keepsparks and free flames away from the battery while recharging.Remove the battery from the vehicle by disconnecting the negative terminal first.Normal bench charging must be performed using the recommended battery charger020333Y (single) or 020334Y (multiple), setting the battery charge selector to the type ofbattery that requires recharging (i.e., at a current equal to 1/10 of the battery normalcapacity). Connections to the power supply source must be implemented by connecting thecorresponding poles (+ to + and - to -).9.2.16.5 Cleaning the BatteryKeep the battery clean, especially the top; coat the terminals with Vaseline.Warning – Never use fuses having a greater capacity than the recommended value. Theuse of a fuse of unsuitable capacity may result in serious damages to the whole vehicle oreven culminate in a fire.Warning – Drinking water contains mineral salts that can be extremely harmful to thebattery: only use distilled water.Warning – To ensure maximum performance the battery must be charged before using thevehicle. Insufficient battery charge or low electrolyte level, when first used, will result inpremature battery failure.9.2.16.6 Installing the Battery- Remove the battery cover by removing the fourscrews securing the central cover to the footrest,as shown in the picture.108
- Remove the battery fixing clamp.- Use the hole shown in the figure to insert thebattery bleed tube- Place the battery onto the tray as shown in thefigure, so to attach the wires to the terminals.Note: In order to correctly connect the wires to thebattery terminals, pay attention when placing thebattery onto the tray and ensure that there are nointerferences between the wires and the frame (dueto a possible misplacement of the battery) sincethese might seriously affect the wiring integrity(see sketch).109
- With the aid of a screwdriver fix the wires to thebattery terminals placing the supplied beveledwasher between the screw head and the wireterminal.Note: Do not use a wrench to tighten the screws.- Once the wires are securely fastened, proceed bycorrectly placing the battery onto the tray.- Replace the battery fixing clamp.- Replace the battery cover.110
10 Engine10.1 Disassembling the Engine from the FrameCaution – The following operations must beperformed with the engine cold.- Disconnect the battery.- Remove the helmet compartment.- Remove the side fairings.- Disassemble the silencer.- Release the three screws fixing the air filter tothe crankcase.- Remove the clip from the blow-by pipe- Disconnect the carburetor bellows. Then removethe air filter.111
- Remove the air intake bellows to thetransmission compartment by releasing the twoscrews shown in the figure and removing theplastic clip.- Remove the cooling fluid inlet piping from thepump as shown in the figure.- Remove the fuel tap vac uum pipe from the «T»union shown in the figure.- Remove the fuel feeding pipe from thecarburetor.112
- Remove the cooling fluid outlet piping from theengine.- Also remove the bleeding piping shown in thefigure.- Remove the spark plug cap.- Remove the cooling fluid temperature sensorconnector shown in the figure.- Remove the gas control cable from thecarburetor by releasing the nut shown in thefigure.113
- Remove the automatic connector from thesystem located inside the protective sheathshown in the figure.- Remove the positive and negative wirings fromthe starter motor as shown in the figure.- Remove the flywheel wiring connector shown inthe figure.- Remove the cable from the flywheel cover retainclip.114
- Remove the rear shock absorbers.- Remove the hydraulic piping from the rear brakecaliper by loosening the screw shown in thefigure. Then, remove the pipe attachments tothe engine crankcase shown in the figure.- Suitably support the vehicle by the jack. Removethe engine–swing arm assembly by loosening thenut and the pin head shown in the figure.- The engine can now be removed.115
10.2 Removing the Silencer- Loosen the two fasteners of the exhaustmanifold from the head.- Loosen the 3 screws fixing the silencer to thesupporting arm.- Remove the complete silencer.10.3 Refitting the Engine onto the Frame- Perform the operations for removal in the reverse order according to the tighteningtorques indicated in Chapter "Characteristics".Warning – Be very careful in ensuring that the throttle cable is in the proper position.- Check that with valve in abutment against the register there is a small clearance.- Check the engine oil level and top up using the recommended brand, if required.- Fill the cooling circuit.- Check that accelerator and electric devices are in good working order.116
10.4 Removing the Rocker Cover- Remove the five rocker cover screws and thepipe shown in the figure, after removing therelative strip; remove the tappet cover withdecanter and automatic valve.- Remove the sealing gasket.- Check that the unidirectional valve is in goodworking order.10.5 Refitting the Rocker CoverPerform the operations for removal in the reverseorder and tighten the five screws at the propertorque.Note: Install a new O-ring gasket on the tappetcover.Tightening torque:Rocker cover screws8.1-9.6 lbs·ft(11-13 N·m)10.6 Checking the Compression- Remove the spark plug cap with cold engine.- Remove the ignition spark plug.- Fit a compression test gauge into the spark plug seat using a 10mm spark plug joint andtighten to the prescribed torque.- Let the engine run by the starter and with the carburetor in fully open position as long asthe gauge value is steady. If pressure is higher than 9 bar, remove the tool and proceedin the reverse order of removal.If the pressure is below the indicated values, check the engine test speed; if the enginespeed is less than 450 rpm, check the starting system; if the value is within the prescribedlimits or slightly higher, check the timing. If no faults are detected:- Ensure that the cylinder base gasket was properly selected.- Check the sealing on the cylinder-piston assembly (piston rings-valves).Tightening torque:Spark plug8.8-10.3 lbs·ft (12-14 N·m)117
10.7 Transmission10.7.1 Removing the Transmission CoverNote: To remove the transmission cover it isnecessary to remove the plastic cover first, using ascrewdriver on the special guides. Using the clutchdrum lock wrench shown in the figure, remove thedriven pulley axle locking nut and washer.Specific equipment and tools:Driven pulley locking wrench020423Y- Remove engine oil dipstick.- Remove the 10 screws from the transmissioncover.- Remove the transmission cover.Note: If this operation is performed withoutdismantling the engine from the vehicle, it isnecessary to remove the transmission cooling airsleeve first.10.7.2 Removing the Fan Case- Remove the 5 screws shown in the figure.118
10.7.3 Removing the Transmission Cooling Intake- To remove the transmission cover intake, it issufficient to remove the 2 screws indicated in thefigure.10.7.4 Removing the Driven Pulley Shaft Bearing- Remove the snap ring from the inside of thetransmission cover.- Remove the bearing from the case, using therecommended tools listed below.Specific equipment and tools:HandleAdapter (28×30mm)15mm Guide020376Y020375Y020412Y10.7.5 Fitting the Driven Pulley Shaft Bearing- Heat the inside of the transmission cover inorder to prevent the paint on the outer surface.- Install the bearing onto its seat.- Replace the snap ring.Specific equipment and tools:HandleAdapter (32×35mm)15mm Guide020376Y020357Y020412YWarning – Ensure to use an appropriate rest surface to avoid damaging the transmissioncover.Warning – Always replace the bearing when reassembling the component.119
10.7.6 Removing the Belt Support Roller- Check that the roller is free from wear and thatit rotates freely.- Remove the special fastening screw and theroller, complete with bearing.- Remove the elastic ring and eject the bearingusing the following tools.Specific equipment and tools:Handle25mm Guide020376Y020364Y10.7.7 Refitting the Belt Support Roller- Heat the roller and install the bearing using thefollowing tools.Specific equipment and tools:Heat gunHeat gun supportHandleAdapter (32×35mm)10mm Guide020151Y020364Y020376Y020357Y020455Y- Reposition the roller using the specific screw.- Tighten at the prescribed torque.Tightening torque:Anti-flapping roller8.1-9.6 lbs·ft(11-13 N·m)- Replace the intake with the O-ring, pan sealinggasket and fan case.120
10.7.8 Removing the Driving Pulley- With the pulley stop wrench correctly insertedinto the apposite slits, remove the lock nut.Note: The nut has an ‘in-built’ spring washer.Specific equipment and tools:Driving pulley stop wrench020442Y- Remove the starting rim assembly.- Remove the driving fixed half-pulley, togetherwith the O-ring and the steel washer on thebushing.- Remove the belt and extract the moving halfpulleywith the relevant bushingNote: The rollers are freely placed onto the slidesinside the pulley. Ensure that they don’t fall whenthe pulley is being removed.- Remove the roller contrast plate with therelevant guide sliding blocks10.7.9 Removing the Driven Pulley- Remove the spacer, the clutch drum and theentire driven pulley assembly.Note: This operation may be performed withoutremoving the driving pulley assembly.121
10.7.10 Inspecting the Clutch Drum- Check that the clutch drum is not worn ordamaged.- Measure the internal diameter, as shown in thefigure.Standard dimension:Clutch drumMax. allowable dimension:Clutch drumØ 5.283 in(134.2 mm)Ø 5.295 in(134.5 mm)10.7.11 Checking the Clutch Drum Surface Eccentricity- Install the drum on a driven pulley shaft usingtwo bearings (internal diameter 15 and 17mm).- Use the original spacer nut to lock thedrum/shaft assembly.- Place the drum/shaft assembly on the support(020074Y) to check the driving shaft alignment.- Using a feeler pin comparator and the magneticbase, measure the drum eccentricity.- Repeat the measurement on three surfaces(central, internal and external).122
10.7.12 Removing the Clutch- Prepare the driven pulley spring compressor(020444Y) with the medium length pins inposition «C» tightened on the inside of the tool.- Introduce the adapter ring no. 11 with thechamfering facing the inside of the tool.- Install the driven pulley assembly onto the toolinserting the three pins into the ventilation holeson the mass holding support.- Make sure that the clutch is perfectly insertedinto the adapter ring before proceeding torelease and tighten the clutch nut.- Using the specific 46×55mm wrench remove theclutch fixing nut.- Separate the components of the driven pulley(clutch and spring with plastic rest).Specific equipment and tools:Driven pulley spring compressorWrench (46×55mm)Adapter ring020444Y020444Y009020444Y011Caution – The toll must be tightly fixed in the viceand the central screw must be moved in abutmentwith the tool. An excessive torque may deform thespecific tool.10.7.13 Disassembling the Fixed Driven Half-Pulley Bearings- Check for any noise and/or signs of wear. If thebearings are worn or noisy, replace them.- Remove the retaining ring using two flatscrewdrivers.- Use a suitable wooden surface to support thebushing from the threaded side.- Using a pin and a mallet, remove the bearing, asshown in the figure.123
- Rotate the pulley assembly up-side-down, asshown in the figure, and ensure the pulley issuitably supported.- Remove the roller bearing using the modularpunch.Specific equipment and tools:HandleAdapter (24mm)Guide (20mm)Bell (no. 35)020376Y020456Y020363Y001467Y03510.7.14 Checking the Fixed Driven Half-Pulley- Measure the external diameter of the bushing;see figure.Standard dimension:Bushing diameterMin. allowable dimension:Bushing diameter∅ 1.598 in(40.985mm)∅ 1.597 in(40.960mm)- Ensure that the working surface (in contact withthe belt) is free from abnormal wear.- Check the riveting.- Check the planarity of the working surface.Wear limit:Fixed Driven pulley planarity0.0012 in(0.03mm)124
10.7.15 Checking the Moving Driven Half-Pulley- Remove the two inner sealing rings and the twoO-rings.- Measure the internal diameter of the bushing, asshown in the figure.Standard dimension:Bushing diameterMin. allowable dimension:Bushing diameter∅ 1.599-1.600 in(41.000-41.035mm)∅ 1.602 in(41.080mm)- Ensure that the working surface (in contact withthe belt) is free from abnormal wear.- Check the riveting.- Check the planarity of the working surface.Wear limit:Fixed Driven pulley planarity0.0012 in(0.03mm)10.7.16 Fitting the Fixed Driven Half-Pulley Bearings- Ensure the pulley bushing is suitably supportedfrom the threaded side on a wooden surface.- Install the new roller casing as shown in thefigure, ensuring that the inscription is facingoutwards.Specific equipment and tools:Punch for roller casing020424Y125
- To install the new ball bearing, proceed asshown in the figure using the modular punch.Note: Install the bearingSpecific equipment and tools:Handle020376Y1.1×1.2 in. (28×30mm) adapter 020375Y10.7.17 Refitting the Driven PulleyNote: Before proceeding with the assembly ensurethe working surface is in good conditions, andshows no signs of abnormal or wear, as describedin the previous section.- Insert the new oil seals and O-rings on themoving half-pulley.- Carefully grease the O-ring (marked as «A» inthe figure).- Install the half-pulley on the bushing using thespecific tool.Specific equipment and tools:Protective sheath020263Y- Ensure that the pins and the collar are not wornand then refit them, using the apposite slits.126
- Using a curved-spout grease dispenser, lubricatethe driven pulley assembly with approximately¼ oz. (7 g) of TUTELA MRM2 grease. Applygrease to one of the holes in the bushing until itcomes out through the hole on the opposite side.Note: This operation is necessary to avoid thepresence of grease beyond the O-rings.Recommended grease:TUTELA MRM2Note: The lubrication of the servo-system can be carried either with the bearings installed orduring their replacement. It may be easier to proceed with the lubrication during overhaul.10.7.18 Checking the Moving Driven Half-Pulley Spring- Measure the length of the moving driven halfpulleyspring, as shown in the figure.Note: The spring must be unloaded.Standard dimension:Spring lengthMin. allowable dimension:Spring length4.84 in(123mm)4.65 in(118mm)10.7.19 Checking the Drive Belt- Ensure the drive belt shows no external signs ofdamage, i.e. no cracks.- Measure the belt width as shown in the figure.Standard dimension:Belt widthMin. allowable dimension:Belt width0.8071±0.0078 in(20.50±0.20 mm)0.7600 in(19.5 mm)127
Note: During the wear check (to be performedaccording to the maintenance table shown at pp.57-58 of this manual), it is necessary to thoroughlycheck the bottom of the tooth groove for cracks(see example «A» shown in figure). If cracks aredetected the belt must be replaced. Also ensurethat no deformations are present.10.7.20 Checking the Clutch Friction Material- Measure the thickness of the clutch shoes frictionmaterial.Min. allowable dimension:Clutch shoe thickness0.04 in(1 mm)Note: Ensure that the clutch shoes bear no tracesof lubricant. If they do, check the seal of the drivenpulley assembly.Note: Upon the running-in period, the clutch shoesmust have a central contact surface and must notdiffer from one another, otherwise the clutch mayslip.Warning – Do not use a tool to open the shoes asthis may affect the return spring load.10.7.21 Fitting the Clutch- Place the driven pulley onto the compressor tool,as shown in the figure, so that the control screwis in a vertical position.- Prepare the tool with the medium length pinsscrewed in position «C» on the inside.- Introduce the adapter ring no. 11 with thechamfering facing upwards.- Insert the clutch on the adapter ring.- Lubricate the end of the spring that abutsagainst the servo-system closing collar.128
Note: An excessive amount could impair the clutchfunctions.- Insert the spring with relevant plastic support incontact with the clutch.- Insert the driving belt into the pulley unitaccording to their direction of rotation.- Insert the pulley unit with the belt into the tool.- Slightly pre-load the spring.- Make sure that the clutch is perfectly inserted10.7.22 Checking the Moving Driving Half-PulleyCheck that the bearing shown in the figure is notworn and measure the internal diameter.Standard dimension:Internal bearing diameterMax. allowable dimension:Internal bearing diameter∅ 1.0140-1.0148 in(26.000-26.021 mm)∅ 1.0283 in(26.12 mm)Warning - Do not lubricate or clean the bushes.- Measure the pulley sliding bushing externaldiameter shown in the figure.Standard dimension:Bushing external diameterMin. allowable dimension:Bushing external diameterØ 1.0220-1.0228 in(25.959-25.980 mm)Ø 1.0217 in(25.950 mm)129
- Check that the rollers are not damaged or worn.Standard dimension:Roller diameterMin. allowable dimension:Roller diameterØ 0.807-0.815 in(20.5-20.7 mm)Ø 0.787 in(20.0 mm)- Check that the roller contrast plate slide blocksare not damaged.- Check the wear of the rolle r housings and of thebelt contact surfaces on both half-pulleys.- Check that the fixed driving pulley exhibits noabnormal wear on the grooved profile and on thebelt contact surface.- Check that the O-Ring is not deformed.10.7.23 Fitting the Fixed Driving Half-Pulley and Bushing Assembly- Pre-assemble the mobile half-pulley with theroller contrast plate, placing the rollers in thespecific slits with the larger matching surface incontact with the pulley according to the directionof rotation. Check that the O- Ring is notdeformed.- Check that the roller contact plate exhibits noanomalies or damages on the grooved profile.130
- Install the group with the bushing on the drivingshaft.- Install the driven pulley/clutch/belt assembly onthe engine.10.7.24 Fitting the Moving Half-Pulley Assembly- Properly reinstall the bendix into its seat, ifremoved.- Install the steel shim in contact with the bushingand the fixed driving half-pulley with the O.R. onthe external end of the ventilation blades.- Install the start-up rim assembly with torquelimiter.- Prevent the half-pulley rotation using the specificlock wrench.- Insert the torque limiter on the driving shaft soas to ensure the alignment of the referencesobtained on the start-up rim and on the fixeddriving half-pulley. If this is not possible, choosethe position where the references are closest toone another.- Failure to comply with this rule can impair thecooling fan efficiency.Warning - It is very important to install the fixeddriving half-pulley with the belt totally free toprevent a false locking of the driving half-pulley.131
Note: Always replace the nut with a new one uponany reassembly.- Turn the engine by hand to obtain a minimumtension of the belt.Tightening torque:Driving pulley screw:Specific equipment and tools:Lock wrench:55.3-61.2 lbs·ft(75-83 N·m)020368Y- The torque limiter is calibrated at 71.7 lbs·ft(100 N·m).- The lock wrench works on the starting rim.- If the torque limiter is worn, it is possible todetect the fault when locking of the nut on thedriving shaft.- The torque limiter cannot be overhauled.- In case of anomalies, replace the start-up rimwith the limiter.10.7.25 Fitting the Clutch Drum- Fit the clutch drum and the spacer.132
10.7.26 Fitting the Transmission Cover- Check that the locating dowels and the oil seal inthe sump are in place.- Fit the transmission cover and tighten the tenscrews to the specified torque- Attach the ground cable to the first screw abovethe oil sump.- Fit the oil dipstick- Fit the steel washer and the driven pulley shaftnut.- Apply Loctite Super Rapid 242E thread lockingcompound to the threads and tighten the drivenpulley shaft nut to the specified tighteningtorque, using the lock wrench specific tool.- Re-fit the plastic cover.Specific equipment and tools:Lock wrench:Tightening torques:Transmission cover screws:Driven pulley axis:020423Y8.1-9.6 lbs·ft(11-13 N·m)39.8-44.2 lbs·ft(54-60 N·m)10.7.27 Removing the Rear Hub Cover- Remove the oil drain plug and thus drain thehub.- Remove the seven flanged screws shown in thefigure.- Remove the hub cover and the related gasket.133
10.7.28 Removing the Rear Wheel Axle- Remove the wheel axle with the related gear.- Remove the reduction gear.10.7.29 Checking the Hub Casing Bearings- Check the condition of the hub casing bearings(wear, play, noise). If any anomalies are found,proceed as described below.- Remove the three 0.585 in (15mm) bearings(two on the crankcase and one on the hubcover) using the specific extractor.Specific equipment and tools:0.585 in (15mm) Pliers 001467Y013Bell001467Y009134
10.7.30 Removing the Wheel Axle Bearing from the Cover- Remove the Snap ring from the outside of thehub cover.- Support the hub cover as shown in the figure.- Remove the bearings using the specific tools.Specific equipment and tools:Column kit020489YHandle020376Y1.46 in (37mm) adapter 020477Y1.18 in (30mm) guide 020483Y- Using the specific tools, remove the oil seal asshown in the figure.Specific equipment and tools:Handle(42×47mm) adapter020376Y020359Y135
10.7.31 Removing the Driven Pulley Shaft- In order to remove the driven pulley shaft, itsbearing and oil seal, it is necessary to removethe transmission cover and the clutch assemblyas previously described.- Pull the driven pulley shaft off the bearing.- Remove the oil seal from inside the bearing andexpel it on the transmission side taking care noto damage its seat.- Remove the Snap ring shown in the figure.- Using the modular punch, remove the drivenpulley shaft bearing.Specific equipment and tools:Handle020376Y1.10×1.18 in (28×30mm) adapter 020375Y0.78 in (20mm) guide 020363Y10.7.32 Checking the Hub Cover- Ensure that the mating surface is not dented or distorted.- Check that the bearing housing shows no signs of wear or cracks.- If any defects are found, replace the hub cover.10.7.33 Fitting the Hub Casing Bearings- Heat the engine crankcase and the hub coverusing the specific hot air gun.Specific equipment and tools:Hot air gun supportHot air gun020150Y020151Y136
- Install the three 15mm bearings using thespecific tools.Specific equipment and tools:Handle020376Y(42×47mm) adapter020359Y0.585 in (15mm) guide 020412YNote: The 42mm side of adapter 020359Y mustface the bearing.Note: Before installing the bearings onto the cover, ensure that this is suitably supported bymeans of the recommended column kit.Specific equipment and tools:Column kit020489Y- Replace the driven pulley axle bearing using themodular punch as shown in the figure.Note: If the bearing is of the asymmetric ballcontainment type, place it as shown in the figure.Specific equipment and tools:Handle020376Y(42×47mm) adapter020359Y0.787 in (20mm) guide 020363Y- Replace the Snap ring.Note: To install the bearings onto the engine crankcase it is necessary to ensure that thecrankcase is supported in such a way to allow the bearings to be placed vertically.10.7.34 Fitting the Wheel Axle Bearing on the Cover- Place the hub cover on an appropriate woodensurface.- Heat the cover using the hot air gun.- Fit the wheel axle bearing onto the cover usingthe specific tools.Specific equipment and tools:Hot air gun support020150YHot air gun020151YHandle020376Y2.047×2.165 in (52×55mm) adapter 020360Y1.181 in (30mm) guide 020483Y137
- Install the Snap ring, as shown in the figure.- Install the oil seal with the sealing lip facing theinside of the hub and aligned to the edge of theseat.Specific equipment and tools:Handle020376Y2.047×2.165 in (52×55mm) adapter 020360YNote: The 2.047 in (52mm) side of adapter020360Y must face the bearing.10.7.35 Checking the Hub Shafts- Ensure that the three shafts exhibit no signs ofwear or deformation, especially at the toothedsurfaces, and at the bearing and oil sealhousings- Replace any damaged parts.138
10.7.36 Fitting the Hub Gears- Install the three shafts in the engine crankcaseas shown in the figure.10.7.37 Fitting the Hub Cover- Install a new gasket with centering dowels.- Carefully seal the vent pipe gasket using blacksilicone sealant.- Install the cover ensuring that the breather pipeis correctly positioned.- Place the three shorter screws, which aredifferent in color, and the pipe support plate inas shown in the figure.- Position the remaining four screws and thentighten all the seven screws with the prescribedtorque.Tightening torques:Hub cover screws17.6-19.9 lbs·ft(24-27 N·m)139
10.8 Flywheel10.8.1 Removing the Flywheel Cover Assembly- Remove the two clamps and sleeves shown inthe figure and then drain the cooling system.- Remove the two clamps fixing the SAS valveconnection sleeve to the drainage pipe.- Remove the two fastening screws, the secondaryair connection pipe and the relevant coppergasket.140
Note: If needed, it is possible to remove thecomplete flywheel cover by releasing the fourhexagonal-head screws shown in the figure.- Remove the two screws fixing the SAS valve tothe flywheel cover.- Remove the SAS valve, complete with thegasket- Remove the three screws fixing the SAS valvesupport to the flywheel cover as shown in thefigure.141
- Remove the SAS valve support complete with itsgasket- Remove the external filter shown in the figure.- Remove the flywheel cover with the twocentering dowels as shown in the figure.- Remove the inside filter cover shown in thefigure.142
- Remove the inside filter shown in the figure.- Check that the two internal and external sponge filters are clean and efficient.- Check that the plastic support for the secondary air box is free from cracks anddeformations.- Check the integrity of the gasket.Warning - an impaired seal between secondary air box valve and flywheel cover may causean increase of noise.- Check that the sleeve connecting the secondary air to the head exhibits no cracks ordeformations. Replace them, if necessary.- Check that the metal duct is free from cracks.10.8.2 Removing the Flywheel- Using the adjustable spanner, hold the flywheelin position; see figure.Specific tools and equipment:Adjustable wrench020565Y- Loosen and remove the lock nut.Warning – Using a different adjustable wrenchcould damage the stator coils.143
- Using the specific extractor, remove theflywheel.Specific tools and equipment:Flywheel extractor008564Y10.8.3 Removing the Stator- Removing the electric terminal of the low oilpressure switch.- Remove the two pick-up screws (indicated bytwo black arrows in the figure), the wiring clipscrew and the two stator fixing screws (whitearrows).- Remove the stator and the related wiring.10.8.4 Checking the Stator- Using a multimeter, check for continuity betweenconnections 5-3 and 5-1.- Check ground insulation on the three statorphases: 5-ground, 3-ground, 1-ground.Standard resistance:For each phase0.5-1.0 O144
10.8.5 Checking the Low Oil Pressure Switch- Using a multimeter, check for continuity betweenconnector 4 and ground (with engine off).10.8.6 Checking the Pick-Up- Check that the resistance between connection 2and ground is approximately 105-124 O at 68°F(20°C).- If the measured resistance is not as specified,replace the faulty parts.Note: Resistance values are rated formeasurements taken at, or near, the indicatedtemperature. Checks carried out with the stator atoperating temperature give higher resistances thanthe rated values.10.8.7 Checking the Flywheel- Check the integrity of the internal plastic parts of the flywheel and the Pick-Up controlplate.10.8.8 Fitting the Stator Assembly- Fit the stator and the flywheel by following theremoving procedure in the reverse order.Tighten the fastenings with the prescribedtorque.- Position the wiring as shown in the figure.Tightening torques:Stator and pick-up screws2.2-2.9 lbs·ft(3-4 N·m)Note: The pick-up wire must be placed betweenthe upper screw and the dowel bolt, as shown here.145
10.8.9 Fitting the Flywheel- Fit the flywheel taking care to correctly insertthe woodruff key.- Tighten the flywheel lock-nut with the prescribedtorque.Tightening torques:Flywheel fixing nut38.2-42.6 lbs·ft(52-58 N·m)- Check that the pick-up clearance gap rangesbetween 0.013-0.029 in (0.34-0.76mm).- No adjustment of the clearance gap is necessarywhen fitting the pick-up.- Different values are the result of deformations ofthe pick-up support.Note: A variation of the clearance gap changes theminimum supply speed if the ignition system.10.8.10 Fitting the Flywheel Cover Assembly- Position the flywheel so that the TDC referencemark is aligned with the mark on the crankcase.146
- Prepare the flywheel cover by aligning thereference marks between the drive and thecover casing.- Fit the cover on the engine. Insert the threestuds in the water pump drive.- Follow the operations for the removal in thereverse order.Warning – Take care to properly position theflywheel connector. Make sure of the presence ofthe two dowel bolts.- Replace the plastic support for the secondary airbox valve and tighten wit the prescribed torque.Tightening torques:Flywheel fixing nut2.2-2.9 lbs·ft(3-4 N·m)- Replace the secondary air box valve with itsgasket and tighten with the prescribed torque.Tightening torques:Secondary air box valve screw2.2±0.4 lbs·ft(3±0.5 N·m)- Replace the rubber sleeve and the metal pipeconnecting the SAS valve to the exhaust.- Check the correct orientation by aligning the tworeferences, on the rubber and on the plasticsupport, as shown in the figure.147
- Tighten the two SAS piping screws at theprescribed torque.Tightening torques:SAS piping screw7.4±8.8 lbs·ft(10±12 N·m)10.9 Checking the Secondary Air Box Valve- Remove the SAS valve.- Temporarily install the rubber sleeve at theoutlet of the SAS valve ensuring its seal.- Connect the mityvac vacuum pump to the rubbersleeve as shown in the figure.- Set the pump onto vacuum mode.- Open the pump slowly.- Check that the one-way valve allows thepassage of air; this should generate a smallvibration.Note: The absence of vibration indicates a poorsealing.- Switch the pump onto pressure mode.- Open the pump and check that there is anincrease in pressure. Small leaks are normal.Note: The incorrect operation of the one-way valvecan cause the overheating of the rubber sleeve andfilters.- Replace in case of faults.Specific tools and equipment:Mityvac pump020329Y148
10.9.1 Checking the One-Way Valve- Remove the SAS valve.- Connect the mityvac vacuum pump to cut-offvalve vacuum inlet as shown in the figure.- Set the pump onto vacuum mode.- Operate the pump until a vacuum pressure of0.5 bar is reached.- Check that this value is maintained does notdecrease with time.- If the value is not maintained, proceed byreplacing the component.Note: Besides impairing the functionality of thecut-off, an incorrect seal of the cut-off valvemembrane affects the engine operation at idle.- Using a «T» branch and rubber hoses,implement a parallel connection between therubber sleeve and the vacuum inlet of the cut-offvalve.- Connect the branch to the mityvac pump, asshown in the figure.- Set the pump in vacuum position.- Using pliers with flat tips clamp the rubber hosein the proximity of the valve.- Operate the pump until a vacuum pressure ofover 0.5 bar is reached.- Release the hose and check the valve response.149
- In standard operating conditions, the pressureundergoes a drop and then settles.- A slow and gradual gain of pressure, up to about0.4 bar, then occurs.- At this point, the valve opens and vacuumsuddenly resets.- A seal failure or an opening at inconsistentpressure values is not to be considered asacceptable. Replace the component.Note: A seal failure of the cut -off valve causesexhaust noises (explosions in the silencer). Awrong calibration of the cut-off valve can impairthe correct functionality of the catalytic converter.Specific tools and equipment:Mityvac pump020329Y150
10.10 Lubrication Circuit151
1 Oil vapors to the air filter 6 Oil filler2 Rocker cover 7 Oil level in sump3 Crankshaft 8 Oil pump4 Oil blow-by valve 9 Oil filter cartridge5 Low oil pressure sensor 10 Net oil filter10.10.1 Checking the Oil Pressure- After removing the flywheel cover as describedin the “Flywheel” chapter (p. 141), detach theelectrical connection of the oil low pressureswitch and remove the switch.- With the engine idling at 1,650 rpm and theengine oil at temperature of ~194°F (~90°C),check that the oil pressure is in the range 0.5-1.2 atm.- With the engine running at 6,000 rpm and theengine oil at a temperature of. ~194°F (~90°C),check that the oil pressure is in the range 3.2-4.2 atm.- After completing the check, remove the specifictools fitted to the engine, refit the low oilpressure switch, with its washer, and tighten itwith the prescribed torque. Then fit the flywheelcover.- If abnormal pressures are found, check in thefollowing order, the oil filter, the by-pass, the oilpump and the crankshaft seals.Specific tools and equipment:Oil pressure gaugePressure gauge connectionMultimeter with temperature probe020193Y020434Y020331YNote: Before carrying out the check, ensure thatthe oil is at the right level and that the oil filter is ingood condition.Min. allowable pressure:Oil pressure3.2 atm @ 6,000rpmTightening torques:(Also applies to inspection joint)8.8-10.3 lbs·ft(12-14 N·m)152
10.10.2 Removing the Oil Sump and Pressure Adjusting By-Pass Valve- Remove the oil filler cap, the transmission cover,the driving pulley assembly (with belt), and thepinio n as described in chapter “Transmission”.- Drain the oil from the sump as previouslydescribed.- Remove the seven screws shown in the figurewith the two rear brake fluid pipe clamps.- Remove the spring, the by-pass piston, thegasket and the centering dowels shown in thefigure.10.10.3 Checking the By-Pass Valve- Check the unloaded length of the spring.Standard dimension:By-pass valve spring length2.11 in(54.2 mm)- Check that the piston exhibits no signs ofsuperficial defects.- Ensure that it slides freely on the crankcase andthat it provides sufficient seal.- If not remove any dirt or replace any defectiveparts.153
10.10.4 Removing the Oil Pump- Remove the chain transmission cover and thecomplete driving pulley assembly.- Install the base of the specific tool on the oilguard, using the supplied screws.Specific equipment and tools:Transmission-side oil seal punch020662Y- Screw the threaded bar at the base of the tooland remove the oil seal.- Remove the pump control rim cover byloosening the two screws shown in the figure.- Hold the oil pump control pulley in place, andthus preventing it from rotating, by inserting ascrewdriver through one of the holes.154
- Remove the central screw with the Bellevillewasher; see figure.- Remove the chain with its pulley.- Remove the control pinion with the O-ring.- After loosening the two fastening screws, shownin the figure, remove the oil pump.- Remove the seal.Note: The chain should be suitably marked in order to ensure that the original direction ofrotations is maintained when refitted.10.10.5 Checking the Oil Pump- Remove the two screws and the oil pump cover.- Remove the inner rotor circlip.- Remove the rotors and carefully clean them withgasoline and compressed air.- Reassemble the rotor with the pump body,leaving the reference marks visible. Re-fit thesnap ring.- Using a thickness gauge check the distancebetween the rotors in the position shown in thefigure.Max. allowable clearance:Rotor clearance0.0040 in(0.12 mm)- Measure the distance between the outer rotorand the pump body; see figure.Max. allowable clearance:Rotor-body clearance0.0078 in(0.20 mm)155
- Check the rotor axial clearance using a rectifiedbar as shown in the figure.Max. allowable clearance:Rotor axial clearance0.0035 in(0.09 mm)10.10.6 Fitting the Oil Pump- Check that the pump shaft body is not worn.- Check that the pump cover exhibits no wear orsuperficial imperfections.- If any measurement does not comply with thelimits previously specified or if any part is scoredor worn, replace the part or, if necessary, theassembly.- Fit the pump cover in a position such to allowthe alignment of the holes for the screwsfastening the pump to the crankcase.- Tighten the fastening screws with specifiedtorque.Tightening torques:Oil pump-crankcase fixing screws0.51-0.66 lbs·ft(0.7-0.9 N·m)- Ensure that the gasket is correctly positionedand then fit the pump to the crankcase. Thepump can only be fitted in one position. Tightenthe screws with the prescribed torque.Tightening torques:Oil pump fastening screws3.7-4.4 lbs·ft(5-6 N·m)- Fit the pinion with a new O-ring.- Fit the chain.- Fit the pulley, the central screw, and theBelleville washer. Tighten with the prescribedtorque.Tightening torques:Central screw7.4-10.3 lbs·ft(10-14 N·m)- Fit the pump cover and tighten the two screws156
with the prescribed torque.Tightening torques:Oil pump cover screw0.5-0.6 lbs·ft(0.7-0.9 N·m)Note: Fit the Belleville washer so that its outer rimis in contact with the pulley. Ensure that the pumpcan rotate freely.10.10.7 Fitting the Chain Cover Oil Seal- Check that the chain tightening shoe is not worn.- If so, replace it or fit it the other way round to make it work on the other side.- Using the specific tools listed below, remove the oil seal.Specific tools and equipment:Handle(32×35mm) adapter020376Y020357Y- Prepare the new oil seal carefully lubricating thesealing lip.Warning – Do not lubricate the surface keyed ontothe engine crankcase.- Pre-assemble the oil seal with the specific tool,by slightly tightening the screws.- Insert the sheath onto the crankshaft.157
- Insert the tool, with the oil seal onto thecrankshaft, and make it slide until it is in contactwith the crankcase.Warning – Orientate the oil seal by positioning thechain housing channel facing downwards. When theseal is in place, do not pull it back outwards.Failure to comply with this rule can cause a wrongpositioning of the oil seal sheath.- Finally, place the oil seal installing the bracketfrom the specific tool kit- Screw the threaded bar onto the crankshaft.- Using the nut at the base of the tool, positionthe oil seal at its position.- Carefully remove all the tooling158
- Place the cover onto the engine crankcase and, by tightening the three screws (withcopper washers) with the prescribed torque, fix the cover to its seat.Tightening torques:Chain cover fixing screw2.6-3.3 lbs·ft(3.5-4.5 N·m)10.10.8 Fitting the By-Pass and the Oil Sump- Fit the by-pass piston in its seat.- Insert the adjusting spring.- Fit a new sump gasket.- Fit the two dowel bolts.- Install the sump taking care to insert the springinto the projection in the sump.- Fit the screws and the rear brake pipe clamps byfollowing the removing procedure in the reverseorder.- Tighten the screws with the prescribed torque.Tightening torques:Oil sump screws7.4-10.3 lbs·ft(10-14 N·m)- Fit the driving pulley assembly, the belt, thepinion and the transmission cover as describedin the chapter “Transmission”.- Regarding the checks relating to the lubricationof the connecting rod assembly, refer to thechapter “Crankcase and Crankshaft”.10.10.9 Removing the Intake Manifold- Remove the flywheel cover assembly.- Loosen the three screws and remove the intakemanifold.159
10.10.10 Thermostat Removal- Loosen the two screws shown in the figure andremove the thermostat cover.- Remove the thermostat and its gasket.10.10.11 Removing the Timing Chain Sprockets- Before removing the cylinder head, it isnecessary to remove all of the followingcomponents: transmission cover, driving pulley(and belt), starter Bendix, oil sump with springand blow-by piston, lower oil pump sprocketcover, O-ring on crankshaft and oil pumpsprockets-timing chain disk.- Remove the rocker cover.- Remove the central screw fastener and theautomatic valve-lifter retaining cover.- Remove the automatic valve-lifter cam, togetherwith its end-stop ring.- Loosen the central screw on the chain tensioner.- Remove the two screw fasteners shown in thefigure.160
- Remove the Allen screw, shown in the figure,and the counterweight.- Remove the timing chain sprocket andassociated washer from the camshaft.- Remove the timing chain drive sprocket fromthe camshaft.- Remove the screw fastener indicated by thearrow in the figure, the stator and the chainguide.Note: Mark the chain in order to replace it with thesame direction of rotation. The chain tensioningpad must be removed from the transmission side.The chain guide can only be removed following theremoval of the cylinder head.10.10.12 Removing the Camshaft and Rockers- Remove the two screw fasteners and thecamshaft retainer shown in the figure.161
- Remove the camshaft.- Remove the rocker pin by pushing it throughfrom the flywheel side.- Remove the rockers, together with their springwashers.Note: Mark the position of the rockers in order toprevent the reversal of the inlet and outlet rockerson reassembly.10.10.13 Removing the Cylinder Head- Remove the spark plug.- Remove the two screw fasteners on the outsideof the cylinder head, shown in the figure.- Loosen the four cylinder head securing nuts intwo or three stages, following a diagonalcrosswise sequence.- Remove the cylinder head, the two locatingdowels and the cylinder head gasket.Note: If necessary, the cylinder head can beremoved as a complete assembly, together withcamshaft, rocker pin and camshaft support.Furthermore, the cylinder head can be removedwithout completely removing the timing chain,together with the tensioner.162
10.10.14 Removing the Valves- Using the appropriate special tool, fitted with theadapter shown in the figure, remove the splitcones, the valve spring retainer caps, the valvesprings and the valves themselves.Special tools and equipment:Valve removing tool020382YAdapter 020382/11YWarning – Place the valves so as to recognizetheir original position on the head.- Remove the valve seals with the appropriatespecial tool.Special tools and equipment:Oil seals removing tool020431Y- Remove the spring seats.10.10.15 Removing the Cylinder and Piston Assembly- Remove the chain guide.- Remove the cylinder base gasket.Warning – Ensure the piston is well-supportedwhilst removing the cylinder, in order to avoiddamaging it.163
- Remove the two wrist pin spring clips, the wristpin and the piston.- Remove the piston rings.Note: Take care to avoid damaging the pistonrings whilst removing them.10.10.16 Inspecting the Small End- Measure the internal diameter of the small endusing an internal micrometer.Standard dimension:Small end diameterMax. allowable dimension:Small end diameter∅ 0.5911-0.5915 in(15.015-15.025 mm)∅ 0.5917 in(15.030 mm)Note: Whenever the small end exceeds the wearlimit, or shows signs of wear or overheating,replace the crankshaft with a new one, asdescribed in the following pages.164
10.10.17 Inspecting the Wrist Pin Diameter- Measure the external diameter of the wrist pin.Standard dimension:Wrist pin diameterMin. allowable diameter:Wrist pin diameter∅ 0.5904-0.5906 in(14.996-15.000 mm)∅ 0.5903 in(14.994 mm)- Estimate the clearance between the wrist pinand piston.Standard clearance:Piston/wrist pin0.00003-0.00025 in(0.001-0.010 mm)Note: The wrist pin housing has two lubricationchannels so, in order to get a true reading of theinternal diameter, the measurement must be takenparallel to the axis of the piston.10.10.18 Inspecting the Piston and Cylinder Diameters- Measure the outside diameter of the piston,perpendicular to the wrist pin axis.- Take this measurement 0.197 in (5 mm) fromthe base of the piston, as shown in the figure.Standard diameter:Piston diameter∅ 2.8328-2.8339 in(71.953-71.981 mm)Note: The wrist pin housing has two lubricationchannels so, in order to get a true reading of theinternal diameter, the measurement must be takenparallel to the axis of the piston.165
- Using a bore measuring instrument, measurethe cylinder bore, in different directions and atdifferent heights, as shown in the figure.- Check that there is no wear or deformation onthe surface of the cylinder that mates with thecylinder head.Max. allowable out-of-plane:Cylinder/cylinder head0.0020 in(0.050 mm)- Pistons and cylinders are classified according tothe diameter. Pistons should be matched withcylinders of the same classification (A-A, B-B,C-C, D-D).- Cylinder re-bores must be carried out respectingthe original matching angle on the bored surfaceof the cylinder.- The surface roughness of the bored surface ofthe cylinder should be 0.00004 in (0.9 m).- This is imperative to ensure proper bedding-in ofthe piston rings, and hence reduced oilconsumption and optimum performance.- 1 st , 2 nd and 3 rd over-size pistons are available asspare parts, for re-bored cylinders,corresponding to 0.2, 0.4 and 0.6 mm oversizes,respectively. There are four categories formatching oversize cylinders (A-A, B-B, C-C,D- D).10.10.19 Inspecting the Piston- Clean the piston ring grooves thoroughly.- Measure the clearance between piston rings andthe grooves using feeler gauges, as shown inthe figure.- If the clearances exceed the limits specified inthe table below, the piston should be replacedby a new one.Note: Measure the clearance by inserting thethickness gauge in the second groove.166
Top ringMiddle ringOil scraper ringStandard Clearance0.0006-0.0024 in(0.015-0.060 mm)0.0006-0.0024 in(0.015-0.060 mm)0.0006-0.0024 in(0.015-0.060 mm)Wear limit: max. clearance0.0028 in(0.070 mm)0.0028 in(0.070 mm)0.0028 in(0.070 mm)10.10.20 Checking the Piston Ring Gap- Insert each of the three piston rings in turn, in apart of the cylinder that still maintains itsoriginal diameter, making sure they are squareto the axis of the cylinder.- Measure the piston ring gap using feelergauges.- Replace piston rings exhibiting a gap exceedingthe specified limit.Note: Before replacing the piston rings alone, onthe original piston, check the piston ring to grooveclearance and the piston to cylinder clearances arewithin the specified limits. The new rings may sitdifferently that the old ones, which had bedded-in,when fitted on a used cylinder.Top ringMiddle ringOil scraper ringStandard gap0.0059-0.0118 in(0.15-0.30 mm)0.0078-0.0157 in(0.20-0.40 mm)0.0078-0.0157 in(0.20-0.40 mm)Maximum gap0.0157 in(0.040 mm)0.0197 in(0.50 mm)0.0197 in(0.50 mm)167
10.10.21 Fitting the Piston- Assemble the piston and wrist pin onto theconnecting rod, with the arrow in the pistoncrown pointing towards the exhaust port.- Insert the wrist pin spring clips, using theappropriate special three-part tool, as describedbelow. With the opening in the position shownon the tool.Specific tools and equipment:Pin retainer installer020488YNote: The letter ‘S’ stamped onto the tool standsfor left, while the letter ‘D’ stands for right.Note: The tool must be used exclusively by hand.- Place the circlip on the hollow tool, with theopening over the arrow stamped on the tool.Insert the longer of the two drifts into thehollow part of the tool and push home, to thecirclip into the correct position on the hollowtool.- Insert the shorter of the two drifts into thehollow part of the tool, offer up the couple tothe circlip groove and push the shorter drifthome, to push the circlip into its groove on thepiston.Warning – Using a mallet to fit the circlip candamage the circlip grooves.10.10.22 Choosing the Base Gasket Thickness- Fit the cylinder without the base gasket.- Fit a dial gauge to the appropriate special tool.Specific tools and equipment:Piston positioning support020428Y- Rest the dial gauge and support on a datumsurface and take an arbitrary zero reading.- Place the bracket, together with the dial gauge,on top of the cylinder, fastening it with two nutsto the studs (use a tightening torque notsuperior to 8.1 lbs·ft (11 N·m).- Rotate the crankshaft to the TDC, by actingonto the flywheel.168
- Choose the base gasket thickness according tothe difference between the two dial gaugereadings obtained, referring to the table below.Choosing the correct base gasket thickness willgive the correct compression ratio.- Remove the dial gauge and support from thecylinder.Warning – Using a mallet to fit the circlip candamage the circlip grooves.With fiber gasket (thickness 0.0433 in (1.1 mm))Measured recessGasket thickness0.0197-0.0236 in (0.5-0.6 mm) 0.0157±0.0020 in (0.4±0.05 mm)0.0236-0.0315 in (0.6-0.8 mm) 0.0236±0.0020 in (0.6±0.05 mm)0.0315-0.0354 in (0.8-0.9 mm) 0.0315±0.0020 in (0.8±0.05 mm)With metal gasket (thickness 0.0118 in (0.3 mm))Measured recessGasket thickness- 0.0118 - -0.0078 in (- 0.3 - - 0.2 mm) 0.0157±0.0020 in (0.4±0.05 mm)- 0.0078 - 0.000 in (- 0.2 - 0.0 mm) 0.0236±0.0020 in (0.6±0.05 mm)0.0000 - +0.0039 in (0.0 - +0.1 mm) 0.0315±0.0020 in (0.8±0.05 mm)169
10.10.23 Fitting the Piston Rings- Place the oil scraper ring spring on the piston.- Install the scraper ring keeping the openingopposed to the spring junction and with theword “TOP” facing upwards. In any case, thechamfering must be arranged towards thepiston.- Fit the middle piston ring with the identificationletter facing the crown of the piston. Thetapered side of the middle piston ring shouldalways be facing the crown of the piston.- The top piston ring with the word “TOP” or thereference mark facing the crown of the piston.Note: In order to improve the bedding in of therings, the surfaces on the top two piston rings areangled to give a conical section of contact.Note: Offset the piston ring gaps on the threerings by 120° to each other, and lubricate thecomponents with engine oil.10.10.24 Fitting the Cylinder- Fit the base gasket of the chosen thickness,previously determined.- Using the fork support and the piston ringretaining band. Install the cylinder as shown inthe figure.Specific tools and equipment:Piston fitting forkPiston ring retaining band020426Y020393Y170
Note: Before installing the cylinder blow out thelubrication ducts thoroughly and lubricate the boreof the cylinder with engine oil.Warning – Always use a new base gasket.10.10.25 Inspecting the Cylinder Head- Using a bar with a ground flat surface, check thesurface of the cylinder head that mates with thecylinder is not worn.Max. allowable out-of-plane:0.0020 in(0.050 mm)- Inspect the working surfaces of the camshaftand the rocker pin for signs of wear.- Inspect the flat surfaces on the cylinder headcover, the inlet manifold and the exhaustmanifold.HoleStandard diameterA0.4724-0.4731 in (12.000–12.018 mm)B0.7874-0.7882 in (20.000-20.021 mm)C1.4567-1.4577 in (37.000–37.025 mm)10.10.26 Checking the Valve Seals- Measure the width of the sealing surfaces on thevalve heads.Standard dimension:Valve sealing width (intake)Standard dimension:Valve sealing width (exhaust)Max. allowable dimension:Valve sealing width (intake)Max. allowable dimension:Valve sealing width (exhaust)0.0390 in(0.99 mm)0.0500 in(1.27 mm)0.0630 in(1.60 mm)0.0630 in(1.60 mm)171
- If the valve sealing surface is wider than theprescribed limit, interrupted in one or morepoints, or bent, replace the valve.Warning – Do not change the valve assemblyposition.10.10.27 Inspecting the Valve Seats- Clean any carbon build-up from the valveguides.- Measure the internal diameter of each valveguide.- Take the above measurement at three differentheights, according to the direction of the thrustof the valves.Standard dimension:Valve seat diameter (intake)∅ 0.1969-0.1973 in(5.000-5.012 mm)Standard dimension:Valve seat diameter (exhaust) ∅ 0.1969-0.1973 in(5.000-5.012 mm)Max. allowable dimension:Valve seat diameter (intake)Max. allowable dimension:Valve seat diameter (exhaust)∅ 0.1977 in(5.022 mm)∅ 0.1977 in(5.022 mm)- Check the width of the wear on the valve seat(indicate by “V” in the figure) does not exceed awidth of 0.063 in (1.6 mm). If the wear exceedsthis limit, replace the cylinder head with a newone.10.10.28 Inspecting the Valves- Measure the diameter of the valve stems in thethree positions indicated in the figure.Standard dimension:Valve stem diameter (intake)∅ 0.1957-0.1963 in(4.972-4.987 mm)Standard dimension:Valve stem diameter (exhaust) ∅ 0.1953-0.1959 in(4.960-4.975 mm)Min. allowable dimension:Valve stem diameter (intake)∅ 0.1953 in(4.960 mm)172
Min. allowable dimension:Valve stem diameter (exhaust)(4.960 mm)∅ 0.1949 in(4.950 mm)- Estimate the clearance between valve stem andvalve guide.Standard clearance:Valve stem-guide (intake)Standard clearance:Valve stem-guide (exhaust)Max. allowable clearance:Valve stem-guide (intake)Max. allowable clearance:Valve stem-guide (exhaust)0.0005 -0.0016 in(0.013-0.040 mm)0.0010-0.0020 in(0.025-0.052 mm)0.0024 in(0.062 mm)0.0028 in(0.072 mm)- Check the wear on the surfaces on the ends ofthe valve stems, in contact with the tappets, isnot excessive.- Measure the length of the valve.Standard dimension:Valve length (intake)Standard dimension:Valve length (exhaust)3.724 in(94.6 mm)3.717 in(94.4 mm)- If any of the sealing surface of the valve doesnot conform to the specified wear limits, or isdamaged or curved, replace the valve with anew one.1 = YES2 = NO- It is advisable to grind the valve seats, whichshould be done using a fine grade grindingpaste. During the grinding operation hold thecylinder in such a position as to keep the valveaxis horizontal. This will avoid grinding pasteresidues penetrating the seal between the valveguide and stem; see figure.Warning – In order to avoid scoring the sealingsurfaces, do not continue rotating the valve afterthe grinding paste has run out. Thoroughly cleanthe cylinder head and valves with a suitableproduct according to the grinding paste used.Note: Do not change the valve assembly position.173
10.10.29 Testing the Valve Seals- Fit each of the valves, alternatively, into thehead.- For each valve, fill the appropriate manifoldchamber with fuel and check that no petrol leaksout, whilst holding the valve shut with just theforce of a finger.10.10.30 Checking the Valve Spring Plates and Half-cones- Check that the spring upper support plates andhalf-cones are free from irregular wear.10.10.31 Fitting the Valves- Lubricate the valve guides with engine oil.- Place the valve spring seats on the cylinderhead.- Using the special drift fit the four valve seals.Specific tools and equipment:Oil seals installing punch020306Y174
- Fit the valves, the springs and the springretaining caps. Using the appropriate special tooland adapter, compress the spring and insert thesplit cones in their seats.Specific tools and equipment:Valve installation tool020382YAdapter 020382/11YNote: Do not change the valve assembly position.Fit the valves with the reference color on the halfconesside.10.10.32 Inspecting the Timing Components- Inspect the chain guide and the chain tensionerfor signs of excessive wear.- Check there is not excessive wear on the timingchain, the camshaft sprocket and the timingchain sprocket on the crankshaft.- Replace worn components, as necessary, and inthe case of wear on the timing chain orsprockets, replace all three components as agroup.- Remove the chain tensioning screw with theassociated washer and spring. Check there is nowear on the one-way valve mechanism.- Check the tensioning is in good condition.- If any of the chain tensioner components isdefective, replace the complete chain tensionerassembly with a new one.175
10.10.33 Inspecting the Camshaft- Inspect the camshaft for signs of abnormal wearon the cams.- Measure the diameter of the two bearingsurfaces (“A” and “B” in the figure) and theheight of the height of the intake and exhaustcams.Standard dimension:Diameter (A)Standard dimension:Diameter (B)Min. allowable dimension:Dimension (A)Min. allowable dimension:Diameter (B)Standard dimension:Cam height (intake)Standard dimension:Cam height (exhaust)∅ 1.4547-1.4557 in(36.950-36.975 mm)∅ 0.7858-0.7866 in(19.959-19.980 mm)∅ 1.4543 in(36.940 mm)∅ 0.7854 in(19.950 mm)1.1923in(30.285 mm)1.1500 in(29.209 mm)- Check there is no wear on the camshaftretaining plate and its associated groove on thecamshaft.Max. allowable clearance:Camshaft retaining plate0.020 in(0.42 mm)- If any of the above dimensions are outside thespecified limits, or there are signs of excessivewear, replace the defective components withnew ones.- Check there are no signs of wear on theautomatic valve-lifter cam, or the end-stop ring,or the rubber buffer on the automatic valvelifterretaining cover.- Check the automatic valve-lifter return spring isnot reformed by over-stretching.- Replace any defective or worn components.176
- Check the rocker pin for excessive wear orscoring.Standard dimension:Rocker pin diameter∅ 0.4715-0.4719 in(11.977-11.985 mm)- Measure the internal diameter of both rockers.Standard dimension:Rocker diameter∅ 0.4724-0.4729 in(12.000-12.011 mm)- Check there are no signs of wear on the camfollowers or the tappets.- Check there are no signs of wear on the springwashers that can take up the axial play betweenthe rockers. Replace any defective componentswith the new ones.10.10.34 Fitting the Cylinder Head- Fit the timing chain guide.- Insert the centering dowels between head andcylinder. Install the head gasket and then placethe head onto the cylinder.- Lubricate the stud threading.- Fit the cylinder head nut fasteners and tightenthem in a crosswise sequence, in two or threestages, to the specified tightening torque.Tightening torque:Cylinder head nuts(preliminary)4.4-5.9lbs·ft+180°(6-8 N·m+180°)- Tighten the nuts by following the sequenceshown in figure.177
- Fit the two screw fasteners on the outside of thetiming chain side of the cylinder head andtighten them to the specified tightening torque.Tightening torque:Timing side screws8.1-9.6 lbs·ft(11-13 N·m)Note: Before fitting the cylinder head, check thelubricating channels are clean, using compressedair, if necessary, to remove any residues.10.10.35 Fitting the Timing Components- Fit the lower timing chain sprocket on thecrankshaft, with the chamfer innermost.- Loop the timing chain around the sprocket onthe crankshaft.- Fit the chain tensioner guide to the cylinderhead.- Fit the spacer and the fastening screw, andtighten the screw at the prescribed torque.Tightening torque:Tensioner screw7.4-10.3 lbs·ft(10-14 N·m)- Fit the rocker pin, the exhaust rocker, the springwasher and the inlet washer.- Lubricate the rockers via the holes on top.- Lubricate the cam surfaces and insert thecamshaft in the support, making sure the camscorrespond to the rockers.- Fit the camshaft retaining plate and fit the twoscrew fasteners, shown in the figure, to thespecified torque.Tightening torque:Camshaft retaining screws3.0-4.4 lbs·ft(4-6 N·m)178
- Fit the spacer on the camshaft.- Rotate the engine so that piston is at TDC, usingthe reference marks on the flywheel and thecrankcase.- Holding the engine in this position, loop thechain over the camshaft timing chain sprocket,making sure the reference mark “4V” on thesprocket corresponds to the reference markmachined on the cylinder head.- Fit the pulley on the camshaft.- Fit the counterweight and tighten the screw tothe specified tightening torque.Tightening torque:Counterweight screw5.1-6.2 lbs·ft(7-8.5 N·m)- Fit the end-stop ring on the automatic valveliftercam and fit the automatic valve-lifter camto the camshaft.Note: Lubricate the end-stop ring with grease, inorder to avoid it from coming loose accidentallyand falling inside the engine.- Fit the automatic valve-lifter return spring, preloadingit by a 180° rotation.- Fit the automatic valve-lifter retaining dish,using the counterweight fastening screw as areference.- Tighten the screw to the specified tighteningtorque.Tightening torque:Retaining dish screw8.1-11.0 lbs·ft(11-15 N·m)- With the tensioning screw screwed right out, fitthe chain tensioner on the cylinder, using a newgasket, and tight the two screws to the specifiedtorque.Tightening torque:Tensioner screw8.1-9.6 lbs·ft(11-13 N·m)- Insert the chain tensioning screw, together withthe spring and washer, tightening it to thespecified tightening torque.179
Tightening torque:Tensioner cap3.7-4.4 lbs·ft(5-6 N·m)- Adjust the valve clearances according to theinstructions given in the previous chapters.- Fit the spark-plug.Tightening torque:Spark plug8.9-10.3 lbs·ft(12-14 N·m)Recommended spark plug:Champion RG 6YC- Fit the rocker cover gasket. The projections onthe timing chain side provide a reference for itsorientation.- Fit the head cover and tighten the five screws atthe prescribed torque. Check the proper positionof the gasket.Tightening torque:Rocker cover screw4.4-5.1 lbs·ft(6-7 N·m)- Fit the flywheel cover as already described inthe “Flywheel” chapter.- Fit the oil pump drive, the oil pump cover, theoil blow-by valve and the sump (see“Lubrication” chapter).- Fit the driving pulley, the drive belt and thetransmission cover (see “Transmission”).180
10.10.36 Fitting the Thermostat- Place the thermostat with the drainage hole inthe highest point.- Check that the rubber gasket is properlypositioned.- Install the thermostat cover with the carburetorheating connection facing the flywheel.- Tighten the two screws at the prescribed torque.Tightening torque:Thermostat screw2.1-2.8 lbs·ft(3-4 N·m)10.10.37 Fitting the Intake Manifold- Install the intake manifold and tighten the threefastening screws.181
10.11 Crankshaft10.11.1 Preparing the Engine for Crankcase Separation- Following the instructions previously described,remove the following components/assemblies:Transmission cover, driving pulley, drive belt,driven pulley, reduction gearbox cover, gearsbearings and oil seals (“Transmission” chapter).Oil sump, oil blow-by valve, oil pump and cover(“Lubrication” chapter).Flywheel cover, water pump, flywheel and stator(“Flywheel” chapter).- Remove the oil filter and the oil low pressuresender.- Remove the cylinder-head and cylinder-pistonassembly (see the previous chapter).- Remove the two screws shown in the figure andthe starter motor.- Before separating the crankcase halves, it isworthwhile to measure the end-float on thecrankshaft. Use a dial gauge and supportattached to the crankcase separating plate.Recommended tools and equipment:Crankcase detachment plateDial gauge with magnetic base020262Y020335YStandard clearance:Crankshaft0.0059-0.0157 in(0.15-0.40 mm)182
10.11.2 Separating the Crankcase Halves- Remove the eleven screw fasteners securing thecrankcase halves together.- Separate the crankcase halves, taking care toleave the crankshaft supported by one of thetwo halves.Warning – Failing to observe this rule can lead todamage of the crankshaft.- Remove the crankshaft from whichevercrankcase half it sits, following separation of thecrankcase halves.Warning – During separation of the crankcasehalves and removal of the crankshaft, take carethat the threaded ends of the crankshaft do notdamage the main bearings.Note: The crankshaft is installed with two steelshim adjusting washers. Make a note of the fittingposition.Recommended tools and equipment:Crankcase detachment plateDial gauge with magnetic base020262Y020335YStandard clearance:Crankcase0.0059-0.0157 in(0.15-0.40 mm)- Remove the crankcase gasket.- Remove the two screws and the internal covershown in the figure.- Remove the oil seal on the flywheel side.- Remove the oil filter union shown in the figure.183
10.11.3 Checking the Crankshaft- Check the connecting rod axial clearance, beforeremoval.Standard clearance:Connecting rod (axial)0.008-0.020 in(0.20-0.50 mm)- Check the radial clearance on the connectingrod.Standard clearance:Connecting rod (radial)0.0014-0.0021 in(0.036-0.054 mm)- Check that the surfaces that limit the axial freeplayare not scored and measure the width, asshown in the figure.Note: Make sure the ends of the caliper do not gointo the machined corner of the crankshaft, as thecurvature in the corner may cause inaccuratereadings.Standard dimension:with shim adjusting washersStandard dimension:with integral washers2.024-2.026 in(51.40-51.45 mm)2.192-2.199 in(55.67-55.85 mm)Warning – The crankshaft can be re-used as long as its width is within the specified limitsand shows no signs of scoring.- If present, check that the shim adjusting washers show no signs of superficialimperfections, such as scratches or crack initiations, and measure their thickness.Standard dimension:Shim adjusters thickness0.0856-0.0876 in(2.175-2.225 mm)Note: If the shim adjusting washers are to be reused, ensure to keep the initial assemblyposition.184
Note: Provided none of the specified crankshaft tolerances are exceeded, any nonacceptableaxial play found on the crankshaft must be due to either excessive wear or wrongmachining on the crankcase.Measure the diameters on both X and Y axesClass1Standard diameter (mm)1.1416–1.1418(28.998-29.004)21.1418–1.1421(29.004-29.010)Maximum allowable misalignment:A = 0.0060 in (0.15 mm)B = 0.0004 in (0.01 mm)C = 0.0004 in (0.01 mm)D = 0.0039 in (0.10 mm)Specific tools and equipment:Support and dial gaugeCrankshaft aligning tool020335Y020074YCrankcase – Crankshaft – Half crankshaft bearingsCrankcaseHalfcrankshaftbearingClass 1 Class 21.2973–1.2978(32.953–32.963)A type - Red B type - Blue C type - Yellow0.0776–0.0777(1.970–1.973)0.0777–0.0778(1.973–1.976)0.0778–0.779(1.976–1.979)Note: Spare crankcases are selected Half-crankcase Half crankshaft Bearingwith half-crankcases of the samecategory and mounted with category Cat. 1 Cat. 1 BB bearings (blue colored).Match the shaft with two category 1shoulders with category 1 crankcase(or cat. 2 with cat. 2).Cat. 2 Cat. 2 BA spare crankcase cannot be Cat. 1 Cat. 2 Acombined with a crankshaft withmixed categories. Spare shafts havehalf-shafts of the same category.Cat. 2 Cat. 1 C185
10.11.4 Checking the Crankcase Halves- Before proceeding to check the crankcasehalves, thoroughly clean all the surfaces and oilducts.- On the transmission side crankcase half, takeparticular care cleaning the housing and oilducts for the following components: the oilpump, the oil blow-by valve, the main bearingsand the cooling jet on the transmission side, seepicture.Note: The cooling jet is fed via the main bearings.When working correctly, it improves the cooling ofthe crown of the piston. Blockage of this jet willincrease piston temperature and the ensuingdamage would require major repairs. A missing orunseated cooling jet can cause a serious reductionin the oil pressure lubricating the main bearing andconnecting rod.As mentioned in the "Lubric ation" chapter, it isessential that the by-pass housing shows no signsof wear capable of affecting the seal of thelubrication pressure adjusting piston.- On the flywheel side crankcase half, takeparticular care in cleaning the oil ducts for themain bearings, the oil duct for the jet thatlubricates the cylinder head and the oil drainageduct at the flywheel side oil seal.Note: The oil duct for lubrication of the cylinderhead is fitted with a vaporizer jet that provides socalled'low pressure lubrication', designed to keepthe oil temperature in the sump at an acceptablelevel. Blockage of this jet will prevent properlubrication of the cylinder head and timingcomponents. A missing or unseated jet can cause aserious reduction in the oil pressure lubricating themain bearing and connecting rod.- Inspect the mating surfaces on the crankcasehalves for scratches or deformations, takingparticular care with the surfaces that mate withthe cylinder and the mating surfaces betweenthe crankcase halves.- Defects in the gasket between the crankcasehalves, or the mating surfaces shown in thefigure, can cause a reduction in the oil pressurelubricating the main bearing and connecting rod.- Check the main bearing seats that limit axialplay in the crankshaft show no signs of wear.The dimension between these seats is measured186
following the procedure previously described formeasuring the crankshaft axial play anddimensions.10.11.5 Checking the Main Bearings- Proper lubrication of the main bearings dependson them being seated correctly in theirhousings, which will avoid obstructing thelubrication ducts. Not only will this ensureproper flow of oil, but also proper oil pressurevalues 58 psi (4 bar), on which lubrication of themain bearings depends.- The main bearings comprise two half-bearings,one containing holes and channels forlubrication and the other solid.- The solid half-bearing bears the load due tocombustion and is, therefore, located at the farside from the cylinder.- In order to avoid obstructing the passage of oil,the plane of the coupling between the two halfbearingsmust be absolutely perpendicular tothe axis of the cylinder, as shown in the figure.- The depth to which the half-bearings are driven,in relation to the surface that limits the axialplay of the crankshaft, can also affect thealignment of the oil ducts.Standard dimension:Main bearing bedding-in depth0.053-0.063 in(1.35-1.60 mm)Note: The main bearings are driven into steelrings located by interference fit inside both thecrankcase castings, in order to maintain theposition described above.- Check the internal diameter of the mainbearings in the three directions indicated in thefigure.- Repeat these measurements on the other sideof the lubrication channel in the bearing (seefigure).Note: Avoid measuring the main bearings internaldiameter on the mating surface of the two halfshells as the ends are relieved to allow distortionduring the bedding.187
during the bedding.A = Matching surface- The main bearings are chosen from a selection of standard sizes that give certain internaldiameters once driven into the bearing housings in the crankcase, so as to obtain a matchwith the crankshaft.- Bearing housings are available in two categories as are the crankshafts (cat. 1 and cat. 2)- The crankcase is available in one class only. And can either be fitted with red, blue oryellow bearings.Standard dimension:Crankcase bearing housing∅ 1.2974-1.2978 in(32.953-32.963 mm)- Main half-bearings are divided into three categories according to their thickness; see tablein the previous page for details.BearingcategoryHalfcrankcasecategoryBearing internal diameteras assembledMating optionA 11.1427-1.1433 in(29.025-29.040 mm)OriginalB121.1425-1.1431 in(29.025-29.040 mm)1.1428-1.1434 in(29.028-29.043 mm)Original and spareC 21.1426-1.1432 in(29.022-29.037 mm)Original10.11.6 Assembling the Crankcase Halves- Fit the internal cover shown in the diagram andtighten the two screw fasteners to the specifiedtightening torque.Tightening torque:Internal cover screws2.9-4.4 lbs·ft(4-6 N·m)188
- Fit the oil filter union and tighten it to thespecified tightening torque.Tightening torque:Oil filter union19.9-24.3 lbs·ft(27-33 N·m)- Place a new gasket on one of the crankc asehalves, preferably on the transmission side,together with the locating dowels.- Lubricate the main bearings and insert thecrankshaft in the transmission side crankcasehalf.- Re-assemble the two crankcase halves.Note: Take care that the threaded end of thecrankshaft does not damage the main bearing.- Place the shim adjusting washers in theiroriginal position.- Fit the eleven screws and tighten them to theprescribed torque.Tightening torque:Half crankcase coupling screws8.1-9.6 lbs·ft(11-13 N·m)Note: Remove any remains of the old gasket fromthe crankcase and cylinder mating surfaces inorder to ensure proper seals.- Lubricate the flywheel-side oil seal.- Using the appropriate special tool, fit the oilseal.Recommended tools and equipment:Punch for oil seal020425YNote: Not using the special tool can lead to the oilseal being fitted at the wrong depth, therebypreventing it from working properly.- Fit a new O-ring on the oil sieve and lubricate it.- Re-ft the oil seal to the engine with the oil drain plug and tighten to the specifiedtightening torque.189
10.11.7 Fitting the Starter Motor- Fit a new O-ring on the starter motor andlubricate it.- Fit the starter motor to the crankcase andtighten the two screw fasteners to the specifiedtightening torque.Tightening torque:Half crankcase coupling screws8.1-9.6 lbs·ft(11-13 N·m)Note: Re-fit the remaining engine components asdescribed in the previous pages.190
10.11.8 Removing the Carburetor10.11.8.1 Kehin CVK 30 Carburetor- To disconnect the carburetor from the engine, itis necessary to move the air filter and removethe throttle cable, the automatic chokeconnection, the clamps fastening the carburetorto the filter box and the intake manifold, thepipe supplying air to the membrane, and theinlet connection.- Pull off the carburetor and rotate it to removethe screw with the water connection completewith pipes.Note: This operation is necessary to avoidemptying the cooling system. It is also necessaryto disconnect the cut-off vacuum supply pipe.- Remove the protection, the clamp and theautomatic choke device after loosening the twoscrews shown in the figure.- Remove the two screws and the automaticchoke device support with its gasket.191
- Remove the clamp and the cap with themembrane chamber filter.- Remove the four fixing screws shown in thefigure and the vacuum chamber cover.- Caution - The spring can suddenly jump outduring the operation of removal. Take care tocontain it.192
- Remove the vacuum valve with the membrane.- Turn the coupling by ? turn and remove it.Remove the spring and the vacuum valve pin.- Remove the four screws shown in the figure.193
- Remove the float bowl, the accelerator pumpand its gasket.- Remove the sealing gasket.- Remove the accelerator pump inlet and outletvalves from the bowl.Note: Pay particular attention when handling thevalves, since they consist of nozzles, springs andmetallic spheres.Note: Do not remove the accelerator pump pistonand control.- Using a hammer, and with the carburetorsuitably supported, remove the float pin fromthe throttle valve side.- Remove the float.194
- Remove the main jet.- Loosen the emulsion jet.- Tilt the carburetor and remove the emulsion jet.195
- Remove the atomizer.Note: This operation is necessary to avoid loosingthe atomizer while cleaning the carburetor body. Ifthe atomizer is jammed in its housing, do notattempt to remove it, or it may get damaged.- Remove the idling jet.- Remove the idle-speed flow screw and spring.Warning - Do not attempt to remove components pressed into the carburetor body. Theseinclude the fuel feed duct, the needle valve seat, the starter jet, the emulsion tube plug, theaccelerator jet, the air adjuster (minimum and maximum), the butterfly valve and thebutterfly valve control arm. The screw fasteners have been crimped after fitting andremoving them will damage the arm.196
10.11.8.2 Walbro WVF-7P Carburetor- To disconnect the carburetor from the engine, itis necessary to move the air filter and removethe throttle cable, the automatic chokeconnection, the clamps fastening the carburetorto the filter box and the intake manifold, thepipe supplying air to the membrane, and theinlet connection.- Pull off the carburetor and rotate it to removethe screw with the water connection completewith pipes.Note: This operation is necessary to avoidemptying the cooling system. It is also necessaryto disconnect the cut-off vacuum supply pipe.- Remove the protection, the clamp and theautomatic choke device after releasing thescrew shown in the figure.- Remove the clamp and the cap with themembrane chamber filter.197
- Remove the four fixing screws shown in thefigure and the vacuum chamber cover.Caution - The spring can suddenly jump outduring the operation of removal. Take care tocontain it.- Remove the vacuum valve with the membrane.198
- Turn the coupling by ? turn and remove it.Remove the spring and the vacuum valve pin.- Remove the four screws shown in the figure.199
- Remove the float bowl, the accelerator pumpand its gasket.- Remove the sealing gasket.- Remove the accelerator pump inlet and outletvalves from the bowl.Note: Pay particular attention when handling thevalves, since they consist of nozzles, springs andmetallic spheres.Note: Do not remove the accelerator pump pistonand control.200
- Using a hammer, and with the carburetorsuitably supported, remove the float pin fromthe throttle valve side.- Remove the float.- Remove the cap conveying fuel to the startingjet, shown in the figure.- Remove the main jet.201
- Loosen the emulsion jet.- Remove the atomizer.Note: This operation is necessary to avoid loosingthe atomizer while cleaning the carburetor body. Ifthe atomizer is jammed in its housing, do notattempt to remove it, or it may get damaged.- Remove the idling jet.202
- Remove the idle-speed flow screw with O-ring,washer and spring.- Remove the two fixing screws, the cover, thespring and the cut -off device membrane.Warning - Do not attempt to remove components pressed into the carburetor body. Theseinclude the fuel feed duct, the needle valve seat, the starter jet, the emulsion tube plug, theaccelerator jet, the air adjuster (minimum and maximum), the butterfly valve and thebutterfly valve control arm. The screw fasteners have been crimped after fitting andremoving them will damage the arm.203
10.11.9 Re-assembling the carburetor10.11.9.1 Kehin CVK 30 Carburetor- Clean the carburetor thoroughly beforereassembly, using petrol and compressed air.- Take particular care in cleaning the fuel feedduct and the float valve seat.- Clean the main air jet shown in the figure.- Carefully clean the slow-running circuit,concentrating in the following points:the air screw, the passage within the slowrunningscrew mechanism and the auxiliarychannel openings around the butterfly valve.- For the starter circuit, concentrate on the jet duct, as the housing blocks the calibratedholes, making them inaccessible.- Thoroughly blow out the accelerator pump jet.Note: The jet outlet is extremely small and directed towards the butterfly valve. Properatomization will be prevented, if this jet is directed otherwise.204
- Check that on the carburetor there are five ball bearing seals pressed into the holesmachined in the carburetor body.- Check that the two mating surfaces, between the float bowl and the diaphragm, areunblemished.- Check the butterfly valve and control arm.- Check that the float valve housing channel shows no signs of scoring.- Check that the valve seat shows no signs of abnormal or excessive wear.- If any of the above defects are observed, replace the carburetor with a new one.Note: Do not insert metal tools or instruments into the calibrated jets as these can causedamage and alter the carburetion.- Thoroughly clean and blow the slow-running jetand re-fit it.- Thoroughly clean and blow the main supplycircuit components, the atomizer, the emulsionjet and the main jet.- Insert the atomizer into the carburetor bodywith the shorter, cylindrical part facing theemulsifier.- Re-fit the emulsion jet, ensuring the atomizer iscorrectly located, and tighten.- Re-fit the main jet.205
- Check there are no signs of wear on the sealingsurface of the float needle, the softened pin orthe return spring.- If there are any signs of wear, replace theneedle with a new one.- Check that the float shows no signs of wear on the hinge, or the metal tab in contact withthe float needle and check that fuel has not infiltrated the float.- If there are any defects, replace the float with a new one.- Re-fit the float, together with the needle, inserting the pin from the fuel inlet side.Note: Ensure the return spring on the float tab is in the correct position.10.11.9.2 Walbro WFV-7P Carburetor- Before reassembling the carburetor, carefully clean the carburetor body using fuel andcompressed air.- Take particular care in cleaning the fuel feed duct and the float valve seat.- In the Venturi tube check the air calibration,shown in the figure.206
- Carefully clean the air holes shown in thefigure.- Carefully clean the slow-running circuit, concentrating in the following points:the air screw, the passage within the slow-running screw mechanism and the auxiliarychannel openings around the butterfly valve.Note: The slow-running is controlled by two calibrations. That of the cut-off is obtaineddirectly in the carburetor.- For the starter circuit, concentrate on the jetduct, as the housing blocks the calibratedholes, making them inaccessible.- Thoroughly blow out the accelerator pump jet.Note: The jet outlet is extremely small anddirected towards the butterfly valve. Properatomization will be prevented, if this jet isdirected otherwise.- Check that on the carburetor there are five ball bearing seals pressed into the holesmachined in the carburetor body.- Check that the two mating surfaces, between the float bowl and the diaphragm, areunblemished.- Check the butterfly valve and control arm.- Check that the float valve housing channel shows no signs of scoring.- Check that the valve seat shows no signs of abnormal or excessive wear.- If any of the above defects are observed, replace the carburetor with a new one.Note: Do not insert metal tools or instruments into the calibrated jets as these can causedamage and alter the carburetion.- Thoroughly clean and blow the slow-running jet and re-fit it.- Thoroughly clean and blow the main supply circuit components, the atomizer, theemulsion jet and the main jet.- Insert the atomizer into the carburetor body with the shorter, cylindrical part facing the207
emulsifier.- Re-fit the emulsion jet, ensuring the atomizer is correctly located, and tighten.- Re-fit the main jet.- Check there are no signs of wear on the sealingsurface of the float needle, the softened pin orthe return spring.- If there are any signs of wear, replace theneedle with a new one.- Check that the float shows no signs of wear on the hinge, or the metal tab in contact withthe float needle and check that fuel has not infiltrated the float.- If there are any defects, replace the float with a new one.- Re-fit the float, together with the needle, inserting the pin from the fuel inlet side.Note: Ensure the return spring on the float tab is in the correct position.10.11.10 Checking the Float Height10.11.10.1 Kehin CVK 30 Carburetor- Holding the carburetor upside-down, check thatthe float is parallel to the plane of the bowl.- If found to be out of alignment, adjust bybending the metal tab that controls the needle,until corrected.- When making adjustments to the metal tab,ensure it remains parallel to the pin on whichthe float hinges.- Remove the float bowl drainage screw and then thoroughly clean and blow out the bowl,paying particular attention in cleaning the accelerator pump ducts.- Repeatedly actuate the accelerator pump piston and blow with compressed air.208
- Replace the accelerator pump valves in thefollowing sequences:Intake valve (A):SpringSphereNozzleDelivery valve (M):SphereSpringNozzleNote: The delivery valve nozzle is provided with amilling.- Check the seal on the screw by introducing asmall amount of fuel into the float bowl.- Re-fit the float bowl to the carburetor body,using a new gasket and tightening the fourscrews to the specified torque.- Check that the throttle rocker arm rotatesfreely onto its seat.Note: Check that the gasket is inserted properly.Note: Avoid excessively loading the acceleratorpump rocker arm control.- Clean and blow the idle-speed flow screw.- Check that the screw is free from oxidationand/or deformations.- Fit the spring onto the screw, as shown in thepicture.- Tighten the flow screw onto the carburetor body and adjust its final position by carryingout an exhaust gas analysis.- Prepare the carburetor for adjustment with the screw loosened by two turns from itsclosing position.209
10.11.10.2 Walbro WVF-7P Carburetor- Holding the carburetor upside-down, check thatthe float is parallel to the plane of the bowl.- If found to be out of alignment, adjust bybending the metal tab that controls the needle,until corrected.- When making adjustments to the metal tab,ensure it remains parallel to the pin on whichthe float hinges.Note: With the carburetor tilted upside-down, thefloat must not overcome the load of the float pinspring. If the float remains in position, check thatit is not burdened with fuel infiltrations. Replacethe float and/or pin as necessary.- Thoroughly clean and blow the fuel conveying cap and insert it onto the starter jet.Note: Failure to install this component results in worse cold starting performance, since thestarter jet draws old fuel from the bottom of the bowl.- Remove the float bowl drainage screw and thenthoroughly clean and blow out the bowl, payingparticular attention in cleaning the acceleratorpump ducts.- Repeatedly actuate the accelerator pump pistonand blow with compressed air.- Check that the accelerator pump piston andseat are free from wear. If worn, replace.- Check that the accelerator pump piston springis not worn.- Install a new O-ring and gasket; hence replacethe piston unit on the bowl.- Install a new O-ring on the drainage screw andtighten it.210
- Check the seal on the screw by introducing asmall amount of fuel into the float bowl.- Re-fit the float bowl to the carburetor body,using a new gasket and tightening the fourscrews to the specified torque.- Check that the throttle rocker arm rotatesfreely onto its seat.Note: Check that the gasket is inserted properly.Note: Avoid excessively loading the acceleratorpump rocker arm control.- Clean and blow the idle-speed flow screw.- Check that the screw is free from oxidationand/or deformations.- Fit the spring onto the screw, as shown in thepicture.- Tighten the flow screw onto the carburetor body and adjust its final position by carryingout an exhaust gas analysis.- Prepare the carburetor for adjustment with the screw loosened by two turns from itsclosing position.- Check that the accelerator pump control rockeris free from abnormal wear.- Check that the rocker travel end screwprotrudes by 0.126 in (3.2 mm).211
- Check that the rocker arm return spring is notslackened.Pre-assemble the spring and the rocker as shownin the figure.Install the rocker on the carburetor keeping thethrottle valve open.Tighten the rocker fixing screw.- Make sure that the gear works properly.10.11.11 Checking the Vacuum Valve and the Needle10.11.11.1 Kehin CVK 30 Carburetor- Ensure the vacuum valve float pin is free fromwear.- Check that the vacuum valve exhibits noscratched on the surface.- Ensure that the vacuum feeding hole is notclogged.- Check that the membrane is not broken orhardened, if not so, replace the entire valve.- Insert the float pin into the vacuum valve seat.- Replace the vacuum throttle valve on thecarburetor paying attention in inserting thepinto into the atomizer.Note: The valve can only be inserted in oneposition.212
- Fit the spring with the pin lock.- After ensuring that the spring is properlypositioned into the housing, fit the vacuumchamber cover.- Clean and blow the ambient pressure inlet filtersponge.- Fit the filter and its clamp as shown in thefigure.213
- Clean and blow out the choke device support.- Install a new gasket onto the carburetor bodyand tighten the two fixing screws.10.11.11.2 Walbro WVF-7P Carburetor- Ensure the vacuum valve float pin is free fromwear and the lock is positioned at the thirdnotch.- Check that the vacuum valve exhibits noscratched on the surface.- Ensure that the two vacuum feeding holes arenot clogged.Note: The two holes have different diameters.- Check that the membrane is not broken orhardened, if not so, replace the entire valve.- Insert the float pin into the vacuum valve seat.- Replace the vacuum throttle valve on thecarburetor paying attention in inserting thepinto into the atomizer.Note: The valve can only be inserted in oneposition.214
- Fit the spring with the pin lock.- After ensuring that the spring is properly positioned into the housing, fit the vacuumchamber cover.- Clean and blow the ambient pressure inlet filter sponge.- Check that the cut-off valve is in good conditionand that the membrane is not broken orhardened.- Check the unloaded length of the spring.Standard dimension:Spring0.945 in(24 mm)- Fit the membrane with the metal pin positioned on the valve.- Fit the spring and the cover. The cover must have the vacuum inlet facing upwards.10.11.12 Checking the Automatic Choke Device10.11.12.1 Kehin CVK 30 Carburetor- Check that the piston (picture) exhibits noscratches or oxidation and that it slides freelyinto the seat.- Check the unloaded length of the spring.- Check that the piston sealing gasket exhibitsno deformations.215
- Measure the projection of the piston as shownin the figure, and check the correspondingvalue.- Ensure that the starter settles at ambienttemperature.Standard dimension:Piston length @ 68°F (20°C)XX-XX in(XX-XX mm)- The choke should gradually disengage as it isbeing heated electrically.- Check the choke resistance at ambienttemperature.Standard resistance:Choke resistance @ 68°F (20°C)~20 O- Using a 12V battery, power the automatic choke and check that the piston reaches itsmaximum protrusion.Note: When performing this check do not generate any short-circuits. It is thereforenecessary to use a cable with suitable terminals.- The effective heating time depends on the ambient temperature.- If measured projection, resistance or time values are inconsistent with the prescribedones, replace the automatic choke assembly.- Install the choke onto the carburetor checkingthe proper positioning of the O-Ring, insert theplate with the knurling resting against thechoke and tighten the fixing screw.- Orientate the choke device as shown in thefigure.- Install the safety casing216
10.11.12.2 Walbro WVF-7P Carburetor- Check that the piston (picture) exhibits noscratches or oxidation and that it slides freelyinto the seat.- Check the unloaded length of the spring.- Check that the piston sealing gasket exhibitsno deformations.- Measure the projection of the piston as shownin the figure, and check the correspondingvalue.- Ensure that the starter settles at ambienttemperature.Standard dimension:Piston length @ 68°F (20°C)0.492-0.512 in(12.5-13.0 mm)- The choke should gradually disengage as it isbeing heated electrically.- Check the choke resistance at ambienttemperature.Standard resistance:Choke resistance @ 68°F (20°C)~40 O- Using a 12V battery, power the automatic choke and check that the piston reaches itsmaximum protrusion.Note: When performing this check do not generate any short-circuits. It is thereforenecessary to use a cable with suitable terminals.- The effective heating time depends on the ambient temperature.- If measured projection, resistance or time values are inconsistent with the prescribedones, replace the automatic choke assembly.217
- Install the choke onto the carburetor checkingthe proper positioning of the O- Ring, insert theplate with the knurling resting against thechoke and tighten the fixing screw.- Orientate the choke device as shown in thefigure.- Install the safety casing218
10.12 Cooling System10.12.1 Cooling Circuit1 = Expansion tank 4 = Carburetor heating circuit2 = LH radiator with electric fan 5 = Electric fan switch3 = Thermostat with by-pass 6 = RH radiator219
10.12.2 Removing the Water Pump- If the bearings are noisy or any liquid leaksfrom the drain hole inside the cover, proceedto overhaul the water pump.- Remove the flywheel cover with the waterpump from the engine.- Remove the impeller cover after unscrewingthe three fastenings shown in the figure.- Position the flywheel cover on the ring-shaped base that is part of tool part no. 020440Y.Specific tools and equipment:Ring base020440YNote: To prevent damage to the cover surface designed to ensure coolant tightness, use thering-shaped base with the accurately machined surface facing the flywheel cover.- Using a press and the drift that is part of toolno. 020440Y, eject the shaft complete with theimpeller from the drive and the bearing.220
- With the aid of a flat screwdriver, carefullyremove the static part of the ceramic seal fromthe flywheel body.- Place the flywheel cover under the press.Ensure that the cover is perfectly horizontal.- Using the drift in inverted position, eject thetwo ball bearings.10.12.3 Checking the Components- Check that the impeller is not cracked or worn.- Check that the impeller shaft is not oxidized.- Check that no oxidation is present on the ceramic seal and bearing housings.- Ensure that the drive is not cracked and that it is perfectly joined to the steel hub.221
10.12.4 Fitting the Water Pump- Using the hot air gun, heat the flywheel coverfrom the inside.Specific tools and equipment:Hot air gun020151YNote: To prevent damage to the painted surface,avoid overheating the cover.- Place the flywheel cover on the ring-shapedbase as during the pump removal.- Position the bearing pair on the specific drift.Note: Always use new bearings. Use grease tokeep bearings on the specific tool.- Drive the bearing fully home into the crankcaseusing a plastic mallet.- Assemble the ceramic ring with the rubbergasket. The ceramic ring bevel must face thegasket.- Lubricate the rubber gasket and fit theassembly to the flywheel cover.- If necessary, use the drift from 020440Y onlyby hand.Note: Always use new ceramic rings and gaskets.Failure to manually install the ceramic ring maydamage the ring.- Insert the drive on the guiding pin of thesupport base of the specific tool no. 020440Y.Ensure that the convex side faces upwards.Specific tools and equipment:Punch020440Y222
- Fit the flywheel cover, complete with bearings,onto the specific tool.- Fit the shaft, comp lete with the mechanicalseal, on the bearings.- Using the specific drift and the press, insert theshaft into the bearings and the drive until thespecific tool is felt to have reached its abuttingend.Note: Carefully center the punch onto theimpeller. Apply force to the shaft and check thatthe flywheel cover rotates horizontally. Failure toobserve this rule may result in damage to thedrive.- Refit the impeller cover using a new O-ring.- Tighten the three fixing screws at theprescribed torque.Tightening torque:Impeller cover fixing screws2.2-2.9 lbs·ft(3-4 N·m)Note: Do not lubricate the O-ring. Failure toobserve this rule results in distortion to the ring.223
10.12.5 Checking the Thermostat- Visually check that the thermostat is notdamaged.- Prepare a metal container with ~¼ gallon(1 liter) of water.- Immerse the thermostat and keep at thecenter of the container.- Dip the thermometer probe next to thethermostat.Specific tools and equipment:Digital multime ter020331Y1 = Thermostat- Heat the container by using the hot air gun.Specific tools and equipment:Hot air gun020151Y- Measure the temperature at which thethermostat begins to open.Standard temperature:Thermostat opening157.1-162.5°F(69.5-72.5°C)- Heat until the thermostat opens completely.Standard dimension:Thermostat openingtravel at 176°F (80°C)0.136 in(3.5 mm)Warning - To properly conduct the test, avoiddirect contact between thermostat and container,and between thermometer and container.- Replace the thermostat in case of malfunction.224
11 SuspensionsThis section provides information on the operations that may be carried out on the suspensions.Lubricate with oilLubricate with greaseClean carefullyCaution: handle with careApply productAlways replaceA B C D E F GQty 5 2 1 1 1 1 2Torquelbs·ft(N·m)73-88104-12663-7790-11018-2125-30225
H I L M N O P Q5 2 2 1 1 1 2 111.1 Removing and Refitting the Front Wheel- Remove the five Allen screws shown in thefigure, fastening the wheel to the hub.- For re-assembly, properly place the wheel ontothe front hub, and tighten the five screws atthe prescribed torque.Tightening torque:Wheel fixing screws14.0-17.5 lbs·ft(20-25 N·m)11.2 Removing and Refitting the Rear Wheel- Remove the silencer-rear shock absorberbracket.- Remove the five Allen screws shown in thefigure.- For refitting, tighten the five screws at theprescribed torque and reassemble the bracket.Tightening torque:Wheel fixing screws14.0-17.5 lbs·ft(20-25 N·m)226
11.3 Removing the Steering Column- Remove the front wheel.- Remove the front caliper.- Loosen the odometer fixing plate screw toremove the cable.- Remove the suspension arm cover by releasingthe three screws shown in the figure.227
- Remove the odometer cable clamp from thefront mudguard, as shown in the figure.- Remove the brake tube clamp from the topplate of the shock absorber.- Remove the brake tube fixing from thesuspension arm.- Pre-loosen the three nuts fixing the mudguardto the front suspension bracket.228
- Remove the rear handlebar cover.- Remove the screw fixing the handlebar to thesteering column.- Carefully rest the rear handlebar cover againstthe leg-shield, paying attention not to scratchany plastic parts.- Remove the steering column ring nut cover.- Remove the counter ring nut, the spacingwasher and the top steering column ball-cagebearing seat ring nut.- Extract the steering column and remove themudguard from the suspension.Specific tools and equipment:Steering column ring nut spanner020055Y- For re-assembly, follow the operations for removal in the reverse order, carefully applyinggrease on the steering column ball-cage bearing seats and tightening at the prescribedtorques.Tightening torques:Upper ring nutLower ring nutHandlebar-steering column21-28 lbs·ft(30-40 N·m)6-7 lbs·ft(8-10 N·m)32-35 lbs·ft(45-50 N·m)229
11.4 Removing the Front Wheel Hub- Remove the front wheel.- Remove the front brake caliper.- Remove the split pin and the wheel axle nutcap shown in the figure.- Remove the wheel axle nut.- Extract the wheel hub, complete with brakedisk, from its axle.- For re-fitting, perform the operations for removal in the reverse order.Tightening torque:Wheel axle nut53-63 lbs·ft(75-90 N·m)11.5 Front Wheel Hub Overhaul- Remove the snap ring shown in the figure.230
- Using the specific tool, remove the ballbearing.Specific tools and equipment:15mm pliersBell001467Y014001467Y017- Using a flat screwdriver, remove the oil seal onthe roller bearing side.- Using the specific tool, remove the rollerbearing.Specific tools and equipment:Handle020376YAdapter020456Y0.787 in (20mm) guide 020363Y- With the aid of the hot air gun, heat the rollerbearing seat.- Using the specific tool, insert the bearing withthe screened side facing outwards and push ithome.- Refit the snap ring.Specific tools and equipment:Handle020376Y1.7×1.8 in (42×47 mm) adapter 020359Y0.591 in (15 mm) guide 020412YHot air gun020151Y231
- Using the specific tool, insert the roller caseand push it home.- Refit the oil seal on the roller bearing side.- Apply grease JOTA 3 FS between ball and rollerbearings.Specific tools and equipment:Punch020038Y11.6 Removing the Front Brake Caliper-Shock Absorber Bracket- Remove the wheel hub and the brake disk.- Remove the front shock absorber lower fixingscrew.- Remove the bracket lock snap ring.- Extract the bracket.232
- Before replacing the bracket into the wheelaxle, place the O-ring as shown in the figure, inorder to keep it properly positioned after thebracket assembly.- Refit the washer and the snap ring.- Replace the screws fixing the shock absorber tothe bracket and tighten at the prescribedtorque.Tightening torque:Shock absorber lower fixing screw14-19 lbs·ft(20-27 N·m)11.7 Front Brake Caliper-Shock Absorber Bracket Overhaul- The caliper-shock absorber fixing bracket isprovided with two roller bearings spaced fromone another as shown in the figure.- Remove the two roller bearings from thebracket using the specific tool form the shockabsorber coupling side, as shown in the figure.Specific tools and equipment:Handle020376Y1.0×1.1 in (26×28 mm) adapter 020441Y0.866 in (22 mm) guide 020365Y233
- Remove the oil guard on the wheel hub sideusing a screwdriver, as shown in the figure.- Suitably support the shock absorber-brakecaliper bracket.- Using the specific tool, install a new oil sealand push it home.Specific tools and equipment:Handle020376Y2.0×2.2 in (52×55 mm) adapter 020360Y- Using the specific tool, install a new rollerbearing on the shock absorber side and push ithome.Specific tools and equipment:Punch020036Y- Suitably support the chock absorber-brakecaliper bracket.- Using the specific tool, install a new rollerbearing on the wheel hub side and push ithome.Specific tools and equipment:Punch020037Y234
11.8 Removing the Front Shock Absorber- Remove the steering column.- Remove the shock absorber lower fixingscrews.- Remove the top shock absorber attachments.- For re-assembly, perform the operations for removal in the reverse order and tighten atthe specified torque.Tightening torque:Shock absorber top fixing screwShock absorber lower fixing screw14-21 lbs·ft(20-30 N·m)14-19 lbs·ft(20-27 N·m)11.9 Front Swing Arm Overhaul- Remove the steering column.- Remove the shock absorber- brake caliperbracket.- Using the special tool, fitted with part 1, asshown in the figure, remove pin and roller cagefrom their seat.- To remove the second roller cage, fit the toolwith part 2, on the opposite side to that shownin the figure.Specific tools and equipment:Front swing arm overhaul tool020021Y1 = Part 1235
Warning - Reassemble with new roller cases,pins, oil seals and dust covers.- Install the two dust covers «C» on theoscillating hub as shown in detail "A".- Connect the oscillating hub to the steeringcolumn using the guide pin indicated as part 5.- Fit the specific tool with the bearing, part 3,onto the shaft and part 4 at its base.- Grease the pin with Z2 grease and insert itonto the oscillating arm. Operate the toolhandle until part 3 comes into contact with thesteering column.- After fitting the pin insert the two spacers, part17, using a mallet. CSpecific tools and equipment:Front swing arm overhaul tool020021Y1=Detail "A"; 2=Part 5; 3=Part 4; 4=Part 3.- Lubricate the oil seals with mineral oil and halffillthe needle casings with the recommendedgrease type Z2.- Introduce the sealing ring on the pin and, atthe same time, the roller bushing with wedgingwasher.- Remove the specific tool, then part 5 (guide),which was partially expelled in the precedingfitting operation, while leaving part 4 fitted.- Replace part 3 with part 16 on the shaft.- Operating on the tool handle push the wedgingwasher-needle casing-oil seal assembly untilpart 16 is brought into contact with theoscillating hub.- For the fitting of the second wedging washerneedlecasing-oil seal assembly, repeat theabove operation with the tool still bearing part16 and with part 22* instead of part 4 on theside opposite to that shown in the figure.Recommended tools and equipment:Front swing arm overhaul tool020021Y1=Detail "B"; 2=Part 17; 3=Part 4; 4=Part 17;5=Part 16(*) supplied with tool 020021Y.236
- Use the tool fitted with parts 20 and 21 on itsshaft, as shown in the figure.- Using the handle exert pressure until thebottom of the two needle casings is broughtinto contact with the pin end.- Use the tool fitted with parts 3 and 4, as forfitting the pin, and operate the handle to exertpressure until the washers are wedged ontothe oscillating hub.- Remove the spacers (part 17); fill the gapbetween the steering column and theoscillating hub with Z2 grease, then place thedust covers in that space.1=Part 20; 2=Part 17; 3=Part2111.10 Steering Column Ball-Cage Bearings OverhaulNote: This operation should be carried out exclusively in the case of extreme necessity andnew components must always be used during re-assembly.237
- Remove the steering column.- Using the specific tool, remove the top steeringcolumn bearing seat from underneath thesteering head, as shown in the figure. Then,from the top, remove the lower steeringbearing seat.Specific tools and equipment:Steering bearing removing punch020004Y- Using the specific tool, remove the steeringcolumn ball-cage bearing seat and the dustcover on the steering column, as shown in thefigure. Use a mallet.Specific tools and equipment:Steering bearing removing punch020004Y238
- Using the specific tool, replace the dust coverand the steering column ball-cage bearing seaton the steering tube to abutment.Specific tools and equipment:Steering bearing removing punch006029Y- Using the specific tool, install the steeringcolumn ball-cage bearing seats on the head asshown in the figure.Specific tools and equipment:Steering bearing seat installer001330Y239
11.11 Removing the Rear Shock Absorber-Silencer Bracket- Remove the silencer.- Remove the two screws fixing the bracket tothe engine crankcase.- Remove the split pin, the key cap, and the rearwheel axle fixing nut with spacer.- Remove the lower shock absorber fixing.- For re-assembly, perform the operations forremoval in the reverse order, tightening eachfastener at the specified torque value.Tightening torques:Bracket-crankcase fixing screwShock absorber lower fixing screwWheel axle nut14-18 lbs·ft(20-25 N·m)23-29 lbs·ft(33-41 N·m)73-88 lbs·ft(104-126 N·m)240
11.12 Rear Shock Absorbers11.12.1 Removing the Rear Shock Absorbers- Rest the vehicle on its central stand.- Remove the rear rack.- Using a jack, slightly lift the engine off theground so to unload the rear suspensions.- Remove the silencer.- Loosen both lower shock absorber fasteningbolts (on crankcase and crankcase-silencerbracket).- Loosen the two top shock absorber fasteningscrews (top picture on the right) and removeboth shock absorbers.241
11.12.2 Refitting the Rear Shock Absorbers- Perform the operations for removal in the reverse order, and tighten all fastenersaccording to the prescribed tightening torques.Tightening torques:Shock absorber lower fixing boltShock absorber top fixing screw23-29 lbs·ft(33-41 N·m)14-18 lbs·ft(20-25 N·m)11.13 Central Stand- Suitably support the vehicle with a jack.- Remove the two stand-return springs.- Loosen the nut indicated in the figure.- Remove the RH pin.- Remove the central stand.- Upon reassembly, tighten the nut at theprescribed torque.Tightening torques:Central stand fastening bolt18-21 lbs·ft(25-30 N·m)11.14 Inspecting the Rear Swing Arm- Rest the vehicle on its central stand.- Remove the air cleaner box.- Remove the screw fixing the oscillating arm tothe engine as shown in the figure.- Push the engine backwards.242
- Remove the spring anchoring the swing arm tothe frame, as shown in the figure.- Remove the two screws fixing the pad supportbracket to the frame.243
- Remove the RH and LH caps located under thefootrest to access the pin fixing the swing armto the body.- Carefully inspect the whole of the swingassembly.244
- Carefully inspect centering bushes, rubber pads, and silent block.- Replace worn components found to exhibit excessive play, resulting in unsatisfactoryriding characteristics.- For reassembly, perform these operations in the reverse order.- Apply TUTELA Z2 grease on all bearings and revolving components.- Complete the assembly tightening the nuts onto the relevant pins at the correct tighteningtorques.Tightening torques:Swing arm bolt, engine sideSwing arm bolt, frame sideSilent-block - frame bracket screwSwing arm bolt,engine and frame side45-50 lbs·ft(64-72 N·m)53-58 lbs·ft(76-83 N·m)29-36 lbs·ft(42-52 N·m)23-29 lbs·ft(33-41 N·m)11.15 Swing Arm Overhaul- Check that the silent-block is not broken.Replace if necessary.- Remove the snap ring shown in the figure.- Remove the bracket and the silent-block.- Remove the silent-block ring shown in thefigure.245
- Suitably support the bracket and the silentblockin a vice.- Using the specific tool, extract the silent-blockfrom the bracket on the frame side. This is toensure that the tool is centered with respect tothe support.- Install a new silent-block ensuring thealignment with the reference tooth.- Fit the silent-block by properly matching thesilent-block chamfering with that of thebracket.- Using the specific tool, install the silent-blockas shown in the figure.246
11.16 Silent-Block Overhaul- Check that there are no dents on the jointconnecting the swing arm on the engine side tothe swing arm on the frame side.- Check the axial clearance between the twoswing arms using a thickness gauge.Standard clearance:Max. allowable clearance:0.016-0.024 in(0.40-0.60 mm)0.059 in(1.50 mm)- To check the clearance on the frame -side arm,prepare the assembly using the frame-side boltand the two spacers from tool no. 020229Y.Alternatively, use two standard washers forØ 0.472 in (12 mm) bolts and minimumexternal diameter and thickness of Ø 1.181 in(30 mm) and 0.157 in (4 mm).- Check that the rotation is smooth.- Check the axial of the swing arm on the frameside.Standard clearance:Max. allowable clearance:0.016-0.024 in(0.40-0.60 mm)0.059 in(1.50 mm)247
- Separate the swing arm on the engine-sidefrom the swing on the frame -side.- Remove the plastic bushes and the internalspacer shown in the figure.- Using a suitable pin, remove the roller cases asshown in the figure.- Using the specific tool, fit new cases beingcareful to position bearings with sealing ringsfacing outwards.Specific tools and e quipment:∅ 0.59 in (15 mm) punch forengine-side swing arm cases∅ 0.71 in (18 mm) punch forengine-side swing arm cases020244Y020115Y248
Standard dimensions:+ 0.008Engine-side swing arm tube length 6 . 9020.0000.000+0.20( 175.3 − 0.00)Engine-side internal swing arm spacer length 7 . 210− 0.008( 183 − 0.20)0.00Engine-side swing arm plastic bushes diameterFrame-side swing arm tube lengthFrame-side internal swing arm spacer lengthFrame-side swing arm plastic bushes diameter- Use TUTELA Z2 to grease the roller cases andthe plastic bushes.- Insert the spacers.- Assemble the two arms with the relevant boltin the position shown in the figure.- Orientate the bolt as shown in the figure.- Place the swing arm on the frame -side with themost protruding part facing the silent-block asshown in the figure.0.13811.14211.4170.138± 0.002± 0.004± 0.004± 0.0020.05( 3.5 ± )0.1( 283 ± )0.1( 290 ± )0.05( 3.5 ± )249
12 Bodywork12.1 Removing the Seat- Remove the helmet compartment.- Loosen the two screws shown in the picture.- Remove the seat.12.2 Removing the Steering Column Cover- Remove the “PIAGGIO” badge.- Loosen the screw shown in the picture.- Carefully pull the cover.12.3 Removing the Front Handlebar Cover- Remove the steering column cover.- Loosen the screw shown in the picture.250
- Loosen the two screws shown in the figure.- Remove the front handlebar cover.- Carefully detach the headlight connections.12.4 Removing the Rear Handlebar Cover- Remove the front handlebar cover.- Loosen the four screws shown in the picture.- Detach the speedometer cable.- Detach all electrical connections and removethe rear handlebar cover.12.5 Removing the Instrument Panel- Remove the rear handlebar cover.- Loosen the four screws shown in the picture.- Remove the instrument panel.251
12.6 Removing the Glove-box Panel- Remove the rear handlebar cover.- Loosen the two screws shown in the picture,from the front leg-shield.- Remove the expansion tank cover and its cap.- Loosen the screw shown in the picture,positioned inside the glove-box compartment.- Loosen the two screws shown in the picture,positioned underneath the two side covers.252
- Loosen the four screws shown in the picture,positioned at the bottom of the glove-boxpanel.- Detach the seat opening electrical connection,the fuse holder, and the seat opening cable.253
12.7 Removing the Battery Compartment Cover- Loosen the four screws shown in the picture.12.8 Removing the Side Fairings- Loosen the two screws shown in the pictureand remove the fairing. Follow the sameoperation for both left and right hand-side.12.9 Removing the Footrest- Remove the glove-box panel.- Remove the battery compartment cover.- Remove the side fairings.- Loosen the screw shown in the picture,positioned in the battery compartment.254
- Remove both pillion pegs by loosening the twoscrews (on each side) shown in the picture.- Loosen the two (LH and RH) footrest fixingscrews.- Remove the two (LH and RH) lower plasticcovers by loosening the screw as shown in thepicture.- Remove the screws positioned underneath therubber mat, as shown in the picture.255
12.10 Removing the Luggage Carrier- Remove the helmet compartment.- Loosen the two screws shown in the pictureand remove the luggage carrier cover.- Loosen the six fixing screws shown in thefigures and remove the luggage carrier.256
12.11 Removing the Taillight- Loosen the two license plate light fixing screwsshown in the figure, and remove the plasticflap.- Loosen the two fixing screws shown in thepicture and remove the taillight.12.12 Removing the Helmet Compartment- Open the seat and lift the helmet compartmentbay.257
12.13 Removing the Front Fender- In order to remove the front fender, it isnecessary to remove the steering column anddisconnect the front brake tube from thecaliper.- The fender can then be removed by looseningthe three fixing screws shown in the picture.12.14 Removing the Fuel Tank- Remove the helmet compartment.- Remove the right hand-side plastic fairing.- Remove the exhaust pipe.- Remove the luggage carrier.- Remove the top shock absorber fixing screws.- Loosen the two fuel tank fixing screws, shownin the figure, from the frame.- Detach the fuel level indicator cable, shown inthe figure.258
- After removing the taillight, loosen the fueltank-frame fixing screw shown in the figure.- Remove the fuel tap clamps shown in thefigure.- Remove the rear turn signal lights.- Lift the vehicle in order to obtain enoughclearance between frame and engine such toremove the fuel tank from underneath theframe.- To reassemble the fuel tank, follow the aboveoperations in the reverse order.259
12.15 Removing the Radiators and the Cooling Fan- Before acting on the radiators, drain thecooling circuit by disconnecting the liquid inlettube from the pump.- Remove the glove-box panel.- Disconnect the inlet and outlet tubes from theRH radiator.- Loosen the radiator fixing screws shown in thefigure.- Remove the radiator.- Detach the cooling liquid tube from the plasticair conveying vent. Hence remove theconveying vent.260
- Follow the same procedure for the LH radiator,although, in this case, it is necessary toremove the electric fan by loosening the threescrews shown in the figure.- When reassembling the radiators, follow the operations described above in the reverseorder, paying particular attention in using new clamps for all the cooling liquid pipingconnections and in properly refilling the cooling circuit.12.16 Removing the Rear Mudguard- Remove the air filter.- Loosen the fixing screw shown in the picture.- Remove the mudguard.12.17 Removing the Turn Signal Lights- Loosen the screw shown in the figure andremove the front turn signal light.261
- Loosen the screw shown in the figure andremove the rear turn signal light.12.18 Removing the Electrical Opening Seat System- Remove the helmet compartment.- Loosen the two nuts shown in the figure.- Detach the electrical cable from the clampsshown in the figure.262
- Remove the seat opening cable.- Remove the seat opening cable manual control.- Detach the electrical connector from the seatopening actuator.- Loosen the two screws shown in the figure.- Remove the return spring.- Remove the actuator from the support bracket.263
13 Pre-Delivery InspectionsBefore deliverying the vehicle, carry out the following checks:Caution – Handle gasoline with the utmost care.13.1 Checking the Vehicle AppearancePaintworkPlastic fairing joinsScratches or dentsDirtiness13.2 Checking the Tightening TorquesCheck all tightening torquesCheck external fairing screws13.3 Checking the Electrical CircuitCharge the battery with a suitable battery chargerIgnition switchLights: headlight (high/low beam), taillight, and warning lights on instrument panelBrake light and brake light switches (front and rear)Turn signal lights (front and rear), and warning lights on instrument panelInstrument panel light, fuel and cooling liquid temperature indicatorsHornElectric starterEmergency engine cut-off switchElectrical seat opening buttonWarning – The battery must be charged before use to ensure optimal performance. Aninadequate electrolyte level will result in a premature failure of the battery.Warning – When installing the battery on the vehicle connect the positive lead before thenegative lead.Caution – Battery electrolyte contains sulphuric acid. Battery electrolyte is poisonous andcauses severe burns. Avoid contact with the eyes, skin, and clothes.In case of contact with the eyes and/or skin, abundantly wash the affected area with cleanwater for about 15 minutes and seek immediate medical attention.264
In case of ingestion of electrolyte, drink water or vegetable oil and seek immediate medicalattention.Batteries produce explosive gases; keep the battery well away from open flames, sparks orcigarettes.Ensure there is adequate ventilation when charging batteries in closed areas.Protect the eyes when working with batteries or in their immediate vicinity.KEEP BATTERIES AWAY FROM CHILDRENWarning – Never use a fuse with a higher rating that the prescribed value. The use ofunsuitably rated fuses can result in widespread damage to the vehicle, including fire.13.4 Checking the LevelsBrake fluidRear hubEngine oilCooling liquid13.5 Road TestCold startInstrumentsThrottle responseVehicle stability in acceleration and brakingFront and rear brake efficiencyFront and rear suspension efficiencyAnomalous noises13.6 Static TestRestart with engine warmAutomatic choke deviceIdleCorrect and smooth steeringLeaksElectric fan265
13.7 Functional CheckBrake lever travel and braking circuitClutchEngineOther: documents inspection, toolkit, license plate, locks, tires inflation pressure, mirrors andaccessoriesWarning – Check and adjust the tire inflation pressure only when the tires are at ambienttemperature.Warning – Over-inflated tires can burst. Never exceed the prescribed inflation pressure.266
14 Time Sheets14.1 EngineDescription Op. Code TimeEngine from the frame -Dismantling andReassembling1 001001 80'Engine oil - Replacement 2 003064 10'Engine fixing - Nuttightening3 003057 10'14.2 CrankcaseDescription Op. Code TimeHalf crankcase gasket -Replacement1 001153 140'Engine crankcase -Replacement2 001133 200'14.3 CrankshaftDescription Op. Code TimeFlywheel-side oil seal -Replacement1 001099 40'Engine crankshaft -Replacement2 001117 160'267
14.4 Piston-Cylinder AssemblyDescription Op. Code TimePiston-cylinder assy. -ReplacementPiston-Rings-Wrist PinAssembly - Overhaul1 001002 130'2 001154 130'14.5 Cylinder Head and ValvesDescription Op. Code TimeCylinder Head Assembly- Replacement1 001126 130'Valves - Replacement 2 001045 130'Valves - Adjustment 3 001049 40'Head Gasket -ReplacementThermistore -ReplacementThermostat -Replacement4 001056 120'5 001083 15'6 001057 20'14.6 CamshaftDescription Op. Code TimeValve rockers -Replacement1 001148 120'Camshaft - Replacement 2 001044 120'268
14.7 Valve CoverDescription Op. Code TimeSpark plug -ReplacementHead cover -ReplacementHead cover gasket -ReplacementOil vapor recovery pipe -Replacement1 001093 15'2 001089 40'3 001088 40'4 001074 10'14.8 Chain Tensioner - By-Pass ValveDescription Op. Code TimeChain tensioner -Overhaul andReplacement1 001129 10'Lubrication by-passvalve - Replacement2 001124 30'14.9 Oil FilterDescription Op. Code TimeOil filter - Replacement 1 001123 10'Oil pressure sensor -Replacement2 001160 40'269
14.10 Driven PulleyDescription Op. Code TimeClutch - Replacement 1 001022 30'Driven pulley - Overhaul 2 001012 45'Driven pulley -ReplacementClutch drum -Replacement3 001110 30'4 001155 20'14.11 Pump Assembly - Oil SumpDescription Op. Code TimeChain guide shoe -ReplacementTiming belt/chain -Replacement1 001125 140'2 001051 140'Oil pump - Overhaul 3 001042 70'Oil pump - Replacement 4 001112 60'Oil pump chain -Replacement5 001122 60'Oil sump - Replacement 6 001130 30'Chain cover port -Replacement7 001172 30'270
14.12 Rear Wheel AxleDescription Op. Code TimeReduction gear assy. -Overhaul1 001010 85'Reduction gear cover -Replacement2 001156 60'Gearbox oil -Replacement3 003065 15'Rear wheel axle -Replacement4 004125 45'14.13 Driving PulleyDescription Op. Code TimeDriving half-pulley -Replacement1 001086 25'Driving belt -Replacement2 001011 25'Driving pulley - Removaland reassembly3 001066 25'Driving pulley - Overhaul 4 001006 25'271
14.14 Electric StarterDescription Op. Code TimeStarter motor -Replacement1 001020 30'Starter pinion -Replacement2 001017 25'Belt support roller -Replacement3 001141 20'14.15 Kick-Starter, Transmission Cover, and Transmission CoolingDescription Op. Code TimeTransmission coverbearing - Replacement1 001135 25'Transmission cover -Replacement2 001096 20'Transmission air inlet -Replaceme nt3 001131 20'14.16 Transmission Cooling Air InletDescription Op. Code TimeTransmission air inletpipe - Replacement1 001132 10'272
14.17 Flywheel MagnetoDescription Op. Code TimeFlywheel cover -ReplacementWater pump, pumpimpeller - ReplacementStator - Removal andreassemblyComplete flywheel -ReplacementSecondary air filter -ReplacementSecondary air filter box -Replacement1 001087 60'2 001113 50'3 001067 45'4 001058 45'5 001161 30'6 001162 30'Rotor - Replacement 7 001173 45'14.18 CarburetorDescription Op. Code TimeIntake manifold -ReplacementCarburetor heating pipes- Replacement1 001013 10'2 007020 20'Carburetor - Overhaul 3 001008 30'Carburetor -ReplacementAutomatic choke -Replacement4 001063 20'5 001081 15'Carburetor - Adjustment 6 003058 10'Exhaust emissions -Adjustment7 001136 20'273
14.19 Air FilterDescription Op. Code TimeAir filter -Replacement/CleaningAir filter box -Replacement1 001014 20'2 001015 15'Carburetor-air boxbellow - Replacement3 004122 20'14.20 SilencerDescription Op. Code TimeSilencer - Replacement 1 001009 15'Silencer protection-Replacement2 001095 10'274
14.21 FrameDescription Op. Code TimeFrame - Replacement 1 004001 240'Fairing (1) -Replacement2 004085 5'Horn - Replacement 3 004149 5'Spoiler - Replacement 4 004053 5'Passenger footrest -Removal and reassemblyShield edge -Replacement5 004015 5'6 004023 45'Badges - Replacement 7 004159 10'14.22 Central StandDescription Op. Code TimeSide stand -Replacement (non-US)1Central stand -Replacement2 004004 10'275
14.23 Footrest and BatteryDescription Op. Code TimeBattery - Replacement 1 005007 20'Footrest - Replacement 2 004079 40'Battery compartment -ReplacementBattery cover -ReplacementFootrest rubber -Replacement3 004071 10'4 005046 5'5 004078 5'14.24 Glove-BoxDescription Op. Code TimeGlove-box - Replacement 1 004083 25'Glove-box flap -Replacement2 004081 25'276
14.25 Helmet Compartment and Rear FenderDescription Op. Code TimeRear fender -Replacement1 004136 15'Helmet compartme nt -Removal and reassembly2 004016 5'Plate holder -Replacement3 005048 10'14.26 Front Fender and Rear MudguardDescription Op. Code TimeFront fender -Replacement1 004002 45'Rear mudguard -Replacement2 004009 20'Front suspension cover -Replacement3 003044 10'14.27 Fuel TankDescription Op. Code TimeFuel tank - Replacement 1 004005 50'Tank float - Replacement 2 005010 45'Fuel tank bleed -Replacement3 004109 10'Fuel tap - Replacement 4 004007 10'277
14.28 Cooling SystemDescription Op. Code TimeRadiator - Replacement 1 007002 35'Fan with support -ReplacementExpansion tank -ReplacementThermo -switch -ReplacementTank-radiator pipe -ReplacementCoolant pipe -ReplacementCoolant and air vent -Replacement2 007016 30'3 007001 40'4 007014 55'5 007013 40'6 007003 60'7 001052 20'14.29 Fuel PumpDescription Op. Code TimeFuel pump -ReplacementFuel pump-tank tube -Replacement1 004073 15'2 004089 10'Fuel filter- Replacement 3 004072 10'Vacuum fuel pump tube- ReplacementPump-carburetor tube -Replacement4 004086 10'5 004086 10'278
14.30 Steering ColumnDescription Op. Code TimeSteering column ballcagebearings -Replacement1 003002 60'Steering column play -Adjustment2 003073 25'14.31 Front SuspensionDescription Op. Code TimeFront shock absorber -Removal and reassemblySteering column -Replaceme ntFront suspension -OverhaulBrake caliper/suspensionbracket - ReplacementFront wheel hub bearings- ReplacementOdometer reel -Replacement1 003011 20'2 003045 60'3 003010 100'4 003035 25'5 003034 40'6 001064 15'279
14.32 Rear suspensionDescription Op. Code TimeRear shock absorber -Removal and reassembly1 003007 20'14.33 Handlebar CoversDescription Op. Code TimeHandlebar cover, frontside - Replacement1 004018 15'Handlebar cover, backside - Replacement2 004019 20'280
14.34 Handlebar, and Brake and Throttle ControlsDescription Op. Code TimeHandlebar - Removaland reassemblyFront brake pump -ReplacementRear brake pump -ReplacementBrake light switch -ReplacementLH handgrip -ReplacementRH handgrip -ReplacementCounterweight -ReplacementThrottle sleeve -ReplacementComplete throttle cable-ReplacementThrottle cable -AdjustmentBrake lever -Replacement1 003001 45'2 002024 35'3 002024 35'4 005017 20'5 002059 10'6 002071 10'7 003059 5'8 002060 30'9 002063 50'10 003061 10'11 002037 15'14.35 Swing ArmDescription Op. Code TimeEngine/Frame swing arm- Replacement1 001072 50'Silent-block -Replacement2 004058 60'281
14.36 BrakesDescription Op. Code TimeRear brake pads - WearcheckFront brake pads - WearcheckFront brake caliper -OverhaulFront brake caliper -Removal and reassemblyRear brake caliper -Removal and reassemblyRear brake caliper -OverhaulFront brake tube -Removal and reassemblyRear brake tube -Removal and reassemblyRear brake pads -Removal and reassemblyFront brake pads -Removal and reassemblyFront brake fluid -ReplacementRear brake fluid -Replacement1 003071 5'2 003070 5'3 002040 60'4 020039 20'5 002048 35'6 002068 50'7 002021 45'8 002020 50'9 002002 30'10 002007 15'11 002047 15'12 002080 15'282
14.37 Saddle and Rear RackDescription Op. Code TimeSaddle - Replacement 1 004003 10'Rack - Replacement 2 004008 10'Rack cover -Replacement3 004062 5'14.38 Locks and ImmobilizerDescription Op. Code TimeSaddle opening cable -Replacement1 002083 45'Lock cable for saddleopening - Replacement2 002092 20'Lock for saddle opening -ReplacementImmobilizer antenna -ReplacementElectric device for saddleopening - replacementSaddle lock -ReplacementSteering lock -ReplacementIgnition switch -Replacement3 004158 20'4 005072 30'5 005099 20'6 004054 10'7 004010 35'8 005016 35'283
14.39 Mirrors, Electric Controls, and Instrument PanelDescription Op. Code TimeRearview mirror -Replacement1 004066 5'Instrument panel -Replacement2 005014 20'Start button -ReplacementEngine cut-off switch -ReplacementTurn signal switch -replacementHorn button -ReplacementSaddle opening button -ReplacementIgnition switch -ReplacementLights switch -ReplacementPanel warning lights -ReplacementClock/battery -Replacement3 005041 20'4 005077 20'5 005006 206 005040 20'7 005121 25'8 005039 20'9 005078 25'10 005038 10'11 005076 15'284
14.40 LightsDescription Op. Code TimeHeadlight - Replacement 1 005002 15'Taillight - Replacement 2 005005 10'License plate light -ReplacementFront turn signal bulb -ReplacementHeadlight bulb -ReplacementTaillight bulb -ReplacementPlate light bulb -ReplacementBrake light bulb -ReplacementRear turn signal bulb -ReplacementRear turn signal light -ReplacementFront turn signal light -ReplacementTurn signal lens -Replacement3 005032 10'4 005067 5'5 005008 10'6 005066 10'7 005031 10'8 005090 10'9 005068 5'10 005022 5'11 005012 5'12 005091 5'285
14.41 Electrical DevicesDescription Op. Code TimeSpark plug cap -Replacement1 001094 10'H.T. coil - Replacement 2 001069 15'Horn - Replacement 3 005003 10'Odometer/Speedometercable - ReplacementElectronic ignition device- ReplacementVoltage regulator -ReplacementElectrical circuit -ReplacementElectrical circuit -OverhaulHeadlight relay -ReplacementStarting relay -ReplacementFuse holder -ReplacementFuse holder board -ReplacementCompleteodo/speedometer cable -ReplacementBattery fuse -ReplacementBattery fuse holder -Replacement4 002049 20'5 001023 40'6 005009 20'7 005001 120'8 005114 30'9 005035 15'10 005011 15'11 005054 25'12 005019 25'13 002051 40'14 005024 10'15 002025 10'286
14.42 Front WheelDescription Op. Code TimeFront brake disk -Replacement1 002041 25'Front wheel hub -Replacement2 003033 25'Front wheel -ReplacementFront wheel rim -Removal and reassembly3 004123 10'4 003037 15'Front tire - Replacement 5 003047 15'Front tire - Check 6 003063 5'14.43 Rear WheelDescription Op. Code TimeRear wheel -Replacement1 001016 20'Rear tire - Replacement 2 004126 25'Rear wheel rim -Removal and reassemblyRear brake disk -ReplacementSilencer-suspensionsupport bracket -ReplacementRear wheel hub -ReplacementRear tire pressure -Check3 001071 25'4 002070 35'5 003077 25'6 002028 35'7 003063 5'287