MP3 250 Workshop Manual.pdf
MP3 250 Workshop Manual.pdf
MP3 250 Workshop Manual.pdf

Create successful ePaper yourself
Turn your PDF publications into a flip-book with our unique Google optimized e-Paper software.
SERVICE STATION MANUAL633823<strong>MP3</strong> <strong>250</strong> i.e.
SERVICE STATIONMANUAL<strong>MP3</strong> <strong>250</strong> i.e.The descriptions and illustrations given in this publication are not binding. While the basic specificationsas described and illustrated in this manual remain unchanged, PIAGGIO-GILERA reserves the right, atany time and without being required to update this publication beforehand, to make any changes tocomponents, parts or accessories, which it considers necessary to improve the product or which arerequired for manufacturing or construction reasons.Not all versions shown in this publication are available in all Countries. The availability of single versionsshould be checked at the official Piaggio sales network."© Copyright 2007 - PIAGGIO & C. S.p.A. Pontedera. All rights reserved. Reproduction of this publicationin whole or in part is prohibited."PIAGGIO & C. S.p.A. - After-SalesV.le Rinaldo Piaggio, 23 - 56025 PONTEDERA (Pi)
SERVICE STATION MANUAL<strong>MP3</strong> <strong>250</strong> i.e.This service station manual has been drawn up by Piaggio & C. Spa to be used by the workshops ofPiaggio-Gilera dealers. It is assumed that the user of this manual for maintaining and repairing Piaggiovehicles has a basic knowledge of mechanical principles and vehicle repair technique procedures. Anysignificant changes to vehicle characteristics or to specific repair operations will be communicated byupdates to this manual. Nevertheless, no mounting work can be satisfactory if the necessary equipmentand tools are unavailable. It is therefore advisable to read the sections of this manual relating to specialtools, along with the special tool catalogue.N.B. Provides key information to make the procedure easier to understand and carry out.CAUTION Refers to specific procedures to carry out for preventing damages to the vehicle.WARNING Refers to specific procedures to carry out to prevent injuries to the repairer.Personal safety Failure to completely observe these instructions will result in serious risk of personalinjury.Safeguarding the environment Sections marked with this symbol indicate the correct use of the vehicleto prevent damaging the environment.Vehicle intactness The incomplete or non-observance of these regulations leads to the risk of seriousdamage to the vehicle and sometimes even the invalidity of the guarantee.
INDEX OF TOPICSCHARACTERISTICSCHARTOOLINGTOOLMAINTENANCEMAINTROUBLESHOOTINGTROUBLELECTRICAL SYSTEMELE SYSENGINE FROM VEHICLEENG VEENGINEENGINJECTIONINJECSUSPENSIONSSUSPBRAKING SYSTEMBRAK SYSCOOLING SYSTEMCOOL SYSCHASSISCHASPRE-DELIVERYPRE DETIMETIME
INDEX OF TOPICSCHARACTERISTICSCHAR
Characteristics<strong>MP3</strong> <strong>250</strong> i.e.This section describes the general specifications of the vehicle.RulesThis section describes general safety rules for any maintenance operations performed on the vehicle.Safety rules- If work can only be done on the vehicle with the engine running, make sure that the premises are wellventilated,using special extractors if necessary; never let the engine run in an enclosed area. Exhaustfumes are toxic.- The battery electrolyte contains sulphuric acid. Protect your eyes, clothes and skin. Sulphuric acid ishighly corrosive; in the event of contact with your eyes or skin, rinse thoroughly with abundant waterand seek immediate medical attention.- The battery produces hydrogen, a gas that can be highly explosive. Do not smoke and avoid sparksor flames near the battery, especially when charging it.- Fuel is highly flammable and it can be explosive given some conditions. Do not smoke in the workingarea, and avoid open flames or sparks.- Clean the brake pads in a well-ventilated area, directing the jet of compressed air in such a way thatyou do not breathe in the dust produced by the wear of the friction material. Even though the lattercontains no asbestos, inhaling dust is harmful.Maintenance rules- Use original PIAGGIO spare parts and lubricants recommended by the Manufacturer. Non-original ornon-conforming spares may damage the vehicle.- Use only the appropriate tools designed for this vehicle.- Always use new gaskets, sealing rings and split pins upon refitting.- After removal, clean the components using non-flammable or low flash-point solvent. Lubricate all thework surfaces except the tapered couplings before refitting.- After refitting, make sure that all the components have been installed correctly and work properly.- For removal, overhaul and refit operations use only tools with metric measures. Metric bolts, nuts andscrews are not interchangeable with coupling members with English measurement. Using unsuitablecoupling members and tools may damage the scooter.- When carrying out maintenance operations on the vehicle that involve the electrical system, makesure the electric connections have been made properly, particularly the ground and battery connections.CHAR - 2
<strong>MP3</strong> <strong>250</strong> i.e.CharacteristicsVehicle identificationChassis prefix (FULL OPTIONAL): M47201Chassis prefix (BASE): M47200Engine prefix: M472MDimensions and massWEIGHTS AND DIMENSIONSSpecificationDesc./QuantityKerb weight224 ± 5 KgWheelbase1490 mmHeight1245 mmWidth (handlebar)745 mmOverall length2130 mmTrack420 mmEngineSpecificationTypeDATADesc./Quantitysingle-cylinder, four-stroke and four liquid-cooledvalvesCHAR - 3
Characteristics<strong>MP3</strong> <strong>250</strong> i.e.SpecificationDesc./QuantityTiming systemsingle overhead camshaft chain driven on the lefthandside, three-arm rocking levers set up withthreaded set screwBore72 mmStroke60 mmCubic capacity249.29 mmCompression ratio 10.5 ÷ 11.5Air filtersponge, impregnated with mixture (50% petrol and50% oil)Starting systemelectric starter motor with freewheelLubricationwith lobe pump (inside the crankcase) chain-drivenand double filter: mesh and paperFuel supplyby electronic injection with electric fuel pumpvalve clearanceintake: 0.10 mm - discharge: 0.15 mmEngine idle speedapprox. 1600 ÷ 1800 rpmMax. speed125 km/hTransmissionSpecificationTransmissionTRANSMISSIONDesc./QuantityAutomatic expandable pulley variator with torqueserver, V belt, automatic clutch, gear reduction unitand transmission housing with forced air circulationcoolingCapacitiesSpecificationEngine oilRear hubFuel tank capacityFuel reserveCooling circuitCAPACITYDesc./Quantityapprox. 1300 cc (recommended oil Selenia HIScooter 4 Tech)<strong>250</strong> cc ( recommended oil TUTELA MATRIX)Tank capacity: ~12 l (approximate value)approx. 2.5 litres (indicative value)Capacity: ~ 2.0 lElectrical systemELECTRICAL COMPONENTSSpecificationDesc./QuantityIgnition/advanceElectronic, with inductive discharge and variableadvance with three-dimensional mappingSpark plugCHAMPION RG 4 PHPBattery12V-12AhGeneratoralternating currentCHAR - 4
<strong>MP3</strong> <strong>250</strong> i.e.CharacteristicsFrame and suspensionsBrakesSpecificationChassisRear suspensionFront suspensionFRAME AND SUSPENSIONSDesc./QuantityTubular and sheet steel.Single arm with two double-acting hydraulic shockabsorbers and preloading adjustable to 4 positions.The tilt mechanism is composed of an articulatedparallelogram suspension with die-cast aluminiumcontrol arms and two side headstocks plus shockabsorbers with hydraulic locking system.SpecificationFront brakeRear brakeBRAKESDesc./QuantityØ 240 mm double disk with hydraulic control activatedby the handlebar right-hand lever.Ø 240 mm disc brake with hydraulic control activatedby the handlebar left-side lever.Wheels and tyresN.B.WHEELS AND TYRESSpecificationDesc./QuantityFront wheel Alloy rims: 12" x 3.00"Rear wheelalloy rim: 12"x3,00Front tyre120/70-12", without inner tubeRear tyreWithout inner tube: 130/70-12" 62PSpecificationFront tyre pressure (rider)Front tyre pressure (rider and passenger)Rear tyre pressure (rider)Rear wheel pressure (rider and passenger):TYRE PRESSUREDesc./QuantityFront tyre pressure (rider): 1.6 barFront tyre pressure (rider and passenger): 1.8 barRear tyre pressure (rider): 2 barRear tyre pressure (rider and passenger): 2.4 barCHECK AND ADJUST TYRE PRESSURE WITH TYRES AT AMBIENT TEMPERATURE. REGU-LATE PRESSURE ACCORDING TO THE WEIGHT OF THE RIDER AND ACCESSORIESTightening TorquesSTEERINGNameTorque in NmSteering lower ring nut (central headstock) 22 ÷ 27 loosen by 90°Steering upper ring nut (central headstock) 27 ÷ 33Handlebar fixing screw 50 ÷ 55Fixing screws for handlebar control assembly U-7 ÷ 10boltsCHAR - 5
Characteristics<strong>MP3</strong> <strong>250</strong> i.e.FRAMENameTorque in NmEngine arm bolt - frame arm 33 ÷ 41Swinging arm buffer nut 64 - 72Engine-swinging arm bolt 55 ÷ 61Frame-swinging arm bolt 55 ÷ 61Centre stand bolt 31 ÷ 39FRONT SUSPENSIONNameTorque in NmShock absorber lower clamp 19 ÷ 26Upper shock absorber clamp 19 ÷ 29Front wheel fixing screws 19 ÷ 24Steering arm bolt nut 20 ÷ 25Tilt calliper fixing screws 20 ÷ 25Front wheel shaft 74 ÷ 88Arm coupling screws 45 ÷ 50Screws fixing arms to side headstocks 45 ÷ 50Screws fixing arms to central headstock 45 ÷ 50Screws fixing the half-arm coupling flange 20 ÷ 25Fixing screws for tilt locking disc section 20 ÷ 25Side headstock upper ring nut 20 - 24Side headstock lower ring nut 12 ÷ 15Screw fixing sliding stem to shock absorber 45 ÷ 50Clamp for sliding stem locking device 6.5 ÷ 10.5Fixing nuts for constant-velocity universal joints 18 ÷ 20Potentiometer to anti-tilting device clamp 8 ÷ 10Electric motor to anti-tilting device clamp 11 ÷ 13Clamp fixing pump bolt to anti-tilting device 11 ÷ 13Pump to anti-tilting device clamp 11 ÷ 13Pressure switch to distribution frame 18 ÷ 20Sensor to tilt gripper clamp 2.5 ÷ 2.9Pipe terminals to fifth wheel check spring 7 ÷ 11Joint to anti-tilting device pump 20 ÷ 25Lower fitting for shock absorber sliding locking20 ÷ 25clamp pipesUpper fitting for shock absorber sliding locking20 ÷ 25clamp pipesREAR SUSPENSIONNameTorque in NmUpper shock absorber clamp 33 ÷ 41Shock absorber lower clamp 33 ÷ 41Shock absorber-crankcase attachment bracket 20 ÷ 25Rear wheel axle 104 ÷ 126Muffler arm clamping screws 27 ÷ 30CHAR - 6FRONT BRAKENameTorque in NmOil bleed screw 8÷12Disc tightening screw (°) 5 - 6Brake fluid pump - hose fitting 16 ÷ 20Brake fluid pipe-calliper fitting 20 ÷ 25
<strong>MP3</strong> <strong>250</strong> i.e.CharacteristicsNameTorque in NmScrew tightening calliper to the support 20 ÷ 25Calliper upper pipe fitting 20 ÷ 25REAR BRAKENameTorque in NmRear brake disc screws(°) 5 ÷ 6.5Rear brake calliper-pipe fitting 20 ÷ 25Rigid / flexible pipe fitting 13 ÷ 18Rear brake pump-pipe fitting 16 ÷ 20Rear brake calliper fixing screws 20 ÷ 25REAR BRAKEProduct Description Specifications(°) Loctite 243 Medium strength threadlock Apply LOCTITE 243 mediumstrengththreadlockMUFFLERNameTorque in NmMuffler heat guard fixing screw 4 ÷ 5Screw for fixing muffler to the support arm 20 ÷ 25Lambda probe clamp on exhaust manifold 40 ÷ 50Exhaust manifold-muffler joint clamp 12 ÷ 13Manifold - muffler diaphragm tightening clamp 16 ÷ 18LUBRICATIONNameTorque in NmHub oil drainage plug 15 ÷ 17Oil filter on crankcase fitting 27 ÷ 33Engine oil drainage plug/mesh filter 24 ÷ 30Oil filter 4 ÷ 6Oil pump cover screws 7 ÷ 9Screws fixing oil pump to the crankcase 5 - 6Oil pump control crown screw 10 ÷ 14Oil pump cover plate screws 4 ÷ 6Oil sump screws 10 ÷ 14Minimum oil pressure sensor 12 ÷ 14CYLINDER HEADNameTorque in NmSpark plug 12 ÷ 14Head cover screws 6 ÷ 7Nuts fixing head to cylinder 7±1 + 10±1 + 270°Head fixing side screws11 ÷ 12 NmStarter ground screw 7 ÷ 8.5Tappet set screw lock nut 6 ÷ 8Inlet manifold screws 11 ÷ 13Timing chain tensioner slider screw 10 ÷ 14Starter ground support screw 11 ÷ 15Timing chain tensioner support screw 11 ÷ 13Timing chain tensioner central screw 5 - 6Camshaft retention plate screw 4 ÷ 6CHAR - 7
Characteristics<strong>MP3</strong> <strong>250</strong> i.e.TRANSMISSIONNameTorque in NmBelt support roller screw 11 ÷ 13Clutch unit nut on driven pulley 45 ÷ 50Drive pulley nut 75 ÷ 83Transmission cover screws 11 ÷ 13Driven pulley shaft nut 54 ÷ 60Rear hub cap screws 24 ÷ 27FLYWHEELNameTorque in NmFlywheel cover screw 11 ÷ 13Stator assembly screws3 - 4 (Apply LOCTITE 242 medium-strengththreadlock)Flywheel nut94 - 102 NmPick-Up clamping screws 3 ÷ 4Screw fixing freewheel to flywheel 13 ÷ 15CRANKCASE AND CRANKSHAFTNameTorque in NmInternal engine crankcase bulkhead (transmission-side4 ÷ 6half shaft) screwsEngine-crankcase coupling screws 11 ÷ 13Starter motor screws 11 ÷ 13Crankcase timing cover screws 3.5 - 4.5 (Apply LOCTITE 242 medium-strengththreadlock)Overhaul dataCOOLINGNameTorque in NmWater pump rotor cover 3 ÷ 4Thermostat cover screws 3 ÷ 4Bleed screw: 3Assembly clearancesCHAR - 8
<strong>MP3</strong> <strong>250</strong> i.e.CharacteristicsCylinder - piston assy.ENGINE COUPLING CATEGORYName Initials Cylinder Piston Play on fittingCylinder M 72.01 ÷ 72.017 71.953 ÷ 71.960 0.050 - 0.064Cylinder N 72.017 ÷ 72.024 71.960 ÷ 71.967 0.050 - 0.064Piston O 72.024 ÷ 72.031 71.967 ÷ 71.974 0.050 - 0.064Piston P 72.031 ÷ 72.038 71.974 ÷ 71.981 0.050 - 0.064Crankcase - crankshaft - connecting rodCRANKSHAFTTitolo Durata/Valore Testo Breve (< 4000car.)CrankshaftCrankshaft to crankcaseaxial clearanceCrankshaft to crankcase axial clearanceIndirizzo ImmagineCHAR - 9
Characteristics<strong>MP3</strong> <strong>250</strong> i.e.CRANKSHAFT/ CRANKCASE AXIAL CLEARANCEName Description Dimensions Initials QuantityHalf-shaft, transmission16.6 +0-0.05 A D = 0.20 - 0.50sideFlywheel-side halfshaft16.6 +0-0.05 B D = 0.20 - 0.50Connecting rod 18 -0.10 -0.15 C D = 0.20 - 0.50Spacer tool 51.4 +0.05 E D = 0.20 - 0.50Slot packing systemCharacteristicCompression ratio10.5 ÷ 11.5 : 1CHAR - 10
<strong>MP3</strong> <strong>250</strong> i.e.CharacteristicsMeasurement "A" to be taken is a value of piston re-entry, it indicates by how much the plane formedby the piston crown falls below the plane formed by the top of the cylinder. The further the piston fallsinside the cylinder, the less the base gasket to be applied (to recover the compression ratio) and viceversa.N.B.MEASUREMENT "A" MUST BE TAKEN WITHOUT ANY GASKET FITTED BETWEEN THE CRANK-CASE AND CYLINDER AND AFTER RESETTING THE GAUGE, EQUIPPED WITH A SUPPORT, ONA GROUND PLANEENGINE <strong>250</strong> SHIMMINGName Measure A Thicknessshimming 3.70 - 3.60 0.4 ± 0.05shimming 3.60 - 3.40 0.6 ± 0.05shimming 3.40 - 3.30 0.8 ± 0.05CHAR - 11
Characteristics<strong>MP3</strong> <strong>250</strong> i.e.ProductsRECOMMENDED PRODUCTS TABLEProduct Description SpecificationsAGIP ROTRA 80W-90 Rear hub oil SAE 80W/90 Oil that exceeds therequirements of API GL3 specificationsAGIP CITY HI TEC 4T Oil to lubricate flexible transmissionsOil for 4-stroke engines(throttle control)AGIP FILTER OIL Oil for air filter sponge Mineral oil with specific additivesfor increased adhesivenessAGIP GP 330 Grease for brake levers, throttle White calcium complex soapbasedspray grease with NLGI 2;ISO-L-XBCIB2AGIP CITY HI TEC 4T Engine oil SAE 5W-40, API SL, ACEA A3,JASO MA Synthetic oilAGIP BRAKE 4 Brake fluid FMVSS DOT4 Synthetic fluidSPECIAL AGIP PERMANENTfluidcoolantMonoethylene glycol-based antifreezefluid, CUNA NC 956-16CHAR - 12
INDEX OF TOPICSTOOLINGTOOL
Tooling<strong>MP3</strong> <strong>250</strong> i.e.Stores code001330YAPPROPRIATE TOOLDescriptionTool for fitting steering seats001467Y014Pliers to extract ø 15-mm bearings005095YEngine support002465YPliers for circlips006029YPunch for fitting fifth wheel seaton steering tube020004YPunch for removing fifth wheelsfrom headstock020055YWrench for steering tube ring nutTOOL - 2
<strong>MP3</strong> <strong>250</strong> i.e.ToolingStores code020074YDescriptionSupport base for checking crankshaftalignment020150YAir heater support020151YAir heater020193YOil pressure gauge020262YCrankcase splitting strip020263YSheath for driven pulley fittingTOOL - 3
Tooling<strong>MP3</strong> <strong>250</strong> i.e.Stores code020306YDescriptionPunch for assembling valve sealrings020329YMityVac vacuum-operated pump020330YStroboscopic light for timing control020331YDigital multimeter020332YDigital rev counterTOOL - 4
<strong>MP3</strong> <strong>250</strong> i.e.ToolingStores code020333YDescriptionSingle battery charger020334YMultiple battery charger020335YMagnetic support for dial gauge020357Y020359Y32 x 35 mm adaptor42x47-mm adaptor020360YAdaptor 52 x 55 mmTOOL - 5
Tooling<strong>MP3</strong> <strong>250</strong> i.e.Stores code020363YDescription20 mm guide020375YAdaptor 28 x 30 mm020376YAdaptor handle020382YValve cotters equipped with part012 removal tool020382Y011adapter for valve removal toolTOOL - 6
<strong>MP3</strong> <strong>250</strong> i.e.ToolingStores code020393YDescriptionPiston fitting band020412Y15 mm guide020423Ydriven pulley lock wrench020424YDriven pulley roller casing fittingpunch020426YPiston fitting forkTOOL - 7
Tooling<strong>MP3</strong> <strong>250</strong> i.e.Stores code020431YDescriptionValve oil seal extractor020434YOil pressure control fitting020444YTool for fitting/ removing the drivenpulley clutch020456Y020477YØ 24 mm adaptorAdaptor 37 mm020483Y30 mm guideTOOL - 8
<strong>MP3</strong> <strong>250</strong> i.e.ToolingStores code020489YDescriptionHub cover support stud bolt set020428YPiston position check support020460YScooter diagnosis and tester020621YHV cable extraction adaptor020481YControl unit interface wiring001467Y035Belle for OD 47-mm bearingsTOOL - 9
Tooling<strong>MP3</strong> <strong>250</strong> i.e.Stores code020626YDescriptionDriving pulley lock wrench001467Y013Pliers to extract ø 15-mm bearings020627YFlywheel lock wrench020467YFlywheel extractor020454YTool for fitting piston pin stops(200 - <strong>250</strong>)020622YTransmission-side oil guardpunchTOOL - 10
<strong>MP3</strong> <strong>250</strong> i.e.ToolingStores code020480YDescriptionPetrol pressure check set020244Y15-mm diameter punch020115YØ 18 punch020271YTool for removing-fitting silentbloc020469YReprogramming kit for scooterdiagnosis testerTOOL - 11
Tooling<strong>MP3</strong> <strong>250</strong> i.e.Stores code020481Y004DescriptionParking control unit interface wiring020639YTilt locking control unit software020645YMIU software updating with CANlines001467Y017Driver for OD 36 mm bearings020234y020441Yextractor26 x 28 mm adaptorTOOL - 12
<strong>MP3</strong> <strong>250</strong> i.e.ToolingStores code020362YDescription12 mm guide020358Y001467Y00237x40-mm adaptorDriver for OD 73 mm bearingTOOL - 13
Tooling<strong>MP3</strong> <strong>250</strong> i.e.TOOL - 14
INDEX OF TOPICSMAINTENANCEMAIN
Maintenance<strong>MP3</strong> <strong>250</strong> i.e.Follow these steps to reset the service icons:1. With the key set to OFF, hold down the"SET" button and turn the key to ON : the"BELT" and "SERVICE" icons start flashing.2. Push the "CLOCK" button for less than 1second and the icons are displayed sequentially.The icon selected remains ON and theother is no longer displayed.3. Press the "CLOCK" button again for morethan 3 seconds to reset the relative maintenancestep and the icon is no longer displayed.Maintenance chart60'Coolant - changeBrake fluid - changeEVERY 2 YEARSAction75'Safety locks - checkThrottle lever - adjustmentEngine oil - changeElectrical system and battery - checkCoolant level - checkBrake fluid level - checkEngine oil - replacementBrake pads - check condition and wearTyre pressure and wear - checkVehicle and brake test - road testHub oil - changeSteering - CheckTilt locking gripper control cable - adjustmentAFTER 1,000 KMActionAFTER 5,000 KM, 15,000 KM, 25,000 KM, 35000 KM, 45,000 KM, 55,000 KM, 65,000 KM,75,000 KM10'Engine oil - level check/ top-upBrake pads - check condition and wearAction115'AFTER 10,000 KM 50,000 KM 70,000 KMMAIN - 2
<strong>MP3</strong> <strong>250</strong> i.e.MaintenanceSafety locks - checkThrottle lever - adjustmentAir filter - cleanEngine oil - changeElectrical system and battery - checkCoolant level - checkBrake fluid level - checkEngine oil - replacementBrake pads - check condition and wearSliding block / variable speed rollers - changeTyre pressure and wear - checkVehicle and brake test - road testHub oil - checkSuspensions - checkSteering - CheckCentre stand - lubricationTilt locking gripper control cable - adjustment35'ActionAFTER 20,000 KM, 35,000 KM, 50,000 KM, 65,000 KM, 80,000 KMDriving Belt - replacement165'Spark plug - replacementThrottle lever - adjustmentAir filter - cleanEngine oil - changeValve clearance - checkElectrical system and battery - checkCoolant level - checkBrake fluid level - checkEngine oil - replacementBrake pads - check condition and wearSliding block / variable speed rollers - changeTyre pressure and wear - checkVehicle and brake test - road testHub oil - changeSuspensions - checkSteering - CheckTilt locking gripper control cable - adjustmentActionAFTER 20,000 KM, 40,000 KM, 80,000 KMAction155'Safety locks - checkThrottle lever - adjustmentAir filter - cleanEngine oil - changeElectrical system and battery - check30,000 KMActionMAIN - 3
Maintenance<strong>MP3</strong> <strong>250</strong> i.e.Coolant level - checkBrake fluid level - checkEngine oil - replacementHub oil - checkBrake pads - check condition and wearSliding block / variable speed rollers - changeTyre pressure and wear - checkVehicle and brake test - road testSuspensions - checkSteering - CheckTilt locking gripper control cable - adjustment205'Spark plug - replacementThrottle lever - adjustmentAir filter - cleanEngine oil - changeValve clearance - checkElectrical system and battery - checkCoolant level - checkBrake fluid level - checkEngine oil - replacementHub oil - changeBrake pads - check condition and wearSliding block / variable speed rollers - changeTyre pressure and wear - checkVehicle and brake test - road testSuspensions - checkSteering - CheckTilt locking gripper control cable - adjustmentChecking the spark advanceThe ignition advance is determined electronicallyon the basis of parameters known by the controlunit. For this reason it is not possible to declare thereference values based on the engine rpm. Theignition timing value is detectable any time usingthe diagnostic tester. It is possible to check whetherthe ignition advance determined by the systemdoes in fact correspond with the value actually activatedon the engine, by means of the stroboscopiclight.Proceed as follows:- Remove the spark plug.Action60,000 KMActionMAIN - 4
<strong>MP3</strong> <strong>250</strong> i.e.Maintenance- Remove the transmission crankcase.- Rotate the driving pulley fan until the referencemarks between the flywheel and flywheel covercoincide as shown in the photograph.- Bring the reference mark onto the transmissionside between the fan and the transmission coveras shown in the photograph.- Refit the spark plug.- Refit the plastic cap on the flywheel cover.- Adjust the spark gap to the contact position (noreference mark visible) and install it on engine betweenthe spark plug and spark plug cap- Connect the induction calliper on the spark gapcable respecting the proper polarity (the arrow onthe calliper must be pointing at the spark plug).- Connect the diagnostic tester.- Start the engine.- Select the «parameter» function in this menu.- Select the stroboscopic light command in the traditionalfour-stroke engine position (1 spark 2revs).- Check that the real values of rpm and ignitionadvance match those measured using the diagnostictester.If the values do not correspond, check:- distribution timing- revolution-timing sensor- Injection control unitSpecific tooling020460Y Scooter diagnosis and tester020330Y Stroboscopic light for timing control020621Y HV cable extraction adaptorMAIN - 5
Maintenance<strong>MP3</strong> <strong>250</strong> i.e.Spark plugRemove the port on the right-hand side panel ofthe vehicle by undoing the clamping screw andusing a small screwdriver in the rear recess shownin the figure, then do the following :1. Disconnect spark plug HV wire cap "A";2. Unscrew the spark plug using the wrench supplied.;3. When refitting, place the spark plug in the holeat the due inclination and tighten it by hand until itis finger tight;4. Only use the wrench to lock it in place;5. Place hood«A» fully over the spark plug.6. Refit the port making sure the rear hook is inserted.WARNINGTHE SPARK PLUG MUST BE REMOVED WHENTHE ENGINE IS COLD. THE SPARK PLUGMUST BE REPLACED EVERY 20,000 KM. USEOF ELECTRONIC CONTROL UNITS OR ELEC-TRONIC IGNITIONS DIFFERING FROM THOSERECOMMENDED CAN SERIOUSLY DAMAGETHE ENGINE.N.B.THE USE OF SPARK PLUGS OTHER THANTHE INDICATED TYPE OR OF SHIELDLESSSPARK PLUG CAPS CAN CAUSE ELECTRI-CAL SYSTEM FAILURES.Electric characteristicSpark plugMAIN - 6
<strong>MP3</strong> <strong>250</strong> i.e.MaintenanceCHAMPION RG4 PHPElectrode gap0.7 ÷ 0.8 mmHub oilCheck- Park the vehicle on its centre stand on flatground;- Remove the oil dipstick «A», dry it with a cleancloth and put it back into its hole tightening itcompletely;Remove the dipstick and check that the oil level isslightly over the second notch starting from thelower end; if the level is under the MAX. mark, itneeds to be filled with the right amount of hub oil.-Screw up the oil dipstick again and make sure itis locked properly into place.Replacement-Remove the oil cap «A».- Unscrew the oil drainage cap "B" and drain outall the oil.- Screw in the drainage cap again and fill the hubwith the prescribed oil.Recommended productsAGIP ROTRA 80W-90 Rear hub oilSAE 80W/90 Oil that exceeds the requirements ofAPI GL3 specificationsCharacteristicRear hub oilCapacity approximately <strong>250</strong> ccLocking torques (N*m)Hub oil drainage screw 15 ÷ 17 NmMAIN - 7
Maintenance<strong>MP3</strong> <strong>250</strong> i.e.Air filterProceed as follows:Undo the clamping screws «A» (two of which areon the knob-type head) and remove the air-boxcover.1. Wash the sponge with water and neutral soap.2. Dry it with a clean cloth and small blasts of compressed air.3. Impregnate the sponge with a mixture of 50% petrol and 50% specified oil.4. Gently squeeze the filter element, let it drip and then refit it.CAUTIONIF THE VEHICLE IS USED ON DUSTY ROADS IT IS NECESSARY TO CARRY OUT MAINTENANCECONTROLS OF THE AIR FILTER TO AVOID DAMAGING THE ENGINE.Recommended productsAGIP FILTER OIL Oil for air filter spongeMineral oil with specific additives for increased adhesivenessEngine oilIn 4T engines, the engine oil is used to lubricate the distribution elements, the bench bearings and thethermal group. An insufficient quantity of oil can cause serious damage to the engine.In all 4T engines, the deterioration of the oil characteristics, or a certain consumption should be considerednormal, especially if during the run-in period. Consumption levels in particular can be influencedby the conditions of use (e.g.: oil consumption increases when driving at "full throttle".ReplacementAt 1,000 km and after every 10,000 km, the oil andthe filter must be changed. The engine must bedrained by running off the oil from drainage cap"B" of the flywheel side gauze pre-filter; furthermoreto facilitate oil drainage, loosen the cap/dipstick "A". Once all the oil has drained throughthe drainage hole, unscrew the oil cartridge filter"C" and remove it.MAIN - 8
<strong>MP3</strong> <strong>250</strong> i.e.MaintenanceMake sure the pre-filter and discharge tap O-ringsare in good condition.Lubricate them and refit the gauze filter and oildrainage tap, screwing them up to the specifiedtorque.Refit the new cartridge filter being careful to lubricatethe O-ring before fitting it.Change the engine oil.Since a certain quantity of oil still remains in thecircuit, oil must be filled from cap "A". Then startup the scooter, leave it running for a few minutesand switch it off: after five minutes check the leveland if necessary top up without exceeding theMAX level. The cartridge filter must be replacedevery time the oil is changed. Use new oil of therecommended type for topping up and changingpurposes.N.B.THE ENGINE MUST BE HOT WHEN THE OIL ISCHANGED.Recommended productsAGIP CITY HI TEC 4T Engine oilSAE 5W-40 Synthetic oil that exceed the requirementsof API SL, ACEA A3, JASO MA specificationsCheckThis operation must be carried out with the enginecold and following the procedure below:1. Place the vehicle on its centre stand and onflat ground.2. Undo cap/dipstick "A", dry it off with a cleancloth and replace it, screwing down completely.3. Remove the cap/dipstick again and checkthat the level is between the min and max.marks; top up if necessary.MAIN - 9
Maintenance<strong>MP3</strong> <strong>250</strong> i.e.The MAX level mark indicates a quantity of around1300 cc of engine oil. If the check is carried outafter the vehicle has been used, and therefore witha hot engine, the level line will be lower; in orderto carry out a correct check it is necessary to waitat least 10 minutes after the engine has been stopped,so as to get the correct level.Oil top upThe oil should be topped up after having checked the level and in any case by adding oil without everexceeding the MAX. level.Restoration of the level from MIN to MAX requires approximately 200 cc.Engine oil filterThe cartridge filter must be replaced every time the oil is changed. Use new oil of the recommendedtype for topping up and changing purposes.Make sure the pre-filter and drainage plug O-rings are in good conditions. Lubricate them and refit themesh filter and oil drainage plug, screwing them up to the specified torque. Refit the new cartridge filterbeing careful to lubricate the O-ring before the fitting. Change the engine oil.Recommended productsAGIP CITY HI TEC 4T Engine oilSAE 5W-40 Synthetic oil that exceed the requirements of API SL, ACEA A3, JASO MA specificationsOil pressure warning lightThe vehicle is equipped with a warning light on theinstrument panel that lights up when the key isturned to the «ON» position. However, this lightshould switch off once the engine has been started.If the light turns on during braking, at idlingspeed or while turning a corner, it is necessaryto check the oil level and the lubrication system.MAIN - 10
<strong>MP3</strong> <strong>250</strong> i.e.MaintenanceChecking the ignition timing-Remove the plastic cap on the flywheel cover-Turn the flywheel until the reference mark «T» onthe rotor matches the reference mark on the flywheelcover as shown in the figure (TDC). Makesure that the 4V reference point on the camshaftcontrol pulley is aligned with the reference point onthe head as shown in the second figure. If the referenceis opposite the indicator on the head, turnthe crankshaft once more.For the use of this reference mark, remove thespark plug and turn the engine in the direction thatis the reverse of the normal direction using a calliperspanner applied to the camshaft commandpulley casing.Cooling systemIntroduction of the engine coolant.The fluid level must checked every 10,000 kilometreswith a cold engine, in the way shown below:Place the scooter on its centre stand and on flatground.- Undo the screw shown in the figure and removethe expansion tank cap on RHS.- Top up if the fluid level is near or below the MINlevel edge. The liquid level must always be betweenthe MIN and MAX level.-The coolant consists of an ethylene glycol andcorrosion inhibitor based 50% demineralised water-antifreeze solution mix.CAUTIONDO NOT EXCEED THE MAX. LEVEL WHENFILLING SO AS TO AVOID THE COOLANT ES-CAPING FROM THE EXPANSION TANK WHENTHE vehicle IS IN USE.MAIN - 11
Maintenance<strong>MP3</strong> <strong>250</strong> i.e.Braking systemLevel checkThe front and rear brake fluid reservoirs are bothpositioned on the handlebars. Proceed as follows:- Rest the vehicle on its centre stand with the handlebarsperfectly horizontal;- Check the fluid level through the sight glass«C». A certain lowering of the level is caused bywear on the pads.Top-upProceed as follows: Loosen the screw "B" and liftthe plastic cover "A" in order to access the brakefluid reservoir. Loosen the two fixing screws andremove the reservoir cover; top-up with the recommendedfluid without exceeding the 'MAX.'mark.This procedure applies to the rear brake pump topupoperation; follow the same procedure for thefront brake pump.Under normal climatic conditions, the fluid must bechanged every 20,000 km or anyway every twoyears.WARNINGONLY USE DOT 4 CLASS BRAKE FLUIDS.COOLING SYSTEM FLUIDS ARE HIGHLY COR-ROSIVE. MAKE SURE THAT IT DOES NOTCOME INTO CONTACT WITH THE PAINT-WORK.CAUTIONMAKE SURE THE BRAKE FLUID DOES NOTGET INTO YOUR EYES OR ON YOUR SKIN ORCLOTHES. IF THIS HAPPENS ACCIDENTALLY,WASH WITH WATER.MAIN - 12
<strong>MP3</strong> <strong>250</strong> i.e.MaintenanceHeadlight adjustmentProceed as follows:1. Position the unloaded vehicle, in running orderand with the tyres inflated to the prescribed pressure,on a flat surface 10 m away from a half-litwhite screen; ensure that the longitudinal axis ofthe vehicle is perpendicular to the screen;2. Remove the headlight assembly central cover3. Turn on the headlight and check that the limit ofthe projected light beam is not over 9/10 or below7/10 of the distance from the ground to the centreof the vehicle headlight;4. Otherwise, adjust the headlight with thescrews«A» indicated in the figureN.B.THE ABOVE PROCEDURE COMPLIES WITHTHE EUROPEAN STANDARDS REGARDINGMAXIMUM AND MINIMUM HEIGHT OF LIGHTBEAMS. REFER TO THE STATUTORY REGU-LATIONS IN FORCE IN EVERY COUNTRYWHERE THE vehicle IS USED.MAIN - 13
Maintenance<strong>MP3</strong> <strong>250</strong> i.e.MAIN - 14
INDEX OF TOPICSTROUBLESHOOTINGTROUBL
Troubleshooting<strong>MP3</strong> <strong>250</strong> i.e.This section makes it possible to find what solutions to apply when troubleshooting.For each breakdown, a list of the possible causes and respective interventions is given.EngineExcessive oil consumption/Exhaust smokeEXCESSIVE CONSUMPTIONPossible CauseOperationWrong valve adjustmentAdjust the valve clearance properlyOverheated valvesRemove the head and the valves, grind or replacethe valvesMisshapen/worn valve seatsReplace the head assemblyWorn cylinder, Worn or broken piston rings Replace the piston cylinder assembly or pistonringsWorn or broken piston rings or piston rings that Replace the piston cylinder unit or just the pistonhave not been fitted properlyringsOil leaks from the couplings or from the gaskets Check and replace the gaskets or restore the couplingsealWorn valve oil guardReplace the valve oil guardWorn valve guidesCheck and replace the head unit if requiredInsufficient lubrication pressurePossible CauseBy-Pass remains openOil pump with excessive clearanceOil filter too dirtyOil level too lowTransmission and brakesPOOR LUBRICATION PRESSUREOperationCheck the By-Pass and replace if required. Carefullyclean the By-Pass area.Perform the dimensional checks on the oil pumpcomponentsReplace the cartridge filterRestore the level using the recommended oil type(Selenia HI Scooter 4 Tech)Clutch grabbing or performing inadequatelyIRREGULAR CLUTCH PERFORMANCE OR SLIPPAGEPossible CauseFaulty clutchOperationCheck that there is no grease on the masses.Check that the clutch mass contact surface withthe casing is mainly in the centre with equivalentcharacteristics on the three masses. Check thatthe clutch casing is not scored or worn in an anomalouswayTROUBL - 2
<strong>MP3</strong> <strong>250</strong> i.e.TroubleshootingInsufficient brakingPossible CauseInefficient braking systemFluid leakage in hydraulic braking systemBrake disc slack or distortedBrakes overheatingINEFFICIENT BRAKING SYSTEMOperationCheck the pad wear (1.5 min). Check that thebrake discs are not worn, scored or warped. Checkthe correct level of fluid in the pumps and replacebrake fluid if necessary. Check there is no air inthe circuits; if necessary, bleed the air. Check thatthe front brake calliper moves in axis with the disc.Failing elastic fittings, plunger or brake pumpseals, replaceCheck the brake disc screws are locked; measurethe axial shift of the disc with a dial gauge and withwheel mounted on the scooter.Possible CauseDefective sliding of pistonsBrake disc slack or distortedClogged compensation holes on the pumpSwollen or glued rubber gasketsSteering and suspensionsBRAKES OVERHEATINGOperationCheck calliper and replace any damaged part.Check the brake disc screws are locked; use a dialgauge and a wheel mounted on the vehicle tomeasure the axial shift of the disc.Clean carefully and blast with compressed airReplace gaskets.Heavy steeringPossible CauseSteering hardeningSTEERING HARDENINGOperationCheck the tightening of the top and bottom ringnuts. If irregularities continue in turning the steeringeven after making the above adjustments,check the seats in which the ball bearings rotate:if they are recessed or if the balls are squashed,replace them.Excessive steering playPossible CauseTorque not conformingEXCESSIVE STEERING CLEARANCEOperationCheck the tightening of the top and bottom ringnuts. If irregularities continue in turning the steeringeven after making the above adjustments,check the seats in which the ball bearings rotate:TROUBL - 3
Troubleshooting<strong>MP3</strong> <strong>250</strong> i.e.Possible CauseOperationif they are recessed or if the balls are squashed,replace them.Noisy suspensionPossible CauseMalfunctions in the suspension systemSuspension oil leakageNOISY SUSPENSIONOperationIf the front suspension is noisy, check: the efficiencyof the front shock absorbers; the condition ofthe ball bearings and relevant lock-nuts, the limitswitch rubber buffers and the movement bushings.In conclusion, check the tightening torque of thewheel hub, the brake calliper, the shock absorberdisk in the attachment to the hub and the steeringtube.Possible CauseSeal fault or breakageOIL LEAKAGE FROM SUSPENSIONOperationReplace the shock absorber Check the conditionof wear of the steering covers and the adjustments.TROUBL - 4
INDEX OF TOPICSELECTRICAL SYSTEMELE SYS
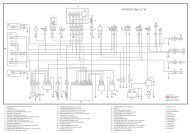
Electrical system<strong>MP3</strong> <strong>250</strong> i.e.KEY1. Immobilizer aerial2. Injection ECU3. Engine rev sensor4. Magneto flywheel5. Diagnostics socket6. Voltage regulator7. Key switch8. Fuse-box9. Fuse-box10. Battery11. Starter motor12. Start up remote control switch13. Starter button14. Stop button on front brake15. Stop button on rear brake16. Helmet compartment light switch17. Helmet compartment light switch18. Helmet compartment light bulb19. Saddle opener actuator20. Saddle opening receiverELE SYS - 2
<strong>MP3</strong> <strong>250</strong> i.e.Electrical system21. Preparation for anti-theft device22. Turn indicator switch23. Hazard switch24. Turn indicator control device25. Left rear turn indicator bulbs26. Rear headlight assemblyA. Tail lightC. Stop light27. License plate bulb28. Right rear turn indicator bulbs29. Left front turn indicator bulb30. Front headlight assemblyA. Low-beam light bulbB. Tail lightC. High-beam light bulb31. Right front turn indicator bulb32. Light switch33. Remote control headlight34. Horn remote control35. Horn36. Horn button37. Pressure sensor38. Locking/unlocking switch39. Geared motor40. Right tone wheel41. Left tone wheel42. Brake calliper sensor43. Parking electronic control unit44. Oil pressure sensor45. Hand brake46. Rider presence sensor47. Potentiometer48. Instrument panel49. External temperature sensor50. Fuel level transmitter51. Electric fan52. Remote control for electric fan53. Injection load remote controlELE SYS - 3
Electrical system<strong>MP3</strong> <strong>250</strong> i.e.54. Engine stop switch55. Mode button56. Engine temperature sensor57. Fuel pump58. Fuel injector59. Lambda probe60. Spark plug61. High voltage coilKeyAr: Orange Az: Sky blue Bi: White Bl: Blue Gi: Yellow Gr:GreyMa:Brown Ne: Black Ro: Pink Rs: Red Ve: Green Vi: PurpleElectrical system installationELE SYS - 4
<strong>MP3</strong> <strong>250</strong> i.e.Electrical systemELE SYS - 5
Electrical system<strong>MP3</strong> <strong>250</strong> i.e.ELE SYS - 6
<strong>MP3</strong> <strong>250</strong> i.e.Electrical systemELE SYS - 7
Electrical system<strong>MP3</strong> <strong>250</strong> i.e.ELE SYS - 8
<strong>MP3</strong> <strong>250</strong> i.e.Electrical systemELE SYS - 9
Electrical system<strong>MP3</strong> <strong>250</strong> i.e.Conceptual diagramsIgnitionKEY1. Immobilizer aerial2. Injection ECU3. Revolution sensor7. Key switch8. Fuse-box9. Fuse-box10. BatteryELE SYS - 10
<strong>MP3</strong> <strong>250</strong> i.e.Electrical system53. Injection load remote control60. Spark plug61. High voltage coilBattery recharge and startingKEY2. Injection ECU4. Magneto flywheel6. Voltage regulator7. Key switch8. Fuse-box9. Fuse-box10. Battery11. Starter motor12. Start up remote control switch13. Starter button14. Stop button on front brake15. Stop button on rear brake26. Rear headlight assemblyB. Stop light54. Engine stop switchELE SYS - 11
Electrical system<strong>MP3</strong> <strong>250</strong> i.e.Level indicators and enable signals sectionKEY1. Immobilizer aerial2. Injection ECU3. Revolution sensor7. Key switch8. Fuse-box9. Fuse-box10. Battery38. Locking/unlocking switch39. Geared motor40. Right tone wheel41. Left tone wheel42. Brake calliper sensor43. Parking electronic control unit44. Oil pressure sensor45. Hand brake46. Rider presence sensor47. Potentiometer48. Instrument panelELE SYS - 12
<strong>MP3</strong> <strong>250</strong> i.e.Electrical system49. External temperature sensor50. Fuel level transmitter53. Injection load remote control54. Engine stop switch55. Mode button56. Engine temperature sensor57. Fuel pump58. Fuel injector59. Lambda probeDevices and accessoriesKEY2. Injection ECU7. Key switch8. Fuse-box9. Fuse-box10. Battery19. Saddle opening actuator20. Saddle opening receiver21. Wiring for antitheft device34. Horn remote controlELE SYS - 13
Electrical system<strong>MP3</strong> <strong>250</strong> i.e.35. Horn36. Horn button37. Pressure sensor43. Parking electronic control unit51. Electric fan52. Remote control for electric fanLights and turn indicatorsKEY7. Key switch8. Fuse-box9. Fuse-box10. Battery21. Wiring for antitheft device22. Turn indicator switch23. Hazard switch24. Turn indicator control device25. Left rear turn indicator bulbs26. Rear headlight assemblyA. Tail lightB. Stop lightELE SYS - 14
<strong>MP3</strong> <strong>250</strong> i.e.Electrical system27. License plate bulb28. Right rear turn indicator bulbs29. Left front turn indicator bulb30. Front headlight assemblyA. Low-beam light bulbB. Tail lightC. High-beam light bulb31. Right front turn indicator bulb32. Light switch33. Remote control headlight43. Parking electronic control unit48. Instrument panelChecks and inspectionsThis section is devoted to the checks on the electrical system components.ImmobiliserThe electronic ignition system is controlled by thecontrol unit with the integrated Immobilizer system.The immobilizer is an anti-theft system thatallows the scooter to be operated only when it isstarted with coded keys recognised by the controlunit. The code is integrated in a transponder in thekey block. This allows the driver clear operationwithout having to do anything other than just turningthe key. The Immobiliser system consists of thefollowing components:- Electronic control unit- Immobilizer aerial- Master key with incorporated transponder (redkey)- service key with incorporated transponder (blackkey)- H.V. coil- Diagnostic LEDThe diagnostic LED also works as a deterringblinker. This function is activated every time theELE SYS - 15
Electrical system<strong>MP3</strong> <strong>250</strong> i.e.ignition switch is turned to the "OFF" position, orthe emergency stop switch is turned to the "OFF"position. It remains activated for 48 hours in ordernot to affect the battery charge. When the ignitionswitch is turned to the "ON" position, the deterringblinker function is deactivated. Subsequently, aflash confirms the switching to the "ON" status.The duration of the flash depends on the programmingof the electronic control unit If the LED is offregardless of the position of the ignition-key switchand/or the instrument panel is not initiated, check:• there is battery voltage• fuses 6,7,10 are in working order• there is power to the control unit asspecified below:Remove the connector support bracket shown inthe photograph and disconnect the connector fromthe control unit. Check the following conditions:With the key switch set to OFF:• if there is battery voltage between terminals6-26 and terminal 6-chassisground (fixed power supply). If there isno voltage check that fuse 6 and its cableare in working order.With the key switch in the OFF position:• there is battery voltage between terminals5-26 and terminal 5-frame earth(fixed power supply). If there is no voltage,check the key switch contacts,that fuse no. 10 and its cable are workingorder.ELE SYS - 16
<strong>MP3</strong> <strong>250</strong> i.e.Electrical system• There is continuity between terminals12-18 and 12-19 with the emergencycut-out switch in the RUN position. Ifthere is no continuity check the contactsof the latter.If no faults are found, replace the electronic controlunit.After removing the shield back plate, remove theelectrical connection from the aerial as shown inthe photographRemove the protective base from the connector.With the ignition key switch at ON check there isbattery voltage between the Red-White and BlackcablesELE SYS - 17
Electrical system<strong>MP3</strong> <strong>250</strong> i.e.With MIU connector disconnected check the continuitybetween the Orange-White cable and pin 7of the interface wiring .Specific tooling020481Y Control unit interface wiring020331Y Digital multimeterVirgin circuitWhen the ignition system is not encrypted, any key will start the engine but limited to 2000 rpm. Thekeys can only be recognised if the control unit has been programmed properly. The data storage procedurefor a previously not programmed control unit provides for the recognition of the master as thefirst key to be stored to memory: this becomes particularly important because it is the only key thatenables the control unit to be wiped clean and reprogrammed for the memorisation of the service keys.The master and service keys must be used to code the system as follows:- Insert the Master key, turn it to «ON» and keep this position for two seconds (lower and upper limits1 to 3 seconds).- Insert the service key and turn it to "ON" for 2 seconds.- If you have copies of the key, repeat the operation with each key.- Insert the MASTER key again and turn it to "ON" for 2 seconds.The maximum time to change keys is 10 seconds.During a single data storage sequence a maximum of 7 service keys are allowed.It is essential to adhere to the times and the procedure. If you do not, start again from the beginning.Once the system has been programmed, master key transponder, decoder and control unit are strictlymatched. With this link established, it is now possible to encode new service keys, in the event of losses,replacements, etc. Each new programming deletes the previous one so, in order to add or eliminatekeys, you must repeat the procedure using all the keys you intend to keep using. If a service key shouldbecome un-coded, the efficiency of the high voltage circuit shielding must be thoroughly inspected: Inany case it is advisable to use resistive spark plugs.ELE SYS - 18
<strong>MP3</strong> <strong>250</strong> i.e.Electrical systemCharacteristicMASTER key:RED KEYSERVICE key.BLACK KEYDiagnostic codesThe immobiliser system is tested each time the ignition-keyswitch is turned from OFF to ON. Duringthis diagnosis phase a number of control unit statusescan be seen and various light codes displayed.Regardless of the code transmitted, if atthe end of the diagnosis the led remains off permanently,the ignition is enabled. If, however, theled remains on permanently, it means the ignitionis inhibited:1. Previously unused control unit - key inserted:a single 2 second flash is displayed, afterwhich the LED remains off permanently. The keyscan be stored to memory, the vehicle can be startedbut with a limitation imposed on the number ofrevs.2. Previously unused control unit - transponderabsent or cannot be used: The LED is permanentlyON; in this condition, no operations arepossible, including starting of the vehicle.3. Programmed control unit - the service key in(normal condition of use): a single 0.7 secondflash is displayed, after which the LED remains offpermanently. The engine can be started.4. Programmed control unit - Master key in: a0.7 sec. flash is displayed followed by the LED remainingoff for 2 sec. and then by short 0.46 sec.flashes the same number of times as there arekeys stored in the memory including the Masterkey. When the diagnosis has been completed, theELE SYS - 19
Electrical system<strong>MP3</strong> <strong>250</strong> i.e.LED remains permanently OFF. The engine canbe started.5. Programmed control unit - fault detected: a light code is displayed according to the fault detected,after which the LED remains on permanently. The engine cannot be started. The codes that can betransmitted are:• Code 1 flash• 2 flash code• 3 flash codeDiagnostic code - 1 flashThe one-flash code indicates a system where theserial line is not present or is not detected. Checkthe Immobiliser aerial wiring and change it if necessary.Diagnostic code - 2 flashesTwo-flash code shows a system where the controlunit does not show the transponder signal. Thismight depend on the inefficiency of the immobiliseraerial or the transponder.Turn the switch to ON using several keys: if thecode is repeated even with the Master key, checkthe aerial wiring and change it if necessary. If thisis not the case, replace the defective key and/orreprogram the control unit. Replace the control unitif the problem continues.ELE SYS - 20
<strong>MP3</strong> <strong>250</strong> i.e.Electrical systemDiagnostic code - 3 flashesThe three-flash code indicates a system where thecontrol unit does not recognise the key. Turn theswitch to ON using several keys: if the error codeis repeated even with the Master key, replace thecontrol unit. If this is not the case, perform a reprogramming.Battery recharge circuitThe recharge system is provided with a three-phase alternator with permanent magneto flywheel.The alternator is directly connected to the voltage regulator.This, in its turn, is connected directly to the ground and the battery positive terminal passing throughthe 30A protective fuse.The three- phase generator provides good recharge power and at low revs, a good compromise isachieved between generated power and idle stability.Stator checkStator winding check-upWARNINGTHE CHECK-UP CAN BE MADE WITH THE STATOR PROPERLY INSTALLED.1 Remove the right side panel.2) Disconnect the connector between stator and regulator with the three yellow cables as shown in thephotograph.3) Measure the resistance between each of the yellow terminals and the other two.Electric characteristicResistance:0.2 - 1 ΩELE SYS - 21
Electrical system<strong>MP3</strong> <strong>250</strong> i.e.4) Check that there is insulation between the eachyellow cable and the ground.5) If values are incorrect, replace the stator.Recharge system voltage checkLook for any leakage1) Access the battery by removing its cover under the saddle.2) Check that the battery does not show signs of losing fluid before checking the output voltage.3) Turn the ignition key to position OFF, connect the terminals of the tester between the negative pole(-) of the battery and the black cable and only then disconnect the black cable from the negative pole(-) of the battery.4) With ignition key still at OFF, the reading detected by the ammeter must be ≤ 0.5 mA.Check the charging currentWARNINGBEFORE CARRYING OUT THE CHECK, MAKE SURE THAT THE BATTERY IS IN GOOD WORK-ING ORDER.1) Place the vehicle on its centre stand2) With the battery correctly connected to the circuit, place the tester terminals between the batteryterminals..3) Turn on the engine, increase the revs and, at the same time, measure the voltage.Electric characteristicVoltage ranging between 14.0 and 15.0V at 5000 rpm.Maximum current output check.- With the engine off and the panel at «ON» with the lights on, allow the battery voltage to stop at 12V.- Connect ammeter pliers to the 2 recharge positive poles in output from the regulator.- Start the engine and rev it up to a high engine speed while reading the value on the pincer.With an efficient battery a value must be detected: > 20ASpecificationTypeVoltageVOLTAGE REGULATOR/RECTIFIERDesc./QuantityNon-adjustable three-phase transistor14 ÷ 15V at 5000 rpm with lights offELE SYS - 22
<strong>MP3</strong> <strong>250</strong> i.e.Electrical systemFusesThe electrical system has twelve fuses divided intwo fuse boxes to protect the different installationcircuits. One of them is inside the battery compartmentand the other is at the right internal side ofthe footrest. To be able to reach, loosen the screw"A" and remove the plastic cover. The chart showsthe position and characteristics of the fuses in thevehicle.CAUTIONBEFORE REPLACING THE BLOWN FUSE,FIND AND SOLVE THE FAILURE THATCAUSED IT TO BLOW. NEVER TRY TO RE-PLACE THE FUSE WITH ANY OTHER MATERI-AL (E.G., A PIECE OF ELECTRIC WIRE).FUSE TABLESpecificationDesc./Quantity1 Fuse No. 1 Capacity: 30AProtected circuits:Voltage regulatorLocation:battery compartment2 Fuse No. 2 Capacity: 20AProtected circuits:battery-powered fuseNo. 7, live fuses No. 8 - No. 9 - No.10 - No.11Location:battery compartment3 Fuse No. 3 (if present) Capacity: 20AProtected circuits:parking control ECULocation:battery compartment4 Fuse No. 4 Capacity: 15 AProtected circuits:Battery-powered saddleopening switch, glove-box lighting, headlight,emergency turn indicatorLocation:battery compartment5 Fuse No. 5 Capacity: 15 AProtected circuits:Battery-powered injectionloads, electrical fanLocation:battery compartment6 Fuse No. 6 Capacity: 3AProtected circuits:Battery-powered injectioncontrol unitLocation:battery compartmentELE SYS - 23
Electrical system<strong>MP3</strong> <strong>250</strong> i.e.SpecificationDesc./Quantity7 Fuse No. 7 Capacity: 7.5 AProtected circuits:Battery-powered instrumentpanelLocation:footrest8 Fuse No. 8 Capacity: 10AProtected circuits:Live stop and start lightsLocation:footrest9 Fuse No. 9 Capacity: 7.5 AProtected circuits:live passing and hornLocation:battery compartment10 Fuse No. 10 Capacity: 7.5AProtected circuits:Live injection, electricalfan remote control antenna, injection loadsremote controlLocation:footrest11 Fuse No. 11 Capacity: 7.5AProtected circuits:Live ECU parking lever,antitheft device, instrument panel, headlightremote control, horn remote controlLocation:footrest12 Fuse No. 12 Capacity: 7.5AProtected circuits:Live turn indicator, saddleopening switch, tail lights, panel lightingLocation:footrestDashboardA = Led immobilizer / anti-theft deviceB= Speedometer with twin scale (km/h and mph)C = CLOCK switchD = Digital displayE = Front suspension locking system warning light (if available)F = SET switchG = Rpm indicatorH = Fuel gaugeI = Warning light for helmet compartment courtesy light onL = Engine control telltale light and injection system failure warning lightM = Low fuel warning lightN = Engine stop warning lightD= Turn indicator warning lightP = Low oil pressure warning lightQ = Front suspension locking system failure warning light (if available)R = Warning light for parking brake engagedC = High-beam warning lightELE SYS - 24
<strong>MP3</strong> <strong>250</strong> i.e.Electrical systemA = Total odometer gaugeB = «BELT» maintenance iconC = «SERVICE» maintenance iconD = Engine coolant temperature indicatorE = Trip odometer gauge (A-B) and ambient temperature(selected with the MODE button)F = TIME-DATE indicatorG = Low fuel warning lightH = Trip odometer gauge (B)I = Trip odometer gauge (A)L = Kilometre - mile indicatorSealed batteryIf the vehicle is provided with a sealed battery, the only maintenance required is the check of its chargeand recharging, if necessary.These operations should be carried out before delivering the vehicle, and on a six-month basis whilethe vehicle is stored in open circuit.Besides, upon pre-delivery it is therefore necessary to check the battery charge and recharge it, ifrequired, before storing the vehicle and, afterwards, every six months.INSTRUCTIONS FOR THE RENEWAL RECHARGE AFTER OPEN-CIRCUIT STORAGE1) Voltage check upBefore installing the battery on the vehicle, check the open circuit voltage with a regular tester.- If voltage exceeds 12.60 V, the battery can be installed without any renewal recharge.- If voltage is below 12.60 V, a renewal recharge is required as explained in 2).2) Constant voltage battery charge mode- Constant voltage charge equal to 14.40 ÷ 14.70VELE SYS - 25
Electrical system<strong>MP3</strong> <strong>250</strong> i.e.-Initial charge voltage equal to 0.3 ÷ 0.5 for Nominal capacity- Charge time:10 to 12 h recommendedMinimum 6 hMaximum 24 h3) Constant current battery charge mode- Charge current equal to 1/10 of the battery rated capacity- Charge time: Maximum 5 hConnectors1A Alimentazione potenziometro2A Linea CAN3A Alimentazione spie4A Spia blocco rollio5A Spia warning6A Uscita teleruttore anabbaglianti7A Massa potenziometro8A Massa centralina1B Alimentazione da chiave2B Linea CAN3B Sensore giri ruota SX4B Sensore giri ruota DX5B Segnale potenziometro6B Pulsante comando bolocco - sblocco rollio7B Teleruttore claxon (allarme)8B Uscita (A) motore elettro-attuatore1C Alimentazione da batteria2C Linea "K"3C Pulsante comando bolocco - sblocco rollio4C Pulsante pinza rollio5C Pulsante comando bolocco - sblocco rollio6C Sensore presenza pilota7C Segnale di velocita per il gruppo strumenti8C Uscita (B) motore elettro-attuatoreELE SYS - 26
<strong>MP3</strong> <strong>250</strong> i.e.Electrical systemDashboard1/20 Sensore velocità2/20 Segnale livello carburante3/20 Sensore temperatura liquido di raffreddamento4/20 Massa sensore temperatura liquido di raffreddamento5/20 Pulsante mode remoto6/20 Spia pressione olio7/20 Spia lampeggiatore sinistro8/20 Spia lampeggiatore destro9/20 Spia luce abbagliante10/20 Spia bauliera aperta11/20 Sensore giri12/20 Sensore temperatura ambiente13/20 Massa sensore temperatura ambiente14/20 Spia motore inibito15/20 Spia immobilizer16/20 Spia controllo motore17/20 Spia freno di stazionamento18/20 Spia blocco rollio attivato19/20 Spia avaria sistema blocco rollio20/20 Positivo sotto chiave dalla centralina comando di stazionamento5/12 Illuminazione6/12 Positivo batteria11/12 Massa12/12 Positivo sotto chiaveRemote seat openingELE SYS - 27
Electrical system<strong>MP3</strong> <strong>250</strong> i.e.Zeroing- Remove the left side fairing to access the saddleopening receiver control unit indicated in the photograph- Remove the metal terminal and connect it to agood earth point, or to terminal 7 (black), for atleast 10 seconds.- In this operation all the remote controls stored inthe control unit will be deleted.WARNINGTHE CONTROL UNIT CAN PROGRAMME UPTO 8 REMOTE CONTROLS.ProgrammingFollow these steps to program the remote controls:1. Insert the remote control key to be programmed in the steering lock key block.2. Turn the key to «ON», press the button on the remote control, release the button, turn the key backto «OFF» from the «ON» position, all within 4 seconds.3 Wait 1 to 8 seconds.4. Repeat steps 2 and 3 for 4 times without removing the key.The control unit confirms the programming has been successfully executed by opening the saddle.WARNINGTO STORE THE OTHER REMOTE CONTROLS TO MEMORY, (MAXIMUM 8), YOU NEED TO RE-PEAT THE WHOLE PROCEDURE AGAIN. FAILURE TO CARRY OUT THESE OPERATIONSWITHIN THE INDICATED TIMES WILL RESULT IN THE AUTOMATIC CANCELLATION OF THEPROCESS FOR PROGRAMMING THE REMOTE-CONTROLLED KEYS.WARNINGAVOID PRESSING THE REMOTE CONTROL BUTTON MORE THAN ONCE WHEN FAR AWAYFROM THE SCOOTER. THE SYNCHRONISM BETWEEN THE REMOTE CONTROL AND THE RE-CEIVER CAN BE IMPAIRED. SHOULD THIS BE THE CASE, REPEAT THE PROGRAMMINGPROCEDURE. DO NOT KEEP THE REMOTE CONTROL IN PLACES WITH TEMPERATURES EX-CEEDING 60° C THE BATTERY WILL RUN DOWN TOO QUICKLY.WARNINGELE SYS - 28
<strong>MP3</strong> <strong>250</strong> i.e.Electrical systemTO AVOID BATTERY DISCHARGE, THE SADDLE OPENING REMOTE CONTROL RADIO RE-CEIVER DEACTIVATES 7 DAYS AFTER THE LAST TIME THE VEHICLE WAS SHUT OFF.JUST TURN THE KEY TO «ON» TO REACTIVATE THE RECEIVER.ELE SYS - 29
Electrical system<strong>MP3</strong> <strong>250</strong> i.e.ELE SYS - 30
INDEX OF TOPICSENGINE FROM VEHICLEENG VE
Engine from vehicle<strong>MP3</strong> <strong>250</strong> i.e.This section describes the operations to carry out when removing the engine from the vehicle.Exhaust assy. Removal- Remove the Lambda probe from its support anddisconnect it.- Undo the two exhaust manifold fixings on thehead. To undo the nuts fixing the muffler flange tothe head properly, you must use a jointed wrenchthat enables you to get at the right nut as well, accordingto the direction of travel, that is difficult toget at with a traditional straight wrench.- Undo the three screws fixing the muffler to thesupport arm.Remove the full muffler unit.Remove the lambda probe from the manifold.ENG VE - 2
<strong>MP3</strong> <strong>250</strong> i.e.Engine from vehicleCAUTION: SHOULD IT BE NECESSARY TO REMOVE ONLY THE MUFFLER TIP, ALWAYS RE-PLACE THE GRAPHITE GASKET BETWEEN STUB AND TIP.Removal of the engine from the vehicle- Disconnect the battery- Remove the engine cover inside the helmet compartment- Remove the side panelsRemove the full muffler assembly.CAUTIONTHIS OPERATION MUST BE CARRIED OUTWHEN THE ENGINE IS COLD.- Remove the rear wheel.- Remove the pipe feeding coolant into the pumpas shown in the photograph and then empty thesystem.- Remove the engine coolant outlet pipe as indicated.- Disconnect the fuel delivery and return pipes fromthe injector by removing the screw locking the retainingclip.- Disconnect the injector wiring and the throttlebody control unit wiring.ENG VE - 3
Engine from vehicle<strong>MP3</strong> <strong>250</strong> i.e.- Remove the coolant outlet pipe from the motoras indicated.- Remove the spark plug caps.- Remove the coolant temperature sensor connectorindicated in the photo.- Remove the throttle cable from the throttle bodyby undoing the nut shown in the photo.- Remove the positive and negative wiring from thestarter motor as shown in the photo.ENG VE - 4
Engine from vehicle<strong>MP3</strong> <strong>250</strong> i.e.PAY PARTICULAR ATTENTION TO POSITIONING THE THROTTLE COMMAND TRANSMISSIONPROPERLY.ENG VE - 6
INDEX OF TOPICSENGINEENG
Engine<strong>MP3</strong> <strong>250</strong> i.e.This section describes the operations to be carried out on the engine and the tools to be used.Automatic transmissionTransmission cover- To remove the transmission cover it is necessaryto remove the plastic cover first, by inserting ascrewdriver in the slotted holes. Using the clutchbell lock wrench shown in the figure, remove thedriven pulley shaft locking nut and washer.Specific tooling020423Y driven pulley lock wrench- Remove the cap/dipstick from the engine oil fillinghole.- Remove the ten screws.- Remove the transmission cover.N.B.WHEN YOU ARE REMOVING THE TRANSMIS-SION COVER YOU MUST BE CAREFUL NOTTO DROP THE CLUTCH BELL.Air ductVersione <strong>250</strong>- Remove the five screws on two different levelsas well as the small casing.ENG - 2
<strong>MP3</strong> <strong>250</strong> i.e.Engine- To remove the intake throat on the transmissioncover, just remove the 2 fixing screws indicated inthe figure.Removing the driven pulley shaft bearing- Remove the clip from the inside of the cover.- Remove the bearing from the crankcase bymeans of:Specific tooling020376Y Adaptor handle020375Y Adaptor 28 x 30 mm020412Y 15 mm guideRefitting the driven pulley shaft bearing- Slightly heat the crankcase from the inside so asnot to damage the painted surface.- Insert the bearing in its seat.- Refit the seeger ring.CAUTIONUSE AN APPROPRIATE REST SURFACE TOAVOID DAMAGING THE COVER PAINT.N.B.ALWAYS REPLACE THE BEARING WITH ANEW ONE UPON REFITTING.Specific tooling020376Y Adaptor handle020357Y 32 x 35 mm adaptor020412Y 15 mm guideBaffle rollerENG - 3
Engine<strong>MP3</strong> <strong>250</strong> i.e.Plastic roller- Check that the roller does not show signs of wearand that it turns freely.- Remove the special clamping screws as indicatedin the photograph- Check the outer diameter of the roller does nothave defects that could jeopardise belt functioning- For refitting, place the roller with the belt containmentedge on the engine crankcase side- Tighten the wrench to the prescribed torque.Locking torques (N*m)Anti-flapping roller 12 - 16Removing the driven pulley- Remove the clutch bell housing and the drivenpulley assembly.N.B.THE UNIT CAN ALSO BE REMOVED WITH THEDRIVING PULLEY MOUNTED.ENG - 4
<strong>MP3</strong> <strong>250</strong> i.e.EngineInspecting the clutch drum- Check that the clutch bell is not worn or damaged.- Measure the clutch bell inside diameter.CharacteristicMax. value clutch bellMax. value: Ø 134.5 mmClutch bell standard valueStandard value: Ø 134 - 134.2 mmChecking the bell working surface eccentricity- Install the bell on a driven pulley shaft using 2bearings (inner diameter 15 and 17 mm).- Lock with the original spacer and nut.- Place the bell/shaft assembly on the support tocheck the crankshaft alignment.- Using a feeler pin gauge and the magnetic base,measure the bell eccentricity.- Repeat the measurement in 3 positions (Central,internal, external).- If faults are found, replace the bell.Specific tooling020074Y Support base for checking crankshaftalignment020335Y Magnetic support for dial gaugeCharacteristicclutch bell inspection: Limit eccentricity.Admissible limit eccentricity: 0.15 mmENG - 5
Engine<strong>MP3</strong> <strong>250</strong> i.e.Removing the clutchFit the driven pulley spring compressor specifictool with medium length pins screwed in position«C» on the tool internal side.- Introduce the adapter ring No. 11 with the chamferingfacing the inside of the tool.- Fit the driven pulley unit on the tool with the insertionof the 3 pins in the ventilation holes in themass holder support.- Make sure that the clutch is perfectly inserted intothe adapter ring before proceeding to loosen/tightenthe clutch nut.- Use the special 46x55 wrench component No. 9to remove the nut fixing the clutch in place.- Dismantle the driven pulley components (Clutchand spring with its plastic holder)CAUTIONTHE TOOL MUST BE FIRMLY FIXED IN THECLAMP AND THE CENTRAL SCREW MUST BEBROUGHT INTO CONTACT WITH THE TOOL.EXCESSIVE TORQUE CAN CAUSE THE SPE-CIFIC TOOL TO BUCKLE.Specific tooling020444Y011 adapter ring020444Y009 46x55 Wrench020444Y Tool for fitting/ removing the drivenpulley clutchInspecting the clutch- Check the thickness of the clutch mass frictionmaterial.- The masses must not show traces of lubricants;otherwise, check the driven pulley unit seals.N.B.UPON RUNNING-IN, THE MASSES MUST EX-HIBIT A CENTRAL CONTACT SURFACE ANDMUST NOT BE DIFFERENT FROM ONE AN-OTHER.VARIOUS CONDITIONS CAN CAUSE THECLUTCH TO TEAR.CAUTIONENG - 6
<strong>MP3</strong> <strong>250</strong> i.e.EngineDO NOT OPEN THE MASSES USING TOOLSTO PREVENT A VARIATION IN THE RETURNSPRING LOAD.CharacteristicCheck minimum thickness1 mmPin retaining collar- Simultaneously turn and pull the collar manuallyto remove it.N.B.USE TWO SCREWDRIVERS IF YOU HAVE DIF-FICULTY.N.B.BE CAREFUL NOT TO PUSH THE SCREWDRIVERS IN TOO FAR TO AVOID DAMAGETHAT COULD ENDANGER THE O-RING SEAL.- Remove the four torque server pins and pull thepulley halves apart.Removing the driven half-pulley bearing- Check there are no signs of wear and/or noisiness;- Replace with a new one if there are.- Remove the retaining ring using two flat bladescrewdrivers.- Support the pulley bushing adequately from thethreaded side using a wooden surface.- Using a hammer and pin, knock the ball bearingout as shown in the figure.ENG - 7
Engine<strong>MP3</strong> <strong>250</strong> i.e.- Support the pulley properly using the bell asshown in the figure.Specific tooling001467Y035 Belle for OD 47-mm bearings- Remove the roller bearing using the modular punch.Specific tooling020376Y Adaptor handle020456Y Ø 24 mm adaptor020363Y 20 mm guideInspecting the driven fixed half-pulleyVersion <strong>250</strong>- Measure the outer diameter of the pulley bushing.- Check the contact surface with the belt to makesure there are no flaws.- Check the riveted joints are functional.- Check the evenness of the belt contact surface.CharacteristicHalf-pulley minimum diameterMinimum admissible diameter Ø 40.96 mmHalf-pulley standard diameterStandard diameter: Ø 40.985 mmWear limit0.3 mmENG - 8
<strong>MP3</strong> <strong>250</strong> i.e.EngineInspecting the driven sliding half-pulley- Remove the two internal grommets and the twoO-rings.- Measure the movable half-pulley bushing insidediameter.- Check the contact surface with the belt to makesure there are no flaws.- Check the riveted joints are functional.- Check the evenness of the belt faying surface.MOVABLE DRIVEN HALF-PULLEY DIMENSIONSSpecificationWear limitstandard diametermaximum allowable diameterRefitting the driven half-pulley bearing- Support the pulley bushing adequately from thethreaded side using a wooden surface.- Fit a new roller sleeve as in the figure.- For the fitting of the new ball bearing, follow theexample in the figure using a modular punch.Fit the retention ringWARNINGN.B.FIT THE BALL BEARING WITH THE VISIBLESHIELDSpecific tooling020376Y Adaptor handle020375Y Adaptor 28 x 30 mm020424Y Driven pulley roller casing fittingpunchDesc./Quantity0.3 mmDiameter 41.000 - 41.035 mmØ 41.08 mmENG - 9
Engine<strong>MP3</strong> <strong>250</strong> i.e.Refitting the driven pulley- Insert the new oil guards and O-rings on the movablehalf-pulley.- Lightly grease the O-rings «A» shown in the figure.- Fit the half-pulley over the bushing using the specifictool.- Check that the pins are not worn and proceed torefitting them in their slots.- Refit the torque server closure collar.- Using a curved-spout grease gun, lubricate thedriven pulley unit with approximately 6 gr. ofgrease. Apply the grease through one of the holesin the bushing until it comes out through the holeon the opposite side. This operation is necessaryto avoid the presence of grease beyond the O-rings.N.B.THE TORQUE SERVER CAN BE GREASEDWHETHER WITH BEARINGS FITTED ORWHEN THEY ARE BEING REPLACED; UNDER-TAKING THE OPERATION WHEN THE BEAR-INGS ARE BEING SERVICED MIGHT BE EAS-IER.Specific tooling020263Y Sheath for driven pulley fittingRecommended productsAGIP GREASE SM 2 Grease for the tone wheelrevolving ringENG - 10
<strong>MP3</strong> <strong>250</strong> i.e.EngineSoap-based lithium grease containing NLGI 2 Molybdenumdisulphide; ISO-L-XBCHB2, DINKF2K-20Inspecting the clutch spring- Measure the length of the spring, while it is relaxed.CharacteristicStandard length123 mmacceptable limit after use:118 mmRefitting the clutch- Support the driven pulley spring compressor appropriatetool with the control screw in vertical axis.- Arrange the tool with the medium length pinsscrewed in position "C" on the inside.- Introduce the adapter ring No. 11 with the chamferingfacing upwards.- Insert the clutch on the adapter ring.- Lubricate the end of the spring that abuts againstthe servo-system closing collar.- Insert the spring with its plastic holder in contactwith the clutch.- Insert the driving belt into the pulley unit accordingto their direction of rotation.- Insert the pulley unit with the belt into the tool.- Slightly preload the spring.- Make sure that the clutch is perfectly inserted intothe adapter ring before proceeding to tighten theclutch nut.- Place the tool in the clamp with the control screwon the horizontal axis.- Fully preload the spring.ENG - 11
Engine<strong>MP3</strong> <strong>250</strong> i.e.- Apply the clutch fixing nut and tighten it to theprescribed torque using the special 46x55 wrench.- Loosen the tool clamp and insert the belt accordingto its direction of rotation.- Lock the driven pulley again using the specifictool.- Preload the clutch return spring with a traction/rotation combined action and place the belt in thesmaller diameter rolling position.- Remove the driven pulley /belt unit from the tool.N.B.DURING THE SPRING PRELOADING PHASE,BE CAREFUL NOT TO DAMAGE THE PLASTICSPRING STOP AND THE BUSHING THREAD-ING.N.B.FOR DESIGN REASONS, THE NUT IS SLIGHT-LY ASYMMETRIC; THE FLATTEST SURFACESHOULD BE MOUNTED IN CONTACT WITHTHE CLUTCH.Specific tooling020444Y Tool for fitting/ removing the drivenpulley clutch020444Y011 adapter ring020444Y009 46x55 WrenchLocking torques (N*m)Clutch unit nut on driven pulley 45 ÷ 50Refitting the driven pulley- Refit the clutch bell.ENG - 12
<strong>MP3</strong> <strong>250</strong> i.e.EngineDrive-belt- Check that the driving belt is not damaged.- Check the width of the belt.Characteristic<strong>250</strong> 4T Transmission belt/minimum width19.5 mm<strong>250</strong> 4T Transmission belt/standard width21.3 ± 0.2 mmDuring the wear checks in the scheduled servicingprogramme, you are advised to check the rim bottomof the toothing does not show signs of incisionsor cracking (see figure): The rim bottom ofthe tooth must not have incisions or cracking; if itdoes, change the belt.Removing the driving pulley- Turn the crankshaft until the ropes of the pulleyare on a horizontal axis- Insert the adaptor sleeve of the appropriate toolin the hole shown in the photographENG - 13
Engine<strong>MP3</strong> <strong>250</strong> i.e.- Insert the tool in the hollows and apply the retentionring- Bring in the ring's clamping screws while keepingthe tool to support the pulleySpecific tooling020626Y Driving pulley lock wrench- Remove the fixing nut and the washer- Remove the stationary drive pulley half.Inspecting the rollers case- Check that the internal bushing shown in the figureis not abnormally worn and measure innerdiameter A.- Measure outer diameter B of the pulley slidingbushing shown in the figure.- Check that the rollers are not damaged or worn.- Check the guide shoes for the variator back-plateare not worn.- Check the wear of the roller housings and of thebelt contact surfaces on both pulley halves.- Check that stationary driving pulley does notshow signs of abnormal wear on the grooved edgeand on the surface in contact with the belt.- Check that the O-ring is not pushed out of shape.CAUTIONDO NOT LUBRICATE OR CLEAN SINTEREDBUSHINGSCharacteristicMovable driving half-pulley bushing: StandardDiameterENG - 14
<strong>MP3</strong> <strong>250</strong> i.e.Engine26.000 - 26.021 mmMovable driving half-pulley bushing: Maximumallowable diameterØ 26.12 mmSliding bushing: Standard DiameterØ 25.959 ÷ 25.98 mmSliding bushing: Minimum admissible diameterØ 25.95 mmRoller: Standard DiameterDiameter 20.5 - 20.7 mmRoller: Minimum diameter permittedØ 20 mmRefitting the driving pulley- Preassemble the movable half-pulley with theroller contrast plate by putting the rollers in theirhousings with the larger support surface touchingthe pulley according to the direction of rotation.- Check that the roller contact plate does not haveflaws and is not damaged on the grooved edge.- Mount the complete bushing unit on the drivingshaft.- Fit the driven pulley/Clutch/belt unit on the engine.ENG - 15
Engine<strong>MP3</strong> <strong>250</strong> i.e.- Fit the steel shim in contact with the bushing andthe stationary drive pulley.- Install the appropriate tool as described in the removalphase.-Tighten the nut with washer to the prescribed torque.Specific tooling020626Y Driving pulley lock wrenchLocking torques (N*m)Drive pulley nut 75 ÷ 83Refitting the transmission cover- Check the presence of the 2 centring dowels andthe correct installation of the sealing gasket for theoil sump on the transmission cover.- Replace the cover tightening the 10 screws at thespecified torque.- Refit the oil loading cap/bar.- refit the steel washer and the driven pulley nut.- Tighten the nut to the prescribed torque using thelock wrench and the torque wrench tools.- Replace the plastic cover.Specific tooling020423Y driven pulley lock wrenchLocking torques (N*m)Transmission cover screws 11 ÷ 13 Driven pulleyshaft nut 54 ÷ 60End gearENG - 16
<strong>MP3</strong> <strong>250</strong> i.e.EngineRemoving the hub cover- Empty the rear hub through the oil drainage plug.- Remove the 7 flanged screws indicated in thefigure.- Remove the hub cover and its gasket.Removing the wheel axle- Remove the wheel axis complete with gear.- Remove the intermediate gear.ENG - 17
Engine<strong>MP3</strong> <strong>250</strong> i.e.Removing the hub bearings- Check the state of the bearings being examined(wear, clearance and noisiness). If faults are detected,do the following.- Use the specific bearing extractor to remove thethree 15 mm bearings (2 in the crankcase and 1 inthe hub cover).Specific tooling001467Y013 Pliers to extract ø 15-mm bearingsRemoving the wheel axle bearings- Take out the clip on the outside of the gearboxcover.- Support the hub cover and expel the bearing.By means of the appropriate tools, remove the oilguard as in the figure.Specific tooling020376Y Adaptor handle020477Y Adaptor 37 mm020483Y 30 mm guide020359Y 42x47-mm adaptor020489Y Hub cover support stud bolt setENG - 18
<strong>MP3</strong> <strong>250</strong> i.e.EngineRemoving the driven pulley shaft bearing- As you need to remove the driven pulley shaft, itsbearing and oil guard, remove the transmissioncover as described above.- Extract the driven pulley shaft from its bearing.- Remove the oil guard using a screwdriver, workingfrom inside the bearing and being careful notto damage the housing, make it come out of thebelt transmission side.- Remove the seeger ring shown in the figureRemove the driven pulley shaft bearing using themodular punch.Specific tooling020376Y Adaptor handle020375Y Adaptor 28 x 30 mm020363Y 20 mm guideInspecting the hub shaft- Check the three shafts for wear or distortion ofthe toothed surfaces, the bearing housings, andthe oil seal housings.- In case of anomalies, replace the damaged components.Inspecting the hub cover- Check that the fitting surface is not dented or distorted.- Check the bearing bearings.- In case of anomalies, replace the damaged components.ENG - 19
Engine<strong>MP3</strong> <strong>250</strong> i.e.Refitting the wheel axle bearing- Support the hub cover on a wooden surface.- Heat the crankcase cover with the specific heatgun.- Fit the wheel shaft bearing with a modular punchas shown in the figure.- Fit the seeger ring.- Fit the oil guard with seal lip towards the insideof the hub and place it flush with the internal surfaceby means of the appropriate tool used fromthe 52 mm side.The 52 mm side of the adapter must be turned towardsthe bearing.Specific tooling020376Y Adaptor handle020360Y Adaptor 52 x 55 mm020483Y 30 mm guideENG - 20
<strong>MP3</strong> <strong>250</strong> i.e.EngineRefitting the hub cover bearingsFor the fitting of the hub box bearings the enginecrankcase and the cover must be heated with thespecial heat gun.- The three 15 mm bearings must be fitted usingthe appropriate tools.- The 42-mm side of the adapter must be turnedtowards the bearing.Specific tooling020150Y Air heater support020151Y Air heater020376Y Adaptor handle020359Y 42x47-mm adaptor020412Y 15 mm guideN.B.TO FIT THE BEARING ON THE COVER, SUPPORT THE COVER WITH THE STUD BOLT SET.- Refit the driven pulley shaft bearing with a modularpunch as shown in the figure.N.B.IF THE BEARING HAS AN ASYMMETRICALBALL RETAINER, PLACE IT SO THAT THEBALLS ARE VISIBLE FROM THE HUB INNERSIDE.Specific tooling020376Y Adaptor handle020359Y 42x47-mm adaptor020363Y 20 mm guideN.B.WHEN FITTING THE BEARINGS ON THE ENGINE CRANKCASE, SUPPORT THE CRANKCASEPREFERABLY ON A SURFACE TO ALLOW THE BEARINGS TO BE DRIVEN VERTICALLY.- Refit the seeger ring with the opening facing the bearing and fit a new oil guard flush with the crankcasefrom the pulley side.ENG - 21
Engine<strong>MP3</strong> <strong>250</strong> i.e.Refitting the hub bearings- Install the three shafts in the engine crankcaseas shown in the figure.Refitting the ub cover- Fit a new gasket together with the centring dowels.- Seal the gasket of the breather pipe using blacksilicone sealant.- Fit the gearbox cover, making sure the breatherpipe is in the correct position.- Position the shorter screw that can also be recognisedfrom the different colour as shown in thefigure.- Fix the breather tube support by means of thelower screw.- Fit the remaining screws and tighten the sevenscrews to the prescribed torque.Flywheel coverENG - 22
<strong>MP3</strong> <strong>250</strong> i.e.EngineRemoving the hub cover- Remove the clip fixing the hose to the cylinder.- Remove the ten fixings- Remove the flywheel cover.Removing the stator- Remove the two pickup screws and the screwholding the wiring support and the three statorclamping screws shown in the figure.- Remove the stator and its wiring.ENG - 23
Engine<strong>MP3</strong> <strong>250</strong> i.e.Refitting the stator- Refit the stator and flywheel carrying out the removalprocedure in reverse, tightening the retainersto the specified torque.Locking torques (N*m)Stator assembly screws (°) 3 ÷ 4Refitting the flywheel cover- Position the spline clip on the crankshaft and orientthe end as shown in the figure.- Orient the water pump shaft with reference to thetransmission gear seat as shown in the photo.- Refit the cover over the engine and tighten the screws to the prescribed torque.- Carry out the steps in the reverse order from the dismantling procedure.CAUTIONTAKE CARE TO CORRECTLY POSITION THE FLYWHEEL CONNECTOR. MAKE SURE THE CEN-TRING DOWELS ARE PRESENT.Locking torques (N*m)Flywheel cover screws 11 - 13Flywheel and startingENG - 24
<strong>MP3</strong> <strong>250</strong> i.e.EngineRemoving the starter motor- Remove the two screws indicated in the figure.- Take the starter motor out of its seatRemoving the flywheel magneto- Remove the water pump shaft and crankshaftspline clip- Line up the two holes in the flywheel as shown inthe photo- Screw in the guide bushing that is part of thespecial flywheel stop tool on the flywheel as shownin the photo.ENG - 25
Engine<strong>MP3</strong> <strong>250</strong> i.e.- Insert the special flywheel stop tool on the flywheelas shown in the photoSpecific tooling020627Y Flywheel lock wrench- Remove the plate indicated in the photo.- Remove the flywheel nut with its washer- Do up the flywheel nut by three or four threadsso that the flywheel does not fall accidentally onextraction- Screw the extractor onto the flywheel and extractit as shown in the photographSpecific tooling020467Y Flywheel extractorInspecting the flywheel components- Check the integrity of the internal plastic parts of the flywheel and the Pick-Up control plate.Refitting the free wheel- Make sure the free wheel contact surfaces are in good condition.- Thoroughly clean the free wheel to remove LOCTITE residue.- Degrease the threading of the holes in the free wheel and the clamping screws.- Apply the recommended product to the end of the screws.Recommended productsLoctite 243 Medium strength threadlockLoctite 243 medium-strength threadlockENG - 26
<strong>MP3</strong> <strong>250</strong> i.e.Engine- Fit the freewheel on the magneto flywheel makingsure that the ground side is in contact with the flywheelitself, i.e. with wheel seeger ring visible.- Lock the six clamping screws in criss-cross fashionto the prescribed torque.Locking torques (N*m)Screw fixing freewheel to flywheel 13 ÷ 15- Oil the free wheel "rollers".Refitting the flywheel magneto- Remove the freewheel retaining plate indicatedin the photograph- Remove the transmission gear and the freewheel- Insert the free wheel on the flywheel as shown inthe photo- Then refit the flywheel with free wheel and transmissiongearENG - 27
Engine<strong>MP3</strong> <strong>250</strong> i.e.- Using the special flywheel stop tool, tighten upthe flywheel fixing nut to the prescribed torque-Refit the retention plateSpecific tooling020627Y Flywheel lock wrenchLocking torques (N*m)Flywheel nut 94 ÷ 102Refitting the starter motor- Fit a new O-ring on the starter motor and lubricateit.- Fit the starter on the crankcase, locking the twoscrews to the prescribed torque.Locking torques (N*m)Starter motor screws 11 ÷ 13Cylinder assy. and timing systemRemoving the intake manifoldLoosen the three screws and remove the air intake manifold.- When refitting, secure to the specified torque.ENG - 28
<strong>MP3</strong> <strong>250</strong> i.e.EngineRemoving the rocker-arms cover- Remove the 5 screws indicated in the figureRemoving the timing system drive- Remove the parts listed below first: transmissioncover, drive pulley with belt, oil sump with springand by-pass piston, oil pump pulley cover, O-ringon the crankshaft and the sprocket wheel separationwasher.- Remove the tappet cover.- Remove the central screw fastener and the automaticvalve-lifter retaining cover, as shown in thefigure.- Remove the return spring of the automatic valvelifter unit and the automatic valve lifter unit and itsend of stroke washer.ENG - 29
Engine<strong>MP3</strong> <strong>250</strong> i.e.- Loosen the central screw on the tensioner first.- Remove the two fixings shown in the figure.- Remove the tensioner with its gasket.- Remove the internal hex screw and the counterweightshown in the figure.- Remove the camshaft control pulley with itswasher.- Remove the command sprocket wheel and thetiming chain.- Remove the screws indicated in the figure, thespacer bar and the tensioner slider.The chain tensioning pad must be removed fromthe transmission side. As regards the lower chainguide pad, it may only be removed after the headhas been removed.N.B.IT IS ADVISABLE TO MARK THE CHAIN IN OR-DER TO ENSURE THAT THE INITIAL DIREC-TION OF ROTATION IS MAINTAINED.ENG - 30
<strong>MP3</strong> <strong>250</strong> i.e.EngineRemoving the cam shaft- Remove the two screws and the cam shaft retainershown in the diagram.- Remove the cam shaft.- Remove the pins and the rocker arms from theflywheel side holes.N.B.IN CASE OF NEED, THE HEAD MAY BE RE-MOVED WITH THE CAMSHAFT, PINS, ROCK-ING LEVERS AND FIXING BRACKET. THEHEAD CAN ALSO BE REMOVED WITHOUT RE-MOVING THE CHAIN AND THE DRIVINGSHAFT CHAIN TIGHTENER.Removing the cylinder head- Remove the spark plug.- Remove the 2 side fixings shown in the figure.- Loosen the 4 head-cylinder fastening nuts in twoor three stages and in criss-cross fashion.- Remove the head, the two centring dowels andthe gasket.N.B.IN CASE OF NEED, THE HEAD MAY BE RE-MOVED WITH THE CAMSHAFT, PINS, ROCK-ING LEVERS AND FIXING BRACKET. THEHEAD CAN ALSO BE REMOVED WITHOUT RE-ENG - 31
Engine<strong>MP3</strong> <strong>250</strong> i.e.MOVING THE CHAIN AND THE DRIVINGSHAFT CHAIN TIGHTENER.Removing the valves- Using the appropriate tool fitted with an adaptor,remove the cotters, caps, springs and valves.- Remove the oil guards with the appropriate tool.- Remove the lower spring supports.CAUTIONREPLACE THE VALVES IN SUCH A WAY ASTO RECOGNISE THEIR ORIGINAL POSITIONON THE HEAD.Specific tooling020382Y011 adapter for valve removal tool020382Y Valve cotters equipped with part 012removal tool020431Y Valve oil seal extractorRemoving the cylinder - piston assy.Removing cylinder and piston- Remove the chain guide pad.- Remove the 4 O-rings on the stud bolts.- Pull out the cylinder.- Remove the cylinder base gasket.- Remove the two stop rings, the wrist pin and thepiston.- Remove the piston seals.CAUTIONTO AVOID DAMAGING THE PISTON, SUP-PORT IT WHILE REMOVING THE CYLINDER.N.B.BE CAREFUL NOT TO DAMAGE THE SEALINGRINGS DURING REMOVAL.ENG - 32
<strong>MP3</strong> <strong>250</strong> i.e.EngineInspecting the small end- Measure the internal diameter of the small endusing an internal micrometer.N.B.REPLACE THE CRANKSHAFT IF THE DIAME-TER OF THE ROD SMALL END EXCEEDS THESTANDARD DIAMETER OR IT SHOWS SIGNSOF WEAR OR OVERHEATING.CharacteristicChecking the connecting rod small end: Maximumdiameter15.030 mmChecking the connecting rod small end: Standarddiameter15 +0.015+0.025 mmInspecting the wrist pin- Measure the outer diameter of the gudgeon pin.- Calculate the coupling clearance between pinand connecting rod end.CharacteristicPin diameter: Standard clearance0.015 ÷ 0.029 mmPin diameter Standard diameter14.996 - 15.000 mmENG - 33
Engine<strong>MP3</strong> <strong>250</strong> i.e.Inspecting the piston- Measure the diameter of the wrist pin seat on thepiston.- Calculate the piston pin coupling clearance.- Measure the outside diameter of the piston, perpendicularto the gudgeon pin axis.- Take the measurement at 5 mm from the base inthe position shown in the figure.- Carefully clean the seal housings.- Measure the coupling clearance between theseal rings and the grooves using suitable sensors,as shown in the diagram.- If the clearance is greater than that indicated inthe table, replace the piston.N.B.MEASURE THE CLEARANCE BY INSERTINGTHE BLADE OF THE FEELER GAUGE FROMTHE SECOND SEAL SIDE.N.B.THE PIN HOUSINGS HAVE 2 LUBRICATIONCHANNELS. FOR THIS REASON MEASURE-MENT OF THE DIAMETER MUST BE CARRIEDOUT ACCORDING TO THE AXIS OF THE PIS-TON.CharacteristicWrist pin seat on the piston: Standard diameter15.001 ÷ 15.006 mmDiameter of the wrist pin seat on the piston:Standard clearance0.001 ÷ 0.010 mmpiston diameter71.953 - 71.981 mmFitting clearanceTop piston ring - standard coupling clearance0.015 - 0.06 mm Top piston ring - maximumclearance allowed after use 0.07 mm Middlepiston ring - standard coupling clearance 0.015- 0.06 mm Middle piston ring - maximum clearanceallowed after use 0.07 mm oil scraper ring- standard coupling clearance 0.015 - 0.06 mmoil scraper ring - maximum clearance allowedafter use 0.07 mmENG - 34
<strong>MP3</strong> <strong>250</strong> i.e.EngineInspecting the cylinder- Using a bore meter, measure the inner cylinderdiameter at three different points according to thedirections shown in the figure.- Check that the head coupling surface is not wornor misshapen.- Pistons and cylinders are classified according todiameter. The coupling must be made with thoseof the same type (M-M, N-N, O-O, P-P).Characteristiccylinder: standard diameter71.990 - 72.018 mm (at 33 mm)Maximum allowable run-out:0.05 mmInspecting the piston rings- Alternately insert the three sealing rings into the cylinder, in the area where it retains its original diameter.Using the piston, insert the rings perpendicularly to the cylinder axis.- Measure the opening (see figure) of the sealing rings using a feeler gauge.- If any measurements are greater than specified, replace the piston rings.N.B.BEFORE REPLACING ONLY THE PISTON RINGS, ENSURE THAT THE CLEARANCE BETWEENTHE PISTON RINGS AND THE PISTON RING GROOVES, AND BETWEEN THE PISTON AND THECYLINDER, IS AS SPECIFIED. IN ANY CASE, NEW PISTON RINGS USED IN COMBINATION WITHA USED CYLINDER MAY HAVE DIFFERENT BEDDING CONDITIONS THAN THE STANDARD.ENG - 35
Engine<strong>MP3</strong> <strong>250</strong> i.e.Sealing rings- Alternately insert the three sealing rings into thecylinder, in the area where it retains its original diameter.Using the piston, insert the rings perpendicularlyto the cylinder axis.- Measure the opening (see figure) of the sealingrings using a feeler gauge.- If any measurements are greater than specified,replace the piston rings.N.B.BEFORE REPLACING ONLY THE PISTONRINGS, ENSURE THAT THE CLEARANCE BE-TWEEN THE PISTON RINGS AND THE PISTONRING GROOVES, AND BETWEEN THE PISTONAND THE CYLINDER, IS AS SPECIFIED. IN ANYCASE, NEW PISTON RINGS USED IN COMBI-NATION WITH A USED CYLINDER MAY HAVEDIFFERENT BEDDING CONDITIONS THANTHE STANDARD.CharacteristicTop piston ringStandard opening: 0.15 ÷ 0.30 mmMiddle piston ringStandard opening: 0.20 ÷ 0.40 mmscraper ringStandard opening: 0.20 ÷ 0.40 mmRemoving the piston- Install piston and wrist pin onto the connectingrod, aligning the piston arrow the arrow facing towardsthe exhaust.- Fit the wrist pin stop ring onto the appropriate tool- With opening in the position indicated on the toolS = leftD= right- Place the wrist pin stop ring into position using apunch- Fit the wrist pin stop using the plug as shown inthe figureN.B.ENG - 36
<strong>MP3</strong> <strong>250</strong> i.e.EngineTHE TOOL FOR INSTALLING THE STOPRINGS MUST BE USED MANUALLY.CAUTIONUSING A HAMMER MIGHT DAMAGE THESTOPS' HOUSING.Specific tooling020454Y Tool for fitting piston pin stops (200 -<strong>250</strong>)Choosing the gasketCharacteristicCompression ratio <strong>250</strong> versionCR: 10.5 ÷ 11.5 : 1N.B.MEASUREMENT "A" TO BE TAKEN IS A VALUE OF PISTON RE-ENTRY, IT INDICATES BY HOWMUCH THE PLANE FORMED BY THE PISTON CROWN FALLS BELOW THE PLANE FORMED BYENG - 37
Engine<strong>MP3</strong> <strong>250</strong> i.e.THE TOP OF THE CYLINDER. THE FURTHER THE PISTON FALLS INSIDE THE CYLINDER, THELESS THE BASE GASKET IS TO BE APPLIED (TO RECOVER THE COMPRESSION RATIO) ANDVICE VERSA.ENGINE <strong>250</strong> SHIMMINGName Measure A Thicknessshimming 3.70 - 3.60 0.4 ± 0.05shimming 3.60 - 3.40 0.6 ± 0.05shimming 3.40 - 3.30 0.8 ± 0.05Refitting the piston ringsFitting the sealing rings- Place the oil scraper spring on the piston.- Refit the oil scraper ring with the join of springends on the opposite side from the ring gap andthe word 'TOP' towards the crown of the piston.The chamfered side of the oil scraper ring shouldalways be facing the piston crown.- Fit the middle piston ring with the identificationletter facing the crown of the piston. In any case,the step must be facing opposite the piston top.- Fit the top piston ring with the word 'TOP' or thereference mark facing the crown of the piston.- Offset the piston ring gaps on the three rings by120° to each other as shown in the figure.- Lubricate the components with engine oil.- The top piston ring on the <strong>250</strong> engine has an Lcross section.N.B.THE TWO PISTON RINGS ARE MADE WITH ATAPERED CYLINDRICAL CONTACT CROSS-SECTION. THIS IS TO ACHIEVE A BETTERBEDDING.ENG - 38
<strong>MP3</strong> <strong>250</strong> i.e.EngineRefitting the cylinder- Insert the cylinder base gasket with the thicknessdetermined above.- Using the fork support and the piston ring retainingband, refit the cylinder as shown in the figure.N.B.BEFORE FITTING THE CYLINDER, CAREFUL-LY BLOW OUT THE LUBRICATION DUCT ANDOIL THE CYLINDER BARREL.Specific tooling020426Y Piston fitting fork020393Y Piston fitting bandInspecting the cylinder head- Using a trued bar and feeler gauge check that thecylinder head surface is not worn or distorted.Maximum allowable run-out: 0.05 mm- Check that the camshaft and the rocker pin capacitiesexhibit no wear.- Check that the cylinder head cover surface, theintake manifold and the exhaust manifold are notworn.Characteristicbearing «A»Ø 12.000 - 12.018 mmbearing «B»Ø 20.000 ÷ 20.021 mmbearing «C»Ø 37.000 - 37.025 mmENG - 39
Engine<strong>MP3</strong> <strong>250</strong> i.e.Inspecting the timing system components- Check that the guide shoe and the tensioner shoeare not worn out.- Ensure that the camshaft control pulley chain assemblyand the sprocket wheel are not worn.- If you encounter wear, replace the parts or, if thechain, sprocket wheel and pulley are worn replacethe whole assembly.- Remove the centre screw with the washer andthe tensioner spring. Check that the one-waymechanism is not worn.- Check the condition of the tensioner spring.- If examples of wear are found, replace the wholeassembly.Inspecting the valve sealings- Insert the valves into the cylinder head.- Alternatively check the intake and exhaustvalves.- The test is carried out by filling the manifold withpetrol and checking that the head does not oozethrough the valves when these are just pressedwith the fingers.ENG - 40
<strong>MP3</strong> <strong>250</strong> i.e.EngineInspecting the valve housings- Check the width of the imprint on the valveseat«V» wear limit max. 1.6 mm.- Remove any carbon formation from the valveguides.- Measure the inside diameter of each valve guide.- Take the measurement at three different heightsin the rocker arm push direction.- If the width of the impression on the valve seat orthe diameter of the valve guide exceed the specifiedlimits, replace the cylinder head.CharacteristicValve seat wear Intake guidelimit accepted: 5.022Valve seat wear Intake guideStandard diameter: 5.000 ÷ 5.012 mmValve seat wear Exhaust guideAccepted limit 5.022Valve seat wear Exhaust guideStandard diameter: 5.000 ÷ 5.012 mmInspecting the valves- Measure the width of the sealing surface on thevalve seats and on the valves.Sealing surface width: After use: Intake and exhaust:1.6 mm- If any of the sealing surfaces on the valves iswider than the specified limit or is damaged in oneor more points, or curved, replace the valve with anew one.CAUTIONDO NOT REVERSE THE FITTING POSITIONSOF THE VALVES (RIGHT - LEFT).CharacteristicValve wear check Standard: Intake and exhaust:0.99 - 1.27 mm- Measure the diameter of the valve stems in the three positions indicated in the diagram.ENG - 41
Engine<strong>MP3</strong> <strong>250</strong> i.e.- Calculate the clearance between valve and valve guide.- Check that there are no signs of wear on the surface of contact with the articulated register terminal.- If the checks above give no failures, you can use the same valves. For best sealing results, it isadvisable to grind the valves. Grind the valves gently with a fine-grained lapping compound. During thegrinding, keep the cylinder head with the valve axes in a horizontal position. This will prevent the lappingcompound residues from penetrating between the valve stem and the guide (see figure).CAUTIONTO AVOID SCORING THE FAYING SURFACE, DO NOT KEEP ROTATING THE VALVE WHEN NOLAPPING COMPOUND IS LEFT. CAREFULLY WASH THE CYLINDER HEAD AND THE VALVESWITH A SUITABLE PRODUCT FOR THE TYPE OF LAPPING COMPOUND BEING USED.N.B.DO NOT CHANGE THE POSITIONS THE VALVES ARE FITTED INCharacteristicValve check standard lengthOutlet: 94.4 mmValve check standard lengthInlet: 94.6 mmValve check Maximum admissible clearanceOutlet: 0.072 mmValve check Maximum admissible clearanceInlet: 0.062 mmValve check standard clearanceOutlet: 0.025 ÷ 0.052 mmValve check standard clearanceInlet: 0.013 ÷ 0.040 mmValve check Minimum admissible diameterOutlet: 4.95 mmValve check Minimum admissible diameterInlet: 4.96 mmValve check Standard diameter:Inlet: 4.972 ÷ 4.987 mmValve check Standard diameter:Outlet: 4.96 ÷ 4.975 mmENG - 42
<strong>MP3</strong> <strong>250</strong> i.e.EngineInspecting the springs and half-cones- Check that the upper spring caps and the cotterhalves show no signs of abnormal wear.ENG - 43
Engine<strong>MP3</strong> <strong>250</strong> i.e.Refitting the valves- Lubricate the valve guides with engine oil.- Place the valve spring supports on the head.- Using the special punch, fit the four valve seals.- Fit the valves, the springs and the caps. Usingthe appropriate tool with adapter, compress thesprings and insert the cotters in their seats.N.B.DO NOT CHANGE THE VALVE FITTING POSI-TION. FIT THE VALVE SPRINGS WITH THEREFERENCE COLOUR ON COTTER SIDE(TURNS WITH GREATER PITCH).Specific tooling020306Y Punch for assembling valve sealrings020382Y Valve cotters equipped with part 012removal tool020382Y011 adapter for valve removal toolInspecting the cam shaft- Inspect the cam shaft for signs of abnormal wearon the cams.- Check the cam height.- Check there is no wear on the cam shaft retainingplate and its associated groove on the cam shaft.- If any of the above dimensions are outside thespecified limits, or there are signs of excessivewear, replace the defective components with newones.- Check there are no signs of wear on the automaticvalve-lifter cam, or the end-of stroke roller,or the rubber buffer on the automatic valve-lifterretaining cover.- Check that the valve lifting spring has not yielded.- Replace any defective or worn components.- Check the rocker pins do not show signs of wearor scoring.ENG - 44
<strong>MP3</strong> <strong>250</strong> i.e.Engine- Measure the internal diameter of each rockerarm.Check there are no signs of wear on the pad fromcontact with the cam and on the jointed adjustmentplate.CharacteristicInternal rocker arm diameter: Standard diameterDiameter 12.000 - 12.011 mmRocker arm pin diameter: Standard diameterDiameter 11.977 - 11.985 mmCam shaft check: Maximum admissible axialclearance0.42 mmCam shaft check: Standard axial clearance:0.11 - 0.41 mmCam shaft check: Standard heightOutlet: 29.209 mmCam shaft check: Standard heightInlet: 30.285 mmCam shaft check: Minimum admissible diameterBearing B diameter: 19.950 mmCam shaft check: Minimum admissible diameterBearing A Ø: 36.94 mmCam shaft check: Standard diameterBearing B diameter: 19.959 ÷ 19.98 mmCam shaft check: Standard diameterBearing A Ø: 36.95 ÷ 36.975 mmENG - 45
Engine<strong>MP3</strong> <strong>250</strong> i.e.Refitting the head and timing system components- Fit the timing chain guide pad.- Insert the centring dowel between the cylinderhead to the cylinder, fit the cylinder head gasketand the cylinder head.- Lubricate the stud bolt threading.- Tighten up the nuts to an initial pre-torque of 7±1N·m- Tighten up the nuts to a second pre-torque of 10±1 N·m- Rotate by an angle of 270°- To carry out the operations described above, followthe tightening sequence in the figure.- Fit the two screws on the outside of the timingchain side and tighten them to the specified torque.N.B.BEFORE INSTALLING THE HEAD, MAKESURE THAT THE LUBRICATION CHANNEL ISCLEAN USING A COMPRESSED AIR JET.Locking torques (N*m)Timing chain tensioner support screw 11 ÷ 13- Refit the lower timing chain sprocket wheel on thecrankshaft, with the chamfer facing the insertionside.- Loop the timing chain around the sprocket on thecrankshaft.- Fit the chain tensioner slider from the cylinderhead side.- Fit the spacer and the screw fastener.- Tighten the screws to the prescribed torque.- Fit the pins and rocker arms.- Lubricate the two rocking levers through theholes at the top.ENG - 46
<strong>MP3</strong> <strong>250</strong> i.e.Engine- Lubricate the 2 bearings and insert the cam shaftin the cylinder head with the cams correspondingto the rockers.- Insert the retention plate and tighten the twoscrews shown in the figure to the prescribed torque.- Refit the spacer on the cam shaft.- Rotate the engine so that the piston is at top deadcentre, using the reference marks on the flywheeland the crankcase.- Holding this position insert the chain on the camshaftcontrol pulley.- Insert the pulley on the cam shaft while keepingthe reference 4V in correspondence with the referencemark on the head.- Fit the counterweight and tighten the fixing screwto the prescribed torque.-Fit the end-stop ring on the automatic valve-liftercam and fit the automatic valve-lifter cam to thecam shaft.- Fit the automatic valve-lifter return spring.- During this operation the spring must be loadedby approximately 180°.- Fit the automatic valve-lifter retaining dish, usingthe counterweight screw fastener as a reference.- Tighten the clamping screw to the prescribed torque.- Set the tensioner cursor in the rest position.- Fit the chain tensioner on the cylinder, using anew gasket, and tight the two screws to the prescribedtorque.- Insert the chain tensioning screw, together withthe spring and washer, tightening it to the prescribedtorque.- Adjust the valve clearance.- Fit the spark plug.Electrode distance 0.8 mmN.B.ENG - 47
Engine<strong>MP3</strong> <strong>250</strong> i.e.GREASE THE END STOP RING TO PREVENTIT COMING OUT AND FALLING INTO THE EN-GINE.Locking torques (N*m)Timing chain tensioner support screw 11 ÷ 13Spark plug 12 ÷ 14 Starter ground screw 7 ÷8.5 Timing chain tensioner slider screw 10 ÷14 Starter ground support screw 11 ÷ 15 Timingchain tensioner central screw 5 - 6 Camshaftretention plate screw 4 ÷ 6ENG - 48
<strong>MP3</strong> <strong>250</strong> i.e.EngineRefitting the rocker-arms cover- Refit the cylinder head cover, tightening the 5clamping screws to the prescribed torque.- Make sure the gasket is positioned properly.Locking torques (N*m)Tappet cover screws 6 - 7 NmRefitting the intake manifoldFit the intake manifold and do up the three screws.Locking torques (N*m)Inlet manifold screws 11 ÷ 13Crankcase - crankshaftSplitting the crankcase halves- Before opening the crankcase, it is advisable tocheck the axial clearance of the crankshaft. To dothis, use a plate and a support with appropriate tooldial gauge.- Upper clearances are an indication of wear onthe surfaces of the crankshaft casing support.- Remove the 10 crankshaft coupling screws.- Separate the crankcase while keeping the crankshaftin one of the two halves of the crankcase.- Remove the crankshaft.- Remove the half crankcase coupling gasket.ENG - 49
Engine<strong>MP3</strong> <strong>250</strong> i.e.- Remove the two screws and the internal covershown in the diagram.- Remove the oil guard on the flywheel side.- Remove the oil filter fitting shown in the diagram.- Check the axial clearance on the connecting rod.- Check the radial clearance on the connecting rod.-Check the surfaces that limit the axial free-playare not scored and measure the width of the crankshaftbetween these surfaces, as shown in thediagram.- If the axial clearance between crankshaft andcrankcase is exceeding and the crankshaft doesnot have any defect, the problem must be due toeither excessive wear or wrong machining on thecrankcase.- Check the diameters of both the bearings of thecrankshaft in accordance with the axes and surfacesshown in the figure. The half-shafts are classifiedin two categories Cat. 1 and Cat. 2 as shownthe chart below.CAUTIONTHE CRANKSHAFT CAN BE REUSED WHENTHE WIDTH IS WITHIN THE STANDARD VAL-UES AND THE SURFACES SHOW NO SIGNSOF SCORING.CAUTIONWHILE OPENING THE CRANKCASES AND RE-MOVING THE DRIVING SHAFT, CHECK THATTHE THREADED SHAFT ENDS DO NOT INTER-FERE WITH THE MAIN BUSHINGS. FAILURETO OBSERVE THIS PRECAUTION CAN DAM-AGE THE MAIN BUSHINGS.CAUTIONKEEP THE CRANKSHAFT IN ONE OF THE TWOHALVES OF THE CRANKCASE WHEN SEPA-RATING IT. IF YOU FAIL TO DO THIS, THECRANKSHAFT MIGHT ACCIDENTALLY FALL.N.B.WHEN MEASURING THE WIDTH OF THECRANKSHAFT, MAKE SURE THAT THE MEAS-UREMENTS ARE NOT MODIFIED BY THE RAD-IUSES OF FITTINGS WITH THE CRANKSHAFTBEARINGS.Specific toolingENG - 50
<strong>MP3</strong> <strong>250</strong> i.e.Engine020262Y Crankcase splitting strip020335Y Magnetic support for dial gaugeCharacteristicAxial crankshaft/crankcase clearance: Standardclearance0.15 - 0.40 mm (when cold)Axial connecting rod - crankshaft clearanceStandard clearance0.20 ÷ 0.50 mmRadial connecting rod - crankshaft clearanceStandard clearance0.036 ÷ 0.054 mmWidth of crankshaft with integral washers:standard measurements55.67 ÷ 55.85 mmCrankshaft bearings: Standard diameter: Cat.128.994 ÷ 29.000Crankshaft bearings: Standard diameter: Cat.229.000 ÷ 29.006Inspecting the crankshaft alignmentTo install the drive shaft on the support and tomeasure the misalignment in the 4 points indicatedin figure.- Check that the driving shaft cone, the tab seat,the oil seal capacity, the toothed gear and thethreaded tangs are in good working order.- In case of failures, replace the crankshaft.The connecting rod head bushings cannot be replaced.For the same reason, the connecting rodmay not be replaced and, when cleaning theENG - 51
Engine<strong>MP3</strong> <strong>250</strong> i.e.crankshaft, be very careful that no impurities get inthrough the shaft's lubrication holes.In order to prevent damaging the connecting rodbushings, do not attempt cleaning the lubricationduct with compressed air.- Make sure that the 2 caps on the crankpin areproperly fitted.- A wrong installation of a cap can seriously affectthe bushing lubrication pressure.N.B.THE MAIN BEARINGS ARE NOT GRINDABLESpecific tooling020074Y Support base for checking crankshaftalignmentCharacteristicOff-line maximum admittedA = 0.15 mmB = 0.01 mmC = 0.01 mmD = 0.10 mmInspecting the crankcase halves- Before proceeding to check the crankcasehalves, thoroughly clean the all surfaces and oilducts.- On the transmission-side crankcase half, takeparticular care when handling the oil pump compartmentand the oil ducts, the by-pass duct, themain bushings and the cooling jet on the transmissionside (see diagram).- Take particular care, also, that there are no signswear in the oil by-pass valve housing (see ChapterLubrication), as this could prevent a good seal inthe valve, which regulates the oil pressure.- On the flywheel side crankcase half, take particularcare cleaning the oil ducts for the main bushings,the oil duct for the jet that lubricates thecylinder head and the oil drainage duct at the flywheelside oil seal.ENG - 52
<strong>MP3</strong> <strong>250</strong> i.e.Engine- Inspect the coupling surfaces on the crankcasehalves for scratches or deformation, taking particularcare with the cylinder/crankcase surfaces andthe crankcase halves surfaces.- Defects in the crankcase coupling gasket betweenthe crankcase halves or the mating surfacesshown in the diagram, could cause a drop in theoil pressure lubricating the main bearings and connectionrod.- Check the main bearing seats that limit axialclearance in the crankshaft show no signs of wear.The dimension between these seats is measuredby way of the procedure described previously formeasuring the crankshaft axial clearance and dimensions.N.B.THE JET IS FED THROUGH THE MAIN BUSH-INGS. PROPER OPERATION OF THIS COMPO-NENT IMPROVES THE PISTON TOP COOLING.CLOGGING HAS EFFECTS THAT ARE DIFFI-CULT TO DETECT (PISTON TEMPERATUREINCREASE). FAILURE OR LEAK CAN CONSID-ERABLY DECREASE THE MAIN BUSHINGAND CONNECTING ROD LUBRICATION PRES-SURE.N.B.THE HEAD LUBRICATION CHANNEL IS PRO-VIDED WITH A SHUTTER JET; THIS GIVES A"LOW PRESSURE" HEAD LUBRICATION; THISCHOICE WAS MADE TO REDUCE THE OILTEMPERATURE IN THE SUMP. THE JETCLOGGING IMPAIRS THE HEAD LUBRICA-TION AND THE TIMING MECHANISMS. A JETFAILURE CAUSES A DECREASE OF THE MAINBUSHING AND CONNECTING ROD LUBRICA-TION PRESSURE.ENG - 53
Engine<strong>MP3</strong> <strong>250</strong> i.e.Inspecting the crankshaft plain bearings- To obtain a good bushing lubrication it is necessaryto have both an optimal lubricating pressure (3,2bar) and a good oil flow rate; the bushings must becorrectly positioned so as not to obstruct the oilsupply channels.- The main bushings are comprised of two halfbearings,one with holes and channels for lubricationwhereas the other is solid.- The solid half-bearing is intended to stand thethrusts caused by combustion, and for this reasonit is arranged opposite the cylinder.- To prevent obstructions in the oil feeding channels,the matching surface of the two half-bearingsmust be perfectly perpendicular to the cylinder axis,as shown in the figure.- The oil feeding channel section is also affectedby the bushings driving depth compared with thecrankshaft axial clearance of the limiting surface.- Check the inside diameter of the main bushingsin the three directions indicated in the diagram.- Repeat the measurements for the other bushinghalf. see diagram.- There are three crankcase versions: with REDmain bushings, with BLUE main bushings and withYELLOW main bushings.- There is only one type of main bushing housinghole in the crankcaseThe standard bushing diameter after driving is variableon the basis of a coupling selection.- The bushing housings in the crankcase are availablein two categories, Cat. 1 and Cat. 2, as arethe crankshafts.- The main bushings are available in three thicknesscategories, identified by colour markings, asshown in the table below.ENG - 54
<strong>MP3</strong> <strong>250</strong> i.e.EngineTYPEABCIDENTIFICATIONREDBLUEYELLOWType "A"Type "B"Type "C"- RED- BLUE- YEL-LOWMain half-1.970 ÷1.9703 ÷1.976 ÷bearing1.9731.9761.979Bush-Crank-Internal bush-Possibleing cat-caseing diameterfittingegoryhalvesafter fittingcategoryA 1 29.025 ÷Original29.040B 1 29.019 ÷29.034Originaland spare2 29.028 ÷29.043C 2 29.022 ÷Original29.037Match the shaft with two category 1 crank webswith the category 1 crankcase (or cat. 2 with cat.2) Furthermore a replacement crankcase cannotbe matched with a crankshaft with mixed categories.The replacement crankshaft has half-shaftsof the same category.CrankcasehalvesEngine halfshaftBushingN.B.Cat. 1 Cat. 1 BCat. 2 Cat. 2 BCat. 1 Cat. 2 ACat. 2 Cat. 1 CTO KEEP THIS POSITION OF THE BUSHINGSON THE CRANKCASE, FITTING IS FORCED ONSTEEL RINGS INSERTED IN THE CASTING OFBOTH CRANKCASE HALVES.ENG - 55
Engine<strong>MP3</strong> <strong>250</strong> i.e.N.B.DO NOT TAKE THE MEASUREMENT ON THETWO HALF-SHELL COUPLING SURFACESINCE THE ENDS ARE RELIEVED TO ALLOWBENDING DURING THE DRIVING OPERATION.N.B.CRANKCASES FOR REPLACEMENTS ARESELECTED WITH CRANKCASE HALVES OFTHE SAME CATEGORY AND ARE FITTEDWITH CATEGORY B BUSHINGS (BLUE)CharacteristicStandard driving depth1.35 ÷ 1.6Diameter of crankcase without bushing32.953 ÷ 32.963Refitting the crankcase halves- Fit the internal bulkhead by locking the twoscrews to the prescribed torque.- Fit the oil filter fitting and tighten it to the specifiedtorque.- Position the oil pre-filter element as shown in thephotograph.- Place a new gasket on one of the crankcasehalves, preferably on the transmission side, togetherwith the locating dowels.- Lubricate the main bushings and insert the crankshaftin the transmission side crankcase half.- Reassemble the two crankcase halves.- Fit the 10 screws and tighten them to the prescribedtorque.- Fit a new O-ring on the pre-filter and lubricate it.- Insert the filter on the engine with the relative cap.Tighten to the prescribed torque.Locking torques (N*m)Internal engine crankcase bulkhead (transmission-sidehalf shaft) screws 4 ÷ 6 Enginecrankcasecoupling screws 11 ÷ 13 Oil filter oncrankcase fitting 27 ÷ 33 Engine oil drainageplug/mesh filter 24 ÷ 30ENG - 56
<strong>MP3</strong> <strong>250</strong> i.e.EngineStudsCheck that the stud bolts have not worked loosefrom their seat in the crankcase.Check the depth of stud bolt driving with a gauge,as indicated in the photograph. If it varies significantlyfrom the driving depth indicated, it meansthat the stud bolt has yielded.In this case, replace it.ENG - 57
Engine<strong>MP3</strong> <strong>250</strong> i.e.By working on two fitted cylinder head fixing nuts,nut and lock nut, as shown in the photograph, removethe stud bolt from its seat.Clean the threaded seat on the carter thoroughly.Refit a new stud bolt and apply the special producton the threading crankcase side.Tighten up to the depth of the driving indicated.Recommended productsLoctite 'Quick Set' Strong 270 threadlockStrong 270 threadlockLubricationConceptual diagramsLUBRICATION CIRCUITENG - 58
<strong>MP3</strong> <strong>250</strong> i.e.EngineENG - 59
Engine<strong>MP3</strong> <strong>250</strong> i.e.Oil pressure check- Remove the electrical minimum oil pressureswitch connection and remove the switch.- Check the oil pressure reading is between 0.5and 1.2 atm with the engine idling at 1650 rpm andthe oil at the required temperature (wait for at leastone electric ventilation).- Check the oil pressure is between 3.2 and 4.2atm with the engine running at a speed 6000 rpmand the oil at the required temperature.- Remove the appropriate tools once the measurementis complete, refit the oil pressure switchand washer, tightening it to the specified torqueand fit the fan cover.- If the oil pressure is outside the specified limits,in the following order, check: the oil filter, the oilby-pass valve, the oil pump and the crankshaftseals.N.B.THE CHECK MUST BE CARRIED OUT WITHOIL AT THE CORRECT LEVEL AND WITH ANOIL FILTER IN GOOD CONDITION.CharacteristicOil pressureMinimum pressure admitted at 6000 rpm: 3.2 atm.Locking torques (N*m)Minimum oil pressure sensor 12 ÷ 14Crankshaft oil sealsENG - 60
<strong>MP3</strong> <strong>250</strong> i.e.EngineRemoval- Remove the transmission cover and the completedriving pulley beforehand- Install the base of the appropriate tool on the oilguard using the screws provided.Specific tooling020622Y Transmission-side oil guard punch- Screw the threaded bar onto the base of the tooland extract the oil guard.Specific tooling020622Y Transmission-side oil guard punchRefitting- Use a new oil guard for the refitting- Prepare the new oil guard, lubricating the sealinglip.- Preassemble the oil seal with the specific tool,positioning the screws.- Insert the sheath over the crankshaft.- Insert the tool with the oil seal on the crankshaftuntil it comes into contact with the crankcase.- Insert the adaptor bushing of the tool in the holeon the crankcase.ENG - 61
Engine<strong>MP3</strong> <strong>250</strong> i.e.- Orientate the oil guard by inserting the bracketwhich is part of the appropriate tool- Tighten the threaded bar onto the crankshaft asfar as it will go.- Use the nut to move the base of the tool until youcan see end of the oil guard driving stroke- Remove all of the tool components following theinverse procedureCAUTIONDO NOT LUBRICATE THE SURFACE FOR KEY-ING ONTO THE ENGINE CRANKCASE.CAUTIONORIENT THE OIL GUARD BY POSITIONINGTHE CHAIN HOUSING CHANNEL FACINGDOWNWARDS. WHEN THE POSITION ISREACHED, DO NOT RETRACT THE OILGUARD. FAILURE TO COMPLY WITH THISRULE CAN CAUSE A WRONG POSITIONINGOF THE OIL GUARD SHEATH.CAUTIONFAILURE TO COMPLY WITH THIS ASSEMBLYPROCEDURE CAN SERIOUSLY DAMAGE THEENGINE DUE TO THE WRONG TENSIONINGOF THE OIL PUMP CONTROL CHAIN.Specific tooling020622Y Transmission-side oil guard punchOil pumpENG - 62
<strong>MP3</strong> <strong>250</strong> i.e.EngineRemoval- Undo the two clamping screws in the figure andremove the cover over the pump control crown.- Block the rotation of the oil pump control pulleywith a screwdriver inserted through one of its twoholes.- Remove the central screw with Belleville washer,as shown in the diagram.- Remove the chain with the crown.- Remove the control sprocket with relative O-ring.- Remove the oil pump by unscrewing the twoscrews in the figure.- Remove the oil pump seal.N.B.IT IS ADVISABLE TO MARK THE CHAIN IN OR-DER TO ENSURE THAT THE INITIAL DIREC-TION OF ROTATION IS MAINTAINED.Inspection- Remove the two screws and the oil pump cover.- Remove the clip retaining the innermost rotor.- Remove and wash the rotors thoroughly with petroland compressed air.- Reassemble the rotors in the pump body, keepingthe two reference marks visible Replace theclip.- Check the clearance between the rotors in theposition shown in the diagram.ENG - 63
Engine<strong>MP3</strong> <strong>250</strong> i.e.Measure the distance between the outer rotor andthe pump body (see figure).- Check the axial clearance of the rotors using atrued bar as shown in the figure.CharacteristicAxial rotor clearanceLimit values admitted: 0.09 mmDistance between the outer rotor and the pumpbodyAdmissible limit clearance: 0.20 mmDistance between the rotorsAdmissible limit clearance: 0.12 mmRefitting- Check there are no signs of wear on the oil pumpshaft or body.- Check there are no signs of scoring or wear onthe oil pump cover.- If you detect non-conforming measurements orscoring, replace the faulty parts or the unit.- Fit the pump cover in the position that permits thecrankcase fixing screws to be aligned.- Make sure the gasket is positioned properly andrefit the pump on the engine crankcase. The pumpcan only be fitted in one position. - Tighten thescrews to the prescribed torque.ENG - 64
<strong>MP3</strong> <strong>250</strong> i.e.Engine- Fit the sprocket wheel with a new O-ring.- Fit the chain.- Fit the central screw and the belleville washer.Tighten to the prescribed torque.- Fit the oil pump cover by tightening the twoscrews to the prescribed torque.N.B.FIT THE BELLEVILLE WASHER SO THAT ITSOUTER RIM TOUCHES THE PULLEY. MAKESURE THAT THE PUMP TURNS FREELY.Locking torques (N*m)Screws fixing oil pump to the crankcase 5 - 6Oil pump control crown screw 10 ÷ 14 Oil pumpcover screws 0.7 ÷ 0.9Removing the oil sump- Remove the oil filler plug, the transmission cover,the complete driving pulley assembly with belt andthe sprocket wheel, as described in the "Transmission"chapter.- Drain the oil as described previously.- Remove the seven screws, shown in the diagram,and the two rear brake fluid pipe fixingbrackets.- Remove the screw, the by-pass piston, the gasketand centring dowels shown in the figure.ENG - 65
Engine<strong>MP3</strong> <strong>250</strong> i.e.Inspecting the by-pass valve- Check the unloaded spring length.- Check that the small piston is not scored.- Ensure that it slides freely on the crankcase andthat it guarantees a good seal.- If not, eliminate any impurities or replace defectiveparts.CharacteristicBy-pass check up: Standard length54.2 mmRefitting the oil sump- Refit the by-pass valve plunger in its housing.- Insert the pressure-regulating spring.- Fit a new sump seal.- Refit the two centring dowels.- Refit the sump, taking care to locate the spring inthe appropriate recess machined into the inside ofthe sump.- Refit the rear brake cable brackets and thescrews in the reverse order from which they wereremoved.- Tighten the screws to the prescribed torque.- Refit the driving pulley assembly, the drive belt,the sprocket wheel and the transmission cover, asdescribed in the "Transmissions" chapter.- When testing the lubrication system, refer tochapter "Crankcase and Crankshaft", regardinglubrication of the crankshaft and connectingrodLocking torques (N*m)Oil sump screws 10 ÷ 14ENG - 66
INDEX OF TOPICSINJECTIONINJEC
Injection<strong>MP3</strong> <strong>250</strong> i.e.INJEC - 2
<strong>MP3</strong> <strong>250</strong> i.e.InjectionTRANSPARENCYSpecificationDesc./Quantity1 Fuel injector2 Throttle body and electronic injection controlunit (MIU)3 Diagnostics socket connector4 Battery 12V - 12 Ah5 Engine rpm sensor6 HV coil7 Lambda sensor8 Fuel pump9 Water temperature sensor10 Injection load remote control11 Instrument panelMIU injection systemThis vehicle is fitted with an integrated injection and ignition system.Injection is indirect in the manifold through an electro-injector.The injection and ignition are timed on the four-stroke cycle by means of a tone wheel keyed on to thecrankshaft (24-2 teeth) and pick-up sensor.Combustion and ignition are managed on the basis of engine revs and throttle valve opening. Furthercorrections are made according to the following parameters:- Coolant temperature.- Intake air temperature- Lambda probe strengthThe system implements an idle feeding correction with cold engine through a Stepper motor on a bypasscircuit of the throttle valve. The control unit manages the Stepper motor and the injector openingtime, thereby ensuring the idle steadiness and the proper combustion.In all conditions of use, mixture preparation is managed by modifying the injector opening time.The fuel supply pressure is kept constant based on the ambient pressure.The feed circuit consists of:- Fuel pump- Fuel filter- Injector- Pressure regulatorPump, filter and regulator are placed into the fuel tank using a single support.The injector is connected by two pipes provided with quick couplings. This allows obtaining a continuouscirculation, thereby avoiding the risk of fuel boiling. The pressure regulator is situated at the end of thecircuit.The fuel pump is controlled by the MIU; this ensures the scooter's safetyThe ignition circuit consists of:INJEC - 3
Injection<strong>MP3</strong> <strong>250</strong> i.e.- HV coil- HV cable- Shielded cap- MIU control unit- Spark plugThe MIU control unit manages ignition with the best advance ensuring four-stroke timing (ignition onlyin the compression phase) at the same time.The MIU injection-ignition system controls engine functions by means of a pre-set program.Should any input signals fail, an acceptable working order of the engine is ensured to allow the user toreach a service station.Of course, this cannot happen when the rev counter signal is missing, or when the failure involves thecontrol circuits:- Fuel pump- HV coil- InjectorThe control unit is provided with a self-diagnosissystem connected to an indicator light in the instrumentpanel.Failures are detected and restored by the diagnostictester.In any case, when the fault is no longer present,the data storage is automatically cleared after 16cycles of use (cold start, running at regular enginetemperature, stop).The diagnostic tester is also required to adjust theidle mixture.Specific tooling020460Y Scooter diagnosis and testerINJEC - 4
<strong>MP3</strong> <strong>250</strong> i.e.InjectionThe MIU injection-ignition system carries outchecks on the rpm counter and the electric fan forradiator cooling.The MIU control unit has a decoder for the antitheftimmobiliser.The MIU control unit is connected to a diagnosticLED on the instrument panel, that also carries outthe deterrent flashing functions.The MIU control unit power supply is furthermore controlled by the emergency switch; that is to providefurther safety for the scooter.PrecautionsTroubleshooting hints1 A fault in the MIU system could most likely be due to the connections and not the components.Before troubleshooting the MIU system, carry out the following checks:A: Electrical power supplya. Battery voltageb. Blown fusec. Remote controlsd. ConnectorsB: Chassis earthingC: Fuel supplya. Broken fuel pumpb. Dirty fuel filterD: Ignition systema. Faulty spark plugb. Broken coilc. Broken shielded capE: Intake circuita. Dirty air filterb. Dirty by-pass circuitc. Faulty Stepper motorF: Othera. Incorrect distribution timingb. Wrong idle mixturec.Incorrect reset of the throttle valve position sensor2 MIU system faults may be caused by loose connectors. Make sure that all connections have beencorrectly made.INJEC - 5
Injection<strong>MP3</strong> <strong>250</strong> i.e.Check the connections as follows:A check that the terminals are not bent.B check that the connectors have been properly connected.C see whether the malfunction can be fixed by shaking the connector slightly.3 Check the entire system before replacing the MIUIf the fault is fixed by replacing the MIU control unit,install the original control unit again and check if the fault occurs again.4 When troubleshooting use a multimeter with an internal resistance over 10 Ohm /V. Instruments thatare not suitable might damage the MIU control unit. Instruments must be used with definitions over 0.1Vand 0.5 W , the precision must be greater than 2%.1. Before fixing any part of the injection system, check to see if there are any registered faults. Do notdisconnect the battery before checking for faults.2. The fuel feed system is pressurised at <strong>250</strong> kPa (2.5 BAR). Before disconnecting the quick couplerof a pipe in the fuel supply system, check that there are no naked flames, and do not smoke. Act withcaution to prevent spraying in the eyes.3. When fixing electric components, operate with battery connected only when actually required.4. When functional checks are performed, check that the battery voltage is more than 12V.5. Before trying to start up, check to make sure there is at least two litres of fuel in the tank. Failure torespect this norm will damage the fuel pump.6. If the scooter is expected to remain unused for a long time, refill the tank up to a little over half thelevel. This will ensure the pump will be covered by fuel.7. When washing the vehicle, be careful with the electric components and wiring.8. When an ignition fault is detected, start the checks from the battery and the injection system connections.9. Before disconnecting the MIU control unit connector, perform the following steps in the order shown:- Set the switch to «OFF»- Disconnect the batteryFailure to respect this norm may damage the control unit.10. Do not invert the polarity when fitting the battery.11. To avoid damage, only disconnect and reconnect the MIU system connectors if required. Beforereconnecting, check that the connectors are dry.12. When carrying out electric inspections, do not force the tester probes into the connectors. Do nottake measurements not specifically foreseen by the manual.13. At the end of every check performed with the diagnostic tester, protect the system connector withits cap. Failure to do this may damage the MIU control unit.14. Before reconnecting the quick couplers of the power supply system, check that the terminals areperfectly clean.INJEC - 6
<strong>MP3</strong> <strong>250</strong> i.e.InjectionEMS circuit diagram1. Battery 12V - 12 Ah2. Engine rpm sensor3. coolant temperature sensor:4. Immobilizer aerial5. Stop switches6. Fuse No. 2 20A7. Fuse No. 6 3A8. Key switch contacts9. Fuse No. 5 15A10.Engine stop switchINJEC - 7
Injection<strong>MP3</strong> <strong>250</strong> i.e.11.Fuse No. 10 7.5A12.CAN line connection with tilt locking electric control unit13.Fuse No. 8 10A14.Starter button15.Injection load remote control16.Starter remote control17.Electric fan starter18.Starter motor19.Electric fan motor20.Fuel pump21.H.V. coil22.Fuel injector23.Lambda sensor24.Engine "WARNING" light25.Immobilizer LED26.Diagnostics connectorTroubleshooting procedureEngine does not startENGINE DOES NOT START IF ONLY PULLEDPossible CauseImmobiliser enabling signalPresence of faults detected by the self diagnosisFuel supplyPower to the spark plugParameter reliabilityEnd of compression pressureOperationSystem not encodedSystem not efficient, repair according to the indicationsof the self-diagnosisPump relayHV coilInjectorrevolution timing sensorFuel in the tankFuel pump activationFuel pressure (low)Injector capacity (low)Shielded spark-plug cap HV coil (secondary insulation)Coolant temperatureDistribution timing - injection ignitionIntake air temperatureEnd of compression pressureINJEC - 8
<strong>MP3</strong> <strong>250</strong> i.e.InjectionStarting difficultiesPossible CausePresence of faults detected by the self diagnosisStart-up speedEnd of compression pressurePower to the spark plugFuel supplyCorrectness of the parametersEngine stops at idleENGINE START-UP PROBLEMSOperationPump relayHV coilInjectorrevolution timing sensorAir temperatureCoolant temperatureStarter motor and remote controlBatteryGround connectionsEnd of compression pressureSpark plugShielded capHV coilRevolution timing sensorIgnition advanceFuel pressure (low)Injector capacity (low)Injector sealing (poor)Coolant temperatureStepper throttle valve position intake air temperature(steps and actual opening)Cleaning of the auxiliary air pipe and throttle valve;air filter efficiencyENGINE DOES NOT HOLD IDLING/ IDLING IS UNSTABLE/ IDLING TOO LOWPossible CausePresence of faults detected by the self diagnosisIgnition efficiencyCorrectness of the parametersIntake system cleaningIntake system sealing (infiltrations)Fuel feed (low pressure)OperationPump relayHV coilInjectorrevolution timing sensorAir temperatureCoolant temperatureSpark plugIgnition timingThrottle valve position sensorStepperCoolant temperature sensorIntake air temperature sensorAir filterDiffuser and throttle valveAdditional air pipe and StepperIntake manifold - headThrottle body - manifoldIntake sleeveFilter boxFuel pumpPressure regulatorINJEC - 9
Injection<strong>MP3</strong> <strong>250</strong> i.e.Possible CauseOperationFuel filterInjector capacityEngine does not rev downENGINE DOES NOT RETURN TO THE IDLING SPEED/IDLING SPEED TOO HIGHPossible CausePresence of faults detected by the self diagnosisIgnition efficiencyCorrectness of the parametersIntake system sealing (infiltrations)Fuel feed (low pressure)Exhaust backfires in decelerationOperationPump relayHV coilInjectorrevolution timing sensorAir temperatureCoolant temperatureIgnition timingThrottle valve position sensorStepperCoolant temperature sensorIntake air temperature sensorIntake manifold - headThrottle body - manifoldIntake sleeveFilter boxFuel pumpPressure regulatorFuel filterInjector capacityEXHAUST BACKFIRES WHEN DECELERATINGPossible CausePresence of faults detected by the self diagnosisCorrectness of the parametersIntake system sealing (infiltrations)Fuel feed (low pressure)Exhaust system sealing (infiltrations)OperationPump relayHV coilInjectorrevolution timing sensorAir temperatureCoolant temperatureLambda sensorThrottle valve position sensorStepperCoolant temperature sensorIntake air temperature sensorIntake manifold - headThrottle body - manifoldIntake sleeveFilter boxFuel pumpPressure regulatorFuel filterInjector capacityManifold - headManifold - mufflerINJEC - 10
<strong>MP3</strong> <strong>250</strong> i.e.InjectionPossible CauseOperationMuffler weldingEngine revs irregularlyENGINE IRREGULAR PROGRESS WITH VALVE SLIGHTLY OPENPossible CauseIntake system cleaningIntake system sealIgnition systemParameter reliabilityTPS reset successfulPresence of faults detected by the self diagnosisPoor performance at full throttleOperationAir filterDiffuser and throttle valveAdditional air pipe and StepperIntake sleeveFilter boxSpark plug wear checkThrottle valve position signalCoolant temperature indicatorIntake air temperature indicatorIgnition advanceTPS reset successfulPump relayHV coilInjectorrevolution timing sensorAir temperatureCoolant temperatureLambda sensorPOOR ENGINE PERFORMANCE AT FULL POWER/ ENGINE IRREGULAR PROGRESSON PICKUPPossible CausePresence of faults detected by the self diagnosisSpark plug power supplyIntake systemParameter reliabilityFuel supplyOperationPump relayHV coilInjectorrevolution timing sensorAir temperatureCoolant temperatureLambda sensorSpark plugShielded capHV cableHV coilAir filterFilter box (sealing)Intake sleeve (sealing)Throttle valve position signalCoolant temperature indicatorIntake air temperature indicatorIgnition advanceFuel level in the tankFuel pressureFuel filterInjector capacityINJEC - 11
Injection<strong>MP3</strong> <strong>250</strong> i.e.Engine knockingPRESENCE OF KNOCKING (HEAD KNOCKING)Possible CausePresence of faults detected by the self diagnosisIgnition efficiencyParameter reliabilityIntake system sealTPS reset successfulFuel supplySelection of the cylinder base gasket thicknessFuel supply systemOperationPump relayHV coilInjectorrevolution timing sensorAir temperatureCoolant temperatureLambda sensorSpark plugThrottle valve position signalCoolant temperature indicatorIntake air temperature indicatorIgnition advanceIntake sleeveFilter boxTPS reset successfulFuel pressureFuel filterInjector capacityFuel qualitySelection of the cylinder base gasket thicknessThe fuel supply circuit includes the electric pump, the filter, the pressure regulator. the electro-injectorand the delivery and return pipes.The electrical pump is located in the tank from which the fuel is pumped and sent to the injector throughthe filter.The pressure is controlled by the pressure regulator situated in the pump assembly in the tank.INJEC - 12
<strong>MP3</strong> <strong>250</strong> i.e.InjectionRemoving the butterfly valveRemove the fuel piping clamping screw indicatedin the figure.Remove the snap-on fittings from the injector supportINJEC - 13
Injection<strong>MP3</strong> <strong>250</strong> i.e.Remove the injector connectorRemove the three screws fixing the manifold to thecylinder head and the clip fixing the throttle bodyto the manifold.Remove the MIU connectorRemove the clip fixing the throttle body to the purifierbellowsINJEC - 14
<strong>MP3</strong> <strong>250</strong> i.e.InjectionRemove the gas command fitting as indicated inthe photographRefitting the butterfly valveTo refit, perform the operations in the reverse orderfrom the removal operations being careful toposition the clip fixing the throttle body to the airfilter bellows at 45° as shown in the photograph.INJEC - 15
Injection<strong>MP3</strong> <strong>250</strong> i.e.Pump supply circuitINJECTION LOADSSpecificationDesc./Quantity1 Battery 12V - 12 Ah2 Fuse 15A3 Fuse 20A4 Key switch contacts5 Fuse 7.5 A6 Injection load remote control7 Fuel pump8 HV coilINJEC - 16
<strong>MP3</strong> <strong>250</strong> i.e.InjectionSpecification9 Fuel injector10 Lambda sensor11 Electric fan starterDesc./QuantityWhen switched to "ON", the fuel pump starts to rotate for two seconds and then stops. When the enginestarts up, in the presence of rpm timing signal the pump is continuously supplied.• Pump winding resistance ~ 1.5 OhmELECTRICAL DATA• Input current during normal functioning 1.4 ÷ 1.8 A• Input current to the closed hydraulic circuit ~ 2 A (to be checked with specific tool for fuelpressure control, choking the circuit on the return pipe)Check the efficiency of injection load 15 A fuse No.5.Check the efficiency of live control unit power supply7.5A fuse No. 10 .Check the efficiency of the injection load remotecontrol: Check the resistance of the energising coilbetween pins 86 and 85: 40 to 80 OhmApply a voltage of 12V to pins 86 and 85; makesure that there is continuity between pins 30 and87 of the remote control.INJEC - 17
Injection<strong>MP3</strong> <strong>250</strong> i.e.Check the power supply line of the injection loadremote control energising coil: after switching to"ON", make sure there is battery voltage, for twoseconds, between the Red-White cable and Black-Violet cable of the remote control base. If there isnot, check the continuity of the Red-White cablebetween the fuse box and the remote control baseand of the Black-Purple cable between the pin 20of the control unit and the remote control base.N.B.CONTINUITY TESTS MUST BE CARRIED OUTWITH THE COMPONENTS DISCONNECTED.(REMOTE CONTROLS, CONTROL UNIT,FUSES ETC.).INJEC - 18
<strong>MP3</strong> <strong>250</strong> i.e.InjectionCheck the presence of fixed voltage between thegrey/black cable of the remote control base andearth. If there is none check the continuity of thegrey/black cable between the fuse box (No. 5 15A) and the remote control base.N.B.CONTINUITY TESTS MUST BE CARRIED OUTWITH THE COMPONENTS DISCONNECTED.(REMOTE CONTROLS, CONTROL UNIT,FUSES ETC.).INJEC - 19
Injection<strong>MP3</strong> <strong>250</strong> i.e.pump circuit 6Check, on switching to "ON", that there is batteryvoltage, for about two seconds, to the Black-Greencable of the pump connector and earth with pumpconnector disconnected. Otherwise check thecontinuity of the Black-Grey cable between thepump connector and the base of the remote control.Check the efficiency of the earth line of the fuelpump by measuring the continuity between thepump connector black cable, system side, and theearth.If, when switching to "ON", the pump continues toturn after two seconds of activation, check, with thecontrol unit disconnected and the injection load remotecontrol disconnected, that the Black-Purplecable (pin 20 on the interface wiring) is insulatedfrom the earth.Specific tooling020331Y Digital multimeterINJEC - 20
<strong>MP3</strong> <strong>250</strong> i.e.InjectionCircuit leak testInstall the appropriate tool for fuel pressure controlwith the pipe fitted with the pressure gauge on thedelivery pipe..Check during regular operation by placing the appropriatetool between the pump and the injector.With the battery voltage> 12 V check that the fuelpressure is 2.5 BAR and that the input current is1.4 to 1.8 AWith the battery voltage > 12 V, check the pump flow rate by disconnecting from the injector the pipeequipped with the pressure gauge of the appropriate tool. Make a graded burette available with a flowrate of approximately 1 L. Rotate the pump using the active diagnosis of the palm top computer. Usinga pair of long flat needle-nose pliers, choke the fuel pipe making the pressure stabilise at approx. 2.5BAR. Check that, in fifteen seconds, the pump has a flow rate of around 110 cm³.Specific tooling020480Y Petrol pressure check setFuel filter checkDisconnect the terminals from the electric pumpINJEC - 21
Injection<strong>MP3</strong> <strong>250</strong> i.e.Remove the screw shown in the photographRemove the clip fixing the piping to the filter shownin the photographSeparate the lower part of the pump support asshown in the photograph.Remove the filter from the pump supportINJEC - 22
<strong>MP3</strong> <strong>250</strong> i.e.InjectionInspecting the injector circuitINJECTION LOADSSpecificationDesc./Quantity1 Battery 12V - 12 Ah2 Fuse 15A3 Fuse 20A4 Key switch contacts5 Fuse 7.5 A6 Injection load remote control7 Fuel pump8 HV coilINJEC - 23
Injection<strong>MP3</strong> <strong>250</strong> i.e.Specification9 Fuel injector10 Lambda sensor11 Electric fan starterCheck the resistance at the injector ends: 14.5 ± 5% OhmDesc./QuantityCheck the efficiency of injection load 15 A fuse No.5.Check the efficiency of live control unit power supply7.5A fuse No. 10 .Check the efficiency of the injection load remotecontrol: Check the resistance of the energising coilbetween pins 86 and 85: 40 to 80 OhmApply a voltage of 12V to pins 86 and 85; makesure that there is continuity between pins 30 and87 of the remote control.INJEC - 24
<strong>MP3</strong> <strong>250</strong> i.e.InjectionCheck the power supply line of the injection loadremote control energising coil: after switching to"ON", make sure there is battery voltage, for twoseconds, between the Red-White cable and Black-Violet cable of the remote control base. If there isnot, check the continuity of the Red-White cablebetween the fuse box and the remote control baseand of the Black-Purple cable between the pin 20of the control unit and the remote control base.N.B.CONTINUITY TESTS MUST BE CARRIED OUTWITH THE COMPONENTS DISCONNECTED.(REMOTE CONTROLS, CONTROL UNIT,FUSES ETC.).Check the presence of fixed voltage between thegrey/black cable of the remote control base andearth. If there is none check the continuity of thegrey/black cable between the fuse box (No. 5 15A) and the remote control base.N.B.CONTINUITY TESTS MUST BE CARRIED OUTWITH THE COMPONENTS DISCONNECTED.(REMOTE CONTROLS, CONTROL UNIT,FUSES ETC.).INJEC - 25
Injection<strong>MP3</strong> <strong>250</strong> i.e.Check the presence of fixed voltage between thegrey/black cable of the remote control base andearth. If there is none check the continuity of thegrey/black cable between the fuse box (No. 4 10A) and the remote control base.N.B.CONTINUITY TESTS MUST BE CARRIED OUTWITH THE COMPONENTS DISCONNECTED.(REMOTE CONTROLS, CONTROL UNIT,FUSES ETC.).INJEC - 26
<strong>MP3</strong> <strong>250</strong> i.e.InjectionWith the control unit and the injector disconnected,check the continuity of the Red-Yellow cable betweenpin 14 of the interface wiring and the injectorconnectorSwitch to "ON" and check if there is voltage, withinjector disconnected and control unit connected,between the Black-Green cable of the injector connectorand the ground leadWith injector disconnected and the injector loadremote control disconnected, check the continuityof the Black-Green cable between the injector connectorand remote control base.INJEC - 27
Injection<strong>MP3</strong> <strong>250</strong> i.e.Inspecting the injector hydraulicsTo carry out the injector check, remove the intakemanifold by removing the three clamping screwsat the head and the clip connecting the control unitto the manifold.Install the appropriate tool for checking fuel pressureand position the manifold over a containergraduated by at least 100 cm³. Connect the injectorwith the cable making up part of the supply forthe injection tester. Connect the clamps of the cableto an auxiliary battery. Activate the fuel pumpwith the active diagnosis. Check that, in fifteenseconds, approximately 40 cc of fuel is dispensedwith a regulation pressure of approximately 2.5BAR.Specific tooling020480Y Petrol pressure check setProceed with the injector seal test.Dry the injector outlet with a blast of compressedair. Activate the fuel pump. Wait for one minute,making sure there are no leaks coming from theinjector. Slight oozing is normal.Value limit = 1 drop per minuteINJEC - 28
<strong>MP3</strong> <strong>250</strong> i.e.InjectionComponents locationINJEC - 29
Injection<strong>MP3</strong> <strong>250</strong> i.e.TRANSPARENCYSpecificationDesc./Quantity1 Fuel injector2 Throttle body and electronic injection controlunit (MIU)3 Diagnostics socket connector4 Battery 12V - 12 Ah5 Engine rpm sensor6 HV coil7 Lambda sensor8 Fuel pump9 Water temperature sensor10 Injection load remote control11 Instrument panelTachometerWith wiring disconnected from the control unit andconnected to the system, check that the sensorresistance between pins 13 - 15 is between 100and 150 Ohm at an engine temperature of approximately20°INJEC - 30
<strong>MP3</strong> <strong>250</strong> i.e.InjectionDisconnect the fuel pipe connector. Start up theengine and wait for it to stop. With the wiring connectedto the control unit and system try to start upthe engine and check that the voltage betweenpins 13 and 15 is around 2.8 VWith the interface cable harness disconnectedfrom the control unit, check continuity between pin13 and the red cable of the rpm sensor connectorand between pin 15 and the brown cable of the rpmsensor connectorWith the interface wiring disconnected from thecontrol unit and rpm sensor connector, check thatthe red and brown cables (pin 13 - 15) are isolatedfrom each other and insulated from the earth.Specific tooling020481Y Control unit interface wiring020331Y Digital multimeterINJEC - 31
Injection<strong>MP3</strong> <strong>250</strong> i.e.HT coilINJECTION LOADSSpecificationDesc./Quantity1 Battery 12V - 12 Ah2 Fuse 15A3 Fuse 20A4 Key switch contacts5 Fuse 7.5 A6 Injection load remote control7 Fuel pump8 HV coilINJEC - 32
<strong>MP3</strong> <strong>250</strong> i.e.InjectionSpecification9 Fuel injector10 Lambda sensor11 Electric fan starterDesc./QuantityThe ignition system is integrated with the injection and is of the inductive high efficiency type.The control unit manages two important parameters:- Ignition advanceThis is optimised according to the engine rpm, to the engine load, temperature and ambient pressureWith idle engine, it is optimised to obtain the stabilisation of the speed at 1450 ± 50 R/1'.- Magnetisation timeThe coil magnetisation time is controlled by the control unit. The ignition power is increased during theengine start-up.The injection system recognises the 4-stroke cycle and therefore, ignition is only controlled duringcompression.Specific tooling020331Y Digital multimeterCheck the efficiency of injection load 15 A fuse No.5.Check the efficiency of live control unit power supply7.5A fuse No. 10 .Check there is voltage between pins 22 and 26 ofthe interface wiring for around two seconds whenswitching to «ON».INJEC - 33
Injection<strong>MP3</strong> <strong>250</strong> i.e.Check the resistance of the primary coil betweenpin 22 of the interface wiring and the green blackcable of the injection load remote control base withthe control unit disconnected and the remote controldisconnected.Resistance of the primary = 0.5 ± 8% OhmCheck the efficiency of the injection load remotecontrol: Check the resistance of the energising coilbetween pins 86 and 85: 40 to 80 OhmApply a voltage of 12V to pins 86 and 85; makesure that there is continuity between pins 30 and87 of the remote control.INJEC - 34
<strong>MP3</strong> <strong>250</strong> i.e.InjectionCheck the power supply line of the injection loadremote control energising coil: after switching to"ON", make sure there is battery voltage, for twoseconds, between the Red-White cable and Black-Violet cable of the remote control base. If there isnot, check the continuity of the Red-White cablebetween the fuse box and the remote control baseand of the Black-Purple cable between the pin 20of the control unit and the remote control base.N.B.CONTINUITY TESTS MUST BE CARRIED OUTWITH THE COMPONENTS DISCONNECTED.(REMOTE CONTROLS, CONTROL UNIT,FUSES ETC.).INJEC - 35
Injection<strong>MP3</strong> <strong>250</strong> i.e.Check the presence of fixed voltage between thegrey/black cable of the remote control base andearth. If there is none check the continuity of thegrey/black cable between the fuse box (No. 5 15A) and the remote control base.N.B.CONTINUITY TESTS MUST BE CARRIED OUTWITH THE COMPONENTS DISCONNECTED.(REMOTE CONTROLS, CONTROL UNIT,FUSES ETC.).INJEC - 36
<strong>MP3</strong> <strong>250</strong> i.e.InjectionCoolant temperature sensorSpecification1 Water temperature sensor2 Engine stop switchWith the connector on the control unit side disconnectedand the coolant temperature sensor connectorconnected, check the resistance valuesbetween pins 9 and 18 correspond to the enginetemperature.20° = <strong>250</strong>0 ± 100 Ω80° = 308 ± 6 ΩWith the control unit side connector disconnectedand the coolant temperature connector discon-TEMPERATURE SENSOR 1Desc./QuantityINJEC - 37
Injection<strong>MP3</strong> <strong>250</strong> i.e.nected, check the insulation between the two lightblue-green and grey-green cablesWith the connector on the control unit side disconnectedand the coolant temperature sensor connectordisconnected, check the continuity betweenpin 9 of the interface wiring and the bluegreencable of the connector, and between pin 18of the interface wiring and the grey-green cable ofthe connector.Specific tooling020481Y Control unit interface wiring020331Y Digital multimeterZeroing the throttleResetting the throttle valve position signal (TPS reset)The MIU control unit is supplied with a throttle valve position sensor that is pre-calibrated.Pre-calibration entails regulating the minimum opening of the throttle valve to obtain a certain flow ofair under pre-set reference conditions.Pre-calibration ensures optimal air flow to control idling.This regulation must not be tampered with in any way whatsoever.The injection system will complete the management of the idling through the Stepper motor and thevariation of the ignition advance.The throttle body after the pre-calibration has an opened valve with an angle that can vary dependingon the tolerances of the machining of the pipe and the valve itself.The valve position sensor can also assume various fitting positions. For these reasons the mV of thesensor with the valve at idle can vary from one throttle body to another.To obtain the optimum fuel mixture, especially at small openings of the throttle valve, it is essential tomatch the throttle body with the control unit following the procedure known as TPS resetting.With this operation we inform the control unit, as the starting point, of the mV value corresponding tothe pre-calibrated position.To reset, proceed as follows.INJEC - 38
<strong>MP3</strong> <strong>250</strong> i.e.InjectionConnect the diagnostic tester.Switch to «ON».Select the functions of the diagnostic tester on«TPS RESET».Specific tooling020460Y Scooter diagnosis and testerMake sure that the throttle valve with the control issupporting the stop screw.Guaranteeing that this position will be kept, senda confirmation for the TPS reset procedure.INJEC - 39
Injection<strong>MP3</strong> <strong>250</strong> i.e.Reset should be performed in the following cases:- on first fitting.- if the injection control unit is replaced.N.B.THE TPS RESETTING PROCEDURE MUST NOT BE CARRIED OUT WITH A USED THROTTLEBODY BECAUSE POSSIBLE VALVE WEAR AND STOP WEAR FOR THE MINIMUM OPENINGMAKE THE AIR FLOW DIFFERENTLY FROM THAT OF PRE-CALIBRATION.Given that the TPS resetting is also done when thecontrol unit is replaced, place the control unit - filterbox bellows at 45° during the refitting operation asshown in the photograph.Lambda probeSIGNAL CONTROLInstall the electronic control unit interface wiring.Start the engine and warm up until the electric fanswitches on.Use an analogue multimeter with a direct voltagescale measuring down to 2 V.Place the tips of the multimeter between pins 4 (-)and 11 (+)INJEC - 40
<strong>MP3</strong> <strong>250</strong> i.e.InjectionWith the engine running at idle speed, check thatthe voltage oscillates between 0V and 1VWith the throttle valve completely open, the voltageis approx. 1V.During the closing phase, the voltage is approx.0V.If the voltage remains constant, the sensor may bedamaged. Remove the sensor and check thatthere are no oil or carbon deposits inside it..INJEC - 41
Injection<strong>MP3</strong> <strong>250</strong> i.e.INJECTION LOADSSpecificationDesc./Quantity1 Battery 12V - 12 Ah2 Fuse 15A3 Fuse 20A4 Key switch contacts5 Fuse 7.5 A6 Injection load remote control7 Fuel pump8 HV coil9 Fuel injector10 Lambda sensorINJEC - 42
<strong>MP3</strong> <strong>250</strong> i.e.InjectionSpecificationDesc./Quantity11 Electric fan starterThe Lambda sensor or oxygen sensor is a sensor which provides indications concerning the oxygencontent in the exhaust gas. The signal generated is not of the proportional type but of the ON/OFF type,i.e. there is oxygen or there is not. The sensor is positioned on the exhaust manifold before the catalyticconverter in an area where the gas temperature is always high. The temperature at which the sensorworks is at least 350°C at 600°C and it has a reaction time of just 50 milliseconds. The signal generatedpasses from a high value to a low value with a mixture with lambda =1. Since the sensor only works athigh temperatures, it has an electric preheating element inside it, controlled by the control unit, to takeit quickly to the functioning state.Specific tooling020481Y Control unit interface wiring020331Y Digital multimeterCheck the efficiency of injection load 15 A fuse No.5.Check the efficiency of live control unit power supply7.5A fuse No. 10 .Check there is voltage between pins 21 and 26 ofthe interface wiring, for around two seconds, whenswitching to «ON».INJEC - 43
Injection<strong>MP3</strong> <strong>250</strong> i.e.With the engine cold, check the resistance of theLambda sensor heater between pin 21 of the interfacewiring and the black green cable of theinjection load remote control base, with the controlunit disconnected and the remote control disconnected.Resistance of the heater at approximately 20° = 9Ohm ± 20%Check the efficiency of the injection load remotecontrol: Check the resistance of the energising coilbetween pins 86 and 85: 40 to 80 OhmApply a voltage of 12V to pins 86 and 85; makesure that there is continuity between pins 30 and87 of the remote control.Check the power supply line of the injection loadremote control energising coil: after switching to"ON", make sure there is battery voltage, for twoseconds, between the Red-White cable and Black-Violet cable of the remote control base. If there isnot, check the continuity of the Red-White cablebetween the fuse box and the remote control baseand of the Black-Purple cable between the pin 20of the control unit and the remote control base.N.B.CONTINUITY TESTS MUST BE CARRIED OUTWITH THE COMPONENTS DISCONNECTED.(REMOTE CONTROLS, CONTROL UNIT,FUSES ETC.).INJEC - 44
<strong>MP3</strong> <strong>250</strong> i.e.InjectionINJEC - 45
Injection<strong>MP3</strong> <strong>250</strong> i.e.Check the presence of fixed voltage between thegrey/black cable of the remote control base andearth. If there is none check the continuity of thegrey/black cable between the fuse box (No. 4 10A) and the remote control base.N.B.CONTINUITY TESTS MUST BE CARRIED OUTWITH THE COMPONENTS DISCONNECTED.(REMOTE CONTROLS, CONTROL UNIT,FUSES ETC.).INJEC - 46
INDEX OF TOPICSSUSPENSIONSSUSP
Suspensions<strong>MP3</strong> <strong>250</strong> i.e.This section is devoted to operations that can be carried out on the suspension.FrontRemoving the front wheel- Remove the 5 fixing screws indicated in the photograph.Locking torques (N*m)Wheel fixing screw 20 ÷ 25Front wheel hub overhaul- Remove the ball bearing seeger ring indicated inthe photographExtract the ball bearing using the specific toolSpecific tooling001467Y014 Pliers to extract ø 15-mm bearings001467Y017 Bell for bearings, outside Ø 39 mmSUSP - 2
<strong>MP3</strong> <strong>250</strong> i.e.Suspensions- Remove the oil seal on the roller bearing sideusing a screwdriver.- Remove the roller bearing using the specific toolSpecific tooling020376Y Adaptor handle020456Y Ø 24 mm adaptor020363Y 20 mm guide- Heat the roller bearing seat with a heat gun- Use the specific tool to introduce and push thebearing until it stops, with the shielded side facingout- Refit the ball bearing locking seeger ringSpecific tooling020151Y Air heater020376Y Adaptor handle020359Y 42x47-mm adaptor020412Y 15 mm guide- Use the specific tool to fit and push the roller casinguntil it stops- Refit the oil seal on the roller bearing side- Lubricate the area between the roller bearing andthe ball bearingSpecific tooling020038Y PunchRecommended productsAGIP GREASE MU3 Grease for odometertransmission gear caseSUSP - 3
Suspensions<strong>MP3</strong> <strong>250</strong> i.e.Soap-based lithium grease with NLGI 3; ISO-L-XBCHA3, DIN K3K-20HandlebarRemovalN.B.• Remove the two handlebar covers asexplained in the Bodywork Chapter.• Remove the handlebar wiring fixingclips and disconnect the electric connectorsfrom the brake levers.• Unscrew the fittings, then remove thefront and rear brake pump piping.• Remove the flexible transmission ofthe accelerator and remove the throttle.• Loosen the clamp fixing the handlebarto the steering tube and pulling upwards,remove the handlebar, then removethe lower plastic cover.IF THE HANDLEBAR IS BEING REMOVED TOREMOVE THE STEERING, IT IS ONLY NECES-SARY TO TILT THE HANDLEBAR FORWARDONTO THE FRONT PART OF THE VEHICLEWITHOUT REMOVING THE PARTS FITTED SOAS TO AVOID DAMAGING THE SHAFTS.RefittingCarry out the above operations by working in the reverse order from those of the removal.Locking torques (N*m)Handlebar fixing screw 50 ÷ 55The tilt mechanismSUSP - 4
<strong>MP3</strong> <strong>250</strong> i.e.SuspensionsHydraulic system layoutWhen tilting is locked, the geared motor activatesthe hydraulic pump indicated in the photographand pressurises the circuit.The pressurised oil reaches the distribution frame"T" and the pressure sensor "A". Then, the pipesbranch out to reach the upper joints on the sidesteering tubes.Through the rigid-flexible pipes inside the sidesteering tubes, the oil reaches the stem slidinglocking device placed parallel to the shock absorber.Steering tubesRemove the brake calliper pipe retainers and thehydraulic pipe fitting from the brake calliper makingsure there is a container to collect the brake fluid.SUSP - 5
Suspensions<strong>MP3</strong> <strong>250</strong> i.e.Disconnect the tone wheel connector indicated inthe photograph.Remove the hydraulic pipe fitting from the slidinglocking device, making sure again that the liquiddrained is collected.Remove the upper fittings, on the parallelogram,of the brake hydraulic pipes and the suspensionlock indicated in the photograph.Remove the hydraulic pipe fitting fixing nuts indicatedin the figure from the support bracket.SUSP - 6
<strong>MP3</strong> <strong>250</strong> i.e.SuspensionsRemove the suspension tilt locking device pipesfrom the headstock.Remove first the flexible part of the calliper fromthe steering tube as shown in the photograph, andthen remove the rigid part.Remove the tone wheel wiring by disconnectingthe connector on the fuel tank after removing thechassis central cover.After that, remove the retainers indicated in thefigure.SUSP - 7
Suspensions<strong>MP3</strong> <strong>250</strong> i.e.Remove the constant-velocity universal joint fromthe steering bar by undoing the nut indicated in thephotograph.Use a specific tool to remove the upper tighteningring nut of the steering tube.Specific tooling020055Y Wrench for steering tube ring nutRemove the hydraulic pipe support bracket.SUSP - 8
<strong>MP3</strong> <strong>250</strong> i.e.SuspensionsRemove the steering tube lower ring nut and theprotection cap indicated in the photograph.Now, it is possible to remove the steering tube.Check that the roller tapered bearing does notshow signs of abnormal wear. If it is, replace it.SUSP - 9
Suspensions<strong>MP3</strong> <strong>250</strong> i.e.THE OPERATIONS DESCRIBED BELOW CANALSO BE CARRIED OUT EVEN WHEN THESUSPENSION IS FITTEDRemove the lower retainer of the sliding stemshown in the photograph.Remove the sliding stem locking device retainersindicated in the photograph.Check that the sliding stem locking device doesnot show signs of abnormal wear.SUSP - 10
<strong>MP3</strong> <strong>250</strong> i.e.SuspensionsFor refitting, follow the operations for removal butin reverse order, observing the prescribed torquesand greasing the bearings and their seats.STEERING TUBESNameTorque in NmSide headstock upper ring nut 20 - 24Side headstock lower ring nut 12 ÷ 15Screw fixing sliding stem to shock absorber 45 ÷ 50Clamp for sliding stem locking device 6.5 ÷ 10.5Fixing nuts for constant-velocity universal joints 18 ÷ 20Parallelogram deviceRemove the steering tubes.To facilitate removal operations of the brake discsector, loosen the 3 fixing screws in the hydraulicelectro-actuator indicated in the photograph.Remove the hydraulic pipe retainers from the parallelogram.SUSP - 11
Suspensions<strong>MP3</strong> <strong>250</strong> i.e.Remove the 4 screws fixing the tilt brake disc sectorindicated in the photograph.Remove the retainers indicated in photograph ofthe half-arms joint flange.To facilitate the operations indicated below, removethe suspension locking electronic controlunit indicated in the photograph.SUSP - 12
<strong>MP3</strong> <strong>250</strong> i.e.SuspensionsRemove the arm coupling retainers from the parallelogramby loosening the retainers indicated.For easy refitting operations, remember to takenote of the positions of the components.Separate the half-arms by hitting slightly with awooden mallet where possible alternatively to theleft and right side of the parallelogram.Remove the headstocks.SUSP - 13
Suspensions<strong>MP3</strong> <strong>250</strong> i.e.Carry out a visual check of the upper and lowerbearings on the headstocks and their seats. Replacethem in case of signs of abnormal wear.SUSP - 14
<strong>MP3</strong> <strong>250</strong> i.e.SuspensionsCheck the ball bearings on the parallelogramarms. Replace them in case of signs of abnormalwear.Check the inside tracks of the parallelogram bearingson the chassis.For refitting, follow the operations for removal butin reverse order, lubricating the locking pins on theparallelogram half-arms and observing the prescribedtorques.PARALLELOGRAM DEVICENameTorque in NmArm coupling screws 45 ÷ 50Screws fixing arms to side headstocks 45 ÷ 50Screws fixing arms to central headstock 45 ÷ 50Screws fixing the half-arm coupling flange 20 ÷ 25SUSP - 15
Suspensions<strong>MP3</strong> <strong>250</strong> i.e.NameTorque in NmFixing screws for tilt locking disc section 20 ÷ 25Geared motor and Suspension locking systemBefore removing the geared motor:Disable the suspension lock.- Remove the front shield.With the set nut indicated in the photograph, removethe tensioning cable of the suspension lockingmechanical calliper.Remove the electrical connection of the gearedmotor position potentiometer.Remove the electrical connection of the gearedmotor electric motor.Disconnect the hydraulic pipes between the pumpand the sliding stem locking clamps. Empty thesystem and use a container to collect the brakefluid.CAUTIONELIMINATE ANY REMAINING BRAKE FLUIDSPILLS.WARNING: BRAKE FLUID IS HIGHLY POISON-OUS. DO NOT INGEST OR SWALLOW. IF AC-CIDENTALLY SWALLOWED, DRINK LARGESUSP - 16
<strong>MP3</strong> <strong>250</strong> i.e.SuspensionsQUANTITIES OF MILK OR WATER AND SEEKMEDICAL ADVICE IMMEDIATELY. BRAKEFLUID DESTROYS SKIN AND OCULAR TIS-SUE. IF YOU ACCIDENTALLY SPILL BRAKEFLUID ON YOURSELF, TAKE OFF YOURCLOTHES, WASH WITH HOT WATER ANDSOAP AND SEEK MEDICAL ADVICE IMMEDI-ATELY. IF BRAKE LIQUID GETS ACCIDEN-TALLY IN CONTACT WITH YOUR EYES, RINSEWITH ABUNDANT FRESH WATER AND SEEKMEDICAL ADVICE IMMEDIATELY. KEEPBRAKE FLUID OUT OF THE REACH OF CHIL-DREN.Remove the 3 fixing screws indicated and removethe whole geared motor.Use a screwdriver to remove the plastic accesscover to the pump joint/geared motorUnscrew the pump joint screw.Unscrew the two geared motor pump lockingscrews.SUSP - 17
Suspensions<strong>MP3</strong> <strong>250</strong> i.e.Unscrew the two potentiometer screws.When refitting, plug the potentiometer in D-typeconnector, afterwards place it with its electric connectiondirected to the opposite side of the pump.Remove the nut indicated in the figure, if necessarylock the lever with a vice making sure not tospoil the surface.In case of difficulties when removing the lever, usethe specific tool.Remove the tongue and then, the moulded washer.Specific tooling020234y extractorRemove the three fixing screws of the electric motor.It is important to mark the direction of the electricmotor position in order to refit it correctly.SUSP - 18
<strong>MP3</strong> <strong>250</strong> i.e.SuspensionsRemove the four screws indicated in the figure,remove the flexible transmission supporting bracket,separate the two crankcase halves, if necessary,use a rubber mallet to hit the flexibletransmission lever in order to separate the twocrankcases.Remove the retaining seeger ring of the bearing ofthe flexible transmission lever control shaft bearing.Remove the bearing with the specific tool.Specific tooling020376Y Adaptor handle020441Y 26 x 28 mm adaptor020362Y 12 mm guideExtract the electric motor bearing with the specifictool.Specific tooling020376Y Adaptor handle020375Y Adaptor 28 x 30 mm020363Y 20 mm guideSUSP - 19
Suspensions<strong>MP3</strong> <strong>250</strong> i.e.Hold the crankcase in a perfectly horizontal position,heat it with a heat gun at a temperature ofabout 120 °C, use the specific tool to fit the bearingof the flexible transmission lever control shaft. Hitslightly with a mallet if necessary.Refit the bearing check seeger ring.Specific tooling020151Y Air heater020376Y Adaptor handle020362Y 12 mm guide020357Y 32 x 35 mm adaptorHold the crankcase in a perfectly horizontal position,heat it with a heat gun at a temperature ofabout 120 °C, use the specific tool to fit the bearingof the electric motor. Hit slightly with a mallet ifnecessary.Specific tooling020363Y 20 mm guide020358Y 37x40-mm adaptor020151Y Air heater020376Y Adaptor handleRemove the spring/toothed sector unit from its fitting,slightly hit with a mallet if necessary to releasethe unit.SUSP - 20
<strong>MP3</strong> <strong>250</strong> i.e.SuspensionsExtract the bearing of the spring/toothed sectorunit with the specific tool.Specific tooling001467Y002 Driver for OD 73 mm bearingExtract the bearing of the electric motor with thespecific tool.Hold the crankcase in a perfectly horizontal position,heat it with a heat gun at a temperature ofabout 120 °C, use the specific tool to fit the bearingof the spring/toothed sector unit. Hit slightly with amallet if necessary.Specific tooling020360Y Adaptor 52 x 55 mm020151Y Air heater020376Y Adaptor handleHold the crankcase in a perfectly horizontal position,heat it with a specific heat gun at a temperatureof about 120 °C, use the specific tool to fit thebearing of the electric motor. Hit slightly with amallet if necessary.Specific tooling020363Y 20 mm guide020151Y Air heater020376Y Adaptor handle020477Y Adaptor 37 mmSUSP - 21
Suspensions<strong>MP3</strong> <strong>250</strong> i.e.Refit the spring/toothed sector unit, hold the crankcasein a perfectly horizontal and stable position,place the spring/toothed sector unit keeping it perfectlyperpendicular to the bearing already fitted onthe crankcase; if necessary, slightly hit the unitshaft end with a mallet and protect the thread byscrewing in a nut.Fit the pinion and align the reference on the pinionteeth with the reference indicated on the secondslot of the toothed sector.Grease the pinion and the toothed sector with specificgrease.Refit the toothed sector spacer.Recommended productsMONTBLANC MOLYBDENUM GREASE MON-TBLANC MOLYBDENUM GREASEMolybdenum disulphide greaseLubricate the interference areas, match the crankcasehalves with slight hits of a mallet to get theminto contact.Place the flexible transmission supporting bracket,refit the four screws, screw them to the prescribedtorque.Locking torques (N*m)Geared motor crankcase halves couplingscrews 11 ÷ 13SUSP - 22
<strong>MP3</strong> <strong>250</strong> i.e.SuspensionsRefit the electric motor; check the position is correctby means of the reference indicated duringremoval.The motor should be so positioned that it does notprotrude from the reduction unit mould, see figure.Tighten the screws to the prescribed torque.Locking torques (N*m)Electric motor coupling screws 11 ÷ 13Place the moulded washer of the flexible transmissioncontrol lever shaft and the tongue.Refit the flexible transmission control lever asshown in the figure.Refit the potentiometer (not forcing in the D-typeconnector ensures a sole position) with the connectordirected to the opposite side of the hydraulicpump.Refit the hydraulic pump on the geared motor bodyand tighten the screws to the prescribed torque.Fit but not tighten the pump stem coupling screwand refit the plastic protection cap.The synchronisation procedure should be completewhen the installation is finished.Locking torques (N*m)Geared motor hydraulic pump tighteningscrews 11 ÷ 13SUSP - 23
Suspensions<strong>MP3</strong> <strong>250</strong> i.e.Remove the two bracket screws after releasing thespring and freeing the flexible transmission adjustment.CAUTION: A FIRST PRODUCTION BATCH WILLBE EQUIPPED WITH DOUBLE COAXIALSPRING.It is very important to remove the flexible transmissionfrom its fitting only for replacement.When refitting, tighten the two bracket screws andthe flexible transmission lever nut to the prescribedtorque.Locking torques (N*m)Bracket tightening screws 8 ÷ 12Unscrew the Allen screw and remove the switch.When refitting, place the switch with the button orientedto the stop indicated on the calliper lever;observing the reference indicated on the switchsupporting bracket.After refitting, check in detail that the switch is regularlyactivated by the stop on the lever.SUSP - 24
<strong>MP3</strong> <strong>250</strong> i.e.SuspensionsUnscrew the two pad pin screws, remove the padswith the spring.When refitting, tighten the two screws to the prescribedtorque and use Threadlock.When refitting, adjust the cable properly so that theswitch is pushed when the system is unlocked.SUSP - 25
Suspensions<strong>MP3</strong> <strong>250</strong> i.e.Select the SYSTEM RESET option from the mainmenuTurn the key switch to ONSelect the LOWER STOP SEARCH option fromthe SYSTEM RESET menuWAITPROCEDURE IN PROGRESSSUSP - 26
<strong>MP3</strong> <strong>250</strong> i.e.SuspensionsThe hand-held computer indicates the outcome ofthe stop search operation:POSSIBLE LIMIT STOP VALUES. TO EXIT,PRESS A KEY AND TURN OFF AND ON. SE-LECT PARAMETERS TO ADJUST AT 12°.Check the geared motor if the hand-held computerdoes not indicate this.Select the PARAMETERS option from the mainmenuThe hand-held computer displays the option: REL-ATIVE POTENTIOMETER ANGLEThis function is active coming from the LOWERSTOP SEARCH procedure.NOTE: a slight oscillation of the angle value between0.00° and 0.50° is considered normalRemove the protection cap of the geared motor setscrewUse a plain slot screwdriver to turn the set screwanticlockwise until replicating the 12° condition onthe hand-held computerRELATIVE POTENTIOMETER ANGLE 12° (aslight value oscillation is considered normal)Refit the protection capSUSP - 27
Suspensions<strong>MP3</strong> <strong>250</strong> i.e.Remove the protection cap, align the pump controland lock the screw to the prescribed torqueLocking torques (N*m)Clamp fixing pump bolt to anti-tilting device 11÷ 13Select the SYSTEM RESET option from the MAINmenuSUSP - 28
<strong>MP3</strong> <strong>250</strong> i.e.SuspensionsSelect the POTENTIOMETER RESET option fromthe SYSTEM RESET menu and press OK.WAIT....PROCEDURE IN PROGRESSThe hand-held computer displays the words:CHECK THAT THE CONTROL IS SET AT 12°FROM THE LOWER STOP. PRESS OK TO CON-TINUEPress OKThe hand-held computer displays the words: POS-SIBLE LIMIT STOP VALUES. PRESS A KEY ANDSHIFT OFF AND ONIf this is not successful, the tilt locking mechanismremains locked for safety.Adjust the flexible transmission so that a smallclearance is left to guarantee switch activation onthe tilt locking calliperElectrical devices testPRINCIPLE DIAGRAM FOR TILT LOCKING ELECTRICAL SYSTEMSUSP - 29
Suspensions<strong>MP3</strong> <strong>250</strong> i.e.1. GEARED MOTOR2. TILT LOCKING CALLIPER SWITCH3. TILT UNLOCKING-LOCKING CONTROL SWITCH4. POTENTIOMETER5. RIDER PRESENCE SENSOR6. LEFT SPEED SENSOR7. RIGHT SPEED SENSOR8. DIAGNOSTIC TESTER SERIAL LINE9. ENGINE CONTROL UNIT10.+ DIRECT BATTERY11.+ LIVE BATTERY12.LOW-BEAM LIGHT13.FUSE No. 3, 20A14.LOW-BEAM LIGHT REMOTE CONTROL15.PRESSURE SWITCH16.HORN REMOTE CONTROL17.INSTRUMENT PANEL18.TILT LOCKING SYSTEM CONTROL UNITTONE WHEEL SENSORSUSP - 30
<strong>MP3</strong> <strong>250</strong> i.e.Suspensions1: Right tone wheel2: Left tone wheelWith interface wiring disconnected from the parkingelectrical control unit and connected to thesystem, check that the sensor resistance betweenpins 23 - 17 and 24 - 17 is between 774 and 946Ohm at a temperature of approximately 20°With interface wiring disconnected from the controlunit, check the continuity between pin 23 and thebrown cable of the LEFT wheel revolution sensorconnector; between pin 17 and the red cables ofthe LEFT wheel revolution sensor and brown cableof the RIGHT sensor; between pin 24 and the redcable of the RIGHT wheel revolution sensorSUSP - 31
Suspensions<strong>MP3</strong> <strong>250</strong> i.e.In case of failures, check the continuity betweenpin 23 and the connector green cable on the fueltank after removing the chassis central cover; betweenpin 17 and the yellow cables on both connectors;between pin 24 and the red cable on theconnector.With interface wiring disconnected from the control unit and the connectors disconnected from wheelturning sensors, check that pin 23 - 17 and 24 - 17 are insulated from each other and from earth.SUSP - 32
<strong>MP3</strong> <strong>250</strong> i.e.SuspensionsWith a thickness gauge, check that the air gap betweenthe screw head and the sensor is between0.35 and 1 mmRIDER PRESENCE SENSORSUSP - 33
Suspensions<strong>MP3</strong> <strong>250</strong> i.e.1: RIDER PRESENCE SENSORWith interface wiring disconnected from the controlunit and connected to the system, check the followingconditions:pin 17 - 36: resistance 15 ÷ 18 kOhm when therider is not seated on the saddle.pin 17 - 36: resistance of about 3 kOhm when therider is seated on the saddleSUSP - 34
<strong>MP3</strong> <strong>250</strong> i.e.SuspensionsCheck the continuity between the interface wiringpin 17 and the yellow cable of the rider presenceconnector.Check the continuity between the interface wiringpin 36 and violet cable of the rider presence connector.TILT LOCKING GRIPPER SENSOR1: TILT LOCKING CALLIPER SENSORSUSP - 35
Suspensions<strong>MP3</strong> <strong>250</strong> i.e.The tilt locking calliper sensor is a normally openedswitch. Check its correct operation with a multimeter.With interface wiring disconnected from the controlunit, check the continuity between pin 34 and thebrown cable of the tilt locking gripper sensor connectoron the system side.Check the continuity of the connector black cableand an earth point on the chassisAlso check that the flexible transmission controllever activates the limit stop switch properly.POTENTIOMETERSUSP - 36
<strong>MP3</strong> <strong>250</strong> i.e.Suspensions1: POTENTIOMETERWith interface wiring connected to the control unit,secure the vehicle on its centre stand and switchto "ON". Select the reading scale on 20 V. Insertthe multimeter probes on pins 17 (black) and 25(red). Check that the voltage in the activated lockingcondition is 4V and 1V in the locking restcondition.SUSP - 37
Suspensions<strong>MP3</strong> <strong>250</strong> i.e.With the interface wiring disconnected from thecontrol unit, check the continuity between pin 17and the yellow cable of the potentiometer connector,between pin 25 and the green-blue cable,between pin 11 and the orange-blue cable. Alsocheck that these lines are insulated from each otherand earth.TILT LOCKING-UNLOCKING SWITCHSUSP - 38
<strong>MP3</strong> <strong>250</strong> i.e.Suspensions0: REST POSITION1: LOCKING POSITION2: UNLOCKING POSITION3: TILT LOCKING-UNLOCKING SWITCHWith interface wiring disconnected from the controlunit, check the continuity of the electrical lines betweenthe interface wiring and the tilt locking-unlockingswitch:Pin 26 and green - grey cablePin 35 and violet - black cablePin 33 and yellow - blue cableAlso check that the above indicated electrical linesare insulated from the earth.SUSP - 39
Suspensions<strong>MP3</strong> <strong>250</strong> i.e.Check the continuity between the black cable onthe connector and an earth point on the chassis.With a multimeter, check the operation of the tiltlocking-unlocking switch referring to the diagramindicated in the figure.1. EARTH2. LOCK3. REST4. UNLOCKGEARED MOTORSUSP - 40
<strong>MP3</strong> <strong>250</strong> i.e.Suspensions1: GEARED MOTORWith the interface wiring disconnected from thecontrol unit, check the continuity between pin 28and the yellow cable, between pin 38 and the bluecable on the geared motor connectorSUSP - 41
Suspensions<strong>MP3</strong> <strong>250</strong> i.e.With the interface wiring disconnected from thecontrol unit, check the continuity of the geared motorwinding placing the multimeter probes on pins28 and 38 as indicated in the figurePRESSURE SWITCH1: PRESSURE SWITCH2: HORN REMOTE CONTROL3: FUSE No. 11, 7.5ASUSP - 42
<strong>MP3</strong> <strong>250</strong> i.e.SuspensionsCheck 7.5 A fuse No. 11 for efficiency. With interfacewiring disconnected from the control unit,check the continuity of the blue - black cable betweenpressure sensor connector and the hornremote control base as indicated in the photograph.Check the continuity between pin 27 andthe remote control base white cable.Check the continuity of the yellow - red cable betweenthe pressure switch connector and the fuseboxand between the remote control base and thefuse-box.With a multimeter, also check the pressure switchoperation as well as the continuity at rest as this isnormally closed switch.SUSP - 43
Suspensions<strong>MP3</strong> <strong>250</strong> i.e.Wheel alignmentTool fittingMetodo di utilizzo dell'attrezzatura• Verificare che la pressione pneumaticisia corretta.• Posizionare il veicolo su un pavimentopiano privo di asperità e irregolarità .• Posizionare il veicolo sul cavallettocentrale.• Assicurarsi che il sistema di stazionamentosia sbloccato.• Sollevare le ruote anteriori come mostratoin foto• Verificare la regolarità di rotazione deicerchi ruota e l'eventuale presenza digiochi anomali dei cuscinetti e delle sospensioni.• Verificare che il comando dello sterzonon presenti giochi anomali su giunti ecuscinetti. In caso contrario procederecon le necessarie riparazioni e successiveregolazioni.CharacteristicFront tyre pressure (rider)Front tyre pressure (rider): 1.6 barRear tyre pressure (rider)Rear tyre pressure (rider): 2 barSUSP - 44
<strong>MP3</strong> <strong>250</strong> i.e.Suspensions• Get the vehicle off the stand, back onthe ground.• Remove the right lower coupling plateof the half-arm by undoing the screwsindicated in the photograph.• Remove the right upper screw and theleft bottom screw of the parallelogramunit .SUSP - 45
Suspensions<strong>MP3</strong> <strong>250</strong> i.e.• Fit the bracket locking the parallelogramin the holes of the previously removedscrews; use the screws suppliedwith the tool and be careful tocorrectly centre the spacer in the bearing.• Remove the nut fixing the steering controlarm and keep the original washerin position.• Fit the steering guiding bracket in astraight riding position, fix one end tothe attachment of the half-arm couplingflange and the other end to the screwfixing the steering control arm.• Place the frame so that the sliderscome into contact with the rim maximumdiameter but without interferingwith the tyre. If required, reposition theframe by operating the 3 adjustablesupport feet.SUSP - 46
<strong>MP3</strong> <strong>250</strong> i.e.Suspensions• Fit the frame locking bracket• Make sure the frame is adequatelycentred by checking with a gauge thatthe lugs along the vertical axis showthe standard protrusion.• Check that the pointers of both tyresare correctly aligned, as shown in thephotograph. Maximum misalignmentallowed: 4 notchesSUSP - 47
Suspensions<strong>MP3</strong> <strong>250</strong> i.e.RearRemoving the rear wheelRemove the full muffler assembly.- Remove the screw fixing the right-hand shockabsorber to the bracket- Remove the two screws supporting the brakecalliper on the bracket- Remove the cotter pin, the cap, the wheel axlefixing nut and the outer one of the two spacers.SUSP - 48
<strong>MP3</strong> <strong>250</strong> i.e.Suspensions- Remove the mud guard clamping screw- Remove the two screws fixing the bracket to theengine- Undo the wheel axle bracket, using the heat gun if necessary.Refitting the rear wheelTo fit, follow the removal steps but in the reversesequence, being careful to fit the spacers on thewheel axle as shown in the photograph.Locking torques (N*m)Muffler arm clamping screws 27 ÷ 30 Rearwheel axle nut 104 ÷ 126 Shock absorbercrankcaseattachment bracket 20 ÷ 25 Lowershock absorber clamping screw 33 ÷ 41 NmRear brake calliper fixing screws 25 ÷ 30 NmSwing-armRemoval- Place the scooter on its centre stand;- Remove the swinging arm/engine fitting shown inthe photo- Move the engine backSUSP - 49
Suspensions<strong>MP3</strong> <strong>250</strong> i.e.- remove the spring anchoring the swinging arm tothe frame as shown in the photo- Remove the two screws fixing the buffer supportbracket to the frame- Undo the nut on the LHS shown in the figure andremove the corresponding bolt from the oppositeside.- Remove the swinging arm.- Check the entire swinging arm assembly.- Check all the centring bushing components andsilent block rubber buffers.- Replace the work components that cause excessiveclearance on the rear suspension.SUSP - 50
<strong>MP3</strong> <strong>250</strong> i.e.SuspensionsRefittingFor correct installation of the swinging arm on thescooter, proceed as follows:1. Position the silent block supporting clamp withpart 3 inserted, and slightly tighten part 12. Position the swinging arm, inserting part 23. Tighten part 3 to the prescribed torque4. Screw on and tighten part 4 to the prescribedtorque5. Screw on and tighten part 5 to the prescribedtorque6. Tighten part 1 to the prescribed torqueInsert the swinging arm - engine bolt and tightento the prescribed torqueSUSP - 51
Suspensions<strong>MP3</strong> <strong>250</strong> i.e.Shock absorbersSWINGING ARM FITTINGNameTorque in NmPart 164 ÷ 72 NmPart 35 - 7 NmPart 490 ÷ 110 NmPart 564 ÷ 72 NmEngine-swinging arm bolt 64 - 72RemovalProceed as follows:- place the scooter on its centre stand;- lift the engine a little with a jack so as to free thetwo shock absorbers;- remove the muffler- undo the shock absorber spring assembly clampingscrew from the support fixed to the engine onthe one side and from that fixed to the muffler onthe other;- undo the two upper nuts (one on each side) fixingthe shock absorber spring assembly to the frameand remove the shock absorbers themselves.RefittingCarry out the previous operations but in reverse order.Locking torques (N*m)SUSP - 52
<strong>MP3</strong> <strong>250</strong> i.e.SuspensionsShock absorber lower clamp 33 ÷ 41 Upper shock absorber clamp 33 ÷ 41Centre-standREMOVAL- Use a jack to support the vehicle properly.- Remove the two return springs from the centrestand.- Undo the nut shown in the figure.- Remove the bolt from the right side.- Remove the centre stand.FITTING- On refitting tighten the nut to the specified torque.Locking torques (N*m)Centre stand bolt 31 ÷ 39SUSP - 53
Suspensions<strong>MP3</strong> <strong>250</strong> i.e.SUSP - 54
INDEX OF TOPICSBRAKING SYSTEMBRAK SYS
Braking system<strong>MP3</strong> <strong>250</strong> i.e.This section è is devoted to the description of the braking system components.Rear brake calliperRemoval- Remove the muffler.- Remove the two rear brake calliper devices fasteningthem to the support as shown in the photograph.N.B.IF IT IS NECESSARY TO REPLACE OR SERV-ICE THE BRAKE CALLIPER, BEFORE REMOV-ING THE FITTINGS FIXING THE CALLIPER TOTHE SUPPORT BRACKET, FIRST LOOSENTHE OIL HOSE FITTING AFTER HAVING EMP-TIED THE SYSTEM OF THE CIRCUIT BEINGEXAMINED.RemovalPlace a container under the calliper, unscrew thetube-calliper joint and empty the braking system.For easy draining of the braking system fluid, openthe pump reservoir cap.Loosen the two screws indicated in the figure andremove the calliper from the support.When refitting, tighten the two calliper retainers tothe prescribed torque.Locking torques (N*m)Screw tightening calliper to the support 24 ÷ 27BRAK SYS - 2
<strong>MP3</strong> <strong>250</strong> i.e.Braking systemRemovalRemove the split pin.Use new split pins when refitting.Undo the wheel hub nut.- When refitting, secure to the specified torque.Locking torques (N*m)Wheel axle nut 74 ÷ 88Remove the seeger ring, after that, remove thehub with the help of a rubber mallet slightly hittingon the brake disc side, turning the wheel hub at thesame time.Loosen the 6 screws indicated in the figure andremove the brake disc from the wheel hub.- When refitting, secure to the specified torque.Recommended productsLoctite 242 product descriptionApply LOCTITE medium type 242 threadlockBRAK SYS - 3
Braking system<strong>MP3</strong> <strong>250</strong> i.e.RemovalRest the vehicle on its centre stand and use thecorresponding jack to lift the two front wheels; unscrewthe five Allen screws indicated in the figureRemove the pad upper closing cap.Remove the pad pin lock with a screwdriver, payingattention not to spoil the calliper surface treatment.Use a corresponding measuring punch to extractthe pad pin, if necessary move the brake pipesmanually to release the pin.Then, remove the spring and the pads.Fit a new pad kit following the procedure but in reverseorder.Locking torques (N*m)Wheel fixing screw 20 ÷ 25Brake pipesFront brake pipes removalBRAK SYS - 4
<strong>MP3</strong> <strong>250</strong> i.e.Braking systemRemove front Shield.Remove front wheel and mudguard.Disconnect the brake pipes from the calliper anddrain the brake fluid.Then, remove the plastic and metallic straps.Unscrew the brake pump pipes as indicated in thefigure.Front brake pipes removalUnscrew the braking splitter screw.Disconnect the brake pipes removing the two metallicstraps indicated in the figure.Remove the brake oil tube fitting from the rigid pipeinside the front suspension arm and loosen thehydraulic joint fixing nut of the suspension lockingto release the brake pipes.BRAK SYS - 5
Braking system<strong>MP3</strong> <strong>250</strong> i.e.Parking brakeRemove the muffler loosening the 3 screws andthe strap on the drainage tube indicated in thephotograph.When refitting, place the parking brake flexibletransmission retaining strap correctly.Loosen the transmission set screw and release thecable from the calliper.Remove the two fixing screws of the mechaniccalliper and remove the calliper. To check callipercomponents, refer to the chapter on the tilt lockingcalliper.When refitting, secure to the specified torque.Locking torques (N*m)Screw tightening calliper to the support 20 ÷ 25After removing the shield back plate, remove theengaging cable for the safety mechanism removingit from its fitting.Remove the 4 screws shown in the figure.When refitting, pay attention to insert the metalliccable peg in the fitting marked «A» as indicated inthe enlarged photograph.BRAK SYS - 6
<strong>MP3</strong> <strong>250</strong> i.e.Braking systemRemove the electric connection from the engagedparking brake warning light switch.Remove the parking brake cable from the lever byoperating the set screw indicated in the photograph.BRAK SYS - 7
Braking system<strong>MP3</strong> <strong>250</strong> i.e.BRAK SYS - 8
INDEX OF TOPICSCOOLING SYSTEMCOOL SYS
Cooling system<strong>MP3</strong> <strong>250</strong> i.e.System bleed- Start up the engine until the operating temperatureis reached.- Remove the rubber hood over the bleed valve- Obtain a rubber tube that is of the right length toconnect the valve to the expansion tank- Place one end of the pipe on the bleed valve andthe other in the expansion tank- Loosen the screw by two turns until the communicationhole is revealed with the head as shownin the photo- Wait until only coolant comes out of the rubberpipe so as to eliminate any air bubbles inside thecircuit.- Tighten the bleed valve respecting the maximumtorque.- Bring the coolant up to the correct level inside theexpansion tankLocking torques (N*m)Bleed screw: 3COOL SYS - 2
INDEX OF TOPICSCHASSISCHAS
Chassis<strong>MP3</strong> <strong>250</strong> i.e.This section è is devoted to the operations that can be carried out on the vehicle's bodywork.SeatLift the saddle and disconnect the rider presencesensor.Remove the three fixing screws.Front handlebar coverRemove the upper cap by operating on the Allenscrew indicated in the figure.Remove the two brake pump caps.CHAS - 2
<strong>MP3</strong> <strong>250</strong> i.e.ChassisRemove the two screws under the brake pumpcaps previously removed.Unscrew the two pairs of screws in the lower partof the half-handlebar.After removing the front part of the handlebar cover,access the two screws fixing the rear part to thehandlebar, as indicated in the photograph.Headlight assy.Remove the radiator cover.Remove the two wheelhouses with the turn indicator.Unscrew the two screws fixing the wheelhouse tothe shield.Disconnect the cable guide; after that, turn thewheelhouse anticlockwise (inwards) to release itfrom the shield supports.CHAS - 3
Chassis<strong>MP3</strong> <strong>250</strong> i.e.To remove the shield central finishing, remove thePIAGGIO clip-on badge paying attention not tospoil the paint, unscrew the screw underneath andremove the finish carefully.Remove the four screws "A" and disconnect thewiring.See alsoRadiator coverFrame central coverRemove the three screws on the right and the leftside.Open the refuelling compartment and remove thetank cap so as to remove the central cover.Disconnect the cable, refuelling compartmentopening.See alsoSeatKnee-guardHandles and top side fairingsCHAS - 4
<strong>MP3</strong> <strong>250</strong> i.e.ChassisLegshieldRemove the front headlight assembly.Remove the spoiler.Remove the two front screws and the two screwsunder the wheelhouse.Remove the four screws on the shield back plate.See alsospoilerHeadlight assy.Knee-guard- Remove the front shield.- Remove the spoiler.- Remove the two central screws and the coolantcap cover screw.CHAS - 5
Chassis<strong>MP3</strong> <strong>250</strong> i.e.- Remove the expansion tank fixing screw and theframe from the instrument panel and manually releasethe unions with the shield back plate.- Unhook the instrument panel wiring.- Remove the six screws and the cable guide strapin the front part of the shield back plate.- Remove the key switch plastic ring and the twoplastic covers near the footrest.CHAS - 6
<strong>MP3</strong> <strong>250</strong> i.e.Chassis- Remove the five screws on the shield back platerear part.- Remove the two shield back plate front screws,see figure.- Remove the two shield back plate lower screws.- Remove the external temperature sensor connection.See alsoLegshieldspoilerTaillight assy.Open the rear case cover, remove the two screws«D», and then, the other four fixing screws «D» topull out the headlight assembly from its fitting.Follow this procedure to remove the bulbs:Remove the snap-on bulbs «B».Remove the bulbs «A» on the bayonet by turningthem 30° clockwise.CHAS - 7
Chassis<strong>MP3</strong> <strong>250</strong> i.e.FootrestRemove the central cover.Remove the four screws and extract the half-footrest.Follow the same procedure for both half-footrests.Release the fuse-boxSee alsoFrame central coverCHAS - 8
<strong>MP3</strong> <strong>250</strong> i.e.ChassisSide fairingsRemove the rear screw under the rear cover.Remove the screw on the fairing front part, pull thefairing to release the hooks.Follow the same procedure for both fairings.Remove the five screws on the right side and thefive on the left side, indicated in the figure.License plate holderRemove the two lateral screws and the two screwsinside the rear case.Operate a slight upwards thrust on the case to releaselicense plate support from the chassis.CHAS - 9
Chassis<strong>MP3</strong> <strong>250</strong> i.e.Helmet bayRemove the chassis central cover.Remove the four external screws and the twoscrews inside the rear case to remove the frame.Remove the upper frame, unscrewing the ten upperscrews, the two saddle closing screws and thecase light wiring.CHAS - 10
<strong>MP3</strong> <strong>250</strong> i.e.ChassisRemove the rear case internal screws indicated inthe photograph, to detach the supporting plates ofthe voltage regulator on one side and the saddleopening switch on the other.Remove the six upper screws.Release the case latch.Remove the case light front and rear switch connections,the HV coil, the battery leads and thefuse-box.See alsoFrame central coverspoilerRemove the shield central finish; then, screw thesix screws indicated in the figure.Remove the five screws indicated in the figure.See alsoCHAS - 11
Chassis<strong>MP3</strong> <strong>250</strong> i.e.Headlight assy.Fuel tankRemove the chassis central cover.Remove the footrest.Remove the three tank retainers.Remove the two lower bracket retainers indicatedin the figure.Disconnect the electric wiring and the fuel pipes.See alsoFootrestCHAS - 12
<strong>MP3</strong> <strong>250</strong> i.e.ChassisTop-caseRearRemove the four fixing screws of the cover andrelease it from the two leverages.Handles and top side fairings• Operating from the rear case removethe two screws indicated in the figure.• Remove the ceiling fitting indicated inthe photograph and remove the internalscrew indicated in the photograph.• Remove the backrest cushionCHAS - 13
Chassis<strong>MP3</strong> <strong>250</strong> i.e.Remove the six screws indicated in the figure.Radiator coverRemove the two front screws indicated in the photographRemove the two lower retainers with the bushingRemove the two rear retainers and then, the twowheelhouse front retainers.CHAS - 14
<strong>MP3</strong> <strong>250</strong> i.e.ChassisRemove the two screws fixing the radiator lowerprotection to the shield back plate.After that, press up and pull the protection frontpart so as to release it from the radiator frame.CHAS - 15
Chassis<strong>MP3</strong> <strong>250</strong> i.e.CHAS - 16
INDEX OF TOPICSPRE-DELIVERYPRE DE
Pre-delivery<strong>MP3</strong> <strong>250</strong> i.e.Carry out the listed tests before delivering the vehicle.Warning- be very careful when handling fuel.Position the plastic cover supplied with the couplingon the steering tube as shown in the figure.If a customer wishes to have mudflaps installed,proceed as follows:• Place the flap in the mudguard innerside as shown in the figure, making the4 securing holes coincide.• Fit the 4 washers on the mudguard outerside and, always on the same side,insert the 4 screws and tighten to theprescribed torque.Locking torques (N*m)mudflap insert fixing screws 2 ÷ 3Aesthetic inspectionAppearance checks:- Paintwork- Fitting of plastics- Scratches- DirtTightening torques inspectionLock check- Safety locks- clamping screwsSafety locks• Rear shock absorber upper fixing• Rear shock absorber lower fixingPRE DE - 2
<strong>MP3</strong> <strong>250</strong> i.e.Pre-delivery• Front shock absorber upper fixing• Front shock absorber lower fixing• Sliding stems fixing• Break callipers fixing• Front wheels fixing screws• Front wheels axle nut• Rear wheel axle nut• Chassis - engine swinging arm fixing• Handlebar lock nut• Lower ring nut for side steering tubes• Upper ring nut for side steering tubes• Lower ring nut for central steering tube• Upper ring nut for central steering tubes• Constant-velocity universal jointsElectrical system• Battery• Main switch• Lights: high beams, low beams, side/taillights (front and rear) and relevant warning lights- Regulating the headlights according to the regulations currently in force• Front and rear stop light buttons and bulb• Turn indicators and their warning lights• Instrument lighting• instruments: fuel and temperature indicator•Instrument panel lights• Horn• electric start up• Engine stopping with emergency stop switch• Electric opening of saddle with remote control• Tilting system locking - unlocking buttonCAUTIONTO ENSURE MAXIMUM PERFORMANCE, THE BATTERY MUST BE CHARGED BEFORE USE.INADEQUATE CHARGING OF THE BATTERY WITH A LOW LEVEL OF ELECTROLYTE BEFOREIT IS FIRST USED SHORTENS THE LIFE OF THE BATTERY.CAUTIONWHEN INSTALLING THE BATTERY, ATTACH THE POSITIVE LEAD FIRST AND THEN THE NEG-ATIVE LEAD.WARNINGBATTERY ELECTROLYTE IS TOXIC AND IT MAY CAUSE SERIOUS BURNS. IT CONTAINS SUL-PHURIC ACID. AVOID CONTACT WITH EYES, SKIN AND CLOTHING.PRE DE - 3
Pre-delivery<strong>MP3</strong> <strong>250</strong> i.e.IN CASE OF CONTACT WITH EYES OR SKIN, RINSE WITH ABUNDANT WATER FOR ABOUT 15MINUTES AND SEEK MEDICAL ATTENTION AT ONCE.IF IT IS SWALLOWED, IMMEDIATELY DRINK LARGE QUANTITIES OF WATER OR VEGETABLEOIL. SEEK IMMEDIATE MEDICAL ATTENTION.THE BATTERIES PRODUCE EXPLOSIVE GAS; KEEP THEM AWAY FROM NAKED FLAMES,SPARKS AND CIGARETTES. IF THE BATTERY IS CHARGED IN A CLOSED PLACE, TAKE CARETO ENSURE ADEQUATE VENTILATION. ALWAYS PROTECT YOUR EYES WHEN WORKINGCLOSE TO BATTERIES.KEEP OUT OF THE REACH OF CHILDRENCAUTIONNEVER USE FUSES WITH A CAPACITY HIGHER THAN THE RECOMMENDED CAPACITY. USINGA FUSE OF UNSUITABLE RATING MAY SERIOUSLY DAMAGE THE VEHICLE OR EVEN CAUSEA FIRE.Levels checkLevel check:- Hydraulic brake system liquid level.- Tilt locking system fluid level- Rear hub oil level- Engine coolant level- Engine oil levelRoad testTest ride- Cold start- Instrument operations- Response to the gas command- Stability on acceleration and braking- Rear and front brake efficiency- Parking brake efficiency- Rear and front suspension efficiency- Abnormal noise- Tilting system locking - unlocking efficiencyStatic testStatic control after the test ride:• Hot engine restart• Minimum seal (turning the handlebar)• Uniform steering rotation• Possible losses• electric radiator fan operationCAUTIONPRE DE - 4
<strong>MP3</strong> <strong>250</strong> i.e.Pre-deliveryCHECK AND ADJUST TYRE PRESSURE WITH TYRES AT AMBIENT TEMPERATURE.CAUTIONNEVER EXCEED THE RECOMMENDED INFLATION PRESSURES OR TYRES MAY BURST.Functional inspectionFunctional check up:• Hydraulic braking system: lever travel• Clutch: proper functioning check• Engine: proper general functioning and no abnormal noise check• Other: papers check, frame and engine number check, tools and equipment, licence plate fitting, lockcheck, tyre pressure check, rear-view mirror and any accessory fittingPRE DE - 5
Pre-delivery<strong>MP3</strong> <strong>250</strong> i.e.PRE DE - 6
INDEX OF TOPICSTIMETIME
Time<strong>MP3</strong> <strong>250</strong> i.e.This section is devoted to the time necessary to carry out repairs.For each operation, the description, code and time envisages are specified.EngineENGINECode Action Duration1 001001 Engine from frame - Removaland refit.2 001127 Engine - Complete service3 003064 Engine oil - changeTIME - 2
<strong>MP3</strong> <strong>250</strong> i.e.TimeCrankcaseCRANKCASECode Action Duration1 001133 Engine crankcase- Replacement2 001099 Oil seal, flywheel side - Replacement3 001100 Oil seal, clutch side - Replacement4 001124 Lubrication by-pass - Replacement5 001153 Crankcase halves gasket -ReplacementTIME - 3
Time<strong>MP3</strong> <strong>250</strong> i.e.CrankshaftCRANKSHAFTCode Action Duration1 001117 Crankshaft - ReplacementTIME - 4
<strong>MP3</strong> <strong>250</strong> i.e.TimeCylinder assy.CYLINDER GROUPCode Action Duration1 001002 Cylinder-Piston - Replacement2 001154 Pin ring piston unit - Service3 001176 Rings / Pin - ReplacementTIME - 5
Time<strong>MP3</strong> <strong>250</strong> i.e.Cylinder head assy.HEAD UNITCode Action Duration1 001057 Thermostat - Replacement2 007012 Coolant bleed valve - Replacement3 001083 Thermistor - Replacement4 001056 Head gasket - Replacement5 001045 Valves - Replacement6 001049 Valves - AdjustmentTIME - 6
<strong>MP3</strong> <strong>250</strong> i.e.TimeRocker arms support assy.ROCKING LEVER UNITCode Action Duration1 001148 Rocking lever valve - Replacement2 001126 Head - Replacement3 001044 Camshaft - Replacement4 001169 Decompressor - ReplacementTIME - 7
Time<strong>MP3</strong> <strong>250</strong> i.e.Cylinder head coverHEAD COVERCode Action Duration1 001089 Head cover - Replacement2 001093 Spark plug - Replacement3 001088 Head cover gasket - Replacement4 001074 Oil vapour recovery pipe - Replacement5 001159 Oil vapour recovery tank -ServiceTIME - 8
<strong>MP3</strong> <strong>250</strong> i.e.TimeOil filterOIL FILTERCode Action Duration1 001150 Flywheel cover gasket - Replacement2 001160 Oil pressure sensor - Replacement3 001123 Oil filter -Replacement4 001102 Net oil filter - Replacement /Cleaning5 001113 Water pump / Pump rotor -ReplacementTIME - 9
Time<strong>MP3</strong> <strong>250</strong> i.e.Flywheel coverFLYWHEEL COVERCode Action Duration1 007009 Head-pump by-pass rubbercoupling - ReplacementTIME - 10
<strong>MP3</strong> <strong>250</strong> i.e.TimeDriven pulleyDRIVEN PULLEYCode Action Duration1 001012 Driven pulley - Service2 001022 Clutch - Replacement3 001110 Driven pulley - Replacement4 001155 Clutch bell - ReplacementTIME - 11
Time<strong>MP3</strong> <strong>250</strong> i.e.Oil pumpOIL PUMPCode Action Duration1 001129 Chain tightener - Overhauland replacement2 001125 Chain guide pads - Replacement3 001122 Oil pump chain - Replacement4 001172 Chain cover flap - change5 001130 Oil sump - Replacement6 001042 Oil pump - Service7 001112 Oil pump - change8 001051 Belt/Timing chain - ChangeTIME - 12
<strong>MP3</strong> <strong>250</strong> i.e.TimeFinal gear assy.FINAL REDUCTION GEAR ASSEMBLYCode Action Duration1 002031 Rear wheel hub bearings -Replacement2 003065 Gear box oil - Replacement3 004180 Reduction gear pipe - Replacement4 004125 Rear wheel axle - Replacement5 001179 Hub drive shaft -replacement6 001156 Gear reduction unit cover -ReplacementTIME - 13
Time<strong>MP3</strong> <strong>250</strong> i.e.Driving pulleyDRIVE PULLEYCode Action Duration1 001177 Variator rollers / shoes - Replacement2 001141 Belt anti-flapping roller - Replacement3 001086 Driving half-pulley - Replacement4 001011 Driving belt - Replacement5 001066 Driving pulley - Removal andRefitting6 001006 driving pulley - ServiceTIME - 14
<strong>MP3</strong> <strong>250</strong> i.e.TimeTransmission coverTRANSMISSION COVERCode Action Duration1 001135 Transmission cover bearing -Replacement2 001096 Transmission crankcase cover- Replacement3 001131 Transmission air intake - Replacement4 001170 Air duct - Replacement5 001132 Transmission air inlet pipe -ReplacementTIME - 15
Time<strong>MP3</strong> <strong>250</strong> i.e.Starter motorELECTRICAL START UPCode Action Duration1 001020 Starter motor - Replacement2 005045 Starter motor cable harness -Replacement3 001151 Start-up driven gearing - Replacement4 001017 Start-up pinion - ReplacementTIME - 16
<strong>MP3</strong> <strong>250</strong> i.e.TimeFlywheel magnetoFLYWHEELCode Action Duration1 001173 Rotor - Replacement2 001058 Complete flywheel - Replacement3 001067 Stator - Removal and Refitting4 001087 Flywheel cover - replaceTIME - 17
Time<strong>MP3</strong> <strong>250</strong> i.e.Butterfly valveTHROTTLE BODYCode Action Duration1 001047 Injector - Replacement2 001023 Control unit - Replacement3 001013 Intake manifold - changeExhaust pipeTIME - 18
<strong>MP3</strong> <strong>250</strong> i.e.TimeMUFFLERCode Action Duration1 001095 Muffler guard - Replacement2 005138 Lambda probe - Replacement3 001092 Exhaust manifold - Replacement4 001009 Muffler - ReplacementAir cleanerAIR CLEANERCode Action Duration1 004122 Air cleaner carburettor fitting -Replacement2 001014 Air filter - Replacement /cleaning3 001015 Air filter box - ReplacementTIME - 19
Time<strong>MP3</strong> <strong>250</strong> i.e.FrameCHASSISCode Action Duration1 004146 Front frame - Replacement2 004116 Rear frame - Replacement3 004001 Frame - replace4 004147 footboard support bracketone side - Replacement5 004143 Footrest support - replaceTIME - 20
<strong>MP3</strong> <strong>250</strong> i.e.TimeCentre-standSTANDCode Action Duration1 001053 Stand bolt - Replacement2 004179 Stand buffer - Replacement3 004004 Stand - ReplacementTIME - 21
Time<strong>MP3</strong> <strong>250</strong> i.e.Legshield spoilerFRONT SHIELDCode Action Duration1 004020 Headlight frame - Replacement2 004064 Front shield - Replacement3 004055 Turn indicator frame - Replacement4 004149 Shield central cover - Replacement5 004022 Shield lower section - Replacement6 004167 Grill / radiator cover - ReplacementTIME - 22
<strong>MP3</strong> <strong>250</strong> i.e.TimeSide fairingsSIDE COVERSCode Action Duration1 004036 Lower chassis cover - Replacement2 004129 Rear fairing - Replacement3 004085 Fairing (1) - Replacement4 004068 Passenger handgrip - Replacement5 004037 Side aprons-ReplacementTIME - 23
Time<strong>MP3</strong> <strong>250</strong> i.e.Rear coverREAR SHIELDCode Action Duration1 004065 Front shield, rear part - Removaland refittingTIME - 24
<strong>MP3</strong> <strong>250</strong> i.e.TimeCentral coverCENTRAL COVERCode Action Duration1 004059 Spark plug inspection flap -Replacement2 004135 Fuel tank port - Replacement3 004011 Central chassis cover - Replacement4 004012 Rear fairings - Removal andrefitting5 004015 Footrest - Removal and Refitting6 004075 Front mat - ReplacementTIME - 25
Time<strong>MP3</strong> <strong>250</strong> i.e.MudguardMUDGUARDSCode Action Duration1 007015 Radiator air intake - Replacement2 004009 Rear mudguard - Replacement3 004181 Lower cover - Replacement4 004184 Front mudguard support - replacement5 004002 Front mudguard - ReplacementTIME - 26
<strong>MP3</strong> <strong>250</strong> i.e.TimeFuel tankFUEL TANKCode Action Duration1 004137 Injector pump pipe - Replacement2 005010 Tank float - Replacement3 004109 Fuel tank breather - Replacement4 004168 Fuel tank cap - Replacement5 004138 Fuel reverse pipe - Replacement6 004005 Fuel tank - Replacement7 004073 Fuel pump - ReplacementTIME - 27
Time<strong>MP3</strong> <strong>250</strong> i.e.Rear shock-absorberREAR SHOCK ABSORBERSCode Action Duration1 003007 Rear shock absorber - Removaland Refitting2 003035 Shock absorber support andbrake calliper - Replacement3 003077 muffler/rear shock absorbersupport arm - ServiceTIME - 28
<strong>MP3</strong> <strong>250</strong> i.e.TimeHandlebar coversHANDLEBAR COVERSCode Action Duration1 000307 RIGHT OR LEFT CONTROLASSEMBLY REPLACE-MENT2 004019 Rear handlebar covers - Replacement3 004026 Handlebar cover - Replacement4 004018 Front handlebar covers - ReplacementTIME - 29
Time<strong>MP3</strong> <strong>250</strong> i.e.Handlebar componentsHANDLEBAR COMPONENTSCode Action Duration1 002059 Right-hand knob - change2 002060 Complete throttle control -Replacement3 002063 Complete throttle control -Replacement4 003001 Handlebar - Replacement5 002071 Left knob - Replacement6 003059 Counterweight - Replacement7 002037 Brake lever - Replacement8 002048 Rear brake calliper - Replacement9 002067 Rear brake pump - Replacement10 002080 Rear brake oil bleeding system- Replacement11 004162 Mirror support and/or brakepump fitting U-bolt - Replacement12 002024 Front brake pump - replace13 002047 Front brake fluid and airbleeding system - ReplacementTIME - 30
<strong>MP3</strong> <strong>250</strong> i.e.TimeSwing-armSWINGING ARMCode Action Duration1 004058 Silent block - Replacement2 003081 Swinging arm support flange- replace3 001072 Swinging arm - Engine-chassisconnection - Replacement4 003080 Swinging arm on frame - ReplacementTIME - 31
Time<strong>MP3</strong> <strong>250</strong> i.e.SeatSADDLECode Action Duration1 004003 Saddle - ReplacementTIME - 32
<strong>MP3</strong> <strong>250</strong> i.e.TimeInstrument panelINSTRUMENT PANELCode Action Duration1 004021 Shield upper section - Replacement2 005014 Odometer - Replacement3 004099 Odometer housing - Replacement4 004035 Instrument panel - ReplacementTIME - 33
Time<strong>MP3</strong> <strong>250</strong> i.e.LocksLOCKSCode Action Duration1 004172 Rear case closure hook - Replacement2 005099 Electric saddle opening activator- Replacement3 004054 Saddle lock catch - Replacement4 004001 Chassis - Replacement5 005072 Immobilizer aerial - ReplacementTurn signal lightsRear lightsTIME - 34
<strong>MP3</strong> <strong>250</strong> i.e.TimeREAR TURN INDICATORS INDICATOR LIGHTSCode Action Duration1 005005 Taillight - Replacement2 005022 Rear turn indicators - Replacement3 005031 Licence plate light bulb - Replacement4 005032 Transparent licence platecover - replace5 005131 Licence plate light support -Replacement6 005066 Rear light bulbs - Replacement7 005068 Rear turn indicator bulb - ReplacementFront lightsTIME - 35
Time<strong>MP3</strong> <strong>250</strong> i.e.FRONT TURN INDICATORS INDICATOR LIGHTSCode Action Duration1 005067 Front direction indicator bulb- Replacement2 005012 Front direction indicators -Replacement3 005002 Front light - Replacement4 005008 Light bulbs - ReplacementTIME - 36
<strong>MP3</strong> <strong>250</strong> i.e.TimeFront wheelFRONT WHEELSCode Action Duration1 003047 Front tyre - Replacement2 003033 Front wheel hub- Replacement3 003037 Front wheel rim- Replacement4 005089 Tone wheel - Replacement5 002041 Front brake disc - Replacement6 004123 Front wheel - ReplacementTIME - 37
Time<strong>MP3</strong> <strong>250</strong> i.e.Rear wheelREAR WHEELCode Action Duration1 002070 Rear brake disc - Replacement2 001016 Rear wheel - Replacement3 001071 Front wheel rim - Removaland refitting4 004126 Rear wheel tyre - ReplacementTIME - 38
<strong>MP3</strong> <strong>250</strong> i.e.TimeElectric devicesELECTRICAL DEVICESCode Action Duration1 005075 Stop remote control - Replacement2 005035 Headlight remote control -Replacement3 005011 Start-up remote controlswitch - Replacement4 005007 Battery - Replacement5 005003 Horn - ReplacementTIME - 39
Time<strong>MP3</strong> <strong>250</strong> i.e.CABLE HARNESSCode Action Duration1 005001 Electrical system - Replacement2 005114 Electrical system - ServiceTIME - 40
<strong>MP3</strong> <strong>250</strong> i.e.TimeElectronic controlsHANDLEBAR CONTROLSCode Action Duration1 005017 Stop switch - Replacement2 005077 Emergency stop switch - Replacement3 005041 Starter button - Replacement4 004010 Anti-theft lock - Replacement5 005040 Horn button - Replacement6 005006 Light switch or turn indicators- Replacement7 005039 Headlight switch - replaceTIME - 41
Time<strong>MP3</strong> <strong>250</strong> i.e.TransmissionsLOCKS TRANSMISSIONSCode Action Duration1 003094 Tilt locking calliper control cable- replacement2 002082 Fuel tank cap opening drive -Replacement3 002083 Saddle opening transmission- Replacement4 002093 Trunk opening transmission -Replacement5 003061 Accelerator transmission -AdjustmentTIME - 42
<strong>MP3</strong> <strong>250</strong> i.e.TimeHelmet bayHELMET COMPARTMENTCode Action Duration1 005046 Battery cover - change2 005026 Helmet compartment bulb -Replacement3 005027 Helmet compartment bulbsupport - Replacement4 004016 Helmet compartment - ReplacementTIME - 43
Time<strong>MP3</strong> <strong>250</strong> i.e.Rear side fairingsREAR COVERSCode Action Duration1 004081 Glove box door - Replacement2 004174 Trunk leverage3 004141 Cat's eye - Replacement4 005048 Licence plate holder - Replacement5 004082 Trunk gasket - ReplacementTIME - 44
<strong>MP3</strong> <strong>250</strong> i.e.TimeFront suspensionFRONT SUSPENSIONCode Action Duration1 003010 Front suspension - Service2 003111 Side steering tube - replacement3 003038 Front wheel axle - Removaland Refit.4 003040 Front wheel bearings - Replacement5 003107 Sliding stems - replacement6 003113 Front shock absorber - replacementTIME - 45
Time<strong>MP3</strong> <strong>250</strong> i.e.Cooling systemCOOLING SYSTEMCode Action Duration1 007013 Radiator expansion tank connectionpipe - Replacement2 001052 Coolant and air bleed - Replacement3 007001 Expansion tank - Replacement4 007024 Expansion tank cap - Replacement5 007003 Coolant delivery and returnpipe - Replacement6 007016 Fan with support - Replacement7 007002 Water radiator - replacementTIME - 46
<strong>MP3</strong> <strong>250</strong> i.e.TimeBraking systemBRAKE SYSTEMCode Action Duration1 002025 Brake piping - Replacement2 003096 Tilt locking calliper- replacement3 003100 Tilt locking calliper pads - replacement4 003108 Parking brake flexible transmission- replacement5 003109 Parking brake mechanicalcalliper - replacement6 002002 Shoes - Rear brake pads -Replacement7 002020 Rear brake pipes - Removaland refitting8 002081 Rear brake disc piping - Replacement9 003118 Tilt locking disc section - replacementTIME - 47
Time<strong>MP3</strong> <strong>250</strong> i.e.Code Action Duration10 003103 Splitter for suspension lockingsystem hoses- replacement11 003102 Hoses for the splitter-callipersuspension locking system -replacement12 003088 Tilt locking hydraulic pump -replacement13 002021 Front brake piping - Replacement14 002007 Front brake pads - Replacement15 002039 Front brake calliper - Replacement16 003104 Suspension system lockingcalliper- replacement17 003119 Hoses for the pump-splittersuspension locking system -replacement18 003105 Suspension locking systembrake fluid - repl.19 003106 Suspension locking systempressure sensor-ReplacementWindscreenTIME - 48
<strong>MP3</strong> <strong>250</strong> i.e.TimeWINDSHIELDCode Action Duration1 004101 Windshield - ReplacementStickersTRANSFERSCode Action Duration1 004066 Driving mirror - Replacement2 004159 Plates / Stickers - ReplacementTIME - 49
Time<strong>MP3</strong> <strong>250</strong> i.e.The tilt mechanismTILT MECHANISMCode Action Duration1 003073 Steering clearance - Adjustment2 003112 Central steering tube - replacement3 003002 Steering fifth wheel - Replacement4 003115 Parallelogram arms - replacement5 003114 Parallelogram bearings - replacement6 003116 Steering rod - replacement7 003117 Constant-velocity universaljoint - replacementTIME - 50
<strong>MP3</strong> <strong>250</strong> i.e.TimeGeared motorGEARED MOTORCode Action Duration1 003101 Tilt locking calliper controllever - replacement2 005009 Voltage regulator - replace3 003095 Tilt locking calliper supportbracket - replacement4 001069 HV coil - replace5 001094 Spark plug cap - Replacement6 003120 Tilt locking control unit - replacement7 003093 Geared motor crankcase - replacement8 003090 Geared electric motor - replacement9 003092 Geared motor bearings - replacement10 003091 Geared motor pinion - replacementTIME - 51
Time<strong>MP3</strong> <strong>250</strong> i.e.Code Action Duration11 003089 Geared motor potentiometer- replacementTIME - 52