van Aaken SmartBox⢠F Installation Instructions - 4 Wheel Online
van Aaken SmartBox⢠F Installation Instructions - 4 Wheel Online
van Aaken SmartBox⢠F Installation Instructions - 4 Wheel Online

You also want an ePaper? Increase the reach of your titles
YUMPU automatically turns print PDFs into web optimized ePapers that Google loves.
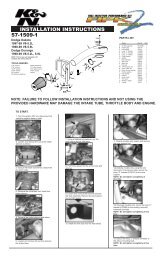
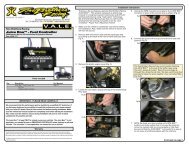
<strong>van</strong> <strong>Aaken</strong> SmartBox FPowerstroke V8 6.0L <strong>Installation</strong> instructionsNow carefully push these connectors down into the spacebelow the ECU plugs and insert the male plug of the <strong>van</strong><strong>Aaken</strong> wiring loom into the female ECU connector, againensuring that the lever lock on the plug is correctly located tolatch firmly into place.Bring the <strong>van</strong> <strong>Aaken</strong> SmartBox F braided wires with theattached 12 pin Grey plug out from the space below the ECUso that the unit can be connected and mounted.Now refit the Battery cover and reconnect the positive andnegative battery terminals, ensuring that you connect thepositive terminal first and then the negative terminal.You are now ready to mount the unit.4) Mounting the UnitThe unit should be mounted on the side of thebattery cover (as shown in the picture opposite) oron top of the battery cover.Fix the unit in place using the supplied selfadhesive Velcro strips. The area on the vehiclewhere the unit is to be attached should bethoroughly cleaned first to remove all traces of oil,engine lacquer or dirt.The grey 12-pin plug on the supplied wiring loomshould be led over to the unit and firmly connectedto the socket on the <strong>van</strong> <strong>Aaken</strong> SmartBox F unitso that both catches on the sides of the plug areseated into place.5) Toggle Switch <strong>Installation</strong> and Connection(Optional)The supplied toggle switch may be installed in any suitable place withinthe vehicle cab. The wires from the switch should be passed through thebulkhead using a rubber grommet to seal the hole and protect the wires.Make sure that the switch wires cannot get entangled in any moving partsbehind the dashboard such as heating controls.Connect the 2-pin plug on the switch loom to the remaining plug on themain loom, which is located at the end nearest to the <strong>van</strong> <strong>Aaken</strong>SmartBox F. Secure the wires using the supplied cable ties.<strong>van</strong> <strong>Aaken</strong> Developments USA LLC4490 Valenty Rd., Suite CChubbuck, ID 83202Phone: (208) 234-5660 Fax: (208) 637-0287Website: www.<strong>van</strong>aaken.com Email: usa@<strong>van</strong>aaken.com