
Create successful ePaper yourself
Turn your PDF publications into a flip-book with our unique Google optimized e-Paper software.
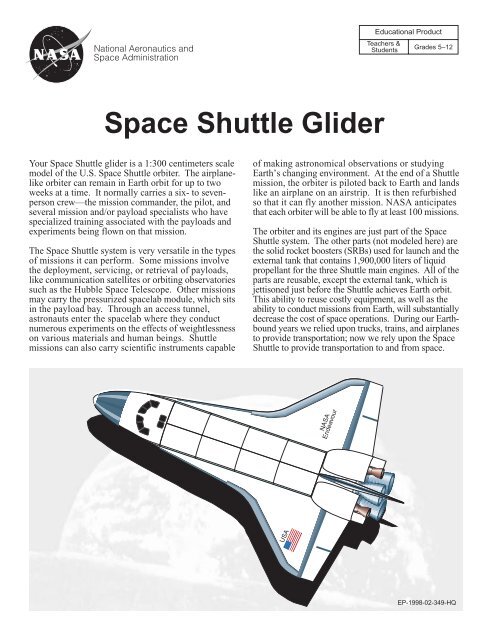
National Aeronautics and<strong>Space</strong> AdministrationEducational ProductTeachers &StudentsGrades 5–12<strong>Space</strong> <strong>Shuttle</strong> <strong>Glider</strong>Your <strong>Space</strong> <strong>Shuttle</strong> glider is a 1:300 centimeters scalemodel of the U.S. <strong>Space</strong> <strong>Shuttle</strong> orbiter. The airplanelikeorbiter can remain in Earth orbit for up to twoweeks at a time. It normally carries a six- to sevenpersoncrew—the mission commander, the pilot, andseveral mission and/or payload specialists who havespecialized training associated with the payloads andexperiments being flown on that mission.The <strong>Space</strong> <strong>Shuttle</strong> system is very versatile in the typesof missions it can perform. Some missions involvethe deployment, servicing, or retrieval of payloads,like communication satellites or orbiting observatoriessuch as the Hubble <strong>Space</strong> Telescope. Other missionsmay carry the pressurized spacelab module, which sitsin the payload bay. Through an access tunnel,astronauts enter the spacelab where they conductnumerous experiments on the effects of weightlessnesson various materials and human beings. <strong>Shuttle</strong>missions can also carry scientific instruments capableof making astronomical observations or studyingEarth’s changing environment. At the end of a <strong>Shuttle</strong>mission, the orbiter is piloted back to Earth and landslike an airplane on an airstrip. It is then refurbishedso that it can fly another mission. <strong>NASA</strong> anticipatesthat each orbiter will be able to fly at least 100 missions.The orbiter and its engines are just part of the <strong>Space</strong><strong>Shuttle</strong> system. The other parts (not modeled here) arethe solid rocket boosters (SRBs) used for launch and theexternal tank that contains 1,900,000 liters of liquidpropellant for the three <strong>Shuttle</strong> main engines. All of theparts are reusable, except the external tank, which isjettisoned just before the <strong>Shuttle</strong> achieves Earth orbit.This ability to reuse costly equipment, as well as theability to conduct missions from Earth, will substantiallydecrease the cost of space operations. During our Earthboundyears we relied upon trucks, trains, and airplanesto provide transportation; now we rely upon the <strong>Space</strong><strong>Shuttle</strong> to provide transportation to and from space.<strong>NASA</strong>EndeavourUSAEP-1998-02-349-HQ
United StatesUSALAUNCHRE-ENTRYBOOST<strong>ER</strong> SEPARATIONEXT<strong>ER</strong>NAL TANKSEPARATION ANDORBIT INS<strong>ER</strong>TION<strong>Space</strong> <strong>Shuttle</strong><strong>Glider</strong>AssemblyInstructionsON-ORBITOP<strong>ER</strong>ATIONSAIRSTRIPLANDING<strong>Space</strong> <strong>Shuttle</strong> <strong>Glider</strong> AssemblyTools Needed:ScissorsRulerDull knife (butter knife)Stick glue or white glueCellophane tape (optional)ProcedureStep 1. Cut out the entire pattern on the outside lines. The morecareful the cutting, the better the finished glider will look.Step 2. Line up the ruler with the dashed fold lines. Pull the dull knifealong the lines to score them. This will make folding moreaccurate.Step 3. Fold the paper on all dashed lines. The dashed line will be up fora mountain fold and down for a valley fold. See figure 2 belowfor details on the folds.Step 4. Lightly cover both pieces of nose strut 1 with glue. Fold it overthe nose of the glider to form a triangle shape. Bend nose strut2 over and press to strut 1 until the glue holds. See figure 1.Step 5. Coat the inside of each wing with glue and press top and bottomtogether. Be very careful to line up the parts. See figure 2.Step 6. Coat the inside of the tail pieces with glue. Also coat the outsideof the four flaps along the payload bay with glue. Bring the twosides of the payload bay together so that all flaps slide insidethe glider. Lightly press the payload bay and the tall piecestogether until the glue holds.Step 7. Coat the inside surface of the nose on each side with glue andpress them to the struts until the glue holds. If you wish,strengthen the nose with a small amount of cellophane tape.Step 8. Put a small amount of glue on the inside of the tiny triangle atthe nose of the glider. Bend it upward to close the hole.As the glue dries, the triangle will stay put.<strong>Space</strong> <strong>Shuttle</strong> <strong>Glider</strong> ChallengesChallenge #1 — Determine the Scale of the <strong>Glider</strong>Needed: <strong>Space</strong> <strong>Shuttle</strong> <strong>Glider</strong>, metric ruler, and calculatorWhat To Do: Measure the length of your glider in centimeters. Divide your answer into thelength of the real <strong>Space</strong> <strong>Shuttle</strong> orbiter to determine your glider's scale.<strong>Space</strong> <strong>Shuttle</strong> orbiter Length: 3,724 centimetersChallenge #2 — Glide RatioNeeded: <strong>Space</strong> <strong>Shuttle</strong> <strong>Glider</strong> and tape measureWhat To Do: Gently launch the <strong>Space</strong> <strong>Shuttle</strong> <strong>Glider</strong> horizontally from a measured heightabove the floor. Measure how far across the floor the orbiter traveled from the launchingpoint. Determine the glide ratio of the glider by dividing how far it traveled by the distanceit dropped to the floor. Research the glide ratios of other aircraft such as commercial jets,small private planes, and sail planes.Challenge #3 — Fishing Line Guidance SystemNeeded: <strong>Space</strong> <strong>Shuttle</strong> <strong>Glider</strong>, paper clips, nylon fishing line,cellophane tape, and book.What To Do: Spread open two paper clips so that they become "S" hooks. Bend the lowerend of the S for each hook straight out. Attach the straightened ends of the paper clips tothe back of the glider with tape so that one clip is in the nose and one is in the tail. Tie oneend of the fishing line around the book and set the book on the floor. Stand back severalmeters from the book and hold the other end of the fishing line about one meter above thefloor. Hook the glider on to the fishing line and let it go. Try to get the glider to land on thefloor without running into the book.121Valley FoldValley FoldFlying the <strong>Space</strong> <strong>Shuttle</strong> <strong>Glider</strong>When the glue is dry, your glider is ready for flight tests. Depending upon how muchglue you used, the glider may already be balanced for flight. Gently toss the gliderforward with its nose slightly elevated. If it flies smoothly and lands flat on its bottom,the glider is ready. If not, it may be necessary to add a small amount of weight to itsnose. Ball up a small piece of tissue paper and push it into the nose from the tail endof the glider with a pencil. Keep adding small pieces until the glider flies properly.Figure 1FlapMountain FoldValley FoldMountain FoldFigure 2FlapMountain FoldFlapFlapMountain FoldNoseStrutMountain FoldValley Fold
FlapFlap<strong>NASA</strong>UNITED STATESEndeavour<strong>NASA</strong>Endeavour11NoseStruts22USAFlap FlapEndeavour<strong>NASA</strong>UNITED STATESDesigned by Gregory Vogt, Crew Educational Affairs Liaison,<strong>NASA</strong> Johnson <strong>Space</strong> Center