REAR DIFFERENTIAL CARRIER OIL SEAL (4WD) - Highlander Club
REAR DIFFERENTIAL CARRIER OIL SEAL (4WD) - Highlander Club
REAR DIFFERENTIAL CARRIER OIL SEAL (4WD) - Highlander Club
- No tags were found...

Create successful ePaper yourself
Turn your PDF publications into a flip-book with our unique Google optimized e-Paper software.
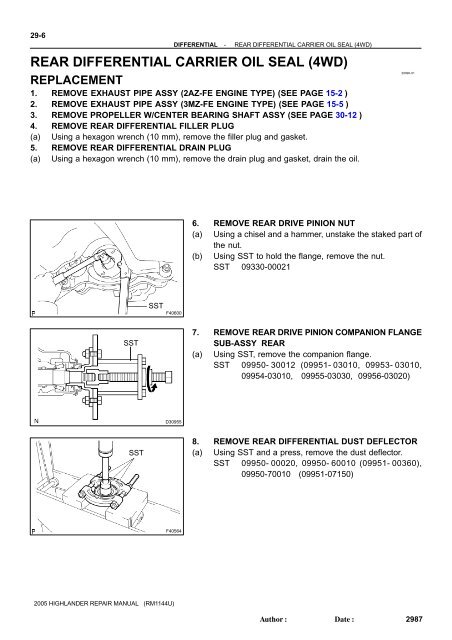
<strong>DIFFERENTIAL</strong>-<strong>REAR</strong> <strong>DIFFERENTIAL</strong> <strong>CARRIER</strong> <strong>OIL</strong> <strong>SEAL</strong> (<strong>4WD</strong>)29-7SST9. REMOVE <strong>REAR</strong> <strong>DIFFERENTIAL</strong> <strong>CARRIER</strong> <strong>OIL</strong> <strong>SEAL</strong>(a) Using SST, remove the oil seal.SST 09308-1001010. REMOVE <strong>REAR</strong> <strong>DIFFERENTIAL</strong> DRIVE PINION <strong>OIL</strong>SLINGERD30956SST11. REMOVE <strong>REAR</strong> DRIVE PINION FRONT TAPEREDROLLER BEARING(a) Using SST, remove the front tapered roller bearing.SST 09556-22010F4071812. REMOVE <strong>REAR</strong> <strong>DIFFERENTIAL</strong> DRIVE PINION BEARING SPACERRear DifferentialDrive PinionOilSlingerRear Drive PinionFront TaperedRoller BearingRear DifferentialDrive PinionBearing SpacerG2418013. INSTALL <strong>REAR</strong> <strong>DIFFERENTIAL</strong> DRIVE PINIONBEARING SPACER(a) Install a new bearing spacer.14. INSTALL <strong>REAR</strong> DRIVE PINION FRONT TAPEREDROLLER BEARING(a) Install the tapered roller bearing.15. INSTALL <strong>REAR</strong> <strong>DIFFERENTIAL</strong> DRIVE PINION <strong>OIL</strong>SLINGER(a) Install the oil slinger.SST16. INSTALL <strong>REAR</strong> <strong>DIFFERENTIAL</strong> <strong>CARRIER</strong> <strong>OIL</strong> <strong>SEAL</strong>(a) Using SST and a hammer, install a new oil seal.Oil seal drive in depth:2.0 0.3 mm (0.079 0.012 in.)(b) Coat MP grease to the oil seal lip.SST 09554-22010G24181G256552005 HIGHLANDER REPAIR MANUAL (RM1144U)Author:Date:2988
29-8<strong>DIFFERENTIAL</strong>-<strong>REAR</strong> <strong>DIFFERENTIAL</strong> <strong>CARRIER</strong> <strong>OIL</strong> <strong>SEAL</strong> (<strong>4WD</strong>)SST17. INSTALL <strong>REAR</strong> <strong>DIFFERENTIAL</strong> DUST DEFLECTOR(a) Using SST and a press, install a new dust deflector.SST 09223-00010NOTICE:Be careful not to damage the dust deflector.F40464SST18. INSTALL <strong>REAR</strong> DRIVE PINION COMPANION FLANGESUB-ASSY <strong>REAR</strong>(a) Using SST, install the companion flange on the shaft.SST 09950- 30012 (09951- 03010, 09953- 03010,09954-03010, 09955-03030, 09956-03020)NOTICE:Apply hypoid gear oil to the SST center bolt tip and threadsbefore use.D3095719. INSTALL <strong>REAR</strong> DRIVE PINION NUT(a) Coat the threads of a new nut with hypoid gear oil LSD.(b) Using SST to hold the flange, torque the nut.SST 09330-00021Torque: 108 N·m (1,100 kgf·cm, 80 ft·lbf)SSTF4060120. INSPECT <strong>DIFFERENTIAL</strong> DRIVE PINION PRELOAD (SEE PAGE 29-1 1)21. INSTALL <strong>REAR</strong> DRIVE PINION NUT(a) Using a chisel and a hammer, stake the drive pinion nut.22. INSTALL PROPELLER W/CENTER BEARING SHAFT ASSY (SEE PAGE 30-12 )23. INSTALL <strong>REAR</strong> <strong>DIFFERENTIAL</strong> DRAIN PLUG(a) Using a hexagon wrench (10 mm), install the drain plug and a new gasket.Torque: 49 N⋅m (500 kgf⋅cm, 36 ft⋅lbf)24. ADD <strong>DIFFERENTIAL</strong> <strong>OIL</strong>(a) Fill the rear differential carrier assy with hypoid gear oil.Oil grade: Hypoid gear oil API GL-5Recommended oil viscosity:Above -18°C (0°F) SAE 90Below -18°C (0°F) SAE 80W or 80W-90Capacity: 0.9 ± 0.05 liters (0.95 ± 0.05 US qts, 0.79 ± 0.04 lmp. qts)25. INSPECT <strong>DIFFERENTIAL</strong> <strong>OIL</strong> (SEE PAGE 29-5 )26. INSTALL <strong>REAR</strong> <strong>DIFFERENTIAL</strong> FILLER PLUG(a) Using a hexagon wrench (10 mm), install the filler plug and a new gasket.Torque: 49 N⋅m (500 kgf⋅cm, 36 ft⋅lbf)27. INSTALL EXHAUST PIPE ASSY (2AZ-FE ENGINE TYPE) (SEE PAGE 15-2 )28. INSTALL EXHAUST PIPE ASSY (3MZ-FE ENGINE TYPE) (SEE PAGE 15-5 )2005 HIGHLANDER REPAIR MANUAL (RM1144U)Author:Date:2989