cylinder head gasket (3mz-fe) replacement - Highlander Club
cylinder head gasket (3mz-fe) replacement - Highlander Club
cylinder head gasket (3mz-fe) replacement - Highlander Club

Create successful ePaper yourself
Turn your PDF publications into a flip-book with our unique Google optimized e-Paper software.
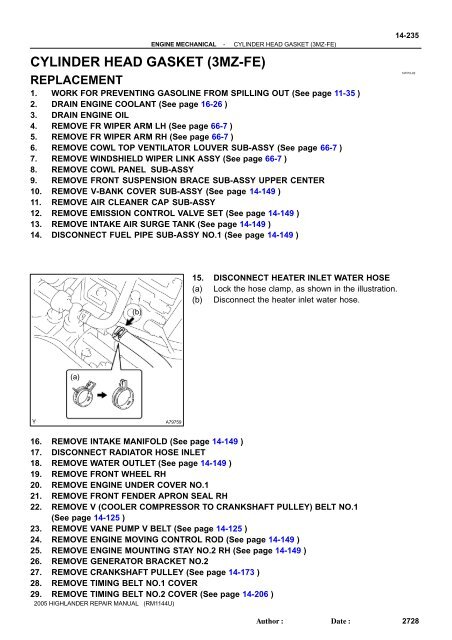
ENGINE MECHANICAL-CYLINDER HEAD GASKET (3MZ-FE)CYLINDER HEAD GASKET (3MZ-FE)REPLACEMENT1. WORK FOR PREVENTING GASOLINE FROM SPILLING OUT (See page 11-35 )2. DRAIN ENGINE COOLANT (See page 16-26 )3. DRAIN ENGINE OIL4. REMOVE FR WIPER ARM LH (See page 66-7 )5. REMOVE FR WIPER ARM RH (See page 66-7 )6. REMOVE COWL TOP VENTILATOR LOUVER SUB-ASSY (See page 66-7 )7. REMOVE WINDSHIELD WIPER LINK ASSY (See page 66-7 )8. REMOVE COWL PANEL SUB-ASSY9. REMOVE FRONT SUSPENSION BRACE SUB-ASSY UPPER CENTER10. REMOVE V-BANK COVER SUB-ASSY (See page 14-149 )11. REMOVE AIR CLEANER CAP SUB-ASSY12. REMOVE EMISSION CONTROL VALVE SET (See page 14-149 )13. REMOVE INTAKE AIR SURGE TANK (See page 14-149 )14. DISCONNECT FUEL PIPE SUB-ASSY NO.1 (See page 14-149 )14-235141PO-02(b)15. DISCONNECT HEATER INLET WATER HOSE(a) Lock the hose clamp, as shown in the illustration.(b) Disconnect the heater inlet water hose.(a)A7975916. REMOVE INTAKE MANIFOLD (See page 14-149 )17. DISCONNECT RADIATOR HOSE INLET18. REMOVE WATER OUTLET (See page 14-149 )19. REMOVE FRONT WHEEL RH20. REMOVE ENGINE UNDER COVER NO.121. REMOVE FRONT FENDER APRON SEAL RH22. REMOVE V (COOLER COMPRESSOR TO CRANKSHAFT PULLEY) BELT NO.1(See page 14-125 )23. REMOVE VANE PUMP V BELT (See page 14-125 )24. REMOVE ENGINE MOVING CONTROL ROD (See page 14-149 )25. REMOVE ENGINE MOUNTING STAY NO.2 RH (See page 14-149 )26. REMOVE GENERATOR BRACKET NO.227. REMOVE CRANKSHAFT PULLEY (See page 14-173 )28. REMOVE TIMING BELT NO.1 COVER29. REMOVE TIMING BELT NO.2 COVER (See page 14-206 )2005 HIGHLANDER REPAIR MANUAL (RM1144U)Author:Date:2728
14-236ENGINE MECHANICAL-CYLINDER HEAD GASKET (3MZ-FE)30. REMOVE ENGINE MOUNTING BRACKET RH31. REMOVE TIMING BELT GUIDE NO.232. REMOVE TIMING BELT (See page 14-206 )33. REMOVE TIMING BELT IDLER SUB-ASSY NO.234. REMOVE CAMSHAFT TIMING PULLEY (See page 14-213 )35. REMOVE TIMING BELT NO.3 COVER (See page 14-213 )36. SEPARATE VANE PUMP ASSY (See page 14-149 )37. REMOVE PROPELLER SHAFT (4WD TYPE) (See page 30-12 )38. DISCONNECT EXHAUST PIPE SUB-ASSY FRONT NO.3 (See page 15-5 )39. REMOVE EXHAUST MANIFOLD CONVERTER SUB-ASSY (See page 14-149 )40. REMOVE IGNITION COIL ASSY41. REMOVE CYLINDER HEAD COVER SUB-ASSY (See page 14-173 )42. REMOVE CAMSHAFT (See page 14-213 )43. REMOVE NO.2 CAMSHAFT (See page 14-213 )44. REMOVE CYLINDER HEAD SUB-ASSY(a) Disconnect the camshaft timing oil control valve connector.(b) Remove the nut and disconnect the engine wire harnessclamp.A78401Front(c)Using a socket hexagon wrench 8, remove the hexagonbolt.A78716Front2 7 5 34 6 8 1A78717(d) Uniformly loosen the 8 <strong>cylinder</strong> <strong>head</strong> bolts in the sequenceshown in the illustration. Remove the 8 <strong>cylinder</strong><strong>head</strong> bolts and plate washers.NOTICE: Be careful not to drop the washers into the <strong>cylinder</strong><strong>head</strong>. Head warpage or cracking could result from removingbolts in an incorrect order.45. REMOVE CYLINDER HEAD GASKET2005 HIGHLANDER REPAIR MANUAL (RM1144U)Author:Date:2729
ENGINE MECHANICAL-CYLINDER HEAD GASKET (3MZ-FE)14-237Tension Portion46. INSPECT CYLINDER HEAD SET BOLT(a) Using a vernier caliper, measure the tension portion diameterof the bolt.Standard outside diameter:8.95 to 9.05 mm (0.3524 to 0.3563 in.)Minimum outside diameter: 8.75 mm (0.3445 in.)If the diameter is less than the minimum, replace the bolt.A52828Front47. INSTALL CYLINDER HEAD GASKET(a) Place a new <strong>cylinder</strong> <strong>head</strong> <strong>gasket</strong> on the <strong>cylinder</strong> blockwith the R mark upside down, as shown in the illustration.NOTICE: Remove any oil from the contact surface. Be careful of the installation direction. To avoid damage to the <strong>gasket</strong>, place the <strong>cylinder</strong><strong>head</strong> on the <strong>gasket</strong> carefully.A7832448. INSTALL CYLINDER HEAD SUB-ASSYNOTICE:The <strong>cylinder</strong> <strong>head</strong> bolts are tightened in 2 successivesteps.Front7246(a)(b)(c)Apply a light coat of engine oil on the threads of the <strong>cylinder</strong><strong>head</strong> bolts.Install the plate washers to the <strong>cylinder</strong> <strong>head</strong> bolts.Uniformly install and tighten the 8 <strong>cylinder</strong> <strong>head</strong> bolts inthe sequence shown in the illustration.Torque: 54 N⋅m (550 kgf⋅cm, 40 ft⋅lbf)5318A78717Front90(d)(e)(f)Mark the front side of each <strong>cylinder</strong> <strong>head</strong> bolt <strong>head</strong> withpaint, as shown in the illustration.Retighten the <strong>cylinder</strong> <strong>head</strong> bolts by 90 in the same sequenceas step (c).Check that each painted mark is now at a 90 angle to thefront.Painted markA787302005 HIGHLANDER REPAIR MANUAL (RM1144U)Author:Date:2730
14-238ENGINE MECHANICAL-CYLINDER HEAD GASKET (3MZ-FE)Front(g)(h)Using a socket hexagon wrench 8, install the hexagonbolt.Torque: 19 N⋅m (194 kgf⋅cm, 14 ft⋅lbf)Connect the engine wire harness clamp with the nut.Torque: 8.0 N⋅m (82 kgf⋅cm, 71 in.⋅lbf)A7871649. INSTALL NO.2 CAMSHAFT (See page 14-213 )50. INSTALL CAMSHAFT (See page 14-213 )51. INSTALL CYLINDER HEAD COVER SUB-ASSY (See page 14-213 )52. INSTALL IGNITION COIL ASSYTorque: 8.0 N⋅m (82 kgf⋅cm, 71 in.⋅lbf)53. INSTALL EXHAUST MANIFOLD CONVERTER SUB-ASSY (See page 14-149 )54. CONNECT EXHAUST PIPE SUB-ASSY FRONT NO.3 (See page 15-5 )55. INSTALL PROPELLER SHAFT (4WD TYPE) (See page 30-12 )56. INSTALL VANE PUMP ASSY (See page 14-149 )57. INSTALL TIMING BELT NO.3 COVER (See page 14-213 )58. INSTALL CAMSHAFT TIMING PULLEY (See page 14-213 )59. INSTALL TIMING BELT IDLER SUB-ASSY NO.2Torque: 43 N⋅m (438 kgf⋅cm, 32 ft⋅lbf)60. INSPECT TIMING BELT (See page 14-206 )61. INSTALL TIMING BELT (See page 14-206 )62. INSTALL TIMING BELT TENSIONER ASSY (See page 14-206 )63. INSTALL TIMING BELT GUIDE NO.2 (See page 14-206 )64. INSTALL ENGINE MOUNTING BRACKET RHTorque: 28 N⋅m (286 kgf⋅cm, 21 ft⋅lbf)65. INSTALL TIMING BELT NO.2 COVER (See page 14-206 )66. INSTALL TIMING BELT NO.1 COVER (See page 14-206 )67. INSTALL CRANKSHAFT PULLEY (See page 14-173 )68. INSTALL GENERATOR BRACKET NO.2Torque: 28 N⋅m (286 kgf⋅cm, 21 ft⋅lbf)69. INSTALL ENGINE MOUNTING STAY NO.2 RH (See page 14-149 )70. INSTALL ENGINE MOVING CONTROL ROD (See page 14-149 )71. INSTALL VANE PUMP V BELT (See page 14-125 )72. INSTALL V (COOLER COMPRESSOR TO CRANKSHAFT PULLEY) BELT NO.1(See page 14-125 )73. INSPECT DRIVE BELT TENSION (See page 14-121 )74. INSTALL WATER OUTLET (See page 14-149 )75. CONNECT RADIATOR HOSE INLET76. INSTALL INTAKE MANIFOLD (See page 14-149 )77. CONNECT HEATER INLET WATER HOSE78. CONNECT FUEL PIPE SUB-ASSY NO.1 (See page 14-149 )79. INSTALL INTAKE AIR SURGE TANK (See page 14-149 )80. INSTALL EMISSION CONTROL VALVE SET (See page 14-149 )81. INSTALL AIR CLEANER CAP SUB-ASSY82. CONNECT VACUUM HOSES (See page 14-149 )83. INSTALL V-BANK COVER SUB-ASSY (See page 14-149 )2005 HIGHLANDER REPAIR MANUAL (RM1144U)Author:Date:2731
ENGINE MECHANICAL-CYLINDER HEAD GASKET (3MZ-FE)14-23984. INSTALL FRONT SUSPENSION BRACE SUB-ASSY UPPER CENTERTorque: 80 N⋅m (816 kgf⋅cm, 59 ft⋅lbf)85. INSTALL COWL PANEL SUB-ASSY86. INSTALL WINDSHIELD WIPER LINK ASSY (See page 66-7 )87. INSTALL COWL TOP VENTILATOR LOUVER SUB-ASSY (See page 66-7 )88. INSTALL FR WIPER ARM LH (See page 66-7 )89. INSTALL FR WIPER ARM RH (See page 66-7 )90. INSTALL FRONT WHEEL RH91. ADD ENGINE OIL92. ADD ENGINE COOLANT (See page 16-26 )93. CHECK FOR ENGINE OIL LEAKS94. CHECK FOR ENGINE COOLANT LEAKS (See page 16-20 )95. INSPECT FOR FUEL LEAKS96. CHECK FOR EXHAUST GAS LEAKS97. INSPECT IGNITION TIMING (See page 14-121 )98. INSPECT ENGINE IDLE SPEED (See page 14-121 )99. INSPECT COMPRESSION (See page 14-121 )100. INSPECT CO/HC (See page 14-121 )2005 HIGHLANDER REPAIR MANUAL (RM1144U)Author:Date:2732