Olympus/Metamorph Fluorescent Microscope User Guide
Olympus/Metamorph Fluorescent Microscope User Guide
Olympus/Metamorph Fluorescent Microscope User Guide
Create successful ePaper yourself
Turn your PDF publications into a flip-book with our unique Google optimized e-Paper software.
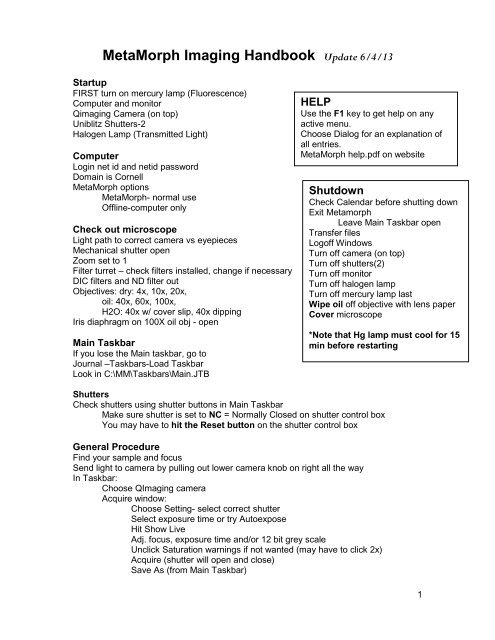
MetaMorph Imaging Handbook Update 6/4/13StartupFIRST turn on mercury lamp (Fluorescence)Computer and monitorQimaging Camera (on top)Uniblitz Shutters-2Halogen Lamp (Transmitted Light)ComputerLogin net id and netid passwordDomain is CornellMetaMorph optionsMetaMorph- normal useOffline-computer onlyCheck out microscopeLight path to correct camera vs eyepiecesMechanical shutter openZoom set to 1Filter turret – check filters installed, change if necessaryDIC filters and ND filter outObjectives: dry: 4x, 10x, 20x,oil: 40x, 60x, 100x,H2O: 40x w/ cover slip, 40x dippingIris diaphragm on 100X oil obj - openMain TaskbarIf you lose the Main taskbar, go toJournal –Taskbars-Load TaskbarLook in C:\MM\Taskbars\Main.JTBHELPUse the F1 key to get help on anyactive menu.Choose Dialog for an explanation ofall entries.MetaMorph help.pdf on websiteShutdownCheck Calendar before shutting downExit <strong>Metamorph</strong>Leave Main Taskbar openTransfer filesLogoff WindowsTurn off camera (on top)Turn off shutters(2)Turn off monitorTurn off halogen lampTurn off mercury lamp lastWipe oil off objective with lens paperCover microscope*Note that Hg lamp must cool for 15min before restartingShuttersCheck shutters using shutter buttons in Main TaskbarMake sure shutter is set to NC = Normally Closed on shutter control boxYou may have to hit the Reset button on the shutter control boxGeneral ProcedureFind your sample and focusSend light to camera by pulling out lower camera knob on right all the wayIn Taskbar:Choose QImaging cameraAcquire window:Choose Setting- select correct shutterSelect exposure time or try AutoexposeHit Show LiveAdj. focus, exposure time and/or 12 bit grey scaleUnclick Saturation warnings if not wanted (may have to click 2x)Acquire (shutter will open and close)Save As (from Main Taskbar)1
Acquire (Main Taskbar)Settings (lower left)Select fluorescence or transmitted. This chooses the shutter as well as exposuretime, 12 bit adjustment, binning, gain, offset, etc.You can save your settings with the same name or a new name.Display TabSpread Triangles to ends, adjust as needed. Right triangle makes pixels whiter,left makes background blacker. Middle is gamma, keep at 1Special TabThe Qimaging camera has a gain, offset and speed control.Gain ranges from 1 to 30. If you have dim images, increasing the gain will giveyou higher signal at the same exposure. Higher gains also have higher noise.Start with gain of 1.Offset controls your black level. Keep between 10-50 to avoid ‘too black’ pixels.Digitizer has values at 2.5, 5.0, 5, 10, 20 MHz. This is the speed of the camerareadout. Higher speeds have more noise. For very low signals, a slower speed will giveyou a higher signal-to-noise ratio. Generally use 10 or 20 MHz.Acquiring an ImageShow Live—Shows a live image on the computer screen for focusing or X-Yadjustment. Use this to focus and set exposure time.Acquire button at top—uses whatever size image was last used.Options:Full Chip—1317 x 1035 pixels. Acquires the largest image fieldCenter Quadrant—658 x 517 pixels. Acquires the center 1/4 of the image fieldAcquire Active Region—You must have an active region defined on an imageTroubleshootingNo light in microscope-- lower knob should be pushed in to send light to eyepieces-- toggle shutter ON from Main Taskbar-- set shutter to NC on shutter control box-- hit Reset button on shutter control box-- check to see if the lamp is on-- mechanical shutter must be open for fluorescence (in light path behind filter cubes)Image on screen all black--lower knob should be pulled out to send light to camera--upper knob should be in to send light to Qimaging camera--set shutter to NC on shutter control box--hit Reset button on shutter control box--check shutter listed at lower left of acquire window or in Acquire tab of same window--try a longer exposureImage too bright or is all white--reduce exposure time, a lot--Reduce gain (under special tab in acquire window)--Send less light to camera by using the middle position on the lower knob (50% less)and the middle position on the upper knob (together 75% less)2
Image Processing12 bit ImagesCollecting images with 12 bits (4096 gray levels) is useful when you are doingquantitative work, complex image processing, especially involving thresholding, or whenyou have very low light levels or high background.Adjusting 12-bit imagesUse the triangles (under Display in the Acquire window) to adjust the white and blacklevels. (This is just like Photoshop using Image-Adjustment-Levels.) The left trianglechooses the level of grey that will be absolute white and the right triangle sets the greylevel below which everything will be black. You lose some of your grey levels but as youstart with 4096, this is generally OK. Do not adjust so far that you have less than 256levels left. Use a longer exposure when this happens. When you convert to 8-bit, theseadjustments become permanent and you will have 256 grey levels.You can also adjust the gamma but use this with care as it makes the relationshipbetween brightness and fluorophore concentration non-linear. Always use gamma=1 ifyou want to make any brightness comparisons between images.Scale Image (Main Taskbar) will adjust a previously acquired image. Choose image.Select the 12-bit 4096 grey levels.Image QualityYou should always avoid saturating pixels, as information is lost and can never beretrieved. When you adjust your 12-bit images, do not make them too bright and also donot make them too black. The area outside the triangles is lost when you convert to 8-bitand can never be retrieved (unless you save the 12-bit images). Further adjustment ofthe 8-bit image is possible with Photoshop.Image NoiseIf your images are grainy, try using a lower gain or a slower speed and increasing theexposure time. You may also want to try 2x2 binning if resolution is not an issue. Thiscreates a larger pixel size but decreases your exposure time.8-bit ImagesTo automatically acquire 8 bit images, click on Acquire 8 bit on the Main Taskbar.To retain the ability to do 12 bit adjustments but only save 8 bit images use the copy to8-bit option in the Main Taskbar. This converts and saves the image as 8-bit.Convert all files to 8 bitOr you can convert all images later using the copy DIR to 8-bit option. This will convertall images in one folder automatically. The 12-bit images are overwritten. To keep the12 bit images, make a copy first. (See also Image Color, below.)Image ZoomUse magnifying glass on each image and right and left mouse buttons to increase ordecrease zoom. Unclick to deactivate. This will be used on the next acquired image.Scroll wheel on mouse also zooms, you may have to wake it up.Image CroppingSelect square in Toolbar -- Draw region on image3
Save Partial, to save just the defined region without re-acquiringTo use this region again, use acquire active region on image.Overlay Images (Main Taskbar)Collect images sequentially using different filters or transmitted lightChoose # images = 4 or moreChoose an image for each color (use black for transmitted light image)Click on Show preview and move preview box around. You can adjust color balance,or brightness if desired, or you can adjust your original images and see the changes livein the preview window. If you do adjust the original images, consider whether you havesaved them, need to resave them, or don’t want to change them,You can do a pixel shift here if the images do not line up properly but most likelyyou bumped the scope and you should re-acquire the images. Note that a DIC imagemay change the alignment.Apply -- This creates a 24-bit RGB TIFF and does not need to be converted to 8-bit.Saving Image ColorOverly images will always be in color. If you want green-black, red-black or blue-blackimages, you can add color with the rainbow at the left side of each image. Note that thiscolor will be used for the next acquired image.Duplicate as Displayed (Main Taskbar) will save the images in color. This converts toa 24-bit RGB image (same as an overlay) so your 12-bit adjustments will be permanent.Both images are on the screen and you can save both at this time.OrLeave the image in grey scale and use the Overlay feature (main taskbar). Put theimage in the color desired and apply. This also saves a 24 bit RGB image.Scale BarAlways save the image firstIf you did not save the magnification with the image you must calibrate the image:Measure Menu--Calibrate distanceLoad calibration file (C:\MM\app\mmproc\data\distance.CALChoose correct objective and zoom and click on ApplyCan apply to all open images to calibrate many at once, orLeave menu open and apply to each image if desiredFor the Motic camera, load the file that matches the image size in pixels that youused.Create a scale bar as follows:Display Menu -- Graphics -- Calibration BarAdjust length, thickness and labelWhen choosing color, remember that white = 4095 (12 bits) or 255 (8 bits)Look for the bar in the lower right corner, you may have to scroll to find itStamp Calibration Bar to see what it will look like. If you want to change it, Undoimmediately. You may want to save with a different name. The bar is permanent.4
Image InformationFile-Open, highlight any file name, will give exposure time, bit depth, image size,magnification, binning, gain, offset, speed, etc.OR—Open imageEdit menu –Image Info—gives above info and more.Click on any file to see thumbnail image. Not with 12-bit images.Saving and Naming ImagesImages save in TIFF format. The .tif. is added automatically. Do not compress yourimages. Opening and closing compressed images causes loss of information over time.There are several ways to save an image.---Use Save As in the Main TaskbarThis is the same as File-Save as---The most recently acquired image can be saved with the button in the Acquire windowthat says Save new01 or whatever number you are on. This button cannot be used forpreviously acquired images. Name the image if desired.---To save several images with the same base name, eg goodexpt01, goodexpt02, etc:Check Save w/sequence. Click on Set Save and set the base name and folder.Click on Save basename01 and it will save with this name.Only the most recently acquired image can be saved with this method. You can skipimages, but you cannot go back.To save as 8-bit images immediately, click on Copy to 8-bit in the Main Taskbar. Thisworks with any open image, not just the most recently acquired.MIF ServerCopy your files to our fileshare ( Z: drive) and retrieve them soon via informationprovided on the <strong>User</strong> Info handout.Both the hard drive and the server have limited space. Please delete your files whenyou have backed them up.After 1 month, your files may be deleted.5
Transmitted Light (Bright Field)IntroductionYou can collect a bright field image of the same region as the fluorescent imageto aid in localization of your fluorescence. The bright field image can be overlaid(merged) with the fluorescent image(s), see Image Processing.Note: Adjusting the microscope for an optimal bright field image is more complicatedthan fluorescence. It is highly recommended that you ask for help the first few times.Kohler IlluminationTechnically, this must be done each time you switch objectives.Focus on your specimen in the microscope.Close the field stop diaphragm at base of microscope.Adjust the height of the condenser until the aperture is sharply focused.Center the aperture with the centering screws.Open the field stop until the light just fills the field and the aperture is no longer visible.Close the condenser diaphragm part way for desired contrast.Focal PlaneThe focal plane you choose for bright field or DIC may not be the same as forfluorescence. You should check focus between acquisitions.Remember to change shutterDifferential Interference Contrast (DIC) – NomarskiDIC is a method of enhancing the contrast of a bright field image. It has opticalsectioning qualities and is very good for viewing surfaces. The effect looks similar to ascanning EM image, with a black ‘shadow’ on one side and a white ‘shadow’ on theother side. The ‘shadows’ are formed by differences in refractive index or by differencesin height.<strong>Microscope</strong> Set Up for DICFirst follow procedures above for Kohler illumination.The upper polarizer (often called the analyzer) found on the right side of themicroscope just below the zoom wheel must be pushed in.The Wollaston Prism, just above the objectives, must be pushed in.The polarizer below the stage must be in place and aligned 90 degrees to the analyzer.It usually is in place.The condenser must be set for the objective being used. There is a setting for eachobjective except the 4x and 10x.The condenser diaphragm should be fully open.Wollaston PrismThe Wollaston Prism (just above the objective) has a screw, which can be adjusted fordesired contrast. The full range of the screw is such that the image is darkest in thecenter and brighter near the ends. The difference between the two sides is the directionthe ‘shadows’ fall on. The optimum setting is usually somewhat off center on either side.Note that the use of this prism may cause a pixel shift, which could be an issue whenoverlaying with a fluorescence image.6
Image Analysis -- Measure MenuUpdated for new software. This is a brief overview. There are lots of things not mentioned here.Defining RegionsDefine region(s) with box or other drawing tool from Region Toolbar.<strong>User</strong> Traced Line to click-draw any shapeSee Region Tool Properties (last icon on Region Toolbar) for other settingsTo delete active region, hit del key.You can shrink, save, move, transfer, label, and color regions.See Region menu, Region Toolbar and Edit-Preferences-RegionsRegion StatisticsChoose source imageCheck to use entire image or active region.Spatial Stats: area, height, width, perimeter, etc. in pixels or umYou must calibrate the image to get values in microns.Intensity Stats: ave, st dev, integrated, min, max. etc.Can use + / - threshold See Threshold, belowIntensity measurements are generally best with single color imagesRegion MeasurementsThis is used for more than one regionChoose + / - threshold, all regions, active region, or entire imageConfigure to choose desired measurements. Includes morphometry and intensity levelsIntensity measurements are generally best with single color imagesThresholdIcon on left toolbar or under measure menuChoose auto threshold for light objects and adjust orange bar in left toolbarSet transparency of threshold to see objects underneathThe threshold menu will give you numbers (?)Try zooming up to 200% to setColor ThresholdBest for real color bright field imagesChoose color range: HSI, HSL, RGB (Hue, Saturation, Intensity, Luminosity)Set by example uses mouse clicks on image to choose colors, go slow as you can onlyundo one click.Cut / Join ObjectsUse icons in OverlayToolbar at topSee Overlay Properties (last icon in overlay toolbar)Center of cross is where line goes.Do in 200% zoomIntegrated Morphometry AnalysisMust have a threshold. You can threshold the entire imageCalibrate the image to get values in microns, otherwise you can use pixelsSelect MeasurementsChoose desired parameters to measureThey are listed but you must check Display to see the dataYou can set filters for one or more measurements (see below)7
Hit Measure (at bottom) Objects measured will be green with white border.Border is an option under PreferencesObject Data—display of dataClick on any data point to highlight object on image or vice versaDouble click to remove any data point/objectData Log is in this viewReset Current to delete measurements and start over.FiltersUse a filter if you want to limit measurements to objects of a certainsize range or grey value range.Do a measurement first, then look through your values to choose a size cutoff oraverage object size or intensity levelCan also use histogram to set parametersHistogramsChoose X-axis, Set # bins.Click on arrow in lower left of graph to change axes scales, etcSet filters for classifying by moving red lines. Click on Set Filters from CalipersLog DataConfigure logChoose parameters to log. Options are dependent on measurement modeChoose log column headings.Open log, choose DDE, Excel, row, columnEach time you measure, hit log data, and it will go into the Excel file.You will need a separate log file for each measurement mode, data vs summary, etcMeasure Linescan--Shows the variation in intensity across any line drawn on imageHistogram--Show intensity levels of image.Calipers—Measure distance and angle between objectsManually Count Objects--Marks each object after clicking with mouse.Morphometry--Measure objects-creates a new image of objects, use as a mask?Apps MenuThese have specific functions but can be used for other samplesOnly work with 12 bit (or greater) imagesCan identify objects based on a local difference in intensity over backgroundUse the mouse cursor to see the grey value of any pixel (at bottom of image window).Click on display result image to get a separate image of objects. The original image hasan overlay that can be toggled on/off with green square icon at left of image.Try some setttings, make large changes, refineExample: Count Nuclei -- set minimum and maximum size and grey level overbackgroundProcess MenuYou may want to do some image processing to make your images easier to analyze.Median filter smooths out rough edges and intensity variations (noise, speckle)Dilate grows objects so you can join themErode shrinks objects so you can separate themMany other options8
Collecting a Z-SeriesSet UpAttach Z-motor color to coarse focus of microscopeMust start MM with the Z-motor iconUse Show Live in the Acquire window to determine the best exposure for entire seriesUse a bright plane in your specimenInsert and tighten focus motor sleeve on right focus knob. Push in while tighteningscrew. Make very snug.All focusing must now be done with the small knob next to the joystick.Select Focal Planes to CollectDevices Menu – FocusFocus (with small knob on joystick) to lowest focal plane you wish to collect.Click on Set Origin to make this position = 0Click on Set BottomFocus slightly lowerClick on Set HomeFocus to highest desired focal planeClick on Set TopClose shutterSet # of planes or spacingAcquire Menu -- Acquire Z-seriesImage storage: set to stackChoose shutterStart at -- bottomMove to -- TopAfter -- HomeChoose number of planes desired - or - number of microns between planesOK to start collectingCalibration: 1um =10 stepsViewing / Processing a StackStack MenuSelect PlanesRemove PlanesCompress into one image (Projection)Under 3-D reconstruction -- choose angle = 03-D ReconstructionsMovie—to watchMake Movie—to make an AVI or Quicktime movieUse 5 or 6 (/30) frames per secondNo compression or try Cinepak at 100% or IndeoVideo at 100% or 50%Building a Stack or MontageFile menu – Open Special -- Build StackUse Numbered Names or QuickClick on first fileClick on last fileFor highest accuracy:Collect against gravity, bottom to top.This is in the negative direction.Return to a lower position than thedesired starting position if you willrepeat with another filter.Note:Moving the focus knob towards you willmove the stage down.9
Timelapse Imaging – BasicChoose in Main TaskbarFor transmitted light or fastest times, use none for shutterInterval—shortest is ~400msec, accuratelyUncheck time reportingSet time or number of framesThere is a maximum file size based on RAM of about 10 min at 0.5msecTo go faster or longerUncheck viewingUse center quadUse binningUse 0 Interval, but times may be uneven (you can get the values)Save as .stkTimelapse Imaging -- AdvancedThis method does not have a RAM limitation?Can go faster?Apps – Multidimensional AcquisitionMain, choose Timelapse onlySaving, pick basename and folder for savingWavelengthSet Gain to 1Set exposure time (match the acquisition window)Use 20MHz (fastest)TimelapseIntervalSet duration or number of framesSummary, to reviewAcquire hereThis saves a .nd file which can be opened in <strong>Metamorph</strong> and is like a .stkAlso saves individual .tif for each time point and some sort of thumbnail imagefor each time pointStream—this seems to crash the softwareYou can also collect a Z-series at each time point with this methodNote that the Motic camera cannot collect faster than 1 sec intervalsBothUse Stack menu to manipulateTo get time stamp:Display – Graphics – Elapsed TimeStamp onto first imageSave as stack? orStack – MovieSave as .AVI10
PhotoShop (ver 5.5 or 6.0 of 7.0) with <strong>Metamorph</strong>Enhancing Contrast or Adjusting ColorsImage--Adjustment--Levelschoose RGB or individual coloruse the histogram to adjust brightness, black level, and gammaAfter adjusting, you should save with a new name. The contrast changes you make arepermanent and if you don’t like the printout, you will want to start with the original image,not the adjusted one. Always save the original image.12-bit files (This doesn't always work, for reasons unknown)Image will open all black.Image--Adjustment--LevelsMove right-hand triangle down to about 25, hit OKThis essentially converts to 8-bitImage--Adjustment--LevelsNow you should see a broader histogramAdjust brightness, black level and gamma as desired.Save with a new name as explained above.Or, go back to MetaMorph and convert to 8-bitColoring ImagesTo make a Red/Black or Green/Black image from greyscale.Open imageImage--Mode—choose RGB ColorImage--Adjust--LevelsChoose colors not wantedDrag left triangle under histogram all the way to the right to eliminate this colorRepeat with other color not wanted. You will be left with the desired color.Adjust as above.Save image (You can get rid of the color by changing Mode back to Grayscale)Saturated pixels will turn white with this method. To avoid this, try the following method:Image--Mode--RGB ColorImage--Adjust--Hue/SaturationCheck ColorizeSaturation at 100% is probably bestAdjust Hue to ~120 for green, red is the defaultLower Lightness to color white areas and darken backgroundSave imageOr use Duplicate as displayed in MetaMorph.11
Specifications<strong>Microscope</strong>: <strong>Olympus</strong> BX50Camera: QImaging Retiga Exi cooled CCD camera 1392 x 1040 pixelsSoftware: <strong>Metamorph</strong> Premier ver 7.7.5from Molecular Devices, Inc.Filters for the <strong>Olympus</strong> / <strong>Metamorph</strong> Digital Imaging SystemStandard Filter TurretName Dyes Type Wavelengths Range Cat #UV DAPI Excitation 360 / 40 340-380 31000Hoechst Dichroic 400 DCLP ChromaEmission 460 / 50 435-485FITC+ FITC Excitation 470 / 40 450-490 11001Green/Red Alexa 488 Dichroic 500 DCLP Chromaalso red Emission 515 LP 515+Red TRITC Excitation ET560 / 40 540-580 49008mCherry Dichroic 585pxr ChromaTexas Red Emission 630 / 75 695-665 NEW 11'11GFP GFP Excitation ET470 /40 450-490 49002Alexa 488 Dichroic 495pxr ChromaFITC Emission ET525 / 50 500-550 NEW 11'11GFP Filter TurretName Dyes Type Wavelengths Range Cat #FR Cy 5 Excitation 620 /60 590-650 41017Alexa 633 Dichroic 600 ChromaAlexa 647 Emission 700 / 75 662-737CFP Cyan Excitation 436 / 20 426-446 31044v2<strong>Fluorescent</strong> Dichroic 455 DCLP ChromaProtein Emission 480 /40 460-500YFP Yellow Excitation 500 / 20 490-510 41028<strong>Fluorescent</strong> Dichroic 515 DCLP ChromaProtein Emission 535 / 30 520-550C-Y Cyan-Yellow Excitation 436 / 20 426-446 31052FRET Dichroic 455 DCLP ChromaEmission 535 / 30 520-550If you move a filter cube to another location, please put it back12
Scale Factors for Qimaging Retiga Camera with MetaMorphObj Zoom um/pixelpixels/umMag onscreenObj Zoom um/pixelpixels/umMag onscreen100x 10.109.82800x20x 10.521.94585x100x 1.25 0.08 12.28 3500x 20x 1.25 0.41 2.43 730x100x 1.6 0.06 15.76 4480x 20x 1.6 0.32 3.12 935x100x 20.0519.85600x20x 20.263.91170x60x 1 0.17 5.85 1680x 10x 1 1.03 0.97 280x60x 1.25 0.14 7.32 2100x 10x 1.25 0.83 1.21 350x60x 1.6 0.11 9.41 2688x 10x 1.6 0.64 1.56 450x60x 20.0911.763360x10x 20.511.95560x40x 1 0.26 3.89 1120x 4x 1 2.56 0.39 110x40x 1.25 0.20 4.88 1400x 4x 1.25 2.04 0.49 140x40x 1.6 0.16 6.26 1800x 4x 1.6 1.61 0.62 180x40x 20.137.852240x4x 21.280.78225xObjectives on <strong>Olympus</strong> <strong>Microscope</strong>Objective Mag Immersion NA WorkingDistanceUsesU PLAN APO 4x Dry 0.16 13 mm Fluor / DICU PLAN APO 10x Dry 0.4 3.1 mm Fluor / DICU PLAN APO 20x Dry 0.7 0.65 mm Fluor / DICU PLAN APO 40x Oil 0.5-1.0 120 um Fluor / DICPLAN APO 60x Oil 1.4 100 um Fluor / DICPLAN APO 100x Oil 0.5-1.35 100 um Fluor / DICU PLAN APO 40x H2O 1.15 260 um Fluor / DICU PLAN APO PH 40x Oil 0.5-1.0 120 um Fluor / Phase contrastU PLAN APO PH 100x Oil 0.5-1.35 100 um Fluor / Phase contrast13


