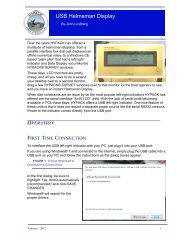
Adding Objects to Cross Sections in CROSS SECTIONS ... - Hypack
Adding Objects to Cross Sections in CROSS SECTIONS ... - Hypack
Adding Objects to Cross Sections in CROSS SECTIONS ... - Hypack

You also want an ePaper? Increase the reach of your titles
YUMPU automatically turns print PDFs into web optimized ePapers that Google loves.
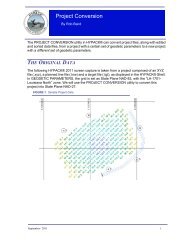
FIGURE 3. Template Edi<strong>to</strong>rNow we're ready <strong>to</strong> create our object.To create an object, do the follow<strong>in</strong>g:1. Click <strong>in</strong> the Object field adjacent <strong>to</strong> the cross section where your object shouldappear.2. Click the Edit icon. (This is the same icon that accesses the Template Edi<strong>to</strong>r when yourcursor is <strong>in</strong> the Template column.) When you click <strong>in</strong> the Object Column and click theEdi<strong>to</strong>r Icon, the three tabbed Object Edi<strong>to</strong>r will appear.3. Create your object. You can create any of three types of objects <strong>to</strong> be <strong>in</strong>serted <strong>in</strong><strong>to</strong> yourcross sections: Text, Pipel<strong>in</strong>e, and Polyl<strong>in</strong>e.FIGURE 4. Creat<strong>in</strong>g a Pipel<strong>in</strong>e <strong>in</strong> theObject Edi<strong>to</strong>rI used the pipel<strong>in</strong>e tab andcreated a new file for thispipel<strong>in</strong>e. The creation isextremely easy:a. Fill <strong>in</strong> the fields on theright with the required<strong>in</strong>formation:• Name: Give your objectit's own name.• DBL: Enter the distancefrom the beg<strong>in</strong>n<strong>in</strong>g ofthe l<strong>in</strong>e.• Depth at which the pipe is found.• Radius of the pipe.• L<strong>in</strong>e Style: Choose the style of the l<strong>in</strong>e (solid, dashes, dots), l<strong>in</strong>e width and color.b. Click [OK] <strong>to</strong> close the edi<strong>to</strong>r and save your object.4. Check your results <strong>in</strong> the View tab of CS&V.2