USB Helmsman Display.pdf - Hypack
USB Helmsman Display.pdf - Hypack
USB Helmsman Display.pdf - Hypack
- No tags were found...

Create successful ePaper yourself
Turn your PDF publications into a flip-book with our unique Google optimized e-Paper software.
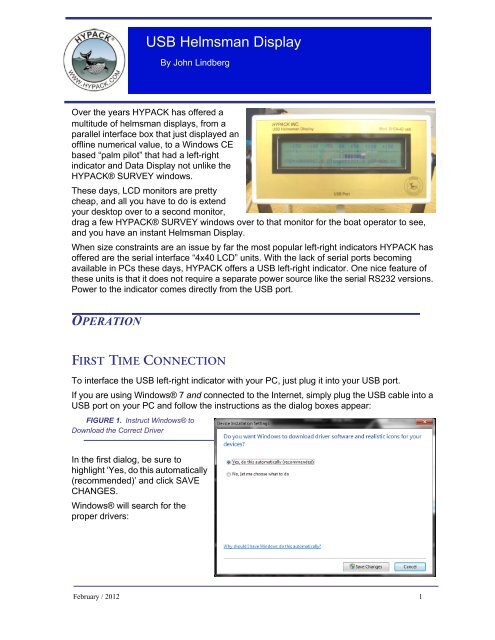
<strong>USB</strong> <strong>Helmsman</strong> <strong>Display</strong>By John LindbergOver the years HYPACK has offered amultitude of helmsman displays, from aparallel interface box that just displayed anoffline numerical value, to a Windows CEbased “palm pilot” that had a left-rightindicator and Data <strong>Display</strong> not unlike theHYPACK® SURVEY windows.These days, LCD monitors are prettycheap, and all you have to do is extendyour desktop over to a second monitor,drag a few HYPACK® SURVEY windows over to that monitor for the boat operator to see,and you have an instant <strong>Helmsman</strong> <strong>Display</strong>.When size constraints are an issue by far the most popular left-right indicators HYPACK hasoffered are the serial interface “4x40 LCD” units. With the lack of serial ports becomingavailable in PCs these days, HYPACK offers a <strong>USB</strong> left-right indicator. One nice feature ofthese units is that it does not require a separate power source like the serial RS232 versions.Power to the indicator comes directly from the <strong>USB</strong> port.OPERATIONFIRST TIME CONNECTIONTo interface the <strong>USB</strong> left-right indicator with your PC, just plug it into your <strong>USB</strong> port.If you are using Windows® 7 and connected to the Internet, simply plug the <strong>USB</strong> cable into a<strong>USB</strong> port on your PC and follow the instructions as the dialog boxes appear:FIGURE 1. Instruct Windows® toDownload the Correct DriverIn the first dialog, be sure tohighlight ‘Yes, do this automatically(recommended)’ and click SAVECHANGES.Windows® will search for theproper drivers:February / 2012 1
FIGURE 4. The COM Port Listed in the Device ManagerAfter the first installation you will not be prompted forthe device drivers again.Note: The virtual COM port drivers used with the<strong>USB</strong> <strong>Helmsman</strong> <strong>Display</strong> are identical tothose used with the <strong>USB</strong> Event Interface andare interchangeable.HYPACK® INSTALLATION1. Select PREPARATION – HYPACKHARDWARE.2. Click ADD DEVICE and select HYPACK LCD4<strong>Helmsman</strong> (lcd4.dll).FIGURE 5. Loading the LCD4 DriverFebruary / 2012 3
3. Under CONNECT choose SERIAL PORT and set the proper port number. Set thebaud rate to 9600, parity to NONE, the data bits to 8, the stop bits to 1, and the flowcontrol to NONE.FIGURE 6. Configuring the DriverIf you click SETUP you will notice a “Reverse XTE” option. Check this only if you notice that,during operation, the cross track error is opposite what it should be. This is dependent onhow one of the internal jumpers is set from the factory. Normally they are set for standardHYPACK® operation.FIGURE 7. LCD4 Driver Setup DialogINTERNAL OPTIONSSome of thedevice display options are controlled by settings inside the device.4
FIGURE 8. Internal Settings in the <strong>USB</strong> Left-Right IndicatorDISPLAY MODEThe SHD4-40 <strong>USB</strong> can display the text data sent from HYPACK® in one of two formats:• The standard format (as supplied from the factory) is the graphics display that providesan auto-ranging bar graph type display on the upper three lines of the display with thelower line reserved for critical text data.• The alternative display is ALL TEXT. Only the lower line is used for a simple bar graphdisplay while the upper three lines are all used for text.To set the display mode using the link inside the display as follows:1. Remove the 4 Philips-head screws and remove the rear cover.2. Locate the 6-pin header block.3. Place a jumper across the center pair of pins. The display will now be in the TEXT ONLYmode.4. Replace the rear cover and screws.DISPLAY SENSEThe sense of the display (left- or right-handed) may also be changed by the setting orremoving of a link on the center pair of pins on the 6-pin header block.The normal sense will read a negative XTE distance from HYPACK® and display the XTEdistance with the negative sign. The bar graph display will move to the left.When the link is in place this sense is reversed and the sign is changed from negative topositive. The bar graph will move to the right when a negative XTE distance is received fromHYPACK®.Follow the same procedure as for setting the display mode, but to change the display sense,set or remove the jumper on the pair of pins closest to the center of the board.February / 2012 5