Grundfos Alldos DMH 28x O&M Manual - WES Dosing Products
Grundfos Alldos DMH 28x O&M Manual - WES Dosing Products
Grundfos Alldos DMH 28x O&M Manual - WES Dosing Products
- No tags were found...

Create successful ePaper yourself
Turn your PDF publications into a flip-book with our unique Google optimized e-Paper software.
6.5 Sound pressure levelPump type<strong>DMH</strong> 280<strong>DMH</strong> 281<strong>DMH</strong> 283<strong>DMH</strong> 285<strong>DMH</strong> 286<strong>DMH</strong> 287<strong>DMH</strong> 288* Testing according to DIN 45635-01-KL3.6.6 Electrical data55 ± 5 dB(A)*55 ± 5 dB(A)*65 ± 5 dB(A)*75 ± 5 dB(A)*75 ± 5 dB(A)*75 ± 5 dB(A)*65 ± 5 dB(A)*6.6.1 Enclosure classThe enclosure class depends on the motor variant selected, seemotor nameplate.The specified enclosure class can only be ensured if the powersupply cable is connected with the same degree of protection.Pumps with electronics: The enclosure class is only met if thesockets are protected! The data regarding the enclosure classapplies to pumps with correctly inserted plugs or screwed-oncaps.6.6.2 MotorVersion: see motor and pump nameplates.6.7 AR control unitFunctions of pumps with electronics:• "Continuous operation" button for function test and dosinghead deaeration• memory function (stores a maximum of 65,000 pulses)• two-stage tank-empty signal (e.g. via <strong>Grundfos</strong> <strong>Alldos</strong> tankempty sensor)• stroke signal/pre-empty signal (adjustable), e.g. as a feedbackto the control room• dosing controller function (only with sensor – optional)• diaphragm leakage detection (only with sensor – optional)• access-code-protected settings• remote on/off• Hall sensor• operating hours counter• motor monitoring.Operating modes:• manualStroke frequency: manually adjustable between zero andmaximum• contact signal controlMultiplier (1:n) and divisor (n:1)• current signal control 0-20 mA / 4-20 mAAdjustment of stroke frequency proportional to the currentsignal. Weighting of current input.6.7.1 Inputs and outputsInputsContact signalMaximum load: 12 V, 5 mACurrent 0-20 mAMaximum load: 22 ΩRemote on/offMaximum load: 12 V, 5 mATwo-stage tank-empty signal Maximum load: 12 V, 5 mA<strong>Dosing</strong> controller and diaphragm leakage sensorOutputsCurrent 0-20 mAError signalStroke signalPre-empty signalAR control unit factory settings• Inputs and outputs: NO (normally open)or• inputs and outputs: NC (normally closed).6.8 Required energyPower supply for AC voltageMaximum permissible mains impedance(0.084 + j 0.084) Ohm (testing according to DIN EN 61000-3-11).These details apply to 50 Hz.6.9 Ambient and operating conditions• Permissible ambient temperature: 0 °C to +40 °C(for an installation height up to 1000 m above sea level).• Permissible storage temperature: –20 °C to +50 °C.• Permissible air humidity: max. relative humidity:70 % at +40 °C, 90 % at +35 °C.Pumps with AR control unit onlyMaximum permissible mains impedance: 0.084 + j 0.084 Ω(testing according to EN 61000-3-11).6.10 <strong>Dosing</strong> mediumMaximum load: 350 ΩMaximum ohmic load:50 VDC / 75 VAC, 0.5 AContact time/stroke: 200 msMaximum ohmic load:50 VDC / 75 VAC, 0.5 ARated voltagePermissible deviation from ratedvalue230 / 400 V ± 10 %240 / 415 V ± 10 %115 V ± 10 %CautionThe installation site must be under cover!Do not install outdoors!In the event of questions regarding the materialNote resistance and suitability of the pump for specificdosing media, please contact <strong>Grundfos</strong> <strong>Alldos</strong>.The dosing medium must have the following basic characteristicsfor the standard pumps:• liquid• non-abrasiveThe dosing of abrasive media is possible with certain versions,on request.• non-inflammableThe dosing of inflammable media is possible with certainversions of explosion-proof pumps, in accordance with ATEX.10
Maximum permissible viscosity at operating temperature*Applies to:• Newtonian liquids• non-degassing media• media without suspended matter• media with a density similar to water.NotePump typeNote that the viscosity increases with decreasingtemperature!Up to strokerate 63[n/min]Stroke rate64-120[n/min]From strokerate 121[n/min]Maximum viscosity* [mPa s]<strong>DMH</strong> 280 5 5 5<strong>DMH</strong> 281 100 50 5<strong>DMH</strong> 283 100 50 5<strong>DMH</strong> 285 100 50 5<strong>DMH</strong> 286 100 50 5<strong>DMH</strong> 287 100 50 5<strong>DMH</strong> 288 100 50 5* The stated values are approximate values and apply to thestandard pumps.Permissible media temperature<strong>Dosing</strong> headmaterialMin. mediatemperatureMax. media temperaturep < 10 barp < 16 bar[°C] [°C] [°C]PVC 0 40 20Stainless steel,DIN 1.4571*–10 100 100Stainless steel,DIN 2.4610*–10 100 100PP 0 40 20PVDF** –10 60 20* For SIP/CIP applications: A temperature of 145 °C at acounter-pressure of max. 2 bar is permitted for a short period(15 minutes).** At 70 °C, the maximum counter-pressure is 9 bar.CautionWarningObserve the chemical manufacturer's safetyinstructions when handling chemicals!The dosing medium must be in liquid form!Observe the freezing and boiling points of thedosing medium!The resistance of the parts that come into contactwith the media depends on the media, mediatemperature and operating pressure. Ensure thatparts in contact with the media are chemicallyresistant to the dosing medium under operatingconditions!Make sure that the pump is suitable for the actualdosing medium!7. Transport and storageCaution7.1 DeliveryThe <strong>DMH</strong> <strong>28x</strong> dosing pumps are supplied in different packaging,depending on pump type and the overall delivery. For transportand intermediate storage, use the correct packaging to protectthe pump against damage.7.2 UnpackingRetain the packaging for future storage or return, or dispose ofthe packaging in accordance with local regulations.7.3 Intermediate storage• Permissible storage temperature: –20 °C to +50 °C.• Permissible air humidity: max. relative humidity:70 % at +40 °C, 90 % at +35 °C.7.4 ReturnThe pump must be thoroughly cleaned before it is returned orstored. It is essential that there are no traces of toxic orhazardous media remaining on the pump. Drain the oil from thedrive mechanism and package the pump correctly.CautionDo not throw or drop the pump.Do not use the protective packaging as transportpackaging.Before returning the pump to <strong>Grundfos</strong> <strong>Alldos</strong> for service, thesafety declaration at the end of these instructions must be filledin by authorised personnel and attached to the pump in a visibleposition.Caution<strong>Grundfos</strong> <strong>Alldos</strong> accepts no liability for damagecaused by incorrect transportation, missing orunsuitable packaging of the pump, residualmedia or leaking oil!If <strong>Grundfos</strong> <strong>Alldos</strong> is requested to service the pump, it must beensured that the pump is free from substances that can beinjurious to health or toxic. If the pump has been used for suchsubstances, the pump must be cleaned before it is returned.If proper cleaning is not possible, all relevant information aboutthe chemical must be provided.If the above is not fulfilled, <strong>Grundfos</strong> <strong>Alldos</strong> can refuse to acceptthe pump for service. Possible costs of returning the pump arepaid by the customer.The safety declaration can be found at the end of theseinstructions.CautionIf a pump has been used for a medium which isinjurious to health or toxic, the pump will beclassified as contaminated.The replacement of the power supply cable mustbe carried out by an authorised <strong>Grundfos</strong> <strong>Alldos</strong>service workshop.11
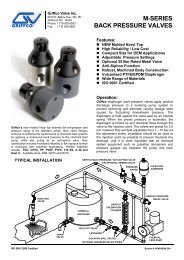
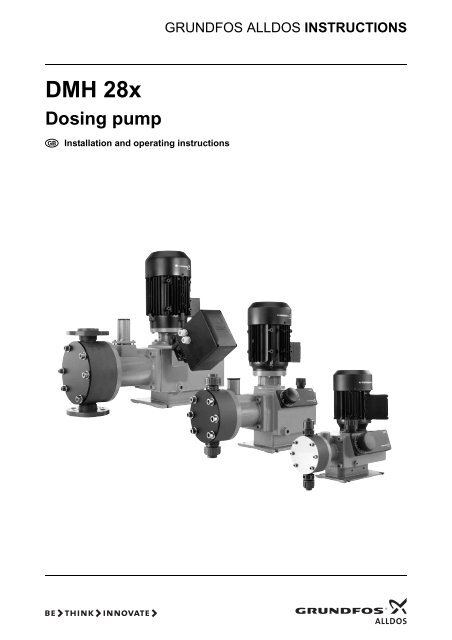
8. Product description and accessories8.1 General descriptionThe <strong>DMH</strong> <strong>28x</strong> are oscillatory positive-displacement pumps withhydraulic diaphragm control. The operation procedure of thedosing pump is shown in the sectional drawing. See fig. 1.The rotational movement of the drive motor (1p) is converted viathe worm gearing (2p) and eccentric (3p) into the oscillatorysuction and stroke movement of the piston (6p). The piston hasa hollow bore and a row of radial control holes, which provide ahydraulic connection between the drive area and the pistonstroke area. The sliding plug (5p) envelops the holes during thestroke and seals the stroke area from the drive area.The hydraulic excursion of the solid PTFE diaphragm (Q)displaces an equivalent volume of dosing medium from thedosing head (2) into the discharge line. With the suction stroke,the piston creates a low pressure, which propagates in the dosinghead, the ball valve (3b) on the dosing side closes and the dosingmedium flows through the suction valve (3a) into the dosing head.The stroke volume size is solely determined by the position of thesliding plug. The active stroke length and corresponding averagedosing flow can therefore be changed continuously and linearlyfrom 10 % to 100 % using the stroke-length adjustment knob andNonius (L).1pFV3bEML3a 2 Q 9p 6p 5p 2p 3pTM03 6855 4506Fig. 2 <strong>DMH</strong> 2801pV3bEMFL3a 2 Q 9p 6p 5p 2p 3pFig. 3 <strong>DMH</strong> 281TM03 6856 450612
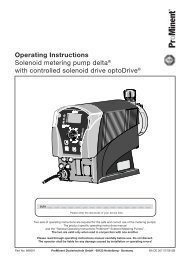
1pFV3bEML3a 2 Q 9p 6p 4p5p 2p 3pFig. 4 <strong>DMH</strong> 283TM03 6857 45061pFV3bEML3a 2 Q 9p 6p5p 2p 3pFig. 5 <strong>DMH</strong> 285, 286, 2877pTM03 6858 450613
1pFV3bEMLFig. 6 <strong>DMH</strong> 2883a 2 Q 9p 6p5p 2p 3pTM03 6859 4506Pos. Components1p Motor2p Worm gearing3p Eccentric4p Recuperating spring (not with drive size 3)5p Sliding plug6p Piston7p CrankM Combined overpressure and degassing valveE Degassing valve9p Diaphragm protection system (AMS)Q <strong>Dosing</strong> diaphragm2 <strong>Dosing</strong> headV <strong>Dosing</strong> head deaeration screw3a Suction valve3b Discharge valveL Stroke-length adjustment knobF Oil-filling screw with dipstick8.1.3 Double-diaphragm system / diaphragm leakagedetection (optional)GeneralThe piston diaphragm and high-tech dosing pumps with drift-freediaphragm leakage detection are equipped with the following:• dosing head with PTFE double-diaphragm system• ball non-return valve with built-in contact pressure gauge.Double-diaphragm system<strong>Dosing</strong> pumps with a double-diaphragm system with nodiaphragm leakage detection have no pressure gauge. In thiscase the ball non-return valve is fitted with a locking unit. Thevalve, however, can be retrofitted with a contact pressure gauge.Ball non-return valveIn order for the diaphragm leakage detection to work and toprotect the diaphragms, the gap must be fully deaerated. <strong>Dosing</strong>heads with a double diaphragm are equipped with a ball nonreturnvalve (T) to prevent air from flowing back during the fillingand deaeration process (2u).S6s8.1.1 Combined overpressure and degassing valveThe combined overpressure and degassing valve (M) opens ifthere is an excessive pressure build-up in the dosing system andprovokes the constant degassing of the hydraulic medium.8.1.2 Diaphragm protection system AMSThe diaphragm protection system AMS (9p) has a keypad, whichis connected to the dosing diaphragm. The dosing diaphragmoscillates freely in the dosing head and cannot be overstretcheddue to a fault in the dosing system since the diaphragm protectionvalve closes if such a fault occurs.Fig. 7Pos.5s4u2)U5uTContact pressure gaugeComponents3u2u3uTM03 6453 4506STUContact pressure gaugeBall non-return valveConnection piece2) For dosing heads with a double diaphragm with no contactpressure gauge (no diaphragm leakage detection), a lockingunit is fitted instead of the contact pressure gauge.14
Functional principle of diaphragm leakage detectionThe non-return valve and the gap between the diaphragms arefactory-filled with a separating agent (paraffin oil). They are set insuch a way during start-up on the test stand that there is always ahydraulically separated equilibrium between the valve anddiaphragm gap (the pressure gauge indicates "0" when the pumpis running and when it is stopped).If one of these diaphragms breaks, the dosing or hydraulicmedium penetrates into the gap between the diaphragms and,when the ball is removed, into the valve. The system pressure istherefore impinged on the valve and the contact pressure gaugeis activated. Depending on the design of the system, theelectrically isolated reed contact can trigger an alarm device orthe pump can be switched off.The contact is triggered at the preset pressure as is shown in thetable below:Description/useFor pumps 16 to 100 barPressure gauge 0 to 100 barFor pumps 16 to 100 barExplosion-proof pressure gauge 0 to 100 barFor pumps up to 200 barPressure gauge 0 to 200 barFor pumps up to 200 barExplosion-proof pressure gauge 0 to 200 barSet pressure[bar]10101010WarningThe contact pressure gauge (Ex) in explosionproofversion with switch amplifier should beused if the pump is fitted with an explosion-proofmotor.15
8.2 Dimensional sketches8.2.1 <strong>DMH</strong> 280, 281ahdZ1geb9mmkfmkjcnl / l'TM03 6860 4506Fig. 8 <strong>DMH</strong> 280, 281Pos. DescriptionZ1 For double pump, motor turned by 180 °l For electrical stroke-length adjustmentl’ For pneumatic stroke-length adjustmentPump type a b c d e f g h j k l l’ n m<strong>DMH</strong> 280 365 336 98 192 142 152 86 465 16 114 230 432 118 180<strong>DMH</strong> 281 348 336 98 192 155 152 86 432 16 114 250 432 118 180Measurements in mm.16
8.2.2 <strong>DMH</strong> 283, 285, 286, 287, 288ahdZ1geb9mmkffxmmxkjcnl / l'TM03 6861 4506Fig. 9 <strong>DMH</strong> 283, 285, 286, 287, 288Pos. DescriptionZ1 For double pump, motor turned by 180 °fx, mx For double pumpsl For electrical stroke-length adjustmentl’ For pneumatic stroke-length adjustmentPump type a b c d e f fx g h j k l l’ n m mx<strong>DMH</strong> 283 437 493 156 254 211 185 260 126 706 10 182 235 413 180 225 300<strong>DMH</strong> 285 510 553 146 274 179 240 333 129 820 25 187 245 420 195 290 382<strong>DMH</strong> 286 510 553 146 274 234 240 333 129 820 25 191 245 420 195 290 382<strong>DMH</strong> 287 490 553 170 274 208 240 333 129 814 25 176 245 420 195 290 382<strong>DMH</strong> 288 425 492 156 156 208 185 260 126 700 10 173 235 413 180 225 300Measurements in mm.17
8.3 WeightPump type<strong>DMH</strong> 280<strong>DMH</strong> 281<strong>DMH</strong> 283<strong>DMH</strong> 285<strong>DMH</strong> 286<strong>DMH</strong> 287<strong>DMH</strong> 2888.4 Stroke volume8.5 Materials<strong>Dosing</strong> headmaterialStainless steel1.4571, 2.4610Stainless steel1.4571, 2.4610Stainless steel1.4571, 2.4610Stainless steel1.4571, 2.4610Stainless steel1.4571, 2.4610Pump housing material• Pump housing: Al 226.AR control unit enclosure• Upper part of enclosure: PPO blend• Lower part of enclosure: aluminium.CautionStainless steel1.4571, 2.4610Stainless steel1.4571, 2.4610SinglepumpWeight [kg]Doublepump13.7 20.413 1936 5443 6445 7145 7136 54Pump type Stroke volume [cm 3 ]<strong>DMH</strong> 280 0.35<strong>DMH</strong> 281 1.1<strong>DMH</strong> 283 6<strong>DMH</strong> 285 12<strong>DMH</strong> 286 25.3<strong>DMH</strong> 287 5.4<strong>DMH</strong> 288 2.33WarningObserve the chemical manufacturer's safetyinstructions when handling chemicals!Make sure that the pump is suitable for the actualdosing medium!The resistance of the parts that come into contactwith the media depends on the media, mediatemperature and operating pressure. Ensure thatparts in contact with the media are chemicallyresistant to the dosing medium under operatingconditions!9. Installation9.1 General information on installationNote9.2 Installation location9.2.1 Space required for operation and maintenanceNoteWarningObserve the specifications for the installationlocation and range of applications described insection 6. Technical data.WarningFaults, incorrect operation or faults on the pumpor system can, for example, lead to excessive orinsufficient dosing, or the permissible pressuremay be exceeded. Consequential faults ordamage must be evaluated by the operator andappropriate precautions must be taken to avoidthem!Maintenance work on the dosing head and the valves must becarried out regularly.• Provide sufficient space for removing the dosing head and thevalves.9.2.2 Permissible ambient influences• Permissible ambient temperature: 0 °C to +40 °C(for an installation height up to 1000 m above sea level).• Permissible air humidity: max. relative humidity:70 % at +40 °C, 90 % at +35 °C.NoteWarningRisk of hot surfaces!Pumps with AC motors may become hot.Allow a minimum space of 100 mm to the fancover!A positive pressure difference of at least 2 bar isrequired between the suction valve and thedischarge valve in order for the dosing pump tooperate correctly.If the total counter-pressure (at the dosing point)and geodetic height difference between thesuction valve and the dosing point is less than2 bar (20 m WC), a pressure-loading valve mustbe installed immediately before the dosing point.The pump must be installed in a position where itis easily accessible during operation andmaintenance work.The installation site must be under cover!Do not install outdoors!9.2.3 Mounting surfaceThe pump must be mounted on a flat surface.NoteFurther information on resistance with regard tothe media, media temperature and operatingpressure is available on request.9.3 Mounting• Mount the pump on a console or pump foundation using fourscrews.8.6 Data of contact pressure gauge for diaphragmleakage detection (optional)The contact pressure gauge has a reed switch with electricallyisolated contact output, maximum switching power 10 W for DCcurrent or 10 VA for AC current. The maximum switching voltageis 100 V, maximum switching current 0.5 A.The switching function is set up as an NC contact, i.e. if thediaphragm breaks, the current circuit is interrupted.The pressure gauge has a 2-metre cable.NoteThe flow must run in the opposite direction togravity!18
9.4 Approximate values when using pulsationdampersCautionRisk of damage to the system!It is always recommended to use pulsationdampers for large high-speed pumps!Since the pulsation is influenced by manyfactors, a system-specific calculation isessential. Request a calculation from ourcalculation program.The table below indicates the approximate values and the suctionline length for which suction pulsation dampers are required. Thevalues apply to 50 Hz operation when water or similar liquids aredosed.Pump type<strong>DMH</strong> 280Stroke rate[n/min]Nominalwidth ofsuction lineMaximumlength ofsuction line[m]<strong>DMH</strong> 0.6-200 29 DN 4 8<strong>DMH</strong> 1.3-200 63 DN 4 8<strong>DMH</strong> 2.2-200 96 DN 4 8<strong>DMH</strong> 2.5-200 120 DN 4 8<strong>DMH</strong> 3.3-200 144 DN 4 8<strong>DMH</strong> 281<strong>DMH</strong> 2-100 29 DN 8 8<strong>DMH</strong> 4.2-100 63 DN 8 8<strong>DMH</strong> 6.4-100 96 DN 8 8<strong>DMH</strong> 8-100 120 DN 8 8<strong>DMH</strong> 9.6-100 144 DN 8 8<strong>DMH</strong> 283<strong>DMH</strong> 19-100 54 DN 20 8<strong>DMH</strong> 27-100 75 DN 20 8<strong>DMH</strong> 33-100 92 DN 20 8<strong>DMH</strong> 40-100 112 DN 20 8<strong>DMH</strong> 55-100 153 DN 20 6<strong>DMH</strong> 285<strong>DMH</strong> 20-100 28 DN 20 8<strong>DMH</strong> 40-100 56 DN 20 8<strong>DMH</strong> 52-100 73 DN 20 8<strong>DMH</strong> 70-100 98 DN 20 6<strong>DMH</strong> 80-100 112 DN 20 5<strong>DMH</strong> 105-100 146 DN 20 3<strong>DMH</strong> 286<strong>DMH</strong> 170-50 112 DN 20 2.5<strong>DMH</strong> 222-50 146 DN 20 1.5<strong>DMH</strong> 85-50 56 DN 20 2.5<strong>DMH</strong> 111-50 73 DN 20 2.5<strong>DMH</strong> 287<strong>DMH</strong> 9-200 28 DN 8 8<strong>DMH</strong> 18-200 56 DN 8 8<strong>DMH</strong> 23-200 73 DN 8 4<strong>DMH</strong> 31-200 98 DN 8 3<strong>DMH</strong> 36-200 112 DN 8 2<strong>DMH</strong> 50-200 146 DN 8 1<strong>DMH</strong> 288<strong>DMH</strong> 3-200 26 DN 8 8<strong>DMH</strong> 7.5-200 54 DN 8 8<strong>DMH</strong> 10-200 75 DN 8 4<strong>DMH</strong> 13-200 92 DN 8 3<strong>DMH</strong> 15-200 112 DN 8 2<strong>DMH</strong> 21-200 153 DN 8 119
9.5 Optimum installation8i2i7i9i6imax. Max. 1m1 m10i1i4i5i3iTM03 6296 4506Fig. 10Pos.1i2i3i4i5i6i7i8i9i10iExample of optimum installationComponents<strong>Dosing</strong> tankElectric agitatorExtraction deviceSuction pulsation damper<strong>Dosing</strong> pumpRelief valvePressure-loading valvePulsation damperMeasuring glassInjection unit• For non-degassing media with a viscosity similar to water, thepump can be mounted on the tank (observe the maximumsuction lift).• Flooded suction preferred.• For media with a tendency to sedimentation, install the suctionline with filter (13i) so that the suction valve remains a fewmillimetres above the possible level of sedimentation.6ip10i9.6 Installation tips• For easy deaeration of the dosing head, install a ball valve(11i) with bypass line (back to the dosing tank) immediatelyafter the discharge valve.• In the case of long discharge lines, install a non-return valve(12i) in the discharge line.Fig. 1111iInstallation with ball valve and non-return valve• When installing the suction line, observe the following:– Keep the suction line as short as possible. Prevent it frombecoming tangled.– If necessary, use swept bends instead of elbows.– Always route the suction line up towards the suction valve.– Avoid loops which may cause air bubbles.12iTM03 6297 4506TM03 6298 4506Fig. 13Tank installation• Note for suction-side installation: Depending on the dosingflow and the line length, it may be necessary to install aproperly sized pulsation damper (4i) immediately before thepump suction valve.NoteFig. 1413iObserve section 9.4 Approximate values whenusing pulsation dampers and, if necessary,request a system-specific calculation from ourcalculation program.4iInstallation with suction-side pulsation damper• Note for discharge-side installation: Depending on the dosingflow and the line length, it may be necessary to install aproperly sized pulsation damper (4i) on the discharge side.TM03 6299 4506TM03 6300 4506Fig. 12Installation of suction line20
NoteTo protect the system, use pulsation dampers (8i)for rigid piping longer than 2 metres and tubinglonger than 3 metres, depending on pump typeand size.• To avoid the siphon effect, install a pressure-loading valve (7i)in the discharge line and, if necessary, a solenoid valve (14i) inthe suction line.p 2 -p 1 ≥ 1 barp 1 p 2- p 1 >_ 1 barp 2Fig. 15CautionInstallation with discharge-side pulsation damper• For degassing and viscous media: flooded suction.• Install a filter in the suction line to prevent the valves frombecoming choked.• To protect the dosing pump and the discharge line againstexcessive pressure build-up, install a relief valve (6i) in thedischarge line.Fig. 16Risk of damage to the system!It is always recommended to use pulsationdampers for large high-speed pumps!Since the pulsation is influenced by manyfactors, a system-specific calculation isessential. Request a calculation from ourcalculation program.6iInstallation with relief valveWith open outflow of the dosing medium or a counterpressurebelow 2 bar• Install a pressure-loading valve (7i) immediately before theoutlet or the injection unit.A positive pressure difference of at least 2 bar must be ensuredbetween the counter-pressure at the injection point and thepressure of the dosing medium at the pump suction valve.• If this cannot be ensured, install a pressure-loading valve (7i)in the discharge line.8ip10iTM03 6301 4506TM03 6302 4506Fig. 189.7 Pipe lines9.7.1 GeneralCautionInstallation to avoid the siphon effectWarningTo protect the dosing system against excessivepressure build-up, install a relief valve in thedischarge line.Only use the prescribed line types!All lines must be free from strain!Avoid loops and buckles in the tubes!Keep the suction line as short as possible toavoid cavitation!If necessary, use swept bends instead of elbows.Observe the chemical manufacturer's safetyinstructions when handling chemicals!Make sure that the pump is suitable for the actualdosing medium!The flow must run in the opposite direction togravity!9.8 Connecting the suction and discharge lines14iThe resistance of the parts that come into contactwith the media depends on the media, mediatemperature and operating pressure. Ensure thatparts in contact with the media are chemicallyresistant to the dosing medium under operatingconditions!WarningAll lines must be free from strain!Only use the prescribed line types!• Connect the suction line to the suction valve.– Install the suction line in the tank so that the foot valveremains 5 to 10 mm above the bottom of the tank or thepossible level of sedimentation.• Connect the discharge line to the discharge valve.7ip p≥ 12 barTM03 6303 4506TM03 6304 4506Fig. 17Installation with pressure-loading valve21
Connection of DN 20 pipe lines• Depending on the pipe material and connection, glue the pipe(PVC), weld it (PP, PVDF or stainless steel) or press it in(stainless steel).• Fit the gasket.• Screw the pipe on the valve using the union nut.Fig. 19Connection of DN 20 pipe lines9.8.1 Connecting the dosing head deaerationThe dosing head is equipped with a deaeration screw (V) andhose nipple (I). During deaeration, dosing medium leaks from thehose nipple. This may also happen during normal operation.The dosing medium should either be collected directly or via adeaeration line in a suitable container.WarningRisk of injuries caused by the dosing medium.<strong>Dosing</strong> medium leaks from the hose nipple (I) ofthe deaeration line. If the pressure is high, themedium may squirt out. Turn the hose nipple (I)in the right direction, or drain the dosing mediumthrough a suitable hose. Observe chemicalresistance!When using a deaeration line,• connect the deaeration line (J) to the deaeration screw (V / I).• Shorten the deaeration line (J) to at least 10 mm above themaximum tank level.• Insert the deaeration line (J) downwards into the dosing tankor collection container without loops. Do not immerse in thedosing medium.VIJTM03 6457 4506Pos.2f2f1Required characteristics of heating liquid:• The heating liquid must not chemically attack stainless steel.• Maximum permissible pressure: p max. = 3 bar.• Maximum permissible temperature: t max. = 100 °C.10. Electrical connectionsMake sure that the pump is suitable for the electricity supply onwhich it will be used.10.1 Electric servomotor (optional)To connect the servomotor to the power supply, see theinstallation and operating instructions for the servomotor.10.2 Electronic preselection counter (optional)To connect the preselection counter to the power supply, see theinstallation and operating instructions for the counter.10.3 Electrically heated dosing head (optional)2eComponents<strong>Dosing</strong> head, liquid-heatedHose nipple, DN 10 connectionWarningElectrical connections must only be carried outby qualified personnel!Disconnect the power supply before connectingthe power supply cable and the relay contacts!Observe the local safety regulations!The pump housing must only be opened bypersonnel authorised by <strong>Grundfos</strong> <strong>Alldos</strong>!Protect the cable connections and plugs againstcorrosion and humidity.Only remove the protective caps from thesockets that are being used.TM03 6460 4506Fig. 22Electrically heated dosing headFig. 20<strong>Dosing</strong> head deaerationTM03 6862 4506Pos.2eComponent<strong>Dosing</strong> head, electrically heated• To connect the temperature controller to the power supply, seethe installation and operating instructions for the electrictemperature controller.9.8.2 Connecting a liquid-heated dosing head (optional)As an option, liquid-heated dosing heads are available instainless steel.2e12f2f12e22e3TM03 6461 4506Ø10Fig. 2140Liquid-heated dosing headTM03 6459 4506Fig. 23 Temperature controllerPos. Connections2e1 Sensor2e2 Heating2e3Power supply22
10.4 Diaphragm controller (optional)Fig. 24Pos.S5s6sTU2u3u4u5uWarningExplosion-proof pumps with diaphragm leakagedetection are fitted with a contact pressure gaugein explosion-proof version.The pressure gauge must be earthed.Connecting the earth cable (4u), see fig. 24.Diaphragm controllerComponentsContact pressure gaugeUnion nutContact outputBall non-return valveConnection pieceDeaeration screwO-ringsConnection for earth cableUnion nut* 2) or locking unit (instead of contact pressure gaugeand its connection)10.5 Connecting the power supply cableCautionCaution5s4uU5uWarningDisconnect the power supply before connectingthe power supply cable!Before connecting the power supply cable, checkthat the rated voltage stated on the pumpnameplate corresponds to the local conditions!Do not make any changes to the power supplycable or plug!The assignment between the plug-and-socketconnection and the pump must be labelledclearly (e.g. by labelling the socket outlet).The pump can be automatically started byconnecting the power supply!• Do not switch on the power supply until you are ready to startthe pump.10.5.1 Versions with mains plug• Insert the mains plug in the mains socket.10.5.2 Versions without mains plugSTWarningThe pump must be connected to an externalclearly labelled mains switch with a minimumcontact gap of 3 mm in all poles.• Connect the motor to the power supply in accordance withlocal electrical installation regulations and the connectionchart on the terminal box cover.2)6s3u2u3uTM03 6453 4506Caution11. Start-up / shutdown11.1 Initial start-up / subsequent start-upCaution11.1.1 Checks before start-up• Check that the rated voltage stated on the pump nameplatecorresponds to the local conditions!• Check that all connections are secure and tighten,if necessary.• Check that the dosing head screws are tightened with thespecified torque and tighten, if necessary.• Check that all electrical connections are correct.• Cross-tighten the dosing head screws using a torque wrench.Torques11.1.2 Oil fillingNoteWarningThe specified enclosure class can only beensured if the power supply cable is connectedwith the same degree of protection.Observe the direction of rotation!To protect the motor, install a motor protectingswitch or motor contactor, and set the bimetalrelay to the rated motor current for the availablevoltage and frequency.WarningWhen dosing dangerous media, observe thecorresponding safety precautions!Wear protective clothing (gloves and goggles)when working on the dosing head, connectionsor lines!Before removing the dosing head, valves andlines, empty any remaining medium in the dosinghead into a drip tray by carefully unscrewing thesuction valve.The pump housing must only be opened bypersonnel authorised by <strong>Grundfos</strong> <strong>Alldos</strong>!Repairs must only be carried out by authorisedand qualified personnel!Observe the flow direction of valves (indicated byan arrow on the valve)!Pump typeTorque[Nm]<strong>DMH</strong> 280 55-60<strong>DMH</strong> 281 17-19<strong>DMH</strong> 283 27-30<strong>DMH</strong> 285 50-54<strong>DMH</strong> 286 80-85<strong>DMH</strong> 287 50-54<strong>DMH</strong> 288 75-80The pump is factory-checked, and the oil isdrained for shipping purposes. Before start-up,add the special oil supplied with the pump.The piston flange is filled with oil for easy startup.The stroke-length adjustment knob must onlybe adjusted if the gear oil has been added,otherwise the oil will leak from the piston flange.Slacken and remove the oil-filling screw (F).1. Slowly add the hydraulic oil supplied with the pump throughthe oil-filling opening (F) until the oil reaches the mark on theoil dipstick.2. Set the stroke-length adjustment knob (L) to "0".23
11.1.3 Filling the dosing head for the initial start-up forsystems without flooded suction (<strong>DMH</strong> 281-288)WarningWhen dosing dangerous media, observe thecorresponding safety precautions!Wear protective clothing (gloves and goggles)when working on the dosing head, connectionsor lines!As assisting suction for systems without flooded suction, you canfill the dosing head with dosing medium before the initial start-up:1. Unscrew the discharge valve (3b).2. Add the dosing medium to the dosing head (2).3. Screw the discharge valve (3b) back in.Deaerating the piston flangeE Y1eV1mh2m3m4mYNoteObserve the flow direction of the discharge valve(indicated by an arrow on the valve)!11.2 Start-up / subsequent start-up of <strong>DMH</strong> 280Fill the dosing head for start-up/subsequent start-up, seesection Filling the dosing head. If the pump does not start,deaerate the piston flange, see Deaerating the piston flange.Filling the dosing headFig. 26Deaerating the piston flangeTM03 6864 4506Fig. 25Pos.1jIVZI1jZFilling the dosing headComponentsHoseDeaeration nippleDeaeration screwSyringe1. Loosen the dosing head deaeration screw (V) by approx.1turn.2. Fit the hose (1j) supplied with the pump onto the deaerationnipple (I).3. Using the syringe (Z) supplied with the pump, carefully drawthe dosing medium until there is some liquid in the hose.4. Tighten the deaeration screw (V).5. Remove the hose (1j) and the syringe (Z).6. Set the stroke-length adjustment knob to 70 % and let thepump run for approx. 5 minutes.7. Switch off the pump, check the oil level and add oil,if necessary.8. Refit the oil filling screw (F).9. If already dosing, the pump is now ready for operation. If thepump is not dosing, deaerate the piston flange.VTM03 6863 4506Pos. Components1q <strong>Dosing</strong> head screws2 <strong>Dosing</strong> head3b Discharge valveF Oil-filling screw with dipstickL Stroke-length adjustment knob1l Cover for stroke-length adjustment knobM Pressure relief valveV Deaeration screwI Hose nipple (connection for J)J Deaeration hose (not supplied with the pump)1m Cover for pressure relief valve2m Adjusting screw3m Pressure relief valve4m SpringE Degassing valve (cartridge)1e Adjusting screwY Holes1. Unscrew the cover for the pressure relief valve (1m).2. Measure the adjustment depth (h) of the adjusting screw (2m).3. Unscrew the adjusting screw (2m).4. Remove the pressure relief valve (3m) with spring (4m).5. Unscrew the whole degassing valve (cartridge) (E) using afork wrench, size 14.CautionDo not turn the inner slotted screw (adjustingscrew (1e)), as this changes the degassing valvesetting.6. Connect the electrical power supply.7. Let the pump run for approx. 5 minutes at a stroke setting of0 % until oil (without bubbles) appears around the holes (Y).Add oil, if necessary.8. Switch off the pump and screw in the degassing valve (E) withfront side O-ring.9. Refit the pressure relief valve (M / 2m, 3m, 4m) in reverseorder. Set the adjusting screw to the depth (h) alreadymeasured.10.Set the stroke-length adjustment knob to 70 % and let thepump run for approx. 5 minutes.The pump is now ready for operation.24
Checking the degassing valve (cartridge)NoteCheck the setting of the degassing cartridge when the pump isswitched off:• Fully tighten the adjusting screw (7e) and then loosen byapprox. 1/4 turn!Fig. 27Pos.5e6e7eNoteNoteAfter start-upTorquesThe degassing valve (E) only operates with thespring (5e), ball (6e) and correct position of theadjusting screw (7e).Degassing valveComponentsSpringBallAdjusting screwRod length of oil dipstick: 27 mm.Immersion depth to marking: approx. 5 mm.Check the oil level at least every two weeks andadd oil, if necessary.Only use original <strong>Grundfos</strong> <strong>Alldos</strong> gear oil!For product number, see service instructions.Pump type Version Description<strong>DMH</strong> 280 Single/double 1.3 l DHG 68CautionPump type7e5e6eAfter initial start-up and after each time thediaphragm is changed, tighten the dosing headscrews.After approximately 6-10 operating hours ortwo days, cross-tighten the dosing head screwsusing a torque wrench.Torque[Nm]<strong>DMH</strong> 280 55-60TM03 6865 450611.3 Start-up / subsequent start-up of <strong>DMH</strong> 281-288MFig. 28 Start-up of <strong>DMH</strong> 281-288F1lLPos. Components1q <strong>Dosing</strong> head screws2 <strong>Dosing</strong> head3b Discharge valveE Degassing valveF Oil-filling screw with dipstickL Stroke-length adjustment knob1l Cover for stroke-length adjustment knobM Pressure relief valveV Deaeration screwI Hose nipple (connection for J)J Deaeration hose (not supplied with the pump)1. Connect the electrical power supply.2. Set the stroke-length adjustment knob (L) to 0 %.3. Let the pump run for approx. 5 minutes.Deaerating the dosing head1. Loosen the deaeration screw (V) by 1 turn to the left.2. Turn the hose nipple (I) vertically downwards.WarningRisk of injuries caused by the dosing medium.<strong>Dosing</strong> medium leaks from the hose nipple (I) ofthe deaeration line. If the pressure is high, themedium may squirt out. Turn the hose nipple (I)in the right direction, or drain the dosing mediumthrough a suitable hose.When dosing dangerous media, observe thecorresponding safety precautions!Wear protective clothing (gloves and goggles)when working on the dosing head, connectionsor lines!3. Set the stroke-length adjustment knob (L) to 15 %.4. Let the pump run until the dosing medium flows from thedeaeration hose (J) or hose nipple (I) without any bubblesback into the tank.5. Tighten the deaeration screw (V).Checking the oil level1. Set the stroke-length adjustment knob (L) to 40 %.2. Let the pump run for approx. 10 minutes with a stroke-lengthsetting of 40 %.3. Switch off the pump, check the oil level and add oil,if necessary.4. Refit the oil-filling screw (F).The pump is now ready for operation.VIJ3b1q2EMTM03 6866 4506NoteRod length of oil dipstick:35 mm (27 mm for <strong>DMH</strong> 281).Immersion depth to marking: approx. 5 mm.25
NoteCheck the oil level at least every two weeks andadd oil, if necessary.Only use original <strong>Grundfos</strong> <strong>Alldos</strong> gear oil!For product number, see service instructions.Pump type Version Description<strong>DMH</strong> 281 Single 1.3 l DHG 68<strong>DMH</strong> 281 Double 1.3 l DHG 68<strong>DMH</strong> 283 Single 3.5 l DHG 68<strong>DMH</strong> 283 Double 4.5 l DHG 68<strong>DMH</strong> 285 Single 5.5 l DHG 68<strong>DMH</strong> 285 Double 7.5 l DHG 68<strong>DMH</strong> 286 Single 5.5 l DHG 68<strong>DMH</strong> 286 Double 7.5 l DHG 68<strong>DMH</strong> 287 Single 5.5 l DHG 68<strong>DMH</strong> 287 Double 7.5 l DHG 68<strong>DMH</strong> 288 Single 3.5 l DHG 68<strong>DMH</strong> 288 Double 4.5 l DHG 68After start-upCautionTorquesAfter initial start-up and after each time thediaphragm is changed, tighten the dosing headscrews.After approximately 6-10 operating hours ortwo days, cross-tighten the dosing head screwsusing a torque wrench.Pump type11.4 Setting the pressure relief valveThe pressure relief valve is set to the pressure given by thecustomer, or to the rated pressure (maximum counter-pressure).The opening pressure can be set to a lower value by thecustomer.Opening pressure of the pressure relief valveSetting the opening pressureTorque[Nm]<strong>DMH</strong> 281 17-19<strong>DMH</strong> 283 27-30<strong>DMH</strong> 285 50-54<strong>DMH</strong> 286 80-85<strong>DMH</strong> 287 50-54<strong>DMH</strong> 288 75-80Rated pressure of the pump[bar]Opening pressure of thepressure relief valve[bar]50 55100 110200 210• To set the operating pressure, a pressure gauge must beinstalled in the discharge line and an isolating valve must beinstalled after the pressure gauge.• To set the pressure relief valve,– use a screwdriver for <strong>DMH</strong> 280.– use a special tool for <strong>DMH</strong> 281-288.Fig. 29Setting the opening pressureSet the pressure relief valve as follows:1. Close the isolating valve after the pressure gauge.2. Remove the cover (1m) from the pressure relief valve.3. Start the pump.4. Adjust the pressure relief valve.– <strong>DMH</strong> 280: Using a screwdriver, slowly turn the adjustingscrew (2m) of the pressure relief valve clockwise until thedesired opening pressure is obtained.– <strong>DMH</strong> 281-288: Using the special tool, slowly turn theadjusting nut (2m) of the pressure relief valve clockwiseuntil the desired opening pressure is obtained.Fig. 30Caution1m2mSetting the pressure relief valveRisk of damage to the pump or system!When blocked, the pressure relief valve does notwork properly and can produce pressures ofseveral hundred bar in the pump or system.Do not block the pressure relief valve duringadjustments!5. Replace the cover of the pressure relief valve.6. Open the isolating valve after the pressure gauge.TM03 6464 4506TM03 6465 450626
11.5 Zero point adjustments (<strong>DMH</strong> 281-288)11.5.1 Adjusting the zero point for system pressures up to100 barThe zero point of the dosing pump is factory-set to a slightly lowercounter-pressure than the rated pressure of the pump. If theoperating counter-pressure deviates considerably from this value,an adjustment of the zero point will ensure more precise values.Counter-pressure at the factory-set zero point of the pumpRated pressure of the pump[bar]11.5.2 Adjusting the zero point for system pressures of100 bar and upCautionAdjusting range approx. 20-100 %If the rated pressure of the pump is 100 bar or higher, themaximum dosing flow is factory-adjusted to a scale value of100 %. The zero point is not set. The zero dosing flow is reacheddepending on the system pressure, e.g. already at 20 % on thescale.Adjusting range approx. 0-80 %You can make an adjustment so that the zero dosing flow is ata scale value of zero, but the non-permissible operating range isthen within the 100 % of the scale value! Loosen the strokelengthadjustment knob completely for a maximum dosing flow,and then close it by approx. 10 %.Counter-pressure at the factory-set zero point of the pump11.5.3 Adjusting the zero pointCounter-pressure at thefactory-set zero point[bar]50 30100 80The pump cannot run if the stroke-lengthadjustment knob is fully open. Depending on thepump adjustment, this value may already belower than 100 % on the scale for systempressures of 100 bar and up.Rated pressure of the pump[bar]Counter-pressure at thefactory-set maximum point[bar]200 1603l 2l 1l3l1. Fit a measuring device on the suction side, for instance placethe suction line in a graduated measuring beaker.2. Set the dosing flow to 15 %.3. Remove the cover (1l) from the stroke-length adjustment knob(L).4. Use a screwdriver to loosen the locking screw (2l) byapproximately 2 turns.5. Switch on the pump.6. Slowly turn the stroke-length adjustment knob towards thezero point until the dosing (the liquid level falls) stops in themeasuring device.7. Switch off the pump.8. Set the scale ring (4l) to zero.– Loosen the screw (3l) in the scale ring (4l) slightly using anhexagon key, M3.– Turn the scale ring (4l) until both "0" are the same on thescale and scale ring.– Tighten the screw (3l).9. Depending on the application, tighten the locking screw (2l) sothat the stroke-length adjustment knob can still be turned/cannot be turned any more.10.Replace the cover (1l).11.6 Operating the pumpNote11.7 ShutdownWarningWhen dosing dangerous media, observe thecorresponding safety precautions!Wear protective clothing (gloves and goggles)when working on the dosing head, connectionsor lines!Always adjust the value with the discharge lineconnected and with operating counter-pressure.When operating the pump, see sections12. Operation and 13. Maintenance and,if necessary, section 14. Fault finding chart.WarningWear protective clothing (gloves and goggles)when working on the dosing head, connectionsor lines!Do not allow any chemicals to leak from thepump. Collect and dispose of all chemicalscorrectly!NoteIf possible, rinse the dosing head before shuttingdown the pump, e.g. by supplying it with water.11.7.1 Switching off / uninstalling1. Switch off the pump and disconnect it from the power supply.Fig. 31 Adjusting the zero pointPos. ComponentsL Stroke-length adjustment knob1l Cover2l Locking screwL4lTM03 6466 45062. Depressurise the system.3. Take suitable steps to ensure that the returning dosingmedium is safely collected.4. Carefully remove all lines.5. Uninstall the pump.11.7.2 Cleaning1. Rinse all parts that have come into contact with the mediumvery carefully:– lines– valves– dosing head– diaphragm.2. Remove any trace of chemicals from the pump housing.3lScrew4lScale ring27
11.7.3 StorageStorage of the pump:1. After cleaning (see section 11.7.2 Cleaning), carefully dry allparts and reinstall the dosing head and valves, or2. change the valves and diaphragm.See section 13. Maintenance.11.7.4 DisposalDisposal of the pump:• After cleaning (see section 11.7.2 Cleaning), dispose of thepump in accordance with the relevant regulations.12. Operation12.1 Switching on/offBefore switching on the pump, check that it isCaution installed correctly. See sections 9. Installationand 11. Start-up / shutdown.• To start the pump, switch on the power supply.• To stop the pump, switch off the power supply.12.3 Deaeration<strong>Manual</strong> deaeration of the dosing head (while the pump isrunning)WarningWhen dosing dangerous media, observe thecorresponding safety precautions!Wear protective clothing (gloves and goggles)when working on the dosing head, connectionsor lines!WarningRisk of injuries caused by the dosing medium.<strong>Dosing</strong> medium leaks from the hose nipple (I) ofthe deaeration line. If the pressure is high, themedium may squirt out. Turn the hose nipple (I)in the right direction, or drain the dosing mediumthrough a suitable hose.V12.2 Setting the dosing capacity3l 2l 1l3lIJTM03 6867 4506Fig. 33 <strong>DMH</strong> 280L4lTM03 6466 4506VIJFig. 32Setting the dosing capacityPos.L1l2l3l4lComponentsStroke-length adjustment knobCoverLocking screwScrewScale ring12.2.1 Setting the dosing flow and locking the stroke-lengthadjustment knob1. Remove the cover (1l) from the stroke-length adjustment knob(L).2. Use a screwdriver to loosen the locking screw (2l) byapproximately 2 turns.3. Increase or reduce the dosing flow while the pump is running.– Slowly turn the stroke-length adjustment knob to the left orright to set the desired dosing volume.4. Depending on the application, tighten the locking screw (2l) sothat the stroke-length adjustment knob can still be turned/cannot be turned any more.5. Replace the cover (1l).CautionThe pump cannot be operated if the stroke-lengthadjustment knob is fully open! Depending on thepump adjustment, this value may already belower than 100 % on the scale for systempressures higher than 100 bar.Open the stroke-length adjustment knobcompletely and then close by approx. 10 % inorder to set the dosing flow to 100 %.Fig. 34 <strong>DMH</strong> 281-288Pos.IJVNoteComponentsHose nippleDeaeration hoseDeaeration screw<strong>DMH</strong> 280: If the deaeration screw is too loose,the O-ring can be washed away.1. Loosen the deaeration screw (V):– <strong>DMH</strong> 280: by max. 1/2 turn to the left.– <strong>DMH</strong> 281-288: by 1 turn to the left.2. Let the pump run until the dosing medium flows from thedeaeration hose (J) or hose nipple (I) without any bubblesback into the tank.3. Carefully tighten the deaeration screw (V).12.4 Using the AR control unit (optional)When using the AR control unit, observe the installation andoperating instructions for the "AR control unit" in addition to theinstructions in this manual.12.5 Electric servomotor (optional)To operate the servomotor, see the installation and operatinginstructions for the servomotor.TM03 6868 450628
12.6 Electronic preselection counter (optional)To operate the preselection counter, see the installation andoperating instructions for the counter.S12.7 Electrically heated dosing head (optional)To operate the temperature controller, see the installation andoperating instructions for the temperature controller.U2u13. MaintenanceVT13.1 General notesCautionWarningWhen dosing dangerous media, observe thecorresponding safety precautions!Wear protective clothing (gloves and goggles)when working on the dosing head, connectionsor lines!The pump housing must only be opened bypersonnel authorised by <strong>Grundfos</strong> <strong>Alldos</strong>!Repairs must only be carried out by authorisedand qualified personnel!Switch off the pump and disconnect it from thepower supply before carrying out maintenancework and repairs!Before removing the dosing head, valves andlines, empty any remaining medium in the dosinghead into a drip tray by carefully unscrewing thesuction valve.Observe the flow direction of valves (indicated byan arrow on the valve)!13.2 Diaphragm leakage control for diaphragmleakage detectionIf a diaphragm leakage (MLS) has been detected, first of all checkwhether an error has been displayed, as different external factorssuch as the heating of dosing or hydraulic medium can cause thecracked medium between the diaphragms to be displaced into thevalve, thereby causing an error to occur.Checks after a diaphragm leakage detection:1. Briefly open the deaeration screw (2u) and then close it again.2. Switch on the pump.3. If, after a short period of time, a diaphragm leakage isdetected again, a diaphragm has broken.CautionAfter a diaphragm breakage, replace thediaphragms and clean the non-return valve, seesection 13.7 Replacing the diaphragm for dosinghead with double diaphragm.Fig. 36Pos.ISTU1u2uV1u<strong>DMH</strong> 281-288: dosing head with double diaphragmComponentsConnection for deaeration lineContact pressure gaugeBall non-return valveConnection pieceFilling screwDeaeration screwDeaeration screw13.3 Cleaning and maintenance intervalsChecking the oil level• Check the oil level every two weeks and add oil, if necessary.Cleaning the valves• At least every 12 months or after 4,000 operating hours.• If the pump does not perform.• In the event of a fault.Clean the valves and replace, if necessary (for stainless-steelvalves: inner valve parts).Changing diaphragms and gear oil• At least every 12 months or after 8,000 operating hours,change the dosing medium and gear oil.• In dusty installation sites, change the gear oil every3,000 operating hours.Cleaning the ball non-return valve of the double diaphragm• After a diaphragm breakage, remove the ball non-return valveimmediately and clean it.TM03 6870 4506SUT2uOnly clean the ball non-return valve afterNotea diaphragm breakage!Replacing the grooved ring• In the event of a fault, e.g. pump not performing, the groovedring can be checked by authorised personnel and replaced,if necessary.13.4 Checking the oil levelCautionCheck the oil level at least every two weeks andadd oil, if necessary.1uITM03 6869 4506NoteRod length of oil dipstick:<strong>DMH</strong> 280-281: 27 mm.<strong>DMH</strong> 283-288: 35 mm.Immersion depth to marking: approx. 5 mm.Fig. 35<strong>DMH</strong> 280: dosing head with double diaphragm29
13.5 Cleaning the suction and discharge valvesWarningWear protective clothing (gloves and goggles)when working on the dosing head, connectionsor lines!Before removing the dosing head, valves andlines, empty any remaining medium in the dosinghead into a drip tray by carefully unscrewing thesuction valve.DN 4 valve• Screwed connection 3/8"• Stainless steel• Spring-loaded.DN 8 valve• Screwed connection 5/8"• Stainless steel• Spring-loaded.DN 20 valve• Screwed connection 1 1/4"• Stainless steel• Spring-loaded (optional).Clean the suction and discharge valves as follows:1. Unscrew the valves.2. Unscrew the screw parts and valve set using round pliers.3. Dismantle the inner part (seat, O-ring, balls, ball cages and,if present, spring).4. Clean all parts. Replace faulty parts by new ones.5. Re-assemble the valve.6. Replace the O-rings by new ones. Refit the valve.Fig. 38Stainless-steel DN 8 valve, spring-loadedTM03 6468 4506OptionalTM03 6872 4506Fig. 39Stainless-steel DN 20 valveFig. 37Stainless steel DN 4 valve, spring-loadedTM03 6871 4506CautionThe O-rings must be correctly placed in thespecified groove.Observe the flow direction (indicated by an arrowon the valve)!13.6 Replacing the diaphragm and gear oil for dosinghead with single diaphragm (no diaphragmleakage detection)WarningWear protective clothing (gloves and goggles)when working on the dosing head, connectionsor lines!The dosing diaphragm should be replaced witheach gear oil change.Before removing the dosing head, valves andlines, empty any remaining medium in the dosinghead into a drip tray by carefully unscrewing thesuction valve.30
Note13.6.1 Drain gear oilFig. 40Only use original <strong>Grundfos</strong> <strong>Alldos</strong> gear oil!For product number, see service instructions.Pump type Version Description<strong>DMH</strong> 280 Single/double 1.3 l DHG 68<strong>DMH</strong> 281 Single/double 1.3 l DHG 68<strong>DMH</strong> 283 Single 3.5 l DHG 68<strong>DMH</strong> 283 Double 4.5 l DHG 68<strong>DMH</strong> 285 Single 5.5 l DHG 68<strong>DMH</strong> 285 Double 7.5 l DHG 68<strong>DMH</strong> 286 Single 5.5 l DHG 68<strong>DMH</strong> 286 Double 7.5 l DHG 68<strong>DMH</strong> 287 Single 5.5 l DHG 68<strong>DMH</strong> 287 Double 7.5 l DHG 68<strong>DMH</strong> 288 Single 3.5 l DHG 68<strong>DMH</strong> 288 Double 4.5 l DHG 68NotePos.B1bFLCollect the gear oil in a container and dispose ofit correctly.Drain gear oilComponentsLocking screwGasketOil-filling screw with dipstickStroke-length adjustment knob1. Unscrew the locking screw (B) and collect the gear oil in acontainer.2. Screw the locking screw (B) and the new gasket (1b) back inand tighten securely.Caution1bBRisk of leaking oil and damage caused by oilloss!For each oil change, a new flat gasket (1b) mustbe fitted!13.6.2 Removing the dosing head1. Close the suction and discharge lines and loosen the suctionand discharge valve connections.2. Loosen the six dosing head screws (1q with 2q).3. Remove the dosing head (2).FLTM03 6472 450613.6.3 Replacing a single diaphragm (no diaphragm leakagedetection)• Remove the diaphragm and fit a new diaphragm (Q) on thesuction side. See fig. 41.Fig. 41Pos.Replacing a single diaphragmComponents1q <strong>Dosing</strong> head screw2q Intermediate disk2 <strong>Dosing</strong> headQ Diaphragm13.6.4 Fitting the dosing head• Fit the dosing head and cross-tighten the dosing head screws(1q with 2q) using a torque wrench.NoteSee section 11. Start-up / shutdown forsubsequent start-up!13.6.5 Filling with gear oilRisk of leaking oil and damage caused by oilloss!CautionFor each oil change, a new flat gasket (1b) mustbe fitted!1. Check that the locking screw (B) is tightened.2. Slacken and remove the oil-filling screw (F).3. Set the stroke-length adjustment knob (L) to "0".4. Slowly add the hydraulic oil through the oil-filling opening (F)until the oil reaches the mark on the oil dipstick.5. Wait 30 minutes.6. Let the pump run for approx. 5 minutes with a stroke-lengthsetting of 0 %.7. Let the pump run for approx. 10 minutes with a stroke-lengthsetting of 40 %.13.6.6 Checking the oil level1. Switch off the pump, check the oil level and add oil,if necessary.2. Refit the oil-filling screw (F).Caution2q1q2QAfter initial start-up and after each time thediaphragm is changed, tighten the dosing headscrews.After approximately 6-10 operating hours ortwo days, cross-tighten the dosing head screwsusing a torque wrench.TM03 6473 450631
TorquesPump typeTorque[Nm]<strong>DMH</strong> 280 55-60<strong>DMH</strong> 281 17-19<strong>DMH</strong> 283 27-30<strong>DMH</strong> 285 50-54<strong>DMH</strong> 286 80-85<strong>DMH</strong> 287 50-54<strong>DMH</strong> 288 75-8013.7 Replacing the diaphragm for dosing head withdouble diaphragmNoteWarningWear protective clothing (gloves and goggles)when working on the dosing head, connectionsor lines!The dosing diaphragm should be replaced witheach gear oil change.Before removing the dosing head, valves andlines, empty any remaining medium in the dosinghead into a drip tray by carefully unscrewing thesuction valve.Only use original <strong>Grundfos</strong> <strong>Alldos</strong> gear oil!For product number, see service instructions.13.7.1 Removing the dosing head1. Close the suction and discharge lines and loosen the suctionand discharge valve connections.2. Loosen the six dosing head screws (1q with 2q).3. Remove the dosing head (2).13.7.2 Replacing a double diaphragm1. Clean the intermediate disk (3q), sealing rings (4q) andcovering rings (5q). After a diaphragm breakage, replace theparts by new ones.2. Remove both clamping sleeves (6q) slightly using pliers. Aftera diaphragm breakage, replace the parts by new ones.3. Measure the outer wall thickness of both new diaphragms(Q1 and Q2): s1 (Q1) < s2 (Q2) .s 1< s 2Caution4. Fit both new diaphragms (Q1 and Q2) and the parts (3q - 5q)in the correct order, as is shown in the diagrams (the clampingsleeves (6q) are used for centring purposes).Fig. 43Pos.SQ1Q23q4q5q6qCautionObserve correct installation of diaphragms(Q1 and Q2)! See fig. 43.Fit the thinner diaphragm (Q1) on the dosing sideand the thicker diaphragm (Q2) on the oil side/pump side!S6qDiaphragm on dosing-head sideComponentsContact pressure gauge (installation position)Diaphragm on dosing-head sideDiaphragm on oil side/pump sideIntermediate diskSealing ringsCovering ringsClamping sleeves13.7.3 Fitting the dosing head• Fit the dosing head and cross-tighten the dosing head screwsusing a torque wrench.3q2 Q1 5q 4q 3q 4q 5qThe paraffin oil between the diaphragms (Q) isconnected via the clamping sleeves (6q) to thecontact pressure gauge (S) in order to fill andactivate the diaphragm leakage detection. The oilis able to pass between the diaphragms throughthe slits in the clamping sleeves and the slits inthe intermediate disk.The clamping sleeves (6q) must therefore beinstalled in such a way that the slits in theclamping sleeve face the slits in the intermediatedisk (3q). See fig. 43.Q2TM03 6475 4506NoteSee section 11. Start-up / shutdown forsubsequent start-up!13.7.4 Filling the double diaphragm with separating agent2q1q2Q11)3q - 5q Q2TM03 6474 4506After a diaphragm has broken, the ball non-returnvalve must be cleaned before the diaphragm isCautionfilled with separating agent. Only clean the ballnon-return valve after a diaphragm breakage!Pump with double diaphragm: After the diaphragm has beenreplaced, refill the separating agent between the diaphragms.Fig. 42Installation of diaphragm1) The shape of the diaphragm varies depending on pump type.Pos.Components1q <strong>Dosing</strong> head screw2q Intermediate disk2 <strong>Dosing</strong> headQ1/Q2See fig. 433q - 5q32
Fig. 44Pos.STU1u2u1u<strong>Dosing</strong> head with double diaphragmComponentsContact pressure gaugeBall non-return valveConnection pieceFilling screwDeaeration screw1. Set the stroke-length adjustment knob of the pump to 0 %.2. Open the filling screw (1u) and deaeration screw (2u) by oneturn.3. Connect the filling hose to the nipple of the filling screw (1u)and, using the dosing syringe, inject the correct amount ofparaffin oil that is specified in the table below.4. Close the filling screw (1u), but leave the deaeration screw(2u) open.5. Start the pump with a system counter-pressure and strokelengthsetting of 40 %.6. Only close the deaeration screw (2u) when the separatingagent stops flowing (after 5 to 10 minutes).After a few operating hours, especially if theNote pressure of the pressure gauge is increasing,deaerate the double diaphragm again.Quantity of paraffin oil required for dosing pumps with adouble diaphragm (per dosing head)Pump typeFor ordering data for double-diaphragm filling components, seeservice instructions.13.7.5 Filling with gear oilFilling quantity[ml]<strong>DMH</strong> 280 3<strong>DMH</strong> 281 3<strong>DMH</strong> 283 4<strong>DMH</strong> 285 4<strong>DMH</strong> 286 6<strong>DMH</strong> 287 4<strong>DMH</strong> 288 4SUTRisk of leaking oil and damage caused by oilloss!CautionFor each oil change, a new flat gasket (1b) mustbe fitted!1. Check that the locking screw (B) is tightened.2. Slacken and remove the oil-filling screw (F).3. Set the stroke-length adjustment knob (L) to "0".4. Slowly add the hydraulic oil through the oil-filling opening (F)until the oil reaches the mark on the oil dipstick.5. Wait 30 minutes.6. Let the pump run for approx. 5 minutes with a stroke-lengthsetting of 0 %.7. Let the pump run for approx. 10 minutes with a stroke-lengthsetting of 40 %.2uTM03 6467 450613.7.6 Checking the oil level1. Switch off the pump, check the oil level and add oil,if necessary.2. Refit the oil-filling screw (F).CautionTorques13.7.7 Cleaning the ball non-return valveNoteFig. 45Pos.S5s6sTU2u3u4u5uAfter initial start-up and after each time thediaphragm is changed, tighten the dosing headscrews.After approximately 6-10 operating hours ortwo days, cross-tighten the dosing head screwsusing a torque wrench.Pump typeContact pressure gaugeTorque[Nm]<strong>DMH</strong> 280 55-60<strong>DMH</strong> 281 17-19<strong>DMH</strong> 283 27-30<strong>DMH</strong> 285 50-54<strong>DMH</strong> 286 80-85<strong>DMH</strong> 287 50-54<strong>DMH</strong> 288 75-80Only clean the ball non-return valve aftera diaphragm breakage!S5s4uU5uTComponents2)6s3u2u3uContact pressure gaugeUnion nutContact outputBall non-return valveConnection pieceDeaeration screwO-ringsConnection for earth cableUnion nut* 2) or locking unit (instead of contact pressure gaugeand its connection)TM03 6453 450633
Removing the ball non-return valve and contact pressuregauge1. For pumps and pressure gauges in explosion-proof version,unscrew the earth cable (4u).2. Hold the connection piece (U) with a screwdriver and unscrewthe union nut (5u).3. Unscrew the ball non-return valve (T) from the dosing head.Cleaning the ball non-return valvet7t6t5t4t3t1t2t1TM03 6476 4506Fig. 46Ball non-return valvePos.t1t2t3t4t5t6t7ComponentsO-ringBall non-return valve bodyBallSpring sheathPressure springScrew partO-ring1. Unscrew the screw part (t6) using round pliers.2. Clean all parts. Replace faulty parts by new ones.3. Re-assemble the ball non-return valve.4. Refit the ball non-return valve (T).5. Screw the contact pressure gauge (S) and connection piece(U) back on.6. For pumps and pressure gauges in explosion-proof version,screw the earth cable (4u) back on.CautionTighten the ball non-return valve and connectionpiece by hand only.34
14. Fault finding chartWarningActions that are taken to correct faults on the pump and that are not described in this manual, must only be carriedout by personnel authorised by <strong>Grundfos</strong> <strong>Alldos</strong>!Fault Diagnosis Cause RemedyNo dosing floweven at a lowcounter-pressure.(Pump is runningwithout any noise).No dosing floweven at a lowcounter-pressure.(Pump is runningnoisily although theoverpressure valvereacted).Pump does notdose or pressurerelief valve opens.No motor sound or vibrations.Fan is not rotating.When the oil-filling screw (F) isremoved, use the dipstick to observea calm oil surface. There is no"sloshing".The degassing valve (M) does notevacuate any oil. Oil level too low.See oil dipstick (F). No reaction ofthe overpressure valve if the suctionline is closed.No dosing flow on the dischargeside.The overpressure valve reactsindependently of the dosing flowadjustment (10 % to 100 %).Fault detection: When the dosinghead deaeration screw (V) isopened, jet medium leaks out.The diaphragm protection system(AMS) responds.The overpressure valve reactsindependently of the dosing flowadjustment (10 % to 100 %).Fault detection: When the dosinghead deaeration screw (V) isopened, no jet medium leaks out.The diaphragm protection system(AMS) responds.The overpressure valve reacts at100 % dosing flow.When reducing the flow ~10 % to 20%, the overpressure valve does notreact any more.Motor is not running.Motor runs, but the eccentric shaft isnot rotating. No piston movement.Spiral pin or motor shaft broken.Not enough oil in the pump. Air ispenetrating the piston flange throughthe control holes.<strong>Dosing</strong> head is not filled. Suction lineempty. Tank empty.Valve on discharge side closed.Counter-pressure is higher than theadjusted pressure at the overpressurevalve.Discharge valve is installed in theopposite direction of the flow. Observethe arrow on the valve.Valve on suction side closed.Suction filter obstructed.Suction valve jammed (does not open).Suction valve has a too strong spring.Suction valve is installed in theopposite direction of the flow. Observethe arrow on the valve.<strong>Dosing</strong> head is not completelydeaerated.Pump is cavitating (dosing liquid withtoo high viscosity; dosing liquid withtoo high steam pressure at operatingtemperature = degassing of the liquid;suction lift too high; wrong design ofthe system on suction side).Diaphragm broken (not enough oil inthe enclosure of the pump; pistonflange).Discharge valve of pump is clogged orball guide in the valve is worn due tocorrosive or abrasive media.Connect the power supply orreplace the motor, if blown.Remove the motor and eccentricshaft. Replace damaged parts.Fill in oil. Deaerate the pump, seesection 11. Start-up / shutdown.Deaerate the dosing head.Fill/exchange the tank on thesuction side.Open the valve.Adjust the overpressure valvehigher, but only if the pump isdesigned for this. Never block theoverpressure valve.Install the discharge valvecorrectly.Open the valve.Clean the suction filter. Replace,if necessary.Dismantle and check the suctionvalve.Use the fitting spring, or usedouble ball valve for checking.Install the suction valve correctly.Fill the dosing head completely.Use a gear with a low strokenumber; use valves with biggernominal width; realise positive inletpressure.Clean and grease well all partsusing oil according to regulations.Then install a new diaphragm.Uninstall the discharge valve.Dismantle and clean, or if the barsof the ball guide are worn, replacethe valve.35
Fault Diagnosis Cause RemedySuction valve: During the dischargestroke, the dosing liquid flows backinto the suction line.Discharge valve: During the suctionstroke, the dosing liquid flows backinto the dosing head.The pump takes in less.Suction/discharge valves dirty or leaky.Clean or replace valves.<strong>Dosing</strong> flow toosmall.Pump doses toomuch.<strong>Dosing</strong> flow depends very much onthe pressure.If the counter-pressure is low, thedosing flow increases considerably.If the stroke frequency rises, thedosing flow increases excessively.Fault detection: When the pumpstops, fit the degassing valve (E)block, start up the pump. Check ifthe dosing flow increases.Open the degassing valve (E) againwhen the pump stops.The degassing valves (M, E) nolonger operate. The degassing valve(M) does not discharge any oil.Briefly close the suction side untilthe overpressure valve reacts.Adjust the dosing flow to approx.50 %. The piston flange conveys theoil and the air into the tank via theoverpressure valve. New oil isextracted from the tank and taken inthrough the piston holes.Pressure gauge in discharge line.Pressure gauge in discharge line.Heavy overdose.Overdosing at high dosing flowsettings and flows.The piston lip seal is worn out (usuallyafter a long period of operation or if theoil is dirty).Too much clearance between pistonand slide valve, or the strokefrequency of the pump is too low (toomuch slip).The O-rings of the degassing valve (E)are faulty.The degassing valve (M) dischargestoo much oil.Air has accumulated in the pistonflange. The air cannot be evacuated.Counter-pressure has seriouslyincreased. Overpressure valve isadjusted too low.Counter-pressure has seriouslydropped.Inlet pressure of suction line higherthan counter-pressure of dischargeline.Too big dynamic in the suction line.Replace grooved ring.Replace the piston and piston slidevalves. Use other hydraulic oil witha higher viscosity (mainly forfrequency converter operation andhigher counter-pressures).Replace O-rings.Caution! If the O-rings areincorrectly installed, or if thedegassing valve (E) is adjustedduring operation, this may damagethe O-rings.Correct setting and replacedegassing valve (M), if necessary.Check setting on degassing valve(M), replace degassing valves(M, E), if necessary.Readjust the zero point(<strong>DMH</strong> 281-288).Correct the setting of the pressurerelief valve.Readjust the zero point(<strong>DMH</strong> 281-288).Install a pressure-loading valve.Install a pulsation damper on thesuction side.36
15. <strong>Dosing</strong> curvesThe dosing curves on the following pages are trend curves.They apply to:• performance of single pump (the flow rate is doubled for thedouble pump)• water as dosing medium• zero point of pump Q 0 for specified pressure, see table below• standard pump version.AbbreviationQQ 0h<strong>DMH</strong> 2801,6Q [l/h]1,41,21,00,80,60,40,20,0Fig. 47Fig. 48Fig. 49Description<strong>Dosing</strong> flowZero point of the pumpStroke length100 bar10bar200 100bar bar10 200bar0 10 20 30 40 50 60 70 80 90 100h [%]<strong>DMH</strong> 0.6-200 (50 Hz), Q 0 = 75 bar1,8Q [l/h]1,6 100bar100 bar1,4 10bar 200 bar1,2 200bar10 bar1,00,80,60,40,20,00 10 20 30 40 50 60 70 80 90 100h [%]3,5Q [l/h]3,02,52,01,51,00,50,0<strong>DMH</strong> 0.6-200 (60 Hz), Q 0 = 75 bar100 10bar bar200 100bar bar10 200bar bar0 10 20 30 40 50 60 70 80 90 100h [%]<strong>DMH</strong> 1.3-200 (50 Hz), Q 0 = 75 barTM03 6796 4506TM03 6797 4506TM03 6798 45063,5Q [l/h]3,02,52,01,51,00,5Fig. 505Q [l/h]4Fig. 51Fig. 52Fig. 53100 bar100bar200 10bar bar10200bar0,00 10 20 30 40 50 60 70 80 90 100h [%]32105Q [l/h]43218Q [l/h]7<strong>DMH</strong> 1.3-200 (60 Hz), Q 0 = 75 bar100 bar10bar200 100bar bar10 200bar0 10 20 30 40 50 60 70 80 90 100h [%]<strong>DMH</strong> 2.2-200 (50 Hz), Q 0 = 75 bar100 bar100bar200 10bar bar10 200bar00 10 20 30 40 50 60 70 80 90 100h [%]6543210<strong>DMH</strong> 2.2-200 (60 Hz), Q 0 = 75 bar100 bar10bar200 100bar bar10 200bar0 10 20 30 40 50 60 70 80 90 100h [%]<strong>DMH</strong> 2.5-200 (50 Hz), Q 0 = 75 barTM03 6799 4506TM03 6800 4506TM03 6801 4506TM03 6802 450637
8Q [l/h]76543210Fig. 54100 bar100bar20010barbar10 200bar0 10 20 30 40 50 60 70 80 90 100h [%]<strong>DMH</strong> 2.5-200 (60 Hz), Q 0 = 75 barTM03 6803 45067Q [l/h]6543210Fig. 5510bar 100 bar100bar 200 bar200bar10 bar0 10 20 30 40 50 60 70 80 90 100h [%]<strong>DMH</strong> 3.3-200 (50 Hz), Q 0 = 75 barTM03 6804 450638
<strong>DMH</strong> 2813Q [l/h]260 bar80 bar100 100 bar bar60 80 bar bar10Q [l/h]8675 bar75bar100 bar100bar140Fig. 560 10 20 30 40 50 60 70 80 90 100h [%]<strong>DMH</strong> 2-100 (50 Hz), Q 0 = 60 barTM03 7201 450620Fig. 600 10 20 30 40 50 60 70 80 90 100h [%]<strong>DMH</strong> 6.4-100 (50 Hz), Q 0 = 75 barTM03 6807 45063Q [l/h]260 bar80 bar100 bar100 bar6080 bar bar10Q [l/h]8675 bar75bar100 bar100bar140Fig. 570 10 20 30 40 50 60 70 80 90 100h [%]<strong>DMH</strong> 2-100 (60 Hz), Q 0 = 60 barTM03 7202 450620Fig. 610 10 20 30 40 50 60 70 80 90 100h [%]<strong>DMH</strong> 6.4-100 (60 Hz), Q 0 = 75 barTM03 6808 45066Q [l/h]543210Fig. 5860 bar80bar100 100bar bar80 60bar0 10 20 30 40 50 60 70 80 90 100h [%]<strong>DMH</strong> 4.2-100 (50 Hz), Q 0 = 60 barTM03 6805 450612Q [l/h]1086420Fig. 6260 bar80bar100barbar60bar 80 bar0 10 20 30 40 50 60 70 80 90 100h [%]<strong>DMH</strong> 8-100 (50 Hz), Q 0 = 60 barTM03 6809 45066Q [l/h]543210Fig. 5960 80bar bar100bar bar80 60bar0 10 20 30 40 50 60 70 80 90 100h [%]<strong>DMH</strong> 4.2-100 (60 Hz), Q 0 = 60 barTM03 6806 450612Q [l/h]1086420Fig. 6360 80bar bar100bar bar80 60bar bar0 10 20 30 40 50 60 70 80 90 100h [%]<strong>DMH</strong> 8-100 (60 Hz), Q 0 = 60 barTM03 6810 450639
14Q [l/h]121086420Fig. 6475 bar75 bar100 bar100 bar0 10 20 30 40 50 60 70 80 90 100h [%]<strong>DMH</strong> 9.6-100 (50 Hz), Q 0 = 75 barTM03 6811 450640
<strong>DMH</strong> 28330Q [l/h]2520151050Fig. 65100bar 50 35bar 100 bar50bar35 bar0 10 20 30 40 50 60 70 80 90 100h [%]<strong>DMH</strong> 19-100 (50 Hz), Q 0 = 75 barTM03 6812 450650Q [l/h]4550barbar40100barbar353025201510500 10 20 30 40 50 60 70 80 90 100h [%]Fig. 69<strong>DMH</strong> 33-100 (50 Hz), Q 0 = 75 barTM03 6816 450630Q [l/h]2520151050Fig. 6650barbar100bar bar35bar35 bar0 10 20 30 40 50 60 70 80 90 100h [%]<strong>DMH</strong> 19-100 (60 Hz), Q 0 = 75 barTM03 6813 450650Q [l/h]4550 bar403550bar100 bar100bar3025201510500 10 20 30 40 50 60 70 80 90 100h [%]Fig. 70<strong>DMH</strong> 33-100 (60 Hz), Q 0 = 75 barTM03 6817 450640Q [l/h]50 bar3550bar100 bar30100bar25201510500 10 20 30 40 50 60 70 80 90 100h [%]Fig. 67<strong>DMH</strong> 27-100 (50 Hz), Q 0 = 75 barTM03 6814 450660Q [l/h]5075 bar100bar100 bar50bar4050 75bar30201000 10 20 30 40 50 60 70 80 90 100h [%]Fig. 71 <strong>DMH</strong> 40-100 (50 Hz), Q 0 = 75 barTM03 6818 450640Q [l/h]35302520151050Fig. 6850 bar50bar100 bar100bar0 10 20 30 40 50 60 70 80 90 100h [%]<strong>DMH</strong> 27-100 (60 Hz), Q 0 = 75 barTM03 6815 450660Q [l/h]504030201075bar75 bar100barbar50barbar00 10 20 30 40 50 60 70 80 90 100h [%]Fig. 72 <strong>DMH</strong> 40-100 (60 Hz), Q 0 = 75 barTM03 6819 450641
70Q [l/h]6050403020100Fig. 7375 100bar100 50bar bar5075barbar0 10 20 30 40 50 60 70 80 90 100h [%]<strong>DMH</strong> 55-100 (50 Hz), Q 0 = 75 barTM03 6820 450642
<strong>DMH</strong> 28530Q [l/h]2575 bar100 bar100 bar50 bar2075 50 bar bar1510500 10 20 30 40 50 60 70 80 90 100h [%]Fig. 74 <strong>DMH</strong> 20-100 (50 Hz), Q 0 = 75 barTM03 6877 450680Q [l/h]75 bar100bar60100 50bar bar5075bar402000 10 20 30 40 50 60 70 80 90 100h [%]Fig. 78 <strong>DMH</strong> 52-100 (50 Hz), Q 0 = 75 barTM03 6823 450630Q [l/h]75 bar2575 bar100 bar100 bar2050 50 bar bar1510500 10 20 30 40 50 60 70 80 90 100h [%]Fig. 75 <strong>DMH</strong> 20-100 (60 Hz), Q 0 = 75 bar60Q [l/h]402075 100bar bar100 50bar bar50 75barTM03 6878 4506Q [l/h]806040200Fig. 79100Q [l/h]80604075 bar75bar100 100bar bar50 50bar0 10 20 30 40 50 60 70 80 90 100h [%]<strong>DMH</strong> 52-100 (60 Hz), Q 0 = 75 bar75 bar100bar50bar 100 bar75bar 50 barTM03 6824 450600 10 20 30 40 50 60 70 80 90 100h [%]Fig. 76 <strong>DMH</strong> 40-100 (50 Hz), Q 0 = 75 barTM03 6821 45062000 10 20 30 40 50 60 70 80 90 100h [%]Fig. 80 <strong>DMH</strong> 70-100 (50 Hz), Q 0 = 75 barTM03 6825 450660Q [l/h]4075 bar75bar100 bar100bar50 50bar bar100Q [l/h]806075 bar75bar100barbar50barbar20400Fig. 770 10 20 30 40 50 60 70 80 90 100h [%]<strong>DMH</strong> 40-100 (60 Hz), Q 0 = 75 barTM03 6822 4506200Fig. 810 10 20 30 40 50 60 70 80 90 100h [%]<strong>DMH</strong> 70-100 (60 Hz), Q 0 = 75 barTM03 6826 450643
100Q [l/h]806075 bar100bar100 50bar bar50 75bar bar402000 10 20 30 40 50 60 70 80 90 100h [%]Fig. 82 <strong>DMH</strong> 80-100 (50 Hz), Q 0 = 75 barTM03 6827 4506100Q [l/h]806075 bar75bar100 100bar bar50bar402000 10 20 30 40 50 60 70 80 90 100h [%]TM03 6828 4506Fig. 83<strong>DMH</strong> 80-100 (60 Hz), Q 0 = 75 bar120Q [l/h]100806040200Fig. 8475 bar100bar100 50bar bar50 75bar bar0 10 20 30 40 50 60 70 80 90 100h [%]<strong>DMH</strong> 105-100 (50 Hz), Q 0 = 75 barTM03 6829 450644
<strong>DMH</strong> 286120Q [l/h]11010025 50 bar bar9050 25 bar807060504030201000 10 20 30 40 50 60 70 80 90 100h [%]Fig. 85Fig. 86Fig. 87<strong>DMH</strong> 85-50 (50 Hz), Q 0 = 25 bar120Q [l/h] 1102510025 barbar9050 bar50 bar807060504030201000 10 20 30 40 50 60 70 80 90 100h [%]<strong>DMH</strong> 85-50 (60 Hz), Q 0 = 25 bar160Q [l/h]14025 bar5012050 bar bar25 bar1008060402000 10 20 30 40 50 60 70 80 90 100h [%]<strong>DMH</strong> 111-50 (50 Hz), Q 0 = 25 barTM03 6873 4506TM03 6874 4506TM03 6875 4506250Q [l/h]20015010050Fig. 89Fig. 90Fig. 910250Q [l/h]200150100500250Q [l/h]20015010050025 bar50bar50 bar25bar0 10 20 30 40 50 60 70 80 90 100h [%]<strong>DMH</strong> 170-50 (50 Hz), Q 0 = 25 bar25 bar25bar50 bar50bar0 10 20 30 40 50 60 70 80 90 100h [%]<strong>DMH</strong> 170-50 (60 Hz), Q 0 = 25 bar25 bar50barbar25bar0 10 20 30 40 50 60 70 80 90 100h [%]<strong>DMH</strong> 222-50 (50 Hz), Q 0 = 25 barTM03 6830 4506TM03 6831 4506TM03 6832 4506160Q [l/h]14025 bar25 bar12050 bar50 bar1008060402000 10 20 30 40 50 60 70 80 90 100h [%]Fig. 88<strong>DMH</strong> 111-50 (60 Hz), Q 0 = 25 barTM03 6876 450645
<strong>DMH</strong> 28714Q [l/h]121086420180 bar200bar200 150bar bar150 180bar bar0 10 20 30 40 50 60 70 80 90 100h [%]TM03 6833 450635Q [l/h]302520151050180 bar200bar150bar 200 bar180bar150 bar0 10 20 30 40 50 60 70 80 90 100h [%]TM03 6837 4506Fig. 92<strong>DMH</strong> 9-200 (50 Hz), Q 0 = 180 barFig. 96<strong>DMH</strong> 23-200 (50 Hz), Q 0 = 180 bar14Q [l/h]121086420180 bar180bar200barbar150barbar0 10 20 30 40 50 60 70 80 90 100h [%]TM03 6834 450635Q [l/h]302520151050180 bar180bar200bar 200 bar150barbar0 10 20 30 40 50 60 70 80 90 100h [%]TM03 6838 4506Fig. 93<strong>DMH</strong> 9-200 (60 Hz), Q 0 = 180 barFig. 97<strong>DMH</strong> 23-200 (60 Hz), Q 0 = 180 bar30Q [l/h]2520151050180 bar200bar150bar 200 bar180bar 150 bar0 10 20 30 40 50 60 70 80 90 100h [%]TM03 6835 450650Q [l/h]45180 bar200bar40150bar 200 bar35180bar 150 bar3025201510500 10 20 30 40 50 60 70 80 90 100h [%]TM03 6839 4506Fig. 94<strong>DMH</strong> 18-200 (50 Hz), Q 0 = 180 barFig. 98<strong>DMH</strong> 31-200 (50 Hz), Q 0 = 180 bar30Q [l/h]2520151050180 bar180bar200bar 200 bar150barbar0 10 20 30 40 50 60 70 80 90 100h [%]TM03 6836 450650Q [l/h]45180 bar180bar4035200bar bar150bar bar3025201510500 10 20 30 40 50 60 70 80 90 100h [%]TM03 6840 4506Fig. 95<strong>DMH</strong> 18-200 (60 Hz), Q 0 = 180 barFig. 99<strong>DMH</strong> 31-200 (60 Hz), Q 0 = 180 bar46
60Q [l/h]50403020100180 bar200bar100bar 200 bar180bar 100 bar0 10 20 30 40 50 60 70 80 90 100h [%]TM03 6841 4506Fig. 100 <strong>DMH</strong> 36-200 (50 Hz), Q 0 = 180 bar60Q [l/h]50403020100180 bar180bar200barbar100barbar0 10 20 30 40 50 60 70 80 90 100h [%]TM03 6842 4506Fig. 101 <strong>DMH</strong> 36-200 (60 Hz), Q 0 = 180 bar70Q [l/h]6050403020100160 bar200bar100bar 200 bar160bar 100 bar0 10 20 30 40 50 60 70 80 90 100h [%]Fig. 102 <strong>DMH</strong> 50-200 (50 Hz), Q 0 = 160 barTM03 6843 450647
<strong>DMH</strong> 2886Q [l/h]543210100 bar100bar200 bar200bar0 10 20 30 40 50 60 70 80 90 100h [%]Fig. 103 <strong>DMH</strong> 3-200 (50 Hz), Q 0 = 100 barTM03 6844 450618Q [l/h]16100 bar100bar14200 bar12200bar10864200 10 20 30 40 50 60 70 80 90 100h [%]Fig. 107 <strong>DMH</strong> 10-200 (50 Hz), Q 0 = 100 barTM03 6848 45066Q [l/h]543210100 bar100bar200 bar200bar0 10 20 30 40 50 60 70 80 90 100h [%]Fig. 104 <strong>DMH</strong> 3-200 (60 Hz), Q 0 = 100 barTM03 6845 450618Q [l/h]16100 bar100bar14200 bar200bar1210864200 10 20 30 40 50 60 70 80 90 100h [%]Fig. 108 <strong>DMH</strong> 10-200 (60 Hz), Q 0 = 100 barTM03 6849 450614Q [l/h]121086420100 bar100bar200 bar200bar0 10 20 30 40 50 60 70 80 90 100h [%]Fig. 105 <strong>DMH</strong> 7.5-200 (50 Hz), Q 0 = 100 barTM03 6846 450620Q [l/h]18100 bar16100bar200 bar14200bar1210864200 10 20 30 40 50 60 70 80 90 100h [%]Fig. 109 <strong>DMH</strong> 13-200 (50 Hz), Q 0 = 100 barTM03 6850 450614Q [l/h]121086420100 bar100bar200 bar200bar0 10 20 30 40 50 60 70 80 90 100h [%]Fig. 106 <strong>DMH</strong> 7.5-200 (60 Hz), Q 0 = 100 barTM03 6847 450620Q [l/h]18100 bar16100bar200 bar14200bar1210864200 10 20 30 40 50 60 70 80 90 100h [%]Fig. 110 <strong>DMH</strong> 13-200 (60 Hz), Q 0 = 100 barTM03 6851 450648
28Q [l/h]24201612840100 bar100bar 200 bar200bar0 10 20 30 40 50 60 70 80 90 100h [%]Fig. 111 <strong>DMH</strong> 15-200 (50 Hz), Q 0 = 100 barTM03 6852 450628Q [l/h]24201612840100 bar100bar 200 bar200bar0 10 20 30 40 50 60 70 80 90 100h [%]Fig. 112 <strong>DMH</strong> 15-200 (60 Hz), Q 0 = 100 barTM03 6853 450632100 barQ [l/h]100bar28200 bar200bar242016128400 10 20 30 40 50 60 70 80 90 100h [%]Fig. 113 <strong>DMH</strong> 21-200 (50 Hz), Q 0 = 100 barTM03 6854 450616. DisposalThis product or parts of it must be disposed of in anenvironmentally sound way:1. Use appropriate waste collection services.2. If this is not possible, contact the nearest <strong>Grundfos</strong> or<strong>Grundfos</strong> <strong>Alldos</strong> company or service workshop.Subject to alterations.49
Safety declarationPlease copy, fill in and sign this sheet and attach it to the pump returned for service.We hereby declare that this product is free from hazardous chemicals, biological and radioactivesubstances:Product type: ________________________________Model number: _____________________________No media or water: _____________________________A chemical solution, name: _________________________(see pump nameplate)Fault descriptionPlease make a circle around the damaged part.In the case of an electrical or functional fault, please mark the cabinet.GrA3504Please give a short description of the fault:_____________________Date and signature_____________________Company stamp50
ArgentinaBombas GRUNDFOS de Argentina S.A.Ruta Panamericana km. 37.500 Lote 34A1619 - GarinPcia. de Buenos AiresPhone: +54-3327 414 444Telefax: +54-3327 411 111Australia<strong>Grundfos</strong> <strong>Alldos</strong><strong>Dosing</strong> & DisinfectionALLDOS Oceania Pty. Ltd.Unit 3 / 74 Murdoch CircuitAcacia Ridge QLD 4100Phone: +61 (0)7 3712 6888Telefax: +61 (0)7 3272 5188E-mail: alldos.au@alldos.comAustraliaGRUNDFOS Pumps Pty. Ltd.P.O. Box 2040Regency ParkSouth Australia 5942Phone: +61-8-8461-4611Telefax: +61-8-8340 0155AustriaGRUNDFOS Pumpen Vertrieb Ges.m.b.H.<strong>Grundfos</strong>straße 2A-5082 Grödig/SalzburgTel.: +43-6246-883-0Telefax: +43-6246-883-30BelgiumN.V. GRUNDFOS Bellux S.A.Boomsesteenweg 81-83B-2630 AartselaarTél.: +32-3-870 7300Télécopie: +32-3-870 7301BelorussiaПредставительство ГРУНДФОС в Минске220090 Минск ул.Олешева 14Телефон: (8632) 62-40-49Факс: (8632) 62-40-49Bosnia/HerzegovinaGRUNDFOS SarajevoParomlinska br. 16,BiH-71000 SarajevoPhone: +387 33 713290Telefax: +387 33 231795BrazilMark GRUNDFOS Ltda.Av. Humberto de Alencar Castelo Branco,630CEP 09850 - 300São Bernardo do Campo - SPPhone: +55-11 4393 5533Telefax: +55-11 4343 5015BulgariaGRUNDFOS Pumpen VertriebRepresentative Office - BulgariaBulgaria, 1421 SofiaLozenetz District105-107 Arsenalski blvd.Phone: +359 2963 3820, 2963 5653Telefax: +359 2963 1305CanadaGRUNDFOS Canada Inc.2941 Brighton RoadOakville, OntarioL6H 6C9Phone: +1-905 829 9533Telefax: +1-905 829 9512China<strong>Grundfos</strong> <strong>Alldos</strong><strong>Dosing</strong> & DisinfectionALLDOS (Shanghai) Water Technology Co.Ltd.West Unit, 1 Floor, No. 2 Building (T 4-2)278 Jinhu Road, Jin Qiao Export ProcessingZonePudong New AreaShanghai, 201206Phone: +86 21 5055 1012Telefax: +86 21 5032 0596E-mail: alldos.cn@alldos.comChinaGRUNDFOS Pumps (Shanghai) Co. Ltd.22 Floor, Xin Hua Lian Building755-775 Huai Hai Rd, (M)Shanghai 200020PRCPhone: +86-512-67 61 11 80Telefax: +86-512-67 61 81 67CroatiaGRUNDFOS predstavništvo ZagrebCebini 37, BuzinHR-10000 ZagrebPhone: +385 1 6595 400Telefax: +385 1 6595 499Czech RepublicGRUNDFOS s.r.o.Čapkovského 21779 00 OlomoucPhone: +420-585-716 111Telefax: +420-585-716 299DenmarkGRUNDFOS DK A/SMartin Bachs Vej 3DK-8850 BjerringbroTlf.: +45-87 50 50 50Telefax: +45-87 50 51 51E-mail: info_GDK@grundfos.comwww.grundfos.com/DKEstoniaGRUNDFOS Pumps Eesti OÜPeterburi tee 92G11415 TallinnTel: + 372 606 1690Fax: + 372 606 1691FinlandOY GRUNDFOS Pumput ABMestarintie 11FIN-01730 VantaaPhone: +358-3066 5650Telefax: +358-3066 56550France<strong>Grundfos</strong> <strong>Alldos</strong><strong>Dosing</strong> & DisinfectionALLDOS S.A.R.L.7, rue GutenbergF-67610 La WantzenauTél.: +33-3 88 59 26 26Télécopie: +33-3 88 59 26 00E-mail : alldos.fr@alldos.comFrancePompes GRUNDFOS Distribution S.A.Parc d’Activités de Chesnes57, rue de MalacombeF-38290 St. Quentin Fallavier (Lyon)Tél.: +33-4 74 82 15 15Télécopie: +33-4 74 94 10 51Germany<strong>Grundfos</strong> <strong>Alldos</strong><strong>Dosing</strong> & DisinfectionALLDOS Eichler GmbHReetzstraße 85D-76327 Pfinztal (Söllingen)Tel.: +49 7240 61-0Telefax: +49 7240 61-177E-mail: alldos.de@alldos.comGermanyGRUNDFOS GMBHSchlüterstr. 33D-40699 ErkrathTel.: +49-(0) 211 929 69-0Telefax: +49-(0) 211 929 69-3799E-mail: infoservice@grundfos.deService in Deutschland:E-mail: kundendienst@grundfos.deGreeceGRUNDFOS Hellas A.E.B.E.20th km. Athinon-Markopoulou Av.P.O. Box 71GR-19002 PeaniaPhone: +0030-210-66 83 400Telefax: +0030-210-66 46 273Hong KongGRUNDFOS Pumps (Hong Kong) Ltd.Unit 1, Ground floorSiu Wai Industrial Centre29-33 Wing Hong Street &68 King Lam Street, Cheung Sha WanKowloonPhone: +852-27861706 / 27861741Telefax: +852-27858664HungaryGRUNDFOS Hungária Kft.Park u. 8H-2045 Törökbálint,Phone: +36-23 511 110Telefax: +36-23 511 111IndiaGRUNDFOS Pumps India Private Limited118 Old Mahabalipuram RoadThoraipakkamChennai 600 096Phone: +91-44 2496 6800IndonesiaPT GRUNDFOS PompaJl. Rawa Sumur III, Blok III / CC-1Kawasan Industri, PulogadungJakarta 13930Phone: +62-21-460 6909Telefax: +62-21-460 6910 / 460 6901IrelandGRUNDFOS (Ireland) Ltd.Unit A, Merrywell Business ParkBallymount Road LowerDublin 12Phone: +353-1-4089 800Telefax: +353-1-4089 830ItalyGRUNDFOS Pompe Italia S.r.l.Via Gran Sasso 4I-20060 Truccazzano (Milano)Tel.: +39-02-95838112Telefax: +39-02-95309290 / 95838461JapanGRUNDFOS Pumps K.K.Gotanda Metalion Bldg. 5F,5-21-15, Higashi-gotandaShiagawa-ku, Tokyo,141-0022 JapanPhone: +81 35 448 1391Telefax: +81 35 448 9619KoreaGRUNDFOS Pumps Korea Ltd.6th Floor, Aju Building 679-5Yeoksam-dong, Kangnam-ku, 135-916Seoul, KoreaPhone: +82-2-5317 600Telefax: +82-2-5633 725LatviaSIA GRUNDFOS Pumps LatviaDeglava biznesa centrsAugusta Deglava ielā 60, LV-1035, Rīga,Tālr.: + 371 714 9640, 7 149 641Fakss: + 371 914 9646LithuaniaGRUNDFOS Pumps UABSmolensko g. 6LT-03201 VilniusTel: + 370 52 395 430Fax: + 370 52 395 431MalaysiaGRUNDFOS Pumps Sdn. Bhd.7 Jalan Peguam U1/25Glenmarie Industrial Park40150 Shah AlamSelangorPhone: +60-3-5569 2922Telefax: +60-3-5569 2866MéxicoBombas GRUNDFOS de México S.A. deC.V.Boulevard TLC No. 15Parque Industrial Stiva AeropuertoApodaca, N.L. 66600Phone: +52-81-8144 4000Telefax: +52-81-8144 4010Netherlands<strong>Grundfos</strong> <strong>Alldos</strong><strong>Dosing</strong> & DisinfectionALLDOS BVLeerlooiersstraat 6NL-8601 WK SneekTel.: +31-51 54 25 789Telefax: +31-51 54 30 550E-mail: alldos.nl@alldos.comNetherlandsGRUNDFOS NetherlandsVeluwezoom 351326 AE AlmerePostbus 220151302 CA ALMERETel.: +31-88-478 6336Telefax: +31-88-478 6332e-mail: info_gnl@grundfos.comNew ZealandGRUNDFOS Pumps NZ Ltd.17 Beatrice Tinsley CrescentNorth Harbour Industrial EstateAlbany, AucklandPhone: +64-9-415 3240Telefax: +64-9-415 3250NorwayGRUNDFOS Pumper A/SStrømsveien 344Postboks 235, LeirdalN-1011 OsloTlf.: +47-22 90 47 00Telefax: +47-22 32 21 50PolandGRUNDFOS Pompy Sp. z o.o.ul. Klonowa 23Baranowo k. PoznaniaPL-62-081 PrzeźmierowoTel: (+48-61) 650 13 00Fax: (+48-61) 650 13 50PortugalBombas GRUNDFOS Portugal, S.A.Rua Calvet de Magalhães, 241Apartado 1079P-2770-153 Paço de ArcosTel.: +351-21-440 76 00Telefax: +351-21-440 76 90RomâniaGRUNDFOS Pompe România SRLBd. Biruintei, nr 103Pantelimon county IlfovPhone: +40 21 200 4100Telefax: +40 21 200 4101E-mail: romania@grundfos.roRussiaООО ГрундфосРоссия, 109544 Москва, ул. Школьная 39Тел. (+7) 495 737 30 00, 564 88 00Факс (+7) 495 737 75 36, 564 88 11E-mail grundfos.moscow@grundfos.comSerbiaGRUNDFOS Predstavništvo BeogradDr. Milutina Ivkovića 2a/29YU-11000 BeogradPhone: +381 11 26 47 877 / 11 26 47 496Telefax: +381 11 26 48 340SingaporeGRUNDFOS (Singapore) Pte. Ltd.24 Tuas West RoadJurong TownSingapore 638381Phone: +65-6865 1222Telefax: +65-6861 8402SloveniaGRUNDFOS PUMPEN VERTRIEBGes.m.b.H.,Podružnica LjubljanaBlatnica 1, SI-1236 TrzinPhone: +386 1 563 5338Telefax: +386 1 563 2098E-mail: slovenia@grundfos.siSouth Africa<strong>Grundfos</strong> <strong>Alldos</strong><strong>Dosing</strong> & DisinfectionALLDOS (Pty) LTD98 Matroosberg Road, Waterkloof ParkP.O. Box 36505, Menlo Park 01020181 ZA PretoriaE-mail: alldos.za@alldos.comSpainBombas GRUNDFOS España S.A.Camino de la Fuentecilla, s/nE-28110 Algete (Madrid)Tel.: +34-91-848 8800Telefax: +34-91-628 0465SwedenGRUNDFOS AB(Box 333) Lunnagårdsgatan 6431 24 MölndalTel.: +46(0)771-32 23 00Telefax: +46(0)31-331 94 60Switzerland<strong>Grundfos</strong> <strong>Alldos</strong><strong>Dosing</strong> & DisinfectionALLDOS International AGSchönmattstraße 4CH-4153 ReinachTel.: +41-61-717 5555Telefax: +41-61-717 5500E-mail: alldos.ch@alldos.comSwitzerlandGRUNDFOS Pumpen AGBruggacherstrasse 10CH-8117 Fällanden/ZHTel.: +41-1-806 8111Telefax: +41-1-806 8115TaiwanGRUNDFOS Pumps (Taiwan) Ltd.7 Floor, 219 Min-Chuan RoadTaichung, Taiwan, R.O.C.Phone: +886-4-2305 0868Telefax: +886-4-2305 0878ThailandGRUNDFOS (Thailand) Ltd.92 Chaloem Phrakiat Rama 9 Road,Dokmai, Pravej, Bangkok 10250Phone: +66-2-725 8999Telefax: +66-2-725 8998TurkeyGRUNDFOS POMPA San. ve Tic. Ltd. Sti.Gebze Organize Sanayi BölgesiIhsan dede Caddesi,2. yol 200. Sokak No. 20441490 Gebze/ KocaeliPhone: +90 - 262-679 7979Telefax: +90 - 262-679 7905E-mail: satis@grundfos.comUkraineТОВ ГРУНДФОС УКРАЇНА01010 Київ, Вул. Московська 8б,Тел.:(+38 044) 390 40 50Фах.: (+38 044) 390 40 59E-mail: ukraine@grundfos.comUnited Arab EmiratesGRUNDFOS Gulf DistributionP.O. Box 16768Jebel Ali Free ZoneDubaiPhone: +971-4- 8815 166Telefax: +971-4-8815 136United Kingdom<strong>Grundfos</strong> <strong>Alldos</strong><strong>Dosing</strong> & DisinfectionALLDOS Ltd.39 Gravelly Industrial Park, Tyburn RoadBirmingham B24 8TGPhone: +44-121-3283336Telefax: +44-121-3284332E-mail: alldos.uk@alldos.comUnited KingdomGRUNDFOS Pumps Ltd.Grovebury RoadLeighton Buzzard/Beds. LU7 8TLPhone: +44-1525-850000Telefax: +44-1525-850011U.S.A.GRUNDFOS Pumps Corporation17100 West 118th TerraceOlathe, Kansas 66061Phone: +1-913-227-3400Telefax: +1-913-227-3500UsbekistanПредставительство ГРУНДФОС вТашкенте700000 Ташкент ул.Усмана Носира 1-йтупик 5Телефон: (3712) 55-68-15Факс: (3712) 53-36-35Addresses revised 17.03.2008
Being responsible is our foundationThinking ahead makes it possibleInnovation is the essence15.720170 V1.0 96771794 0408Repl.15.720057 V2.015.720154 V2.015.720105 V2.015.720111 V2.015.720117 V2.015.720123 V2.0Repl.91834767 120796709832 120796709797 120796709803 120796709809 120796709815 1107GBwww.grundfosalldos.com