Radial Saw Table - Vintage Projects
Radial Saw Table - Vintage Projects
Radial Saw Table - Vintage Projects
- No tags were found...

You also want an ePaper? Increase the reach of your titles
YUMPU automatically turns print PDFs into web optimized ePapers that Google loves.
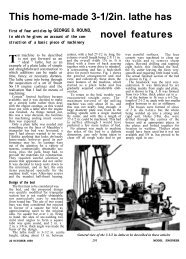
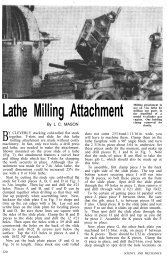
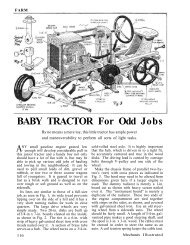
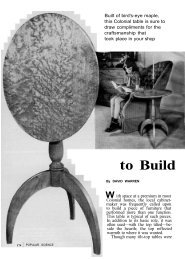
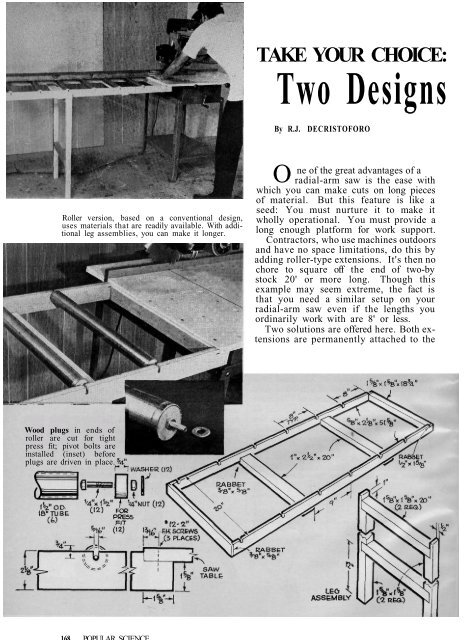
TAKE YOUR CHOICE:Two DesignsBy R.J. DECRISTOFORORoller version, based on a conventional design,uses materials that are readily available. With additionalleg assemblies, you can make it longer.One of the great advantages of aradial-arm saw is the ease withwhich you can make cuts on long piecesof material. But this feature is like aseed: You must nurture it to make itwholly operational. You must provide along enough platform for work support.Contractors, who use machines outdoorsand have no space limitations, do this byadding roller-type extensions. It's then nochore to square off the end of two-bystock 20' or more long. Though thisexample may seem extreme, the fact isthat you need a similar setup on yourradial-arm saw even if the lengths youordinarily work with are 8' or less.Two solutions are offered here. Both extensionsare permanently attached to theWood plugs in ends ofroller are cut for tightpress fit; pivot bolts areinstalled (inset) beforeplugs are driven in place.
for <strong>Saw</strong>-<strong>Table</strong> Extensionssaw, but the roller extension canbe knocked down by removing afew screws, and the hinged extensionflips down when not in use,taking little more room than thesaw itself. This version won't interferewith mobility if you havethe tool on casters.Building the roller type. Thoughthe drawing gives specific dimensions,you can change them tosuit. Two of these units, attachedat either side of a 3' saw table,will give you over 11' of worksupport. You can make the extensionslonger by providing moreleg assemblies. If you work regularlywith heavy structural lumber,you may prefer a strongerframe—substitute two-by-fours forthe 5/8" side pieces used.ContinuedFlip-down version extends the work surface about2½. Sliding action (see drawing below) nearlydoubles support length. <strong>Table</strong> folds against stand.NOVEMBER 1968 169
Material for the rollers can be any rigidtubing or pipe. There is no lack of suitablematerial, ranging from antenna maststo seamless tubes. The idea is to getsomething inexpensive with a good wall,Extension with a built-in extension lets you handlelong boards with minimum effort. Yet table telescopesto store out of the way when not needed.of at least 1½" outside diameter. I settledfor a 10' length of clothesline mast,costing about $3. To get square endswhen cutting, I scribed a mark with atube cutter, cut with a hacksaw, andtouched up sharp edges with a disk sanderand file.The wood plugs. Cut the ¾"-thickplugs with an adjustable hole saw if youhave one available. The tight press-fityou'll get with such plugs is ideal sinceit's all you need to keep the plugs inplace—and the hole saw, with a ¼" pilotdrill, also provides an accurate centerhole. Seating the plugs will be easier ifyou chamfer one end first, and then makea drive block by drilling a ½" holethrough a piece of scrap hardwood. Ifyou lack a hole saw, cut plugs as accuratelyas possible and, after insertingthem, drill several small holes throughthe tubing and lock each plug in placeby driving brads into its edge. The boltaxles, of course, are secured before theplugs are inserted.[Continued on page 198]Guide-slide assembly should be positioned accurately,dressed for loose fit so table moves easily.This one is built-up 3/8" ply; ¾" would be better.This ¼" bolt is a lock to keep table from slidingoff when in storage position. Use a bolt long enoughto be tapped up from the bottom for removal.In storage position, extension table rests withinfloor space required by tool alone. <strong>Saw</strong> make andpedestal determine attachment-block location.170 POPULAR SCIENCE
Two Designs for <strong>Saw</strong>-<strong>Table</strong> Extensions[Continued from page 170]The rest of the job is fairly straightforward.But do an accurate job of drillingthe holes for the roller axles. Bestbet here is to drill a ¼" hole, but makethe slot 5/16" so the rollers will turn freely.The flip-down version. The length of theextension table must be related to thedistance from the saw-table surface to thefloor if the table is to store out of theway. Since this imposes limitations, aslide was incorporated in the design.Thus, with one table attached on eachside of the main saw table, you can achievea total work support of close to 13' withoutsacrificing the space-saving advantage.Start off by shaping the guides, andthe block that attaches to the saw table.Next, cut the slides, using the dimensionsin the drawing but dressing just enoughso the slides will move freely in the guidegrooves. Attach the guides to the blockby using 3" T-hinges, and set this assemblyon a flat surface.Cut the extension table to size and useclamps to make a temporary table-slideassembly. Put this in place on the guidesand adjust until you are sure the extensiontable will move freely. Make the assemblypermanent by using 1½" No. 8flathead wood screws. Locate the extensiontable so its forward edge lines up withthe forward edge of the saw table.Cut and attach the cleat to the outboardend of the inner slides. This can bedone with screws or with glue and nails.Then make the leg assembly, adjustingthe height to match the distance fromthe saw-table surface to the floor. Attachto the cleat with 1½" butt hinges.Hold the block to the saw table withclamps and drill for, and drive home, the2" No. 12 screws that secure it.To get the most from this project, it'sa good idea to sand all parts thoroughlybefore assembly. Brush on a coat of resinsealer after assembly and, when dry, polishwith 00 steel wool. Finally, apply a generouscoat of Butcher's wax and rub down.For best results, repeat the waxing operation.If radial-saw mobility is important inyour shop, the extension table can be fittedwith brake-type casters to retain thisflexibility. The flip-down version doesnot require them.198 POPULAR SCIENCE