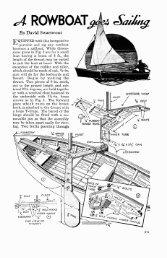
to Build - Vintage Projects
to Build - Vintage Projects
to Build - Vintage Projects
- No tags were found...

You also want an ePaper? Increase the reach of your titles
YUMPU automatically turns print PDFs into web optimized ePapers that Google loves.
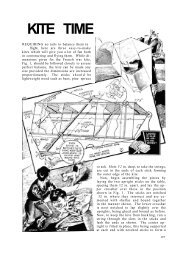
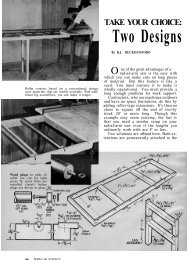
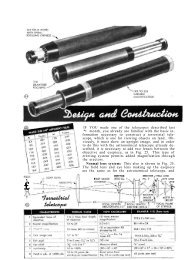
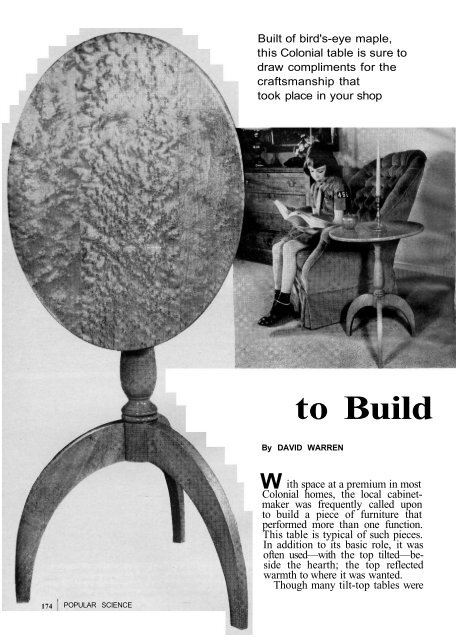
Quarter section of cardboard template for <strong>to</strong>p servesas guide for marking legs. To make <strong>to</strong>p template(pho<strong>to</strong> right), draw 14" and 18" intersecting linesat right angles. Drive a 2d nail 3¼" in from eachBoards for <strong>to</strong>p are <strong>to</strong>ngue-and-grooved, glued, andclamped. For best appearance, grain runs with cleats.end of the longer line and at one end of the 14"line. Tie string tightly around all three nails; removethe nail on the 14" line. To draw accurate ellipse,hold pencil vertical, keep string taut as pencil moves.After cutting <strong>to</strong> shape, sand <strong>to</strong>p down <strong>to</strong> 5/8"thickness. Then edge is rounded with spokeshave.a Tilt-Top Tablelarger (some served for dining), the sizeof this one makes it ideally suited for useas an occasional, or end, table. With <strong>to</strong>ptilted, it takes little space when s<strong>to</strong>redagainst a wall and it's easy <strong>to</strong> movearound <strong>to</strong> serve as a snack table whereverneeded.Since the <strong>to</strong>p is in full view when vertical,I made mine of bird's-eye maple. Itsdistinctive figured grain is decorative andadds an authentic look <strong>to</strong> the piece. Allother wood members are of white maple.Both are available from woodworkingsupplyhouses such as Craftsman WoodService Co., 2727 S. Mary St., Chicago60608, and Albert Constantine, 2053 EastchesterRd., Bronx, NYC 10461.Laying out the table. The <strong>to</strong>p is an ellipse,not an oval, with 14"-semicircleends. Using the string-and-pencil methodshown, lay it out on a piece of cardboard.To insure symmetry, score the templatein quarter sections and fold it <strong>to</strong> checkthe edge in both length and width. Ifnecessary, trim it with sharp scissors ora utility knife until the edges matchperfectly.After cutting <strong>to</strong>ngues and grooves, glueand clamp the boards for the <strong>to</strong>p. WhenContinuedOCTOBER 1968 175
How <strong>to</strong> <strong>Build</strong> a Tilt-Top Table[Continued from page 178]may also cut down the amount of stainthe wood absorbs.After removing the post from the lathe,locate the three dovetail sockets. Usingthe leg dovetails you've cut as a pattern,mark and cut the sockets. Bore the wastes<strong>to</strong>ck in the sockets with a 3/8" drill andfinish cleaning with a sharp chisel.The crow's nest. Cut the 4"-by-4" blockfrom 7/8" s<strong>to</strong>ck. Bore a 1" hole in thecenter and cut the mortise square. Drillthe 3/8" pin holes for the dowels andround the edge. Now, using the mortise,mark the round tenon on the post andcut it square. Slot the tenon and cut thewedge so that it fits snugly.Finally, cut the cleats and drill allholes. Since bird's-eye is an especially<strong>to</strong>ugh hardwood, drill the right-size bodyand pilot holes. (Rubbing a little soap orwax on the threads makes turning in thescrews easier.)Assembly. Make a trial assembly withoutglue <strong>to</strong> check the table for plumb andlevel. With the table on a level surface,check the post with a framing squareand the <strong>to</strong>p (in the horizontal position)with a level.The brass tilt-table catch can be fittedand installed at this time. The one usedhere is number 48 ($2.95) from Hor<strong>to</strong>nBrasses, Box 95, Brooks Hill Rd., Cromwell,Conn. 06416.Do the gluing in two steps. First, gluethe dowels in their mating holes in thecrow's nest. Secure one cleat <strong>to</strong> the <strong>to</strong>p,position the crow's nest, and fasten thesecond cleat. (Note: Dowels are not glued<strong>to</strong> the cleats.) The legs can be glued <strong>to</strong>the post at this time. Later, glue thecrow's nest <strong>to</strong> the post, fit the mortiseand-tenon,apply glue, and drive thewedge in. When dry, cut the wedge flushwith the tenon.The table shown was stained with MinwaxIpswich Pine, then rubbed with linseedoil. Since it was <strong>to</strong> be used occasionally<strong>to</strong> serve snacks, final finish was acoat of polyurethane varnish for durability.If you follow the same procedure,allow the oil (which is used generously)<strong>to</strong> dry for at least 72 hours before applyingthe varnish. After two or three weeksof curing, rub the surface <strong>to</strong> a soft lusterwith Butcher's wax.