This go-round puts kids in orbit - Vintage Projects
This go-round puts kids in orbit - Vintage Projects
This go-round puts kids in orbit - Vintage Projects
- No tags were found...

Create successful ePaper yourself
Turn your PDF publications into a flip-book with our unique Google optimized e-Paper software.
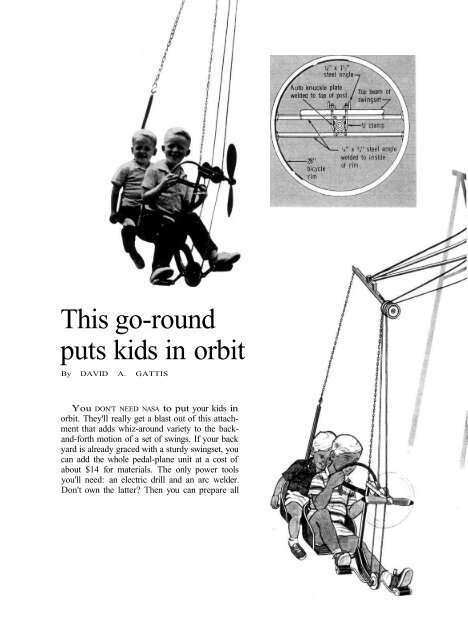
<strong>This</strong> <strong>go</strong>-<strong>round</strong><strong>puts</strong> <strong>kids</strong> <strong>in</strong> <strong>orbit</strong>By DAVID A. GATTISYou DON'T NEED NASA to put your <strong>kids</strong> <strong>in</strong><strong>orbit</strong>. They'll really get a blast out of this attachmentthat adds whiz-a<strong>round</strong> variety to the backand-forthmotion of a set of sw<strong>in</strong>gs. If your backyard is already graced with a sturdy sw<strong>in</strong>gset, youcan add the whole pedal-plane unit at a cost ofabout $14 for materials. The only power toolsyou'll need: an electric drill and an arc welder.Don't own the latter? Then you can prepare all
If you have a backyard sw<strong>in</strong>g set, you can add this flyer to itand give it all the thrills of a big-time amusement park.No sw<strong>in</strong>g set? Then hang it from its own freestand<strong>in</strong>g pole.Either way, you'll be the hero of the local merry-<strong>go</strong>-<strong>round</strong> set
pieces for assembly and take them to a weld<strong>in</strong>gshop. If you don't have a sw<strong>in</strong>gset now, you canerect the pedal-plane as a separate unit, tak<strong>in</strong>g abit more care with the "plant<strong>in</strong>g" of the pivotpole, and add<strong>in</strong>g prop-type supports.Roller and ball bear<strong>in</strong>gs elim<strong>in</strong>ate virtually alldrag, mak<strong>in</strong>g the rotat<strong>in</strong>g mechanism surpris<strong>in</strong>glyeasy to operate. A three-year-old can "solo"at speeds up to 15 mph (circular miles) at analtitude of from 1 to 4 ft. The unit is designedfor youngsters under 120 lbs., but additionalsupports could be added to adapt it for largerchildren. The truss and center post have beentested at over 200 lbs., but with this weight applied,only the most rugged sw<strong>in</strong>gset frames willprovide necessary brac<strong>in</strong>g.In the sketch on page 1693, we show a twoseaterunit, for small youngsters, balanced by as<strong>in</strong>gle-seater for older <strong>kids</strong>. In this arrangement,you've <strong>go</strong>t a double pedal action, with both drivebelts bear<strong>in</strong>g on the same bicycle rim. But as thesketch on page 1694 <strong>in</strong>dicates, a s<strong>in</strong>gle pedalplaneunit will sp<strong>in</strong> the structure nicely, and youcan provide balance by hang<strong>in</strong>g a baby sw<strong>in</strong>g,basket, hobby horse or what have you from theother end of the beam. Surpris<strong>in</strong>gly, the extraweight is hardly noticed by the pedaler.front seat provides tensionThe front of the seat unit actually hangs onthe endless belt—its weight is what gives thisdrive loop enough tension aga<strong>in</strong>st the pivotedbicycle rim to send the whole unit sp<strong>in</strong>n<strong>in</strong>g. Thebelt (1/4-<strong>in</strong>. manila rope for economy) passesa<strong>round</strong> the pedal pulley, up through guide pulleysbeh<strong>in</strong>d the w<strong>in</strong>d-spun prop, up past pulleys onthe end of the support beam and across to the centralrim. The front cha<strong>in</strong> is merely a safety factor,s<strong>in</strong>ce the drive belt is subject to wear andcould, <strong>in</strong> time, break; a small spr<strong>in</strong>g between afew top l<strong>in</strong>ks keeps this cha<strong>in</strong> taut <strong>in</strong> normal use.The rear cha<strong>in</strong> is, of course, what holds the backof the plane up. It attaches about 2 ft. above thecenter of gravity, for stabilization.The belt is made by untwist<strong>in</strong>g 12 <strong>in</strong>. of ropeat one end and weav<strong>in</strong>g the strands back throughan untwisted portion of the other end. Trim offthe loose ends and you've a splice that can't pullapart. To elim<strong>in</strong>ate belt slippage, rubber electricaltape (or a strip of old <strong>in</strong>ner-tube) iswrapped a<strong>round</strong> the bicycle rim and a vacuumcleanerbelt is snapped over the drive pulley.The plane unit itself is of the simplest possibleconstruction. The seat frame is a double bend of1/2-<strong>in</strong>. water pipe; the size <strong>in</strong>dicated is adequatefor two seats for children 2 to 5 yrs. old, andthe seat positions are adjustable.The fork of an old tricycle provides the drivemechanism. Remove the wheel, but leave the1/2-<strong>in</strong>. shaft at the center. With the crank used, a5/8-<strong>in</strong>. hole <strong>in</strong> the pulley just clears the elbows.After position<strong>in</strong>g the pulley shim the shaft withsheet-metal strips and, to elim<strong>in</strong>ate slippage, drillthe shaft to provide a seat for a setscrew. If notricycle fork is available, suspend a bicycle crankbetween two hangers of steel plate, welded to theframe's front bend.make plywood pulleysGuide pulleys are made from %-<strong>in</strong>. waterproofplywood, with an old auto generator ball bear<strong>in</strong>gepoxied <strong>in</strong> the center. Not own<strong>in</strong>g a lathe, youcan turn pulleys on a portable drill. Just <strong>in</strong>sert abolt through the center of each rough disk andchuck it <strong>in</strong> the drill, which is secured <strong>in</strong> an uprightbracket. Then, with a <strong>round</strong> file, cut theedge groove about 3/8-<strong>in</strong>. wide and 1/2-<strong>in</strong>. deep.The bear<strong>in</strong>g holes are cut with a circle cutter setfor a diameter slightly less than that of the bear<strong>in</strong>g.Degrease the outside of the bear<strong>in</strong>g beforeapply<strong>in</strong>g epoxy and drive it <strong>in</strong>to the hole; beforethe cement sets, align the bear<strong>in</strong>g so the pulleywill sp<strong>in</strong> without wobble.The support post is 2-1/2-<strong>in</strong>. steel water pipethelength determ<strong>in</strong>ed by the height of yoursw<strong>in</strong>gset's top beam. Two U-bolts clamp thepipes together, and a length of 2 x 4 is boltedacross the post's lower end to keep the pipefrom s<strong>in</strong>k<strong>in</strong>g. Or you could provide a concretefoot<strong>in</strong>g.The hub and knuckle (sp<strong>in</strong>dle) were from anold Dodge front end; however, almost any type(except a ball jo<strong>in</strong>t) could be substituted. Allparts attached to the hub and knuckle should bearc-welded to m<strong>in</strong>imize heat distortion. You mayhave to modify the pipe to <strong>in</strong>sert the knuckleshank. The knuckle-pipe weld should be as strongas possible.The ma<strong>in</strong> beams are two lengths of 1/2-<strong>in</strong>. pipeflattened on each end. These ends are bent andwelded together after you weld the beams to thehub plates.If you want to add up-and-down motion, youcould tilt the center pole or bolt the bicycle rimoff center.