Gas SmartPoint Programming Instructions-CommandLink ... - Sensus
Gas SmartPoint Programming Instructions-CommandLink ... - Sensus
Gas SmartPoint Programming Instructions-CommandLink ... - Sensus
- No tags were found...

You also want an ePaper? Increase the reach of your titles
YUMPU automatically turns print PDFs into web optimized ePapers that Google loves.
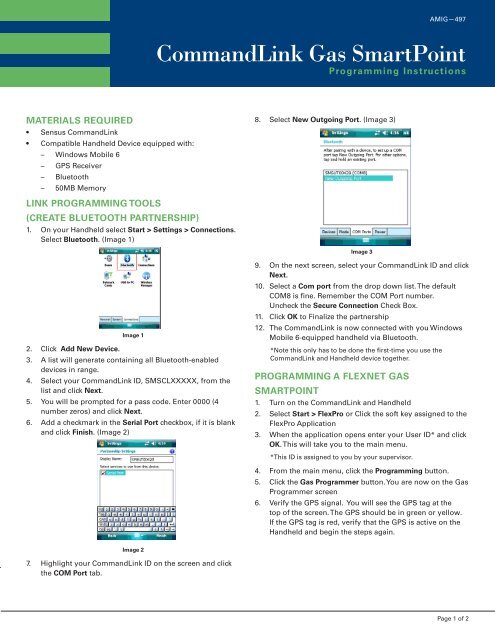
AMIG—497<strong>CommandLink</strong> <strong>Gas</strong> <strong>SmartPoint</strong><strong>Programming</strong> <strong>Instructions</strong>MATERIALS REQUIRED• <strong>Sensus</strong> <strong>CommandLink</strong>• Compatible Handheld Device equipped with:––Windows Mobile 6––GPS Receiver––Bluetooth––50MB Memory8. Select New Outgoing Port. (Image 3)LINK PROGRAMMING TOOLS(CREATE BLUETOOTH PARTNERSHIP)1. On your Handheld select Start > Settings > Connections.Select Bluetooth. (Image 1)Image 32. Click Add New Device.Image 13. A list will generate containing all Bluetooth-enableddevices in range.4. Select your <strong>CommandLink</strong> ID, SMSCLXXXXX, from thelist and click Next.5. You will be prompted for a pass code. Enter 0000 (4number zeros) and click Next.6. Add a checkmark in the Serial Port checkbox, if it is blankand click Finish. (Image 2)9. On the next screen, select your <strong>CommandLink</strong> ID and clickNext.10. Select a Com port from the drop down list. The defaultCOM8 is fine. Remember the COM Port number.Uncheck the Secure Connection Check Box.11. Click OK to Finalize the partnership12. The <strong>CommandLink</strong> is now connected with you WindowsMobile 6-equipped handheld via Bluetooth.*Note this only has to be done the first-time you use the<strong>CommandLink</strong> and Handheld device together.PROGRAMMING A FLEXNET GASSMARTPOINT1. Turn on the <strong>CommandLink</strong> and Handheld2. Select Start > FlexPro or Click the soft key assigned to theFlexPro Application3. When the application opens enter your User ID* and clickOK. This will take you to the main menu.*This ID is assigned to you by your supervisor.4. From the main menu, click the <strong>Programming</strong> button.5. Click the <strong>Gas</strong> Programmer button. You are now on the <strong>Gas</strong>Programmer screen6. Verify the GPS signal. You will see the GPS tag at thetop of the screen. The GPS should be in green or yellow.If the GPS tag is red, verify that the GPS is active on theHandheld and begin the steps again.Image 27. Highlight your <strong>CommandLink</strong> ID on the screen and clickthe COM Port tab.Page 1 of 2
AMIG—4977. Position <strong>CommandLink</strong> using the strap to affix to<strong>SmartPoint</strong>. (Image 4)Front-mount <strong>SmartPoint</strong>/indexImage 4Top-mount <strong>SmartPoint</strong>/index8. Click Program. Verify that the parameters on the screenand click Next to begin the programming session. Thesession will last approximately sixty (60) seconds.SETTING THE DEFAULT PROGRAMMINGPARAMETERSOnly users with Supervisor rights can access this menu.1. From the Main Menu, click the Configuration button.2. From the configuration menu, click the Supervisorbutton. You will be prompted to enter your password.3. From the supervisor menu, click Programmers Available.4. Click <strong>Gas</strong> Programmer Defaults.5. To edit the field, click on the Edit button. Select the valueyou wish to change then click OK. (Image 5)NOTE: the Compensation Factor forpulse units is adjusted automatically by<strong>CommandLink</strong> before the <strong>SmartPoint</strong>is programmed. During verification,the Compensation Factor shown on thedisplay will be the result of the meter’sCompensation Factor divided by thepulses per revolution.(Example: A compensation factor of 1that is divided by 2 pulses per revolutionwill display a Compensation Factor of0.500.)EDIT DEFAULT OPTIONSa. Meter Type: Select from: Remote Mount, Single Switch,or Direct Mount, Dual Switch.b. Number of Index Dials: This is the number of significantindex dials.Select from: 2 Dials, 3 Dials, 4 Dials, 5 Dials, 6 Dials, 7Dials, or 8 Dials.c. Meter Units: This is the unit of measure of the meter.Options: Cubic Feet, Cubic Meters, Liters, and Gallons.d. Reading Resolution: The Reading Resolution multipliedby the Reading Units is the volume unit of the MeterReading. For example, if the Reading Units are CubicFeet, and the Resolution is 100x, then a Reading of 1234represents a volume of 123,400 CF (1234 CCF).Select from: 1x, 10x, 100x, and 1000x.e. Index Drive: The Index Drive is the number of volumemeasurement units (cubic feet or cubic meters) perrevolution in direct mount or per pulse output in remotemount.Select from: 1, 2, 5, 10, 20, 25, 50, 100, 250, 500, and1000.f. Index Scale: The Index Scale represents Hundreds ofCubic Feet, Thousands of Cubic Feet, or Cubic Meters.Select from: CCF, MCF, and Cubic Meters.g. Compensation Factor: The Compensation Factor is anumber between 1 and 4 used to determine pulse counton Temperature/Pressure compensated indexes.h. Utility Code: The Utility Code is used to separate themeters from one utility from the meters of another utilitywith the FlexNet network.Select from: 0 to 15.i. Pulse Per Revolution: The number of pulses perrevolution of the Form A pulsing device attached to themeter.Select from: 1, 2, 5, 10, 20, 50, and 100. (This optionis only active when the Remote Mount, Single SwitchMeter Type is selected.)Image 56. When finished, scroll to the bottom of the screen andclick Close. This will save the changes made.Page 2 of 2AUTHORIZED SENSUS DISTRIBUTOR805 Liberty BoulevardDuBois, PA 15801 USAT: 1-800-375-8875F: 1-814-375-8460www.sensus.com/gas