Irrigation Professionals with questions about ... - Hunter Industries
Irrigation Professionals with questions about ... - Hunter Industries
Irrigation Professionals with questions about ... - Hunter Industries

You also want an ePaper? Increase the reach of your titles
YUMPU automatically turns print PDFs into web optimized ePapers that Google loves.
<strong>Irrigation</strong> <strong>Professionals</strong> <strong>with</strong> <strong>questions</strong> <strong>about</strong> design or commentsconcerning this workbook can be directed to<strong>Hunter</strong> Technical Services at 800-733-2823© Copyright 2012 by <strong>Hunter</strong> <strong>Industries</strong> IncorporatedThe <strong>Irrigation</strong> InnovatorsAll Rights ReservedThis workbook may not be reproduced in whole or in part by any means(<strong>with</strong> the exception of short quotes for the purpose of review) <strong>with</strong>out thepermission of the publisherFor information on ordering additional <strong>Irrigation</strong> System Designworkbooks or other literature or sales support materials contact:<strong>Hunter</strong> <strong>Industries</strong> Incorporated1940 Diamond StreetSan Marcos, CA 92078 USAPhone: 760-744-5240Fax: 800-848-6837www.hunterindustries.comED-004.B F 12/12Information contained in this workbook is based upon generally accepted formulas,computations, and trade practices. <strong>Hunter</strong> <strong>Industries</strong> Incorporated and its affiliates assume noresponsibility or liability for errors or for the use of the information contained herein.
<strong>Irrigation</strong> System DesignIntroduction 8:00 - 8:15Plot Plans 8:15 - 8:45Basic Hydraulics 8:45 - 9:15Break 9:15 - 9:25Design Capacity 9:25 - 10:55Break 10:55 - 11:05Sprinkler Selection 11:05 - 11:50Backflow Prevention 1:50 - 12:00Lunch 12:00 - 12:45Sprinkler Placement 12:45 - 1:30Break 1:30 - 1:40System Lay-out and Pipe Sizing 1:40 - 2:40Break 2:40 - 2:50Re-Calculating Friction Losses 2:50 - 3:20Precipitation Rates 3:20 - 3:40<strong>Irrigation</strong> Scheduling 3:40 - 3:50Q&A/Conclusion 3:50 - 4:00The above schedule is approximate and is subject to change
Plot PlansIntroductionOne of the most costly mistakes in developing an irrigation system is apoor design stemming from inaccurate plot plan measurements. If thedesigner has carefully determined the system’s design capacity andworking pressure at the sprinkler heads, and does not take the same care inobtaining accurate measurements, the irrigation system may fail.A mistake in the field measurements could mean the difference betweenan irrigation system <strong>with</strong> good head-to-head coverage and a system wherethe heads are stretched out too far. Or, the error could result in lost profitsbecause of having to add heads, pipe, and valves that may not have beencovered in the bid.Designing the SystemDesigning an irrigation system is a matter of gathering the project’s siteinformation and systematically transferring that information to a largesheet of paper, and adding sprinklers, pipes, and valves in the appropriateplaces. In this section we will discuss the various steps involved ingathering the site information, and completing the design.First, in order to get accurate information from the site, you will need theproper tools. While it is possible to design a sprinkler system <strong>with</strong>outsome of these tools, you will find your job a lot easier <strong>with</strong> them.
Field ToolsAt the project site, you will need to measure the static pressure and obtainthe size of the water supply lines, as well as measure the actual property.You will need the following tools in order to accomplish this: Pressure gauge <strong>with</strong> hose adapter Tape measure (25 or 30 foot and at least one 100 foot) Screwdriver StringThe pressure gauge should be of high quality, as you must have anaccurate pressure measurement if you are to design an efficient sprinklersystem. A pressure gauge can be purchased from your distributor.Measuring a property is a great deal easier and more precise <strong>with</strong> two ormore tapes. The 100 foot tape is used for longer measurements, and can beused in conjunction <strong>with</strong> your smaller, 25 or 30 foot tape measure to plotout curves, or to make triangulation measurements faster and moreaccurate. For larger triangulation measurements, two 100 foot tapes usedtogether will make your job a lot easier. (More on triangulation measuringlater.)The screwdriver is used to hold the end of the 100 foot tape measure inplace while you unreel the tape and get your dimensions.The string can be wrapped around the service line and delivery line inorder to get the sizes of those pipes. Simply wrap the string around thepipe, measure how long the string is, and then compare to the chart onpage 11 of the <strong>Hunter</strong> Friction Loss Tables (located in the back of thisdesign workbook).
Drawing ToolsThere are just a few tools you will need to begin drawing sprinklersystems. Compass Architect’s scale Engineer’s scaleThe compass is used to lightly draw small arcs when locating objects onyour plan which were triangularly measured in the field. Additionally, youwill use this tool a lot when drawing sprinkler locations.Of the two scales, you will probably use the Engineer’s scale the most.The graph section on the <strong>Hunter</strong> Design Tablet (LIT-247) measures 10 in.by 15 in., so using the 20 to 1 on the Engineer’s scale (or 20 ft. equals 1in.), you can draw a property as large as 200 ft by 300 ft.. Using the 10scale, you can draw a property as large as 100 ft by 150 ft.Other drafting tools are available, and as you gain more experience insprinkler system design, you may want to explore the use of some of theseother tools to draw your systems. Some of the more common toolsinclude: T-square 45º triangle 30º/60º triangle Circle template French Curve Drafting board Erasing shieldSketch the PropertyThe first step in designing an irrigation system is obtaining accurate fieldmeasurements. Later, you will need to know how much water you haveavailable, and at what pressure. Additionally, once you leave the project<strong>with</strong> your measurements, you don’t want to have to go back to checkmeasurements or to get a measurement that you forgot to get the first time.Start by sketching the property on a large piece of paper. Include theapproximate location of property lines, buildings, all hardscape, trees,shrubs, lawns, grade changes, etc. Once this is complete, you can begin torecord the appropriate site information and measure the property.
Record Site InformationConnect the pressure gauge to a hose faucet, open the faucet and recordthe static pressure on the sketch. Be sure there is no other water runningon the property while you are performing your test. Because pressure canvary a great deal throughout the day, try to measure the pressure as closeto the planned watering time as possible.Record the size of the water meter on your sketch; the size is stamped onthe top of the meter.Later, when you are calculating working pressure, you will need areasonably accurate estimate of elevation change between the point whereyou measured the static pressure, and where you will make the sprinklersystem tie-in (POC), so be sure to record this distance on your sketch. Youwill also need to record the elevation change from the POC to theproposed location of the highest head on the system.To determine service and delivery line size, wrap a string around theservice line and delivery line, then measure how long the string is, andcompare your measurement to the chart below. (This chart can also befound on page 11 of the <strong>Hunter</strong> Friction Loss Tables. The tables arelocated in the back of this design workbook). PVC pipe is the sameoutside diameter as clean galvanized pipe. Be sure to record thesemeasurements on your sketch.Length ofStringSize of ServiceLine - CopperSize of ServiceLine - Galvanized2 3/4” 3 1/4” 3 1/2” 4” 4 3/8” 5”3/4” 1” 1 1/4”3/4” 1” 1 1/4”Figure 1Measure and record the approximate length of the service line. This is theline that runs from the city water main to the water meter (or curb stop ifthe property doesn’t have a meter).Then measure the length of the delivery line, or the pipe that runs from themeter to the proposed sprinkler system point of connection (POC)location. Record the length of pipe and the proposed POC location.
Measure the PropertyTake careful measurements and add them to your sketch.When measuring property lines, use the house as a reference, sightingdown the sides of the house walls:20 ft.20 ft.8 ft.42 ft.10 ft.15 ft.25 ft.22 ft.8 ft.20 ft.10 ft.32 ft.22 ft.35 ft.NorthFigure 2The difference between the length of the East property line (67 ft.) and theWest property line (70 ft.) is only 3 feet. But where is that 3 footdifference? Using this method of measurement, you can quickly see that itis not in the back yard, but in the front.If you had just looked at the over-all job site you would have said theproperty is a rectangle <strong>with</strong> the opposite sides of the property are equallengths. And then based on that observation, if you just measured the Eastand the North property lines and designed the sprinkler system accordingto a rectangular property, the sprinklers in the Southwest corner would nothave head to head coverage.
You could change the nozzle sizes and probably reach the additional 3feet, but that may cause the system to exceed design capacity, so you mayneed to add a valve, add pipe, and install a larger controller than what youincluded in your bid.You can see how sighting down the line of the wall of a house, thencontinuing that imaginary line to the property line, and finally measuringthe distance from the house to the property line along that imaginary linecan be a very accurate way to set the house on the property. At the sametime, this method establishes the right locations for the property lines, andultimately the right locations for the sprinkler heads.For curving sidewalks or driveways, or meandering lawn edges, sightingdown the side of the house is an excellent way of getting an accurate layout.House16 ft.17 ft.19 ft.21 ft.23 ft.10 ft.10 ft.10 ft.2 ft.2 ft.1 ft.100 ft. tapemeasureFigure 3Lay out one of your 100 foot tapes along the imaginary line (the extensionof the side of the house). Then measure across at a right angle to the tapemeasure from the imaginary line to the curve you need located. Dependingon how tight a curve it is, you may want to get a measurement every 5feet, or every 10 feet. If the curve is really tight, you might even want toget more measurements, while if it is a gentle curve, you might want fewermeasurements.
Trees, water meters, and other items on your sketch which are standingalone can be located by taking a measurement from two other items suchas two separate corners of a building and forming a triangle <strong>with</strong> the treeor other object you are trying to locate.23 ft.28 ft.Figure 4If your project has a slope or rolling terrain, remember that the plan view,or the “bird’s-eye view” will show the slope as being shorter than theactual soil measurement. You will want to take this into considerationwhen measuring the site and drawing your sketch.Plan View10 ft12 ft1-1/2 :1 SlopeFigure 5
In Figure 5, the slope is referred to as a 1-1/2 to 1 slope. This means thatyou must measure out 1-1/2 foot in order to record a 1 foot drop.1 ft1-1/2 ftSlope RatioSlope-to-Plan Factor1-1/2:1 1.202:1 1.122-1/2:1 1.05If the actual soil measurement is 12 feet, and the sloperatio is 1-1/2:1, then divide by the Slope-to-Plan Factor:12 feet ÷ 1.20 = 10 feet plan measurementOr, if the plan measurement is 10 feet for a slope <strong>with</strong> a1-1/2:1 ratio, then multiply by the Slope-to-Plan Factor:10 feet x 1.20 = 12 feet soil measurement
Step 2 - Redraw On Graph PaperThe next step is to redraw your sketch on graph paper. Be sure thedrawing is large enough to read, is positioned correctly, and fits on thepaper.Using your drafting scale, see which scale will provide the largest drawingpossible. (Generally, the 10 or 20 scale works fine.) In the drawing infigure 2, the longest property line is 70 feet, so you would first try the 10scale and see if the 70 foot property line will fit on the paper. If whenusing the 10 scale the property won’t fit, try the 20 scale.Normally, you would want to position the property on the drawing so thatthe North arrow is pointing up (North would be at the top of the page), andthe title block on the graph paper is to the right. In some cases, theproperty will be very narrow and long <strong>with</strong> the North arrow runningparallel to the long property line. In a case such as this, you may have toturn the property so that the North arrow is pointing side-ways in order touse a scale where the drawing will be legible.Be sure to transfer all of the information on your sketch to the newdrawing, including the house, property lines, driveway, trees, shrubs,patios, decks, lawns, lamp posts, fences, walls, walkways, etc.Once you have transferred the site information you will have a completedplot plan on which you will be able to design your system. On the newdrawing, divide the property into areas. The areas should be as large aspossible, while considering the different watering needs of lawns andshrubs in sunny or shady areas.
Step 3 - Select and Place SprinklersYou are now ready to begin selecting and placing sprinklers in theestablished areas. While there will be a thorough discussion of selectingand placing sprinklers in two later sections, here is an overview of theprocess:Selecting SprinklersSprinkler selection is a matter of wading through the various sprinklercharacteristics and choosing the sprinkler that best suits the area you wishto water. This information is found in the product catalog.Information that will be important in your selection includes thesprinkler’s operating pressure, flow range, and precipitation rate, and itsradius and arc of coverage. Additionally, each sprinkler has specialfeatures (such as built-in check valves, side inlets, angles of trajectory)which may be an instrumental part of the selection process.Placing SprinklersBegin placing sprinklers on the plan one area at a time. Start by placingthe sprinklers in the corners of the area. Be sure to draw the sprinkler’s arcof coverage to insure head-to-head coverage.To draw the sprinkler’s arc of coverage, set your compass to therecommended radius according to the scale of the plot plan, and <strong>with</strong> thepointed end on the location of the sprinkler, draw an arc. This arc shouldtouch or go beyond the sprinkler next to it in order to achieve head -toheadcoverage. If the arc does not reach the next head, add sprinklersalong the perimeters. Then, if necessary for full coverage, add sprinklersin the middle.
SymbolsIn order to distinguish between the sprinklers and valves and the otherproducts that you will be placing on the plan, you will need to drawdifferent symbols designating the various items.The American Society of <strong>Irrigation</strong> Consultants (ASIC) and the AmericanSociety of Agricultural Engineers (ASAE) have both proposedstandardized symbols for landscape irrigation. The irrigation industry,however, has been reluctant to accept any set of standard symbols forirrigation design.Because of a lack of standardized symbols, many designers use some ofthe proposed symbols along <strong>with</strong> symbols they have designed. In the caseof sprinkler heads, some designers have adopted a system of a circle <strong>with</strong>an number inside. This works particularly well where sprinklers havemultiple nozzle options. The following are some suggestions for typicalsymbols:Sprinkler HeadsQuarterHalfFullAutomatic Control ValvesIsolation ValvesControllerLateral Line PipeMain Line PipeSymbols, no matter who designs them, should be easy to draw by hand,and should be easily distinguishable from one to another.
Step 4 - Group Sprinklers Into ZonesAfter you have selected and placed the sprinklers, you will need to groupthem by area into zones based on the system’s design capacity.The Design Capacity section of this Design workbook will provide you<strong>with</strong> information on system capacity, and the System Layout section willexplain how to use that information to divide the area into separatesprinkler zones.To group the sprinklers into zones, write individual sprinkler GPMrequirement next to each sprinkler in the area. Add up the GPMrequirements for all sprinklers in one area, and divide by the total GPM sothat the design capacity is not exceeded.After the individual sprinkler zones have been established, connect thesprinklers together <strong>with</strong> pipe, size the pipe, and layout and size the valvesand backflow preventer.Step 5 - Size Pipe and Recalculate Friction LossesTo size the pipe, start at the last head on the zone and note the GPMrequirement for that head. Refer to the <strong>Hunter</strong> Friction Loss Tables for thetype of pipe you are using. Size the pipe according to the chart, then moveto the next pipe.Add the GPM requirements of the next head to that of the last head on thesystem together to size the pipe supplying the two heads.To size the next pipe, add the GPM requirement of the next head to thelast total. Continue to do this until you get to the zone valve. Be sure to notsize a pipe smaller than the chart indicates.After the pipes in all of the zones in all areas have been sized, refer to thepressure loss chart in the product catalog for the valve you are using. Sizethe valve according the those charts. Then size the main line pipeaccording to the amount of flow needed by the zone control valves.When you have completed the layout and pipe sizing, go back over yourdesign and calculate the friction loss on the most critical zones. Athorough discussion of friction loss calculations is discussed in theFriction Loss section.More information on pipe layout and sizing is available in the SystemLayout section.Step 6 - Finalize Plan
Make sure the drawing is dated and if any changes are made, be sure thedate <strong>with</strong> a brief statement of those changes get noted on the plan. If yourfinal drawing includes more than one page, include the page numbers <strong>with</strong>the total number of pages on all sheets (1 of 1, 1 of 3).<strong>Irrigation</strong> designers will want to also include the following items on theirplans: Installation details (<strong>Hunter</strong> LIT-141) General and specific installation notes Requirements for design or specification changes Statement of design capacity and working pressure, for example: “Thisdesign is based on ____ PSI at ____ GPM.”SummaryThe importance of an accurate irrigation plan cannot be over stated. Aninaccurate design could mean poor coverage or lost profits. In addition toaccuracy, the completed design should be neat and include all information.
What You Need to KnowWhile no two designers will develop a drawing the same, the followingstep-by-step outline will help you in completing your sprinkler systemdesigns.Step 1 - Sketch Property Sketch the property on a piece of paper Place the house location on your sketch Draw all concrete or brick walks, patios, and driveways Include wood decks and their approximate height above grade Locate walls and fences on the sketch, and note their heights Mark the lawn areas and the locations, types, and sizes of all trees andshrubs Note the location of severe grade changes Be sure to include plenty of measurements Note the direction of North on your sketch Take a static PSI measurement and write it on the sketch Note the location of the water meter Write down the sizes and the types of pipe for the service and deliverylines Note where you will probably make your Point of Connection (POC)Step 2 - Redraw On Graph Paper On a separate sheet of paper, re-draw your sketch to scale Be sure to include all walks, patios, decks, driveways, and landscape Write the scale you are using on the plan; you do not need to includemeasurements Place the North arrow on the plot plan Group like-landscape areas togetherStep 3 - Select and Place Sprinklers Select sprinklers Begin placing sprinklers on the plan one area at a time Start <strong>with</strong> placing sprinklers in the corners Draw sprinkler coverage arcs to insure head-to-head coverage Add sprinklers along the perimeters to obtain head-to-head coverage Add sprinklers in the middle if necessary
Step 4 - Group Sprinklers Into Zones Group sprinklers into zones• Draw a line connecting all sprinklers on each zone• Determine valve manifold locations Draw a line connecting the sprinklers to zone valve Add the main line connecting the valves to the backflow preventer andthe POCStep 5 - Size Pipe and Recalculate Friction Losses• Size the pipes• Start at the last head on the zone Size the pipe between each head adding the GPM requirements as yougo Calculate the friction loss on the most critical zonesStep 6 - Finalize Plan Add the irrigation legend to the plan Include any installation or other important notes Complete the title block
On-Site Checklist Location of trees, shrubs, other obstructions Static Water Pressure Water Meter Size Elevation Change - from location of the static pressure measurement tothe POC Elevation Change - from the POC to the where the highest head will belocated Service Line Size, Length, and Type of Pipe Delivery Line Size, Length, and Type of Pipe Site Measurements for Plot Plan Location for POC Location of 115 Volt Electrical (for controller) Slope Locations (note elevation changes) Soil Type(s) North Orientation Direction of Prevailing Wind Landscape and Hardscape Plan Review Local Code Requirements
Basic HydraulicsIntroductionHydraulics is defined as a branch of science that deals <strong>with</strong> the effects ofwater or other liquids in motion. In this section we will studycharacteristics of water – both in motion and at rest. The emphasis will beon the relationships between flow, velocity, and pressure. With thisknowledge we will be able to determine pressure losses in pipe andfittings, and pressures at various points in an irrigation system.A knowledge of the basic principles of irrigation hydraulics is essential todesigning and maintaining an economical and efficient irrigation system.Understanding the principles outlined in this section will lead to irrigationsystems that have a more uniform distribution of water and cost less toinstall and maintain.How Does Hydraulics Affect an <strong>Irrigation</strong> System?Water pressure in an irrigation system will affect the performance of thesprinklers. If the system is designed correctly, there will be enoughpressure throughout the system for all sprinklers to operate properly.Maintaining this pressure in the system will help to ensure the mostuniform coverage possible. While a consistent pressure is the primarygoal, it is important to achieve this at the lowest cost. With a knowledge ofhydraulics, it is possible to design a system using the smallest andtherefore least expensive components while conserving sufficient pressurefor optimum system performance.
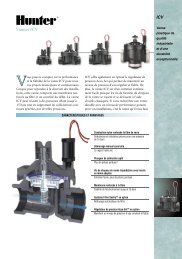
Water PressureWater pressure in irrigation systems is created in two ways: 1) by usingthe weight of water (such as <strong>with</strong> a water tower) to exert the forcenecessary to create pressure in the system or 2) by the use of a pump (amechanical pressurization).In many municipal water delivery systems both of these methods may beused to create the water pressure we have at our homes and businesses.Water tanks use gravity to create pressure. These tanks are located on amountain top, tower or roof top. Because these storage tanks are locatedabove the homes they serve, the weight of the water creates pressure in thepipes leading to those homes. In other cases, a “booster” pump is used toincrease the pressure where the elevation of the water storage tank is nothigh enough above the home to provide sufficient pressure. In other areas,the water source may be a well, lake or canal <strong>with</strong> a pump generating thepressure.In this section, we will explore how water pressure is affected by itsweight and what happens to water pressure when water moves throughirrigation pipes.Water pressure can be measured or expressed in several ways:1) psi; the most commonly used method in landscape irrigation,pounds of pressure exerted per square inch,2) feet of head; equivalent to the pressure at the bottom of a column ofwater 1 ft. high [in this case the unit of measurement is feet of head(ft./hd)].
How Pressure is Created By the Weight of WaterWhat water weighs at 60° F:• 1 cubic foot (ft. 3 ) or 1728 cubic inches (in. 3 ) of water = 62.43 lb.• 1 cubic inch, (in. 3 ) of water = 0.0361 lbs.Water creates pressure in landscape irrigation systems by the accumulatedweight of the water.In Figure 6, we can see a container 1 ft. high and 1 ft. wide, holding 1 ft. 3of water, would create a column of water 1 ft. high over every square inchon the bottom of the container.12 in.12 in.12 in.1 ft 3 of waterFigure 6If we look at just one of those columns, Figure 7, we can calculate theweight of water pressing on the bottom of the column in pounds persquare inch (PSI).
A column 12 in. high resting on a surface at the bottom of 1 in. 2 representsa column <strong>with</strong> 12 in. 3 of water.1 in.12 in.1 in.0.433 psiFigure 7The weight of the 12-in.-high column of water is 0.433 lbs. (12 in. 3 x0.0361 lbs. per in. 3 = 0.433 lbs.). Therefore, a column of water 1 ft. highwill exert a pressure at the bottom of 0.433 lbs. per in. 2 or0.433 PSI. This is a very important number because it means that as ourcolumn of water gets higher, every 1 ft. of height added will increase thepressure at the bottom by 0.433 PSI.For example, a column of water 2 ft. high creates a pressure at the bottomof 0.866 PSI (0.433 PSI/ft. x 2 ft. = 0.866 PSI).Important FactsThis gives us some important facts to remember. Memorize these facts:• A column of water 1 ft. high = 1 foot of head = 0.433 PSI.• 1.0 PSI equals the pressure created by a column of water 2.31 ft.high, or1 PSI = 2.31 ft. of head (ft./head).• A column of water 1 ft. high creates 0.433 PSI at the bottom,or1 ft./head = 0.433 PSI.
Does the Shape or Size of the Container Make a Difference?The shape or size of the container does NOT make any difference in thepressure at the bottom, as seen in Figure 8. Because we are measuring theweight of water in a column resting on 1 in 2 regardless of the container'ssize or shape, pressure at an equal depth will be the same no matter whatthe shape or size of the container.1 ft. high0.433 PSI at the bottomFigure 8While at first this does not seem possible, let’s look at the example inFigure 9 that will help us to better understand this concept. Considerdiving into a swimming pool or lake. When you dive below the surface ofa lake or pool, the deeper you dive the more pressure builds up on yourears. The amount of increased pressure on your ears does not change <strong>with</strong>the shape of the pool nor does it change depending on whether you arediving into a backyard pool or a large lake. The pressure at any depth inthat pool or lake is dependent upon the height of the column of waterabove that point - not on the shape or size of the pool.Swimming PoolLakeDiver at 10 ft.Diver at 10 ft.DiversPressure on Diver in Pool and Lakeis 4.33 PSI (10 ft. x 0.433 PSI/ft.= 4.33 PSI)Figure 9
What Does This Mean in <strong>Irrigation</strong> Design?When designing landscape irrigation systems, for every 1 ft. of elevationchange there will be a corresponding change in pressure of 0.433 PSI.Static and Dynamic PressureThere are two classifications of water pressure:static and dynamic pressure:• Static pressure is a measurement of water pressure when thewater is at rest. In other words, the water is not moving in thesystem.• Dynamic pressure (or working pressure) is a measurement ofwater pressure <strong>with</strong> the water in motion (also known asworking pressure).Factors Affecting Static PressureStatic pressure is created either by elevation change or by a pump. In thissection, we will concentrate on the effect of elevation change on staticpressure. As previously discussed, each foot of elevation change results ina 0.433 PSI change in pressure. As we can see in the following diagrams,the change in elevation that we are concerned <strong>with</strong> is the change invertical elevation only, not in the length of pipe. Because water exertspressure equally in all directions, the length of pipe will not affect thestatic pressure (it does affect the dynamic pressure, as we will see later).If we return to our tank of water, Figure 10, we can see that inserting afourteen foot pipe into the tank of water at an angle does not affect thepressure at the bottom of the tank or pipe. Static pressure is not affectedby the length of the pipe, only by elevation change.10 ft.4.33 psiFigure 10
L O W24 VAC 50-60 Hz60mA INRUSH60mA HOLDINGOFFS OC U RLE NROEIDNONTLO W24 VAC60mA60mAOFFS OC U RLE NROEIDN T50-60 HzINRUSHHOLDINGONWe can see the effect of elevation change on static pressure in an irrigationsystem in Figures 11 and 12. In the example in Figure 11, the staticpressure at the water meter is 60 PSI. Since the control valve is below thewater meter by 8 ft., the static pressure is increased by 3.46 PSI.(8 ft. x 0.433 PSI per foot = 3.46 PSI).Figure 118 ft. x 0.433 PSI/ft. = 3.46 PSI60 PSI + 3.46 PSI = 63.46 PSI static pressureGoing uphill reverses the process: for every 1 ft. of vertical elevation gainthe static pressure will drop by 0.433 PSI.Figure 1240 ft. x 0.433 PSI/ft. = 17.32 PSI60 PSI - 17.32 PSI = 42.68 PSI static pressure
LO W24 VAC 50-60 Hz60mA INRUSH60mA HOLDINGOFFS OC U RLE NROEIDN TONStatic pressure is not affected by the size or length of pipe. Both diagramsin Figure 13 illustrate a control valve 40 ft. above a water meter. In thefirst case the main line from the meter to the valve is 100 ft. of two inchpipe and in the second it is 250 ft. of one inch pipe. The static pressure ateach control valve is 42.68 PSI. Only the vertical elevation change affectsthe static pressure.250 ft.1 in. pipe42.68 psi(Static Pressure)ControlValveWaterMeterMElevation View40 ft.VerticalElevationChange60 psi(Static Pressure)Figure 13
Factors Affecting Dynamic PressureWhen water moves through an irrigation system it is said to be in adynamic state. The movement of water is described in terms of velocity(the speed at which it is moving) and flow (the amount of water movingthrough the system). The velocity is measured in feet per second (fps) andthe flow is measured in gallons per minute (GPM). Dynamic waterpressure is measured in the same units as static pressure (PSI).Dynamic pressure is affected by the following factors:1) change in elevation (change in elevation affects static and dynamicpressure in the same way)2) friction losses in pipe, valves and fittings (pressure loss is causedby water moving through the system)3) velocity head (the pressure required to make water move <strong>with</strong>in thesystem; this is a minor loss and won’t be calculated here)4) entrance losses (the pressure lost as water flows through openings;this is also a minor loss and won’t be calculated here)Friction Loss in PipeWhen measuring dynamic pressure at any point in a landscape irrigationsystem, we must first determine the static pressure at that point and thensubtract the pressure losses due to the movement of water.As water moves through an irrigation system, pressure is lost because ofturbulence created by the moving water. This turbulence can be created inpipes, valves or fittings. These pressure losses are referred to as “frictionlosses.”There are four factors that affect friction losses in pipe:1) the velocity of the water,2) the inside diameter of the pipe,3) the roughness of the inside of the pipe and4) the length of the pipe.
VELOCITY is the speed at which water moves through the systemand it is measured in feet per second (fps). Water moving in the pipecauses turbulence and results in a loss of dynamic pressure. Increasingthe velocity will cause increased turbulence and increased pressurelosses. In Figure 14 the inside diameter, roughness and lengthremain the same. However, due to increased velocity (fps), there is agreater dynamic pressure loss. [Note: With the increase in velocitythere is a corresponding increase in flow (GPM). Velocity and flow aredirectly related. An increase or decrease in one will result in acorresponding increase or decrease in the other.]Figure 14When velocity increases, pressure loss increases. When the velocity isincreased from 2.97 fps to 6.67 fps, the pressure lost in 100 ft. of pipeincreases from 1.59 PSI to 7.12 PSI. The velocity typically increases when1) the flow is increased, such as when additional sprinklers are added to anexisting line or 2) a smaller pipe is used <strong>with</strong> the same flow (GPM).
INSIDE DIAMETER (i.d.) of the pipe: a smaller inside pipediameter proportionally increases the amount of water in contact <strong>with</strong>the pipe surface. This increased contact increases the turbulence andconsequently increases the dynamic pressure loss. In Figure 15, thevelocity, length and roughness remain the same but the inside pipediameter is reduced. The reduced i.d. results in increased turbulenceand reduced dynamic pressure.(Note: The velocity remains the same even though the pipe size isreduced because there is a corresponding reduction in the flow.)Figure 15Even <strong>with</strong> a smaller flow and the same velocity more turbulence wascreated in the small pipe because there was a greater percentage of thewater in contact <strong>with</strong> the surface.
ROUGHNESS of the inside wall of the pipe is the third factor thataffects friction loss in pipe. Pipe wall roughness is rated by a “C”factor. The lower the value of C, the rougher the inside wall of the pipe(in standard steel pipe C=100; in PVC pipe C=150.) The rougher theinside, the more turbulence created and the greater the pressure loss.In Figure 16, the velocity, volume and inside diameter remain thesame. As the roughness of the inside of the pipe increases (standardsteel has a rougher pipe wall than PVC), there is an increase inturbulence, resulting in a greater pressure loss.Figure 16
LENGTH is the fourth factor affecting friction losses in pipe. Thegreater the distance, the greater the cumulative effect of the first threefactors (velocity, i.d. and roughness). In Figure 17 we see the directrelationship between increased length and increased pressure loss. Thetotal pressure loss doubles as the length of the pipe doubles.Figure 17These four factors affecting pressure loss in pipe were used to developformulas for calculating the pressure loss associated <strong>with</strong> various types ofpipe. Several formulas were developed; the most common in landscapeirrigation hydraulics is the Hazen-Williams formula. The Hazen-Williamsformula can be represented as:1.852 1.852100 QH f = 0.090194( )4.866C dWhere H f= pressure loss in pounds per square inch (PSI)C = roughness factorQ = flow in gallons per minute (GPM)d = inside pipe diameter in inchesSince these formulas are somewhat cumbersome, we will rely on chartsdeveloped using the Hazen-Williams formula. Samples of these charts canbe found in the back of this design manual.
Use of Pressure Loss ChartsFigure 18 below represents a portion of one of the pressure loss chartstaken from the <strong>Hunter</strong> Friction Loss Tables found in the back of thisdesign manual.Figure 18The components of the typical friction loss chart are described below:A) Type of pipe represented in the chart.B) IPS - Iron Pipe Size - indicates that the pipe’s outside diameterdimensions correspond to that of iron pipe. All IPS PVC pipe ofthe same nominal size will have the same outside diameter. Forexample: all 1/2-in. PVC irrigation pipe will have an outsidediameter of 0.840 in.; thus all 1/2-in. slip fittings will fit on theoutside of all types of 1/2-in. PVC pipe.C) (1120, 1220) - Represents a designation for the specifications ofthe plastic pipe.
D) SDR –Standard Dimension Ratio – indicates the pipe’s wallthickness as a ratio of the outside diameter. Outside diameter of 1-in. pipe is 1.315 in. If you divide 1.315 by the SDR, 21, it will giveyou a minimum wall thickness. (There may be some exceptions tothis rule.) Minimum wall thickness for 1-in. Class 200 PVC pipe1.315/21=0.063 in. Class-rated pipes (SDR pipes) maintain auniform maximum operating pressure across all pipe sizes. This isnot true of schedule rated pipes such as Schedule 40 PVC. Inschedule rated pipes the maximum operating pressure decreases aspipe size increases.E) C=150 – indicates the value of the C factor, which is a measure ofthe roughness of the inside of the pipe. The lower the number, therougher the inside of the pipe and the greater the pressure loss. ForPVC, C = 150; Galvanized Pipe C = 100.F) Designated pressure losses shown in the chart are per 100 ft.of pipe.G Size – indicates the “nominal” pipe size. Nominal means “in nameonly,” and none of the actual pipe dimensions are exactly that size.For example, in the 3 /4-in. pipe, none of the dimensions are actually3/4-in.H) OD – outside pipe diameter in inches.I) ID – inside pipe diameter in inches.J) Wall Thick – wall thickness in inches.K) Flow (GPM) – flow rate in gallons per minute.L) Velocity (fps) – speed of water in feet per second at thecorresponding flow rate.M) PSI Loss – pressure loss per 100 ft. of pipe in pounds per squareinch at the corresponding flow rate.N) The shaded area on the chart designates those flow rates thatexceed 5 fps. It is recommended that caution be used <strong>with</strong> flowrates above 5 fps in main lines where water hammer will be aconcern.What the Charts Are Used forThese charts are used to:• Determine the pressure loss in pipe due to friction losses• Determine the velocity at various flow rates• Use pressure losses and/or velocities to determine appropriatepipe sizes (pipe sizing is covered in another section)
How to Use the Friction Loss Charts to Calculate Loss in aSpecific Length of PipeUsing the <strong>Hunter</strong> Friction Loss Tables in the back of this design manual:1. Find the flow of water in gallons per minute (GPM) in the columnon the left.2. Now read across the top of the chart looking for the size of thepipe.3. Read down this column, under the “PSI Loss” heading, and acrossthe row for the GPM.4. Divide this number by 100 to find the PSI loss per foot.5. Multiply this number times the length of the pipe in feet.Sample Problem: Find the friction loss in a 42 ft. length of 3/4 in. Class200 PVC flowing 6 GPM.Friction Loss Tables, page 4Figure 19
1. Look in the left column (FLOW G.P.M.”) on the friction loss chartand read down to the GPM in our sample.Sample Problem:6 GPM2. Now, read across the top of the chart looking for the size ofthe pipe in our sample problem.Sample Problem:3/4 in .3. Read down this column, under the “P.S.I. LOSS” heading,and across the row for the GPM.Sample Problem:1.67 PSI loss4. Where the two intersect (in Step 3) is the PSI loss per 100. Dividethis number by 100 to find the loss per foot.Sample Problem:1.67100= 0.0167 psi loss per ft.5. Multiply your answer by the length of pipe supplying thissprinkler only (just to the next head on the zone).Sample Problem:0.0167 x 42 ft. = 0.701Determining Dynamic Pressure LossesWhen calculating dynamic pressures in pipes, we use the followingfactors:A) Pressure change due to elevation change.B) Pressure loss due to friction losses in the pipeC) Pressure losses in valves, meters, etc. (These losses are determinedby the manufacturer and listed in product literature or technicalcharts.)D) Pressure losses due to fittings.The following example illustrates how the dynamic pressure at a givenpoint in a landscape irrigation system is determined. Pressure change dueto the change in elevation is calculated and the friction losses aresubtracted from the subtotal. The example uses the Friction Loss Charts atthe back of this design manual.
100 ft.75 ft.Point A100 ft.Point B1-1/4 in. CL 200 PVC85 psi at Point A18 GPM50 ft.Elevation ViewFigure 20In Figure 20, all the pipe is 1-1/4-in. Class 200 PVC and the flow is18 GPM from point A to point B. At point A, a pressure gauge readingindicates 85 PSI. In order to determine the dynamic pressure at point B,first find the pressure change due to change in elevation and then combinethat <strong>with</strong> the friction loss in the pipe.Pressure loss due to the higher elevation at point B (an elevation gain):75 ft. x 0.433 PSI per ft. of elevation change = 32.48 PSI less atpoint BPressure loss due to friction in the pipe:Use the friction loss charts at the back of this manual to find thepressure loss at 18 GPM in 1-1/4-in. Class 200 PVC pipe: frictionloss from the chart is 1.24 PSI per 100 ft.PSI loss in pipe:(50 ft. + 100 ft. + 100 ft.) x (1.24 PSI loss per 100 ft. ÷ 100 ft.) = PSI lossNote: the 1.24 PSI loss from the charts is PSI loss per 100 ft. and isdivided by 100 to find the pressure loss per foot,(1.24 ÷ 100 = 0.0124).so, the PSI loss in pipe = 250 ft. x 0.0124 PSI loss per ft.PSI loss in pipe = 3.10 PSI [total due to friction loss]85.00 PSI pressure at point A- 32.48 PSI due to elevation change52.52 PSI subtotal at point B- 3.10 PSI due to friction loss in pipe from point A topoint B49.42 PSI dynamic pressure at point B
SummaryThere is a limited amount of pressure helping to supply water to a sprinklersystem. As more sprinklers are added to a system, the GPM requirementincreases. As the GPM increases, the velocity of the water increases until thepressure losses due to friction equal the pressure available at the source.The design of a landscape irrigation system requires an understanding ofwater movement. Changes in elevation and friction losses in pipe, valves,and fittings affect pressure, which in turn affects sprinkler performance.<strong>Irrigation</strong> hydraulics is used to determine the volume of water availablefor use by the system, the pressure available at the sprinkler heads, and thecorrect pipe sizes.Understanding the principles of hydraulics outlined in this section willlead to irrigation systems that have a more uniform distribution of waterand cost less to install and maintain.What You Need to KnowWater pressure is created by: weight of water pump (mechanical pressurization)Water pressure can be measured in: PSI (pounds per square inch) ft./hd. (feet of head)For every one foot of elevation change, the water pressure: Increases 0.433 PSI going downhill from the P.O.C. Decreases 0.433 PSI going uphill from the P.O.C.
Design CapacityIntroductionThe two <strong>questions</strong> that most frequently confuse someone learningirrigation system design are, 1) “How much water will be available formy irrigation system?” and, 2) “What pressure will I have available formy sprinklers?”The reason there is so much confusion surrounding this topic is that thereare many factors affecting how much water will be available (DesignCapacity), and what the pressure will be at the sprinkler head (Dynamic,or Working Pressure); the static pressure at the source, net elevationchange, the size and length of the service line and delivery line, watermeter size, filters, backflow prevention devices, and the number and sizeof gate valves. While many texts and references refer to “restricting flowsto conserve pressure”, or list “restrictions on appropriate flows”, most failto offer an orderly, step-by-step method to answering these two basic<strong>questions</strong>.This section will explain how to determine the flow available for use inthe sprinkler system and what pressure can be expected for sprinkleroperation.Determining Water Supply and Available PressureHow to calculate the flow or design capacity and the dynamic pressureavailable will vary depending upon the water source. This section isdivided into three parts depending on the water source:I. Metered Municipal Water Sources (page 38)II. Unmetered Municipal Water Sources (page 51)III. Pump Delivered Well Sources (page 52).
DefinitionsUse the diagram below along <strong>with</strong> the definitions:Figure 21Curb Stop (Meter Stop) - An isolation valve installed between theservice line and delivery line. In Figure 21, this would be located wherethe water meter is located.Delivery Line - The pipe that connects the water meter or curb stop to thePOC. It may also connect the water meter to the residence or business.Design Capacity - The “Design Capacity” of an irrigation system is themaximum amount of water (flow) available for use at one time. This willdetermine how many sprinkler heads may be in operation at the same time.For example, if the Design Capacity is 18 GPM, and the sprinkler headselected for the project uses 3 GPM, only six sprinkler heads may be inoperation at the same time (6 heads x 3 GPM = 18 GPM Design Capacity).If more than six of these sprinklers are needed to cover the area beingirrigated, additional control valves must be installed so a maximum of sixheads are used at one time.
Dynamic Pressure - The available dynamic pressure, also known as workingpressure, is simply the water pressure calculated while the water is flowing.The “Dynamic Pressure at Design Capacity” is a calculation of the pressure(PSI) available at the maximum system flow rate. This pressure is calculatedat the system Point of Connection (POC). The dynamic pressure at the POCwill influence your choice of sprinkler heads. For example, you would notchoose a head <strong>with</strong> an operating pressure rating that is above the availabledynamic pressureEstimated Dynamic Pressure at Worst Case Head - Once the DynamicPressure at Design Capacity is calculated, an estimate is made of the pressurethat will be available for the sprinklers. The “Worst Case Head” indicates thishead is the highest head in the system. The Design Capacity (GPM) andEstimated Dynamic Pressure at Design Capacity (PSI) are used to select thesprinklers. Pressure and flow limitations are two of the prime factors insprinkler selection.Flow - The volume/velocity rate water moving through a system. This can bemeasured in gallons per minute (GPM), gallons per hour (gph), liters persecond (l/s), liters per minute (l/min), or cubic meters per hour (m 3 /hr).Point of Connection - The Point of Connection (POC) is where the irrigationsystem is connected to the water source. This represents a logical orconvenient location to connect the irrigation system to the water supply.Service Line - The service line is the pipe connection between the city mainin the street and the water meter. In the case of unmetered systems, it is thepipe between the city water main and the curb stop.Water Meter - A device used to measure water usage. In southern climates,the meter is usually located near the property line, close to the city main line.In northern climates, the meter is usually in a basement or other indoorlocation.Working Pressure - See Dynamic Pressure
Calculating Dynamic Pressure at Design CapacityThe following sections explain how to determine design capacity anddynamic pressure at design capacity, and estimate the dynamic pressurefor the worst case head for the three most common landscape irrigationwater sources. The three most common water sources are: 1) meteredmunicipal systems, 2) unmetered municipal systems, and 3) pumping froma well.I. Metered Municipal SystemsThese instructions and the worksheet refer to the sample problem in Figure22. The worksheet on page 39 has been included for your convenience. Usingthe sample problem in Figure 22, complete the worksheet as you read thissection.Figure 22
(METERED SYSTEMS)Design Capacity and Working PressureWorksheetCALCULATING DESIGN CAPACITY AND DYNAMIC PRESSUREA. Record Site Information1 Static* Pressure at the Source (Main) PSI2 Net elevation Change (Source to POC) ± FEET (+uphill, - downhill)3 Pressure change due to elevation: Line 2 x 0.433 = PSI4 Static Pressure at POC: Line 1 +/- Line 3 = PSINumber/Length Size Type5 Service Line6 Delivery Line7 Water Meter8 Isolation Valves9 OtherB. Determine Design Capacity GPM WithFactor Restriction Restriction10 Pressure loss through Not to exceed 10% of availablethe water meter. PSI at the source(Line 1) GPM11 Volume through the Not to exceed 75% of maximumwater meter. safe flow of the meter. GPM12 Velocity through the Velocity not to exceed 7.5 fpsservice line. (Main to meter) GPM13 Design Capacity Lowest GPM of the three flows rates - lines 10, 11, and12. GPMC. Calculate Dynamic Pressure at Design CapacityPressure Losses from Source(City Water Main) to the POC14 Pressure loss in the Service Line PSI loss (per 100' ) x ft./100 = PSI15 Pressure loss in the Delivery Line PSI loss (per 100' ) x ft./100 = PSI16 Pressure loss in the Water Meter at design capacity = PSI17 Pressure loss in the Gate Valves: _____ Equivalence Factorx _____ PSI loss per 100' ofStandard Steel/100x _____ Number of Gate Valves = PSI18 Other pressure losses_____________________________ = PSI19 Pressure loss from the source to POC (add Lines 14 through 18) PSI20 Approximate Dynamic Pressure at Design CapacityStatic Pressure at the POC (Line 4 above)Subtract the PSI lost from the source to the POC (Line 19 )Approximate Dynamic Pressure at Design CapacityPSIPSIPSI
D. Estimate Pressure Available at “Worst-Case” Head21 Pressure change due to elevation change from the POC to thehighest head in the system. ft. x 0.433 = PSI22 Pressure subtotal (subtract Line 21 from Line 20; for worst caseheads which are lower than the POC, add Lines 20 and 21)PSI23 Estimated Pressure Available at worst case-headtwo-thirds of subtotal: Line 22 PSI x 0.67 = PSIPressure Available for Sprinkler Selection and Operation*Although this is referred to as static pressure, in municipal systems it is taken to mean the minimum dynamicpressure at the water main.PSI
A. Record Site InformationLine #1 - Static* Pressure at the Source: For municipal systems,the static pressure at the source can be obtained from the water purveyor.This is usually a municipal water utilities department, quasi-governmentalagency, or a private water company. It is suggested that this informationbe obtained from the water company rather than by using a gauge becausethe water company can also tell you what minimum pressure you wouldexpect in the main line. Service line size and type can be obtained at thesame time, or you can use a string to wrap around the pipe and comparethat length to the chart on page 11 in the <strong>Hunter</strong> Friction Loss Tables. Thewater meter size is stamped on the meter.Sample Problem: Minimum static pressure in the city main = 85 PSI* In a municipal system the water in the city main would seldom, if ever,be at a static state. However, since the pressure in the city main wouldunlikely change because of the irrigation system demand, the pressure inthe main is considered to be static.Line #2 - Net Elevation Change: The net elevation change isdetermined by estimating the difference in elevation from the point wherethe static water pressure is taken (line #1) to the POC. More accurateestimates may be made if civil engineering plans are available.Sample Problem: Elevation gain 5’ + 12’ = 17’Line #3 - Pressure Change Due to Elevation: This is calculatedby multiplying the elevation change from the source to the POC (line #2)by 0.433 PSI (PSI change per foot of elevation change).Sample Problem: 17’ x 0.433 PSI per ft. = 7.36 PSILine #4 - Static Pressure at POC: For most systems the POC ishigher in elevation (uphill) in relation to the water main or source. In thesecases the pressure change (line #3) is subtracted from the pressure at thesource. If the POC is lower in elevation (downhill), the change in pressurewould be added to the pressure at the source (line #1).Sample Problem:85 PSI at the city main - 7.36 PSI (POC is uphill from main) = 77.64 PSI
Line #5 - Service Line: This is the line in a municipal system thatruns from the city main in the street to the water meter. Data on size andtype should be obtained when contacting the water purveyor <strong>about</strong> staticpressure (line #1).Sample Problem: 1-1/4 in. Type “K” Copper, 25 ft.Line #6 - Delivery Line: The delivery line is installed by thecontractor that built the house or commercial project. It is not informationthe water purveyor will be able to provide. The information can beobtained from project plans or on-site investigation. (Note: If the POC isat the water meter there will not be a delivery line and this portion can beignored.)Sample Problem: 1-1/4 in. Sch. 40 PVC - 65 ftLine #7 - Water Meter: This is installed by, or under the directionof, the water purveyor. Data on size and type can be obtained wheninquiring <strong>about</strong> static pressure (line #1). In some cases, size can bedetermined during a site inspection.Sample Problem: 1 inch water meterLine #8 - Isolation Valves: These are often used to isolate portionsof the system. They may be a gate valve, ball valve, or globe type valve.There are none used in this example.Note: the meter stop will not be considered in this example because thepressure losses are considered to be minor.Line #9 - Other: This line would be for other system componentswhich could cause a pressure loss in the system – such as a water filter,pressure regulator, or a backflow prevention device. Manufacturerspublish pressure loss (also known as friction loss) information in theirproduct catalogs. There are no other components for this example.
B. Determine Design CapacityThe Design Capacity is the maximum flow rate available for systemoperation. There are three factors that restrict the available flow (GPM) ina landscape irrigation system:1) Pressure loss through the water meter - because pressure is limited tothat available at the main, no more than 10% of that pressure should beexpended through the meter.2) Volume through the water meter - because a safety margin for possiblechanges in the system or for other uses on the project should beincluded in the design, no more than 75% of the maximum safecapacity of the meter should be used for irrigation.3) Velocity through the service line - because excessive water velocity canresult in excessive pressure losses and potential system failure, velocitythrough the service line should be limited to 7.5 feet per second (fps).Lines 10 -12 will determine a maximum flow under each restrictive factor.The Design Capacity is the lowest of these three flow rates.Line #10 - Pressure Loss Through the Meter: Limited to 10%of Static Pressure at the Source:Sample problem: 1 inch meterA) Determine 10% of the pressure at the main by multiplying 10%(0.10) times the PSI at the main, line #1 (85 PSI).85.0 x 0.10 = 8.5 PSI allowable loss through the water meterB) Turn to page 11 for the chart “Pressure Loss Through WaterMeters” in the <strong>Hunter</strong> Friction Loss Tables at the end of thisdesign manual.C) Select the column for 1 inch water meters.D) Read down the column until pressure loss is as close to theallowable loss (8.5 PSI) <strong>with</strong>out exceeding it.E) Read across to left hand column to determine the volume at thatpoint (36 GPM).F) Record 36 GPM on line #10 of the worksheet.
Line #11 - Volume Through the Meter: Limited to 75% of WaterMeter CapacitySample problem: 1 inch water meterA) Turn to page 11 for the chart “Pressure Loss Through WaterMeters” in the <strong>Hunter</strong> Friction Loss Tables at the end of thisdesign manual.B) Locate the column for size of water meter (1 inch).C) Read down the pressure loss column under 1 inch meters untilpressure loss figures stop.D) Read across to left hand column to determine the volume at thatpoint (50 GPM). This represents the maximum safe flow for thatsize meter.E) Determine 75% of maximum safe flow by multiplying the flowby 75% (0.75).50 GPM x 0.75 = 37.5 GPMF) Record 37.5 GPM on line #11 of the worksheet.Line #12 - Velocity in the Service Line: This is the friction lossdue to the speed at which water flows through the service line. Becauseexcessive water velocity can result in excessive pressure losses andpotential system failure, velocity through the service line is limited to 7.5Feet Per Second (fps)*.Sample Problem: 1-1/4 inch Type “K” CopperA) Turn to the chart for the type of service line used, page 9 in the<strong>Hunter</strong> Friction Loss Tables at the end of this design manual.B) Locate the column for the size of service line (1-1/4 inch).C) Read down the column for velocity (fps) until the velocityreaches 7.5 fps (or as high a velocity as listed <strong>with</strong>out exceeding7.5 fps).D) Read across from that point to the left hand column todetermine volume (GPM) at allowed 7.5 fps (28 GPM).E) Record 28 GPM on line #12 of the worksheet.
Note: This 7-1/2 fps restriction is sometimes disregarded in the industrybecause service line is usually copper and is unlikely to be damaged bywater hammer. If you disregard this restriction, a check of actualpressure loss through the service line must be made to insure thepressure loss incurred due to high velocity is not excessive. Conversely,some areas will not allow a velocity as high as 7-1/2 fps -- check thelocal restrictions.Line #13 - Design Capacity: Lowest of the three flow rates listed onLines 10 - 12. The lowest flow rate is selected because this flow rate is theonly one that will not exceed any of the three restrictions on DesignCapacity: Pressure Loss Through the Meter, Volume Through the Meter,and Velocity Through the Service Line. List the lowest of the three flowrates on line #13.Sample Problem: 28 GPM
C. Calculate Dynamic Pressure at Design CapacityNow that a flow rate (Design Capacity) has been established, this flow ratecan be used to estimate the dynamic pressure at the Point of Connection.Pressure losses from the source to the POC include those through theservice line, delivery line, water meter, isolation valves, or other systemcomponents. Note: not all components listed are present in all systems.Line #14 - Pressure Loss in the Service Line: Determine thepressure loss in the service line.Sample Problem: 1-1/4 inch Type “K” CopperA) Turn to the chart for the type of service line used, page 9 in the<strong>Hunter</strong> Friction Loss Tables at the end of this design manual.B) Read down the left hand column (Flow GPM) to the designcapacity, line #13.Sample Problem: 28 GPMC) Read across to the right from that point to the column for PSIloss in 1-1/4” “K” copper.Sample Problem: 7.97 PSI per 100 ft.D) Record this in the first space on line #14.Sample Problem: 7.97E) Record the length of the service line in the second space on line#14, this information was recorded on line #5 of the worksheet.Sample Problem: 25 ft.F) Determine the pressure loss through the service line bymultiplying the pressure loss per 100 ft. times the length of theservice line and dividing the answer by 100 to find the actualPSI loss in the service line.Sample Problem:(7.97 x 25) = 1.99 PSI loss in the service line100G) Record this PSI loss on line #14 of the worksheet.Sample Problem: 1.99
Line #15 - Pressure Loss in the Delivery Line: Determine thepressure loss in the delivery line.Sample Problem: Schedule 40 PVCA) Turn to the chart for the type of delivery line used, page 2 in the<strong>Hunter</strong> Friction Loss Tables at the end of this design manual.B) Read down the left hand column (Flow GPM) to the designcapacity, line #13.Sample Problem: 28 GPMC) Read across to the right from that point to the column for PSIloss in 1-1/4” Schedule 40 PVC.Sample Problem: 4.25 PSI per 100 ft.D) Record this in the first space on line #15.Sample Problem: 4.25E) Record the length of the delivery line in the second space online #15. This information was recorded on line #6 of theworksheet.Sample Problem: 65F) Determine the pressure loss through the delivery line bymultiplying the pressure loss per 100 ft. times the length of thedelivery line and dividing the answer by 100 to find the actualPSI loss in the delivery line.Sample Problem:(4.25 x 65) = 2.76 PSI loss in the service line100G) Record this PSI loss on line #15 of the worksheet.Sample Problem: 2.76
Line #16 - Pressure Loss in the Water Meter: Determine thepressure loss in the water meter.A) Turn to page 11 for the chart “Pressure Loss Through WaterMeters” in the <strong>Hunter</strong> Friction Loss Tables at the end of thisdesign manual.B) Read down the left hand column (Flow GPM) to the designcapacity, line #13.Sample Problem: 28 GPMC) Read across to the right from that point to the column forpressure loss in 1 inch water meters.Sample Problem: 4.60 PSI lossD) Record this PSI loss on line #16 of the worksheet.Sample Problem: 4.60Line #17 - Pressure Loss in the Isolation Valves: Isolationvalves may be gate valves, ball valves, globe valves, meter cocks or curbstops. While there will be a meter cock or curb stop in most municipalsystems, the pressure losses incurred are generally considered minimal. Ifthey are included, pressure losses can be estimated by use of theequivalent length chart, “Pressure Loss in Valves and Fittings,” on page10 in the <strong>Hunter</strong> Friction Loss Tables at the end of this design manual.There are no isolation valves included in this example.Line #18 - Other Pressure Losses: These may include pressurelosses through backflow prevention devices, filters or other systemcomponents located between the water source and the POC.Manufacturers publish pressure loss (also known as friction loss)information in their product catalogs. There are no other components forthis example.Line #19 - Pressure Loss from the Source to POC: Add thepressure losses recorded on lines 14 - 18.Sample Problem: 1.99 + 2.76 + 4.60 + 0.0 + 0.0 = 9.35 PSI
Line #20 - Approximate Dynamic Pressure at DesignCapacity:1) Record the static pressure previously determined on line #4.2) Record the pressure loss subtotal from line #19.3) Subtract these two lines to determine the approximate dynamicpressure expected at the POC at the maximum system flow rate(Design Capacity).Sample Problem:static pressure from line #477.64 PSIpressure loss subtotal from line #19 - 9.35 PSIapproximate Dynamic Pressure at the POC 68.29 PSID. Estimate Pressure Available at"Worst Case" HeadAt this point the Design Capacity (GPM from line #13) and DynamicPressure at the POC (PSI from line #20) have been calculated. The DesignCapacity establishes the maximum flow rate for the system and theDynamic Pressure at the POC provides us <strong>with</strong> a basis for estimating thedynamic pressure that will be available to operate the sprinklers.In order to begin our irrigation system design, an estimate of the availabledynamic pressure at the worst case head must be made. This is calculatedby:1) Adding or subtracting the pressure change due to the change inelevation between the POC and the highest head in the system.2) Estimating the amount of pressure that would remain after normalpressure losses between the POC and the highest head; typically 1/3 ofthe available dynamic pressure is lost and 2/3 remains available forsprinkler operation.
Line #21 - Pressure Change Due to Elevation Change:Calculate the pressure change due to elevation between the POC and thehighest head.Sample Problem: the highest head is 10 ft. above the POC.0.433 = 4.33 PSI10 xLine #22 - Estimated Pressure Subtotal: If the highest head inthe system is above the POC, subtract the pressure change calculated online #21 from line #20, if the highest head is lower than the POC, thepressure change from line #21 must be added to the pressure on line #20.Sample Problem: 68.29 - 4.33 = 63.96 PSILine #23 - Two Thirds Estimate: A normal landscape irrigationsystem will lose approximately one third (1/3) of the dynamic pressureavailable between the POC and the highest head. These losses occurbecause of friction loss in pipe, pressure loss in valves and fittings, andpressure loss through backflow prevention devices or other systemcomponents. Because of these losses, only two thirds of the dynamicpressure available at the POC is available for sprinkler operation. In thisstep, multiply the pressure subtotal calculated on line #22 by 2/3 (0.67).Sample Problem: 63.96 x 0.67 = 42.85 PSI
How To Use The Worksheet InformationWith this worksheet you have determined the following:• Design Capacity (line #13): The Design Capacity is the maximum safeflow available for use in the sprinkler system. This flow will determinehow many heads can be operated at any one time. For example, if thedesign capacity is 18 GPM, the system can have six 3 GPM headsoperating at one time (6 heads x 3 GPM = 18 GPM). If more than 6 headsare needed for the project, additional valves must be added so that no morethan 18 GPM would be used at one time.• Dynamic Pressure at Design Capacity (line #20): This is the dynamicpressure that can be expected at the POC when the system is using themaximum safe flow (Design Capacity, line #13). This figure is used 1) asa starting point in estimating the pressure that will be available at theworst case head, and 2) as a guideline when the irrigation design iscompleted to check total system pressure required and assure the system isdesigned correctly.• Estimated Pressure Available for Sprinkler Operation (line #23):This is an estimate of the dynamic pressure available for sprinkleroperation at the highest head in the system. If there is a significant drop inelevation to the location of other heads in the system, the pressure gain dueto the drop in elevation could be added to this figure. This pressure shouldbe used as a guide for selecting sprinklers. For example, if the pressure online #23 is 40 PSI, then sprinklers selected for the project should haveoperating pressures of 40 PSI or less.After the preliminary design has been completed, a thorough calculationof the friction loss in the system should be made before committing to thefinal irrigation plan. This calculation should include friction loss in thelateral lines and all other components back to the point of connection, andshould be based on the GPM actually expected to be used by the sprinklerheads chosen. This subject is covered later under “Friction Losses”.
Design ProblemMany times, you will use a pressure gauge attached to an outside faucet tomeasure the static pressure. When measuring the PSI in this manner, besure that no water is running anywhere on the property. Be aware that thestatic pressure can vary throughout the day; it’s best to take the pressuremeasurement at the same time of day as you plan on watering.Remember: the static pressure at the POC will be greater if themeasurement is taken at a point above the POC, and lower at the POC ifthe measurement is taken at a point below the POC.Using the following design and the information below, complete a DesignCapacity and Working Pressure worksheet :1-1/4 in Type “K” CopperService Line - 15 ft.SprinklerSystem POC70 psiMeasured5 ft. to POC3 ft. - POC toHighest Head1 in. Type “K” CopperDelivery Line - 5 ft.City Water MainStatic Pressure at P.O.C.Net elevation change - P.O.C. to highest head72 PSI+3 ft.Service Line 15 ft. 1-1/4” Type K CopperDelivery Line 5 ft. 1” Type K CopperWater Meter size 5/8”Static Pressure at POC is measured as follows:1. Static pressure measured at the hose bib is 70 psi.2. Elevation change from the hose bib to the POC is 5 feet (POC is lower).3. 5 ft x .433 psi/ft = 2.165 psi4. 70 psi + 2.165 psi = 72.165 psi at the POC
II. Unmetered Municipal SystemsCalculation of design capacity and dynamic pressure at design capacity inunmetered systems differs from metered systems in that the restrictions arebased only on service line velocity.When filling out the worksheet to determine design capacity and workingpressure in an unmetered system, simply disregard any <strong>questions</strong> relatingto water meters.Figure 23
III. Systems Supplied by a PumpCalculation of design capacity and dynamic pressure at design capacity onsystems <strong>with</strong> a pump as the water source must begin <strong>with</strong> an evaluation ofthe capacity of the well and pump. The process of quantifying flow ratesand pressures in pump systems can be difficult. Flow rates, well drawdownand the subsequent pressure delivered by the pump can vary byseason and by the year. Contact a well/pump expert for assistance <strong>with</strong> thebest method for determining well/pump capacity in your area.These instructions and worksheet refer to the sample problem in figure 24.The worksheet on page 53 has been completed using the sample problemin Figure 24. Follow along on the worksheet as you read this section.Pump capacity: 15 GPM at 70 PSIElevation from pump discharge to POC: 18 ft.Delivery line: 1 in. Sch 40 - 65 ft.Figure 24
SAMPLE PROBLEM(PUMP SYSTEMS)Design Capacity and Working Pressure WorksheetCALCULATING DESIGN CAPACITY AND DYNAMIC PRESSUREA. Record Site Information1 Dynamic pressure at the discharge point 70 PSI2 Pump available flow at discharge point 15 GPM3 Net elevation change (discharge to POC) ± + 18 FEET (+uphill, - downhill)4 Pressure change due to elevation: Line 3 x 0.433 = - 7.79 PSI5 Pressure at POC: Line 1 +/- Line 4 = 62.21 PSINumber/Length Size Type6 Delivery Line 65 ft. 1 in. Sch 40 PVC7 Isolation Valves -- -- --8 Other -- -- --B. Determine Design Capacity GPM WithFactor Restriction Restriction9 Pump/Well GPM capacity Continuous supply available atdischarge point (Line 2) 15.0 GPM10 Pump Safety Factor Not to exceed 90% of continuous supplyavailable at discharge point 15.0 x 0.10= 1.5 GPM11 Design Capacity (subtract Line 10 from Line 9) 13.5 GPMC. Calculate Dynamic Pressure at Design CapacityPressure Losses from Discharge Point to the POC12 Pressure reduction 10% as Pump Safety Factor 70 x 0.10 = 7.0 PSI13 Pressure loss in the Delivery Line 4.19 PSI loss (per 100' ) 65 ft./100 = 2.72 PSI14 Pressure loss in the Isolation Valves: Equivalence factorxPSI loss per 100' ofstandard steel/100x Number of valves = -- PSI15 Other pressure losses_____________________________ = -- . PSI16 Pressure loss from the discharge point to POC (add Lines 12 through 15) 9.72 PSI17 Approximate Dynamic Pressure at Design CapacityDynamic pressure at the POC (Line 5 above) 62.21 PSISubtract the PSI lost from the discharge point to the POC (Line 16) 9.72 PSIApproximate Dynamic Pressure at Design Capacity 52.99 PSI
D. Estimate Pressure Available at “Worst-Case” Head18 Pressure change due to elevation change from the POC to thehighest head in the system. 10 ft. x 0.433 = 4.33 PSI19 Pressure subtotal (subtract Line 18 from Line 17; for worst caseheads which are lower than the POC, add Lines 17 and 18) 48.66 PSI20 Estimated Pressure Available at worst case-headtwo-thirds of subtotal: Line 19 48.66 PSI x 0.67 = 32.60 PSIPressure Available for Sprinkler Selection and Operation32.60 PSI
A. Record Site InformationLine #1 - Dynamic Pressure at the Discharge Point: Thepressure and the design capacity of pump/well systems differ frommunicipal systems in that they are dependent on the capacity of individualpumps and wells. These flow rates and pressures vary widely evenbetween wells located close to one another. Well/pump systems differ inthe determination of design capacity because of the need to establish thecapacity of the well or pump. This flow can vary from just a few gallonsper minute to hundreds of gallons per minute. The pump/well capacity andthe pump's discharge pressure may be obtained from:1) The property owner - if they have records from past pump/welltests.2) The company installing the pump.3) An on-site test conducted by a pump engineer or well drillingfirm.Sample Problem: Dynamic pressure at the discharge point = 70 PSILine #2 - Available Flow at the Discharge Point: This isobtainable from the above sources. (With pump systems, available flow isgenerally stated as "___ GPM at ___ PSI".)Sample Problem: 15 GPMLine #3 - Net Elevation Change: The net elevation change isdetermined by estimating the difference in elevation from the dischargepoint of the pump or well (point used on line #1) to the sprinkler systemPOC.Sample Problem: Elevation gain = 18’Line #4 - Pressure Change Due to Elevation: This is calculatedby multiplying the elevation change from the discharge point to the POC(line #3) by 0.433 PSI (PSI change per foot of elevation change).Sample Problem: 18’ x 0.433 PSI per ft. = 7.79 PSI
Line #5 - Pressure at POC: If the POC is higher in elevation(uphill) in relation to the discharge point, the pressure change (line #4) issubtracted from the pressure at the source (line #1). If the POC is lower inelevation (downhill), the change in pressure would be added to thepressure at the source.Sample Problem: 70 PSI (at the discharge point)- 7.79 PSI (POC is uphill from main)= 62.21 PSILine #6 - Delivery Line: This is the line that runs from the dischargepoint to the POC. Data on size and type are gathered when determiningpump/well capacity.Sample Problem: 65 ft. of 1 in. Schedule 40 PVCLine #7 - Isolation Valves: These are often used to isolate portionsof the system. They may be a gate valve, ball valve, or globe type valve.There are none used in this example.Line #8 - Other: This line would be for other system componentswhich could cause a pressure loss in the system such as a water filter,pressure regulator, or a backflow prevention device. There are none forthis example.B. Determine Design CapacityThe Design Capacity is the maximum flow rate at the discharge pointwhich is available for system operation. The Design Capacity is limited bythe capacity of the well and pump. Additionally, pump systems should bedesigned at no more than 90% of system capacity to reduce the chance ofpump cavitation. Pump cavitation is caused when the entrance pressure isreduced to a point where air pockets form in the pump. The result isinefficient pump operation, and the pump may prematurely wear out andfail.Line #9 - Pump/Well GPM Capacity: The pump/well GPMcapacity is determined by testing, or is obtained from the pump installationcompany, as described above. Record the pump's available flow atdischarge point (from line 2).Sample Problem: 15 GPM
Line #10 - Pump Safety Factor: In order to reduce the chance ofpump cavitation, the design capacity should not exceed 90% of thecontinuous supply available at the discharge point. Here, the pump/wellGPM capacity is multiplied by 10% (0.10).Sample Problem:A) Record the pump/well GPM capacity (Line #9) in the firstspace on Line #10.B) Multiply the pump/well GPM capacity by 0.10. 15 x0.10 = 1.5 GPM capacity safety factorLine #11 - Design Capacity: The Design Capacity is the maximum flowrate at the discharge point that is available for system operation. This isdetermined by subtracting line #10 from line #9.Sample Problem: 15.0 GPM - 1.5 GPM = 13.5 GPMC. Calculate Dynamic Pressure at Design CapacityNow that a flow rate (Design Capacity) has been established, this flow ratecan be used to estimate the dynamic pressure at the POC. Pressure lossesfrom the source to the POC include those through the delivery line,isolation valves, or other system components.Note: not all components listed are present in all systems.Line #12 - Pressure Reduction - 10% as Pump SafetyFactor: To further reduce the chance of pump cavitation, the dischargepressure should not exceed 90% of the pump's available pressure at thedischarge point. Here, the stated pressure is multiplied by 10% (0.10).Sample Problem:A) Record the dynamic pressure at the discharge point (line #1) inthe first space on line #12.B) Multiply the dynamic pressure at the discharge point by 0.10.Sample Problem: 70 x 0.10 = 7 PSI pressure safety factorLine #13 - Pressure Loss in the Delivery Line: Determine thepressure loss in the delivery line.Sample Problem: 1 inch Schedule 40 PVCA) Turn to the friction loss chart for the type of delivery line used,page 2 in the <strong>Hunter</strong> Friction Loss Tables at the end of thisdesign manual.B) Read down the left hand column (Flow GPM) to the designcapacity, line 11.
Sample Problem: 13.5 GPMC) Read across to the right from that point to the column for PSIloss in 1” Schedule 40 PVC.Sample Problem: Note that there is not a listing for 13.5 GPM.Here, you can simply round down to 13 GPM, or you canfigure the partial GPM as follows:1) PSI loss for 14 GPM = 4.47 PSI per 100 ft.subtract the PSI loss for 13 GPM = 3.90 PSI per 100 ft.0.57 PSI per 100 ft.2) multiply .57 PSI per 100 ft. x .5 GPM = 0.285PSI loss for .5 GPM per 100 ft.3) add 0.285 GPM loss for .5 GPM3.9 GPM loss for 13 GPM4.185 GPM loss for 13.5 GPMAnswer to Sample Problem: 4.19 PSI loss per 100 ft.D) Record this in the first space on line #13.Sample Problem: 4.19E) Record the length of the delivery line in the second space online #13. This information was recorded on line #6 of theworksheet.Sample Problem: 65 ftF) Determine the pressure loss through the delivery line bymultiplying the pressure loss per 100 ft. times the length of thedelivery line and dividing the answer by 100 to find the actualPSI loss in the delivery line.Sample Problem:(4.19 x 65) = 2.72 PSI loss in the delivery line100G) Record this PSI loss on line #13 of the worksheet.Sample Problem: 2.72
Line #14 - Pressure Loss in the Isolation Valves: Isolationvalves may be gate valves, ball valves, or globe valves. While there willbe a meter cock or curb stop in most municipal systems, the pressurelosses incurred are generally considered minimal. If they are included,pressure losses can be estimated by use of the equivalent length chart,“Pressure Loss in Valves and Fittings,” on page 10 in the <strong>Hunter</strong> FrictionLoss Tables at the end of this design manual.There are no isolation valves in this example.Line #15 - Other Pressure Losses: These may include pressurelosses through backflow prevention devices, filters, or other systemcomponents located between the water source and the POC. There arenone in this example.Line #16 - Pressure Loss from the Source to POC: Add thepressure losses recorded on lines 12 - 15.Sample Problem: 7.0 + 2.72 + 0.0 + 0.0 = 9.72 PSILine #17 - Approximate Dynamic Pressure at DesignCapacity:1) Record the pressure previously determined on line #5.2) Record the pressure loss subtotal from line #16.3) Subtract these two lines to determine the approximate dynamicpressure expected at the POC at the maximum system flow rate(Design Capacity).Sample Problem:pressure from line #562.21 PSIpressure loss subtotal from line #16 - 9.72 PSIapproximate Dynamic Pressure at the POC 52.99 PSI
D. Estimate Pressure Available at"Worst Case" HeadAt this point the Design Capacity (GPM from line #11) and DynamicPressure at the POC have been calculated. The Design Capacityestablishes the maximum flow rate for the system and the DynamicPressure at the POC provides us <strong>with</strong> a basis for estimating the dynamicpressure that will be available to operate the sprinklers.In order to begin our irrigation system design an estimate of the availabledynamic pressure at the worst case head must be made. This is calculatedby:1) Adding or subtracting the pressure change due to the change inelevation between the POC and the highest head in the system.2) Estimating the amount of pressure that would remain after normalpressure losses between the POC and the highest head; typically 1/3 ofthe available dynamic pressure is lost and 2/3 remains available forsprinkler operationLine #18 - Pressure Change Due to Elevation Change:Calculate the pressure change due to elevation between the POC and thehighest head.Sample Problem: the highest head is 10 ft. above the POC.10 x 0.433 = 4.33 PSILine #19 - Estimated Pressure Available for SprinklerOperation: If the highest head in the system is above the POC, subtractthe pressure change calculated on line #18 from line #17, if the highesthead is lower than the POC, the pressure change from line #18 must beadded to the pressure on line #17.Sample Problem: 52.99 - 4.33 = 48.66 PSILine #20 - Two Thirds Estimate: A normal landscape irrigationsystem will lose approximately one third (1/3) of the dynamic pressureavailable between the POC and the highest head. These losses occurbecause of friction loss in pipe, pressure loss in valves and fittings, andpressure loss through check valves or other system components. Becauseof these losses, only two thirds of the dynamic pressure available at thePOC is available for sprinkler operation. In this step, multiply the pressuresubtotal calculated on line #19 by 2/3 (0.67).Sample Problem: 48.66 x 0.67 = 32.60 PSI
How To Use The Worksheet InformationWith this worksheet you have determined the following:• Design Capacity (line #11): The Design Capacity is the maximum safeflow available for use in the sprinkler system. This flow will determinehow many heads can be operated at one time. For example, if the designcapacity is 18 GPM, the system can have six 3 GPM heads operating atone time (6 heads x 3 GPM = 18 GPM). If more than 6 heads are neededfor the project, additional valves must be added so that no more than 18GPM would be used at one time.• Dynamic Pressure at Design Capacity (line #17): This is the dynamicpressure that can be expected at the POC when the system is using themaximum safe flow (Design Capacity, line #11). This figure is used 1) asa starting point in estimating the pressure that will be available at theworst case head, and 2) as a guideline when the irrigation design iscompleted to check total system pressure required and assure the system isdesigned correctly.• Estimated Pressure Available for Sprinkler Operation (line #20):This is an estimate of the dynamic pressure available for sprinkleroperation at the highest head in the system. If there is a significant drop inelevation to the location of other heads in the system, the pressure gain dueto the drop in elevation could be added to this figure. This pressure shouldbe used as a guide for selecting sprinklers. For example if the pressure online #20 is 40 PSI, then sprinklers selected for the project should haveoperating pressures at 40 PSI or less.After the preliminary design has been completed, a thorough calculationof the friction loss in the system should be made before committing to thefinal irrigation plan. This calculation should include friction loss in thelateral lines and all other components back to the point of connection, andshould be based on the GPM actually expected to be used by the sprinklerheads chosen. This subject is covered later under “Friction Losses”.
(METERED SYSTEMS)Design Capacity and Working PressureWorksheetCALCULATING DESIGN CAPACITY AND DYNAMIC PRESSUREA. Record Site Information1 Static* Pressure at the Source (Main) PSI2 Net elevation Change (Source to POC) ± FEET (+uphill, - downhill)3 Pressure change due to elevation: Line 2 x 0.433 = PSI4 Static Pressure at POC: Line 1 +/- Line 3 = PSINumber/Length Size Type5 Service Line6 Delivery Line7 Water Meter8 Isolation Valves9 OtherB. Determine Design Capacity GPM WithFactor Restriction Restriction10 Pressure loss through Not to exceed 10% of availablethe water meter. PSI at the source(Line 1) GPM11 Volume through the Not to exceed 75% of maximumwater meter. safe flow of the meter. GPM12 Velocity through the Velocity not to exceed 7.5 fpsservice line. (Main to meter) GPM13 Design Capacity Lowest GPM of the three flows rates - lines 10, 11, and 12. GPMC. Calculate Dynamic Pressure at Design CapacityPressure Losses from Source(City Water Main) to the POC14 Pressure loss in the Service Line PSI loss (per 100' ) x ft./100 = PSI15 Pressure loss in the Delivery Line PSI loss (per 100' ) x ft./100 = PSI16 Pressure loss in the Water Meter at design capacity = PSI17 Pressure loss in the Gate Valves: _____ Equivalence Factorx _____ PSI loss per 100' ofStandard Steel/100x _____ Number of Gate Valves = PSI18 Other pressure losses_____________________________ = PSI19 Pressure loss from the source to POC (add Lines 14 through 18) PSI20 Approximate Dynamic Pressure at Design CapacityStatic Pressure at the POC (Line 4 above)Subtract the PSI lost from the source to the POC (Line 19 )Approximate Dynamic Pressure at Design CapacityPSIPSIPSI
D. Estimate Pressure Available at “Worst-Case” Head21 Pressure change due to elevation change from the POC to thehighest head in the system. ft. x 0.433 = PSI22 Pressure subtotal (subtract Line 21 from Line 20; for worst caseheads which are lower than the POC, add Lines 20 and 21)PSI23 Estimated Pressure Available at worst case-headtwo-thirds of subtotal: Line 22 PSI x 0.67 = PSIPressure Available for Sprinkler Selection and Operation*Although this is referred to as static pressure, in municipal systems it is taken to mean the minimumdynamic pressure at the water main.PSI
(METERED SYSTEMS)Design Capacity and Working PressureWorksheetCALCULATING DESIGN CAPACITY AND DYNAMIC PRESSUREA. Record Site Information1 Static* Pressure at the Source (Main) PSI2 Net elevation Change (Source to POC) ± FEET (+uphill, - downhill)3 Pressure change due to elevation: Line 2 x 0.433 = PSI4 Static Pressure at POC: Line 1 +/- Line 3 = PSINumber/Length Size Type5 Service Line6 Delivery Line7 Water Meter8 Isolation Valves9 OtherB. Determine Design Capacity GPM WithFactor Restriction Restriction10 Pressure loss through Not to exceed 10% of availablethe water meter. PSI at the source(Line 1) GPM11 Volume through the Not to exceed 75% of maximumwater meter. safe flow of the meter. GPM12 Velocity through the Velocity not to exceed 7.5 fpsservice line. (Main to meter) GPM13 Design Capacity Lowest GPM of the three flows rates - lines 10, 11, and12. GPMC. Calculate Dynamic Pressure at Design CapacityPressure Losses from Source(City Water Main) to the POC14 Pressure loss in the Service Line PSI loss (per 100' ) x ft./100 = PSI15 Pressure loss in the Delivery Line PSI loss (per 100' ) x ft./100 = PSI16 Pressure loss in the Water Meter at design capacity = PSI17 Pressure loss in the Gate Valves: _____ Equivalence Factorx _____ PSI loss per 100' ofStandard Steel/100x _____ Number of Gate Valves = PSI18 Other pressure losses_____________________________ = PSI19 Pressure loss from the source to POC (add Lines 14 through 18) PSI20 Approximate Dynamic Pressure at Design CapacityStatic Pressure at the POC (Line 4 above)Subtract the PSI lost from the source to the POC (Line 19 )Approximate Dynamic Pressure at Design CapacityPSIPSIPSI
D. Estimate Pressure Available at “Worst-Case” Head21 Pressure change due to elevation change from the POC to thehighest head in the system. ft. x 0.433 = PSI22 Pressure subtotal (subtract Line 21 from Line 20; for worst caseheads which are lower than the POC, add Lines 20 and 21)PSI23 Estimated Pressure Available at worst case-headtwo-thirds of subtotal: Line 22 PSI x 0.67 = PSIPressure Available for Sprinkler Selection and Operation*Although this is referred to as static pressure, in municipal systems it is taken to mean theminimum dynamic pressure at the water mainPSI
(METERED SYSTEMS)Design Capacity and Working PressureWorksheetCALCULATING DESIGN CAPACITY AND DYNAMIC PRESSUREA. Record Site Information1 Static* Pressure at the Source (Main) PSI2 Net elevation Change (Source to POC) ± FEET (+uphill, - downhill)3 Pressure change due to elevation: Line 2 x 0.433 = PSI4 Static Pressure at POC: Line 1 +/- Line 3 = PSINumber/Length Size Type5 Service Line6 Delivery Line7 Water Meter8 Isolation Valves9 OtherB. Determine Design Capacity GPM WithFactor Restriction Restriction10 Pressure loss through Not to exceed 10% of availablethe water meter. PSI at the source(Line 1) GPM11 Volume through the Not to exceed 75% of maximumwater meter. safe flow of the meter. GPM12 Velocity through the Velocity not to exceed 7.5 fpsservice line. (Main to meter) GPM13 Design Capacity Lowest GPM of the three flows rates - lines 10, 11, and12. GPMC. Calculate Dynamic Pressure at Design CapacityPressure Losses from Source(City Water Main) to the POC14 Pressure loss in the Service Line PSI loss (per 100' ) x ft./100 = PSI15 Pressure loss in the Delivery Line PSI loss (per 100' ) x ft./100 = PSI16 Pressure loss in the Water Meter at design capacity = PSI17 Pressure loss in the Gate Valves: _____ Equivalence Factorx _____ PSI loss per 100' ofStandard Steel/100x _____ Number of Gate Valves = PSI18 Other pressure losses_____________________________ = PSI19 Pressure loss from the source to POC (add Lines 14 through 18) PSI20 Approximate Dynamic Pressure at Design CapacityStatic Pressure at the POC (Line 4 above)Subtract the PSI lost from the source to the POC (Line 19 )Approximate Dynamic Pressure at Design CapacityPSIPSIPSI
D. Estimate Pressure Available at “Worst-Case” Head21 Pressure change due to elevation change from the POC to thehighest head in the system. ft. x 0.433 = PSI22 Pressure subtotal (subtract Line 21 from Line 20; for worst caseheads which are lower than the POC, add Lines 20 and 21)PSI23 Estimated Pressure Available at worst case-headtwo-thirds of subtotal: Line 22 PSI x 0.67 = PSIPressure Available for Sprinkler Selection and Operation*Although this is referred to as static pressure, in municipal systems it is taken to mean the minimumdynamic pressure at the water main.PSI
(METERED SYSTEMS)Design Capacity and Working PressureWorksheetCALCULATING DESIGN CAPACITY AND DYNAMIC PRESSUREA. Record Site Information1 Static* Pressure at the Source (Main) PSI2 Net elevation Change (Source to POC) ± FEET (+uphill, - downhill)3 Pressure change due to elevation: Line 2 x 0.433 = PSI4 Static Pressure at POC: Line 1 +/- Line 3 = PSINumber/Length Size Type5 Service Line6 Delivery Line7 Water Meter8 Isolation Valves9 OtherB. Determine Design Capacity GPM WithFactor Restriction Restriction10 Pressure loss through Not to exceed 10% of availablethe water meter. PSI at the source(Line 1) GPM11 Volume through the Not to exceed 75% of maximumwater meter. safe flow of the meter. GPM12 Velocity through the Velocity not to exceed 7.5 fpsservice line. (Main to meter) GPM13 Design Capacity Lowest GPM of the three flows rates - lines 10, 11, and12. GPMC. Calculate Dynamic Pressure at Design CapacityPressure Losses from Source(City Water Main) to the POC14 Pressure loss in the Service Line PSI loss (per 100' ) x ft./100 = PSI15 Pressure loss in the Delivery Line PSI loss (per 100' ) x ft./100 = PSI16 Pressure loss in the Water Meter at design capacity = PSI17 Pressure loss in the Gate Valves: _____ Equivalence Factorx _____ PSI loss per 100' ofStandard Steel/100x _____ Number of Gate Valves = PSI18 Other pressure losses_____________________________ = PSI19 Pressure loss from the source to POC (add Lines 14 through 18) PSI20 Approximate Dynamic Pressure at Design CapacityStatic Pressure at the POC (Line 4 above)Subtract the PSI lost from the source to the POC (Line 19 )Approximate Dynamic Pressure at Design CapacityPSIPSIPSI
D. Estimate Pressure Available at “Worst-Case” Head21 Pressure change due to elevation change from the POC to thehighest head in the system. ft. x 0.433 = PSI22 Pressure subtotal (subtract Line 21 from Line 20; for worst caseheads which are lower than the POC, add Lines 20 and 21)PSI23 Estimated Pressure Available at worst case-headtwo-thirds of subtotal: Line 22 PSI x 0.67 = PSIPressure Available for Sprinkler Selection and Operation*Although this is referred to as static pressure, in municipal systems it is taken to mean the minimumdynamic pressure at the water main.PSI
(PUMP SYSTEMS)Design Capacity and Working PressureWorksheetCALCULATING DESIGN CAPACITY AND DYNAMIC PRESSUREA. Record Site Information1 Dynamic pressure at the discharge point PSI2 Pump available flow at discharge point GPM3 Net elevation change (discharge to POC) ± FEET (+uphill, - downhill)4 Pressure change due to elevation: Line 3 x 0.433 = PSI5 Pressure at POC: Line 1 +/- Line 4 = PSI6 Delivery Line7 Isolation Valves8 OtherNumber/Length Size TypeB. Determine Design Capacity GPM WithFactor Restriction Restriction9 Pump/Well GPM capacity Continuous supply available atdischarge point (Line 2)10 Pump Safety Factor Not to exceed 90% of continuous supplyavailable at discharge point x 0.10= GPMGPM11 Design Capacity (subtract Line 10 from Line 9) GPMC. Calculate Dynamic Pressure at Design CapacityPressure Losses from Discharge Point to the POC12 Pressure reduction 10% as Pump Safety Factor x 0.10 = PSI13 Pressure loss in the Delivery Line PSI loss (per 100' ) x ft./100 = PSI14 Pressure loss in the Isolation Valves: Equivalence factorxPSI loss per 100' ofstandard steel/100x Number of valves = PSI15 Other pressure losses_____________________________ = . PSI16 Pressure loss from the discharge point to POC (add Lines 12 through 15) PSI17 Approximate Dynamic Pressure at Design CapacityDynamic pressure at the POC (Line 5 above)PSISubtract the PSI lost from the discharge point to the POC (Line 16)PSIApproximate Dynamic Pressure at Design CapacityPSI
D. Estimate Pressure Available at “Worst-Case” Head18 Pressure change due to elevation change from the POC to thehighest head in the system. ft. x 0.433 = PSI19 Pressure subtotal (subtract Line 18 from Line 17; for worst caseheads which are lower than the POC, add Lines 17 and 18)PSI20 Estimated Pressure Available at worst case-headtwo-thirds of subtotal: Line 19 PSI x 0.67 = PSIPressure Available for Sprinkler Selection and OperationPSI
(PUMP SYSTEMS)Design Capacity and Working PressureWorksheetCALCULATING DESIGN CAPACITY AND DYNAMIC PRESSUREA. Record Site Information1 Dynamic pressure at the discharge point PSI2 Pump available flow at discharge point GPM3 Net elevation change (discharge to POC) ± FEET (+uphill, - downhill)4 Pressure change due to elevation: Line 3 x 0.433 = PSI5 Pressure at POC: Line 1 +/- Line 4 = PSI6 Delivery Line7 Isolation Valves8 OtherNumber/Length Size TypeB. Determine Design Capacity GPM WithFactor Restriction Restriction9 Pump/Well GPM capacity Continuous supply available atdischarge point (Line 2)10 Pump Safety Factor Not to exceed 90% of continuous supplyavailable at discharge point x 0.10= GPMGPM11 Design Capacity (subtract Line 10 from Line 9) GPMC. Calculate Dynamic Pressure at Design CapacityPressure Losses from Discharge Point to the POC12 Pressure reduction 10% as Pump Safety Factor x 0.10 = PSI13 Pressure loss in the Delivery Line PSI loss (per 100' ) x ft./100 = PSI14 Pressure loss in the Isolation Valves: Equivalence factorxPSI loss per 100' ofstandard steel/100x Number of valves = PSI15 Other pressure losses_____________________________ = PSI16 Pressure loss from the discharge point to POC (add Lines 12 through 15) PSI17 Approximate Dynamic Pressure at Design CapacityDynamic pressure at the POC (Line 5 above)PSISubtract the PSI lost from the discharge point to the POC (Line 16)PSIApproximate Dynamic Pressure at Design CapacityPSI
D. Estimate Pressure Available at “Worst-Case” Head18 Pressure change due to elevation change from the POC to thehighest head in the system. ft. x 0.433 = PSI19 Pressure subtotal (subtract Line 18 from Line 17; for worst caseheads which are lower than the POC, add Lines 17 and 18)PSI20 Estimated Pressure Available at worst case-headtwo-thirds of subtotal: Line 19 PSI x 0.67 = PSIPressure Available for Sprinkler Selection and OperationPSI
Sprinkler SelectionIntroductionThe multitude of variables in sprinkler characteristics and features canmake head selection a daunting task for first time designers. While there isno single method of head selection that works in all situations, this sectionof the design manual will provide a step-by-step process for choosing thebest sprinkler for the area. If the designer follows this method in the orderpresented it will narrow the list of acceptable heads to a limited numberfor final selection.The first step in the process is to have a good understanding of the types(categories) of sprinklers available. Then, knowing what category eachsprinkler fits in to, choosing the correct sprinkler becomes easier; youselect a category which contains just a few sprinklers, then you select asprinkler <strong>with</strong>in that category.Types of Landscape SprinklersGenerally speaking, there are three different types, or categories ofsprinklers which are most commonly used on the smaller irrigationprojects. Drip is used in some areas of the country, but it is not as widelyaccepted as the three categories that we will discuss in this section.1) Bubblers2) Sprays3) Gear Drive Rotors
BubblersBubblers are designed to apply a large amount of water to a small area in ashort period of time. The bubbler delivers water to the area immediatelyaround the head (umbrella bubbler), or is sprayed in thick streams a shortdistance from the bubbler (stream bubbler). Because of this high flow rateand close spacing requirements, bubblers are restricted to small, confined,level areas. Bubblers operate over a pressure range of 1 to 90 PSI and maybe used on most types of plant material <strong>with</strong> the exception of turf.SprinklerTypeBubbler - Floodor StreamBubbler -PressureCompensatingTypicalUsesSmall, levelareas <strong>with</strong>perimetercontainment.Small, levelareas where alower flow rateor pressurecompensatingis neededGeneralCharacteristics Advantages DisadvantagesHeads provide a largevolume of water in asmall area to “flood”plant material basins.Heads provide a loweramount of water in asmall area directly toplant basins.Provides a largequantity of water in ashort period of time.Reduces runoff. Lowerflow rate allows waterto be absorbed intosoil. Pressurecompensating featuremaintains even flowVery high flow ratewill result in run-off ifthe area isn’t level andthe water isn’tcontained.Lower flow raterequires longer runtimes.
Spray HeadsFixed spray heads may be used for almost any type of landscape planting– from turf and ground cover to shrub beds and planters. The shorterradius (5-17 ft.) of lawn and shrub fixed spray heads make for a high levelof control for over-spray, but their relatively short radius also limits theirusefulness to smaller areas. Spray heads typically have flow rates of up to5-1/2 GPM or more. This high flow rate restricts the use of the heads torelatively level areas to prevent runoff.Stream spray heads provide a slightly larger radius. Stream spray headshave been successfully used on gentle slopes because the GPM is slightlylower, while the radius is slightly larger, reducing the risk of run-off.Caution should be exercised when using stream spray heads in shrub bedsbecause shrub branches can block the relatively small spray streams.The pressures for most spray heads range from 15 to 50 PSI. Particularattention should be paid to situations <strong>with</strong> excess pressure, which producessevere misting and poor water distribution.SprinklerTypeShrub - FixedSprayPSSRSPro-SprayI-SprayTypicalUsesInstalled onStationary risersfor use in shrubbeds, groundcover areas oron slopes.GeneralCharacteristics Advantages DisadvantagesFixed spray head on riser<strong>with</strong>out pop-upcapability - typicallymade of plastic.Provides the abilityto install on fixedriser above theplant material.Not recommended for areas<strong>with</strong> pedestrian trafficbecause of tripping hazard.Small radius typically limitsuse to smaller areas.Pop-upFixed SprayPSSRSPro-SprayI-SprayWidely used forturf, groundcover, andshrub beds.Pop-up capabilityranging from 2” to 12” -typically made of plastic.Pops up above turfand ground covers.Pop-up heads nowcommonly usedanywhere foottraffic is a concernsuch as nearwalkways.Gravity retraction or lightweight retraction springs onsome brands may cause headsto stick in up position. Selectmodels <strong>with</strong> heavier-duty,more positive spring assistedretraction.
Gear Driven RotorsGear drive rotor heads are well suited for medium to large landscapes <strong>with</strong>most types of plantings. Their larger radius (15-74 ft.) make rotor heads afrequent choice for medium to large landscape areas.The relatively low GPM for the area of coverage is less than spray headsand makes them useful on landscapes from level to steeply sloping. Lowerflows allow more sprinklers to be operated at one time, reducing thenumber of zone control valves and controller stations (more area can becovered on a single zone). Additionally, less pipe and labor are necessary<strong>with</strong> rotor systems than <strong>with</strong> spray systems, which reduces the over-allsystem installed cost.Typically, designers want to use the largest head possible for the mostefficient and the lowest cost system. Pressure requirements for rotorsrange from 25 to 100 PSI.SprinklerTypeSmall AreaRotor -PGJFull size GearRotor - ShrubPGSI-10Full Size GearRotor - Pop-upPGPI-20I-25I-40TypicalUsesTurf, groundcover and shrubbeds.Installed onstationary risersfor use in shrubbeds, groundcovers areas oron slopes.Turf, groundcover and shrubbeds and slopes.GeneralCharacteristics Advantages DisadvantagesPop-up head <strong>with</strong>internal gear drive.Radius range from 15ft. to 25 ft.Gear drive heads haveone or more nozzlesthat provide largerradius than possible<strong>with</strong> fixed spray heads.Internal gear drive,typically larger nozzleopenings providegreater radius thanfixed spray or smallarearotor.Brings advantages of fullsize gear rotors to midrangeradius head.Multiple nozzle sets,variable arc. The PGMcan be installed on thesame zone as PGP or I-20.Multiple nozzle sets forvarious pressure andradius situationsRelatively low flowrequirements for the areaof coverage.Multiple nozzle sets forvarious pressure andradius situations.Relatively low flowrequirements for the areaof coverage.PGJ rotors should notbe used in areas smallerthan 11 or 12 feet.Full sized rotors aredesigned to be used inlarger areas.Full sized rotors aredesigned to be used inlarger areas.
Selecting the Proper SprinklerNow that you have an understanding of the three categories of sprinklersavailable, selecting the proper sprinkler for a project is simply a matter ofanalyzing the project and the areas to be watered.The following are general rules-of-thumb for sprinkler selection.Remember, there will always be exceptions to these guidelines.1) Pressure Limitations2) Flow Limitations3) Precipitation Rate4) Large to Small Radius5) Spray Patterns6) Angles of Trajectory7) Special FeaturesPressure LimitationsThe first consideration when choosing the correct sprinkler for an area ispressure. If the sprinkler’s operating pressure is greater than the estimateddynamic pressure available (estimated dynamic pressure is discussed inthe Design Capacity section of this manual) the sprinkler must beeliminated from the list of sprinklers to use. For example, our project hasan estimated dynamic pressure of 50 PSI. For the larger area on thisproject, any sprinkler that has an operating pressure over 50 PSI for the 35ft. radius needed would be scratched from the list of available sprinklers.Operating Pressure and Head Selection. The operating pressure is thepressure range that provides optimum sprinkler performance. <strong>Hunter</strong>establishes the range of operating pressures for our sprinklers andpublishes those specifications in our catalogs and other product literature.When selecting a sprinkler the operating pressure must be less than theestimated dynamic pressure available for the project. Operating pressuresrange from as low as 1 to 2 PSI for some bubbler heads to as high as 100PSI in large turf rotor heads.Too Little or Too Much Pressure. Attempting to use sprinklers forwhich there is insufficient pressure results in distorted spray patterns orfailure of the sprinkler to operate. Applying too much pressure to a headcan cause fogging, misting or structural damage to the sprinkler head. Ingeneral, it is easier to deal <strong>with</strong> a system that has too much pressure thanone <strong>with</strong> insufficient pressure. Operating pressures that are too high or toolow will result in uneven water distribution and poor plant growth.
What To Do for Insufficient Pressure. When insufficient pressure isavailable for the sprinkler head chosen, there are several alternatives: check system pressure losses to determine if sufficient pressure canbe conserved elsewhere in the system select an alternative nozzle for the sprinkler that operates at a lowerpressure (Note: this may affect head spacing and layout) select an alternative sprinkler model <strong>with</strong> a lower operating pressure install a booster pump (Note: this is usually the last choice becauseof the high initial cost and continuing operating expenses associated<strong>with</strong> booster pumps.)What To Do With Too Much Pressure. When there is too muchpressure, the pressure may be reduced <strong>with</strong> a pressure regulator for theentire system, or <strong>with</strong> a pressure regulator built into the control valve(such as <strong>Hunter</strong>’s ICV). In many cases, minor pressure reductions may bemade using the valve’s flow control.Flow LimitationsThe “Design Capacity” that was determined earlier may limit the selectionfurther. For example: our project has a design capacity of 14 GPM.Efficient irrigation designs will usually have at least 3 or more heads percontrol valve. Using that rule-of-thumb, 14 GPM divided by 3 equals 4.6GPM as the maximum GPM per sprinkler. Those sprinklers or nozzles<strong>with</strong> flow rates in excess of 4.6 GPM should be dropped fromconsideration.Sprinkler Flow Rates and Head Selection. In irrigation system design,the water available for irrigation on a project is limited to the designcapacity. Once the amount of available water (design capacity) isestablished, sprinkler heads that have flow rates of one third the designcapacity or less are selected. The flow rates are published in <strong>Hunter</strong>’scatalogs and specification sheets. These flow rates will vary for each typeof sprinkler depending on the operating pressure. It is important toremember the pressure being used for the design should be no more thanthe estimated pressure from the design capacity worksheet.Selecting sprinklers <strong>with</strong> flow rates of 1/3 or less of design capacity allowsthe use of at least three heads per control valve. This reduces system costby keeping the number of control valves to a minimum. For example: ifthe design capacity for a project is 18 GPM, sprinklers <strong>with</strong> a flow rate of6 GPM or less would be preferred (3 heads x 6 GPM = 18 GPM, which is<strong>with</strong>in the 1/3 range of the design capacity). There are exceptions to thisgeneral rule, but in most cases, if there are less than three heads percontrol valve the system cost will increase substantially.
Precipitation RateExpressed in inches per hour (in/hr), precipitation rate is the rate at whichwater is being applied. Large area rotors and small area sprays may use thesame GPM, but because the size of the areas they cover are not the same,the inches per hour of water applied is very different. Precipitation rateaffects sprinkler selection and irrigation scheduling. Site conditions,including slopes or slow soil infiltration rates, may require lowprecipitation rate heads or nozzles (less than 0.50 in./hr.). If lowprecipitation rates are necessary for the area, eliminate the higherprecipitation rate heads.Rule: Never install sprinklers <strong>with</strong> differentprecipitation rates on the same zone.Precipitation Rate and Runoff. Caution must be used when selectinghigh precipitation rate sprinklers (over 1.0 in./hr.) for use on areas <strong>with</strong>slopes. Precipitation rates that exceed soil infiltration rates on sloping soilscan result in runoff. While it is not always possible to select a sprinkler<strong>with</strong> a precipitation rate lower than soil infiltration rate, low precipitationrate sprinklers will reduce the potential for runoff and allow longer runtimes per cycle.Sprinklers are generally described as either :• Low Precipitation Rate - Less than 0.50 in/hr• Moderate Precipitation Rate - 0.50 to 1.0 in/hr• High Precipitation Rate - More than 1.0 in/hrThe chart below shows the range of precipitation rates found in commonsprinkler types. Sprinkler types may fall into more than one categorydepending on the nozzle selected.BUBBLERSFIXED SPRAYSGEAR DRIVE ROTORSTYPICAL PRECIPITATION RATE RANGESLOW MODERATE HIGH0.1 to 1.0 in./hr.1-1/2 to 12 in./hr.1 to 5 in./hr.0.1 1.0 2.0Precipitation Rate versus Sprinkler Run Time. In discussions ofprecipitation there is often a misconception <strong>about</strong> longer run timesassociated <strong>with</strong> low precipitation rate sprinklers. The amount of timerequired to irrigate a project is not typically affected by the sprinklerprecipitation rate. While it is true that each low precipitation rate headmust be run for a longer period of time, more heads can be installed on azone and, therefore, the total irrigation time for an entire project will bethe same for high precipitation-rate heads <strong>with</strong> many zones, and lowprecipitation-rate heads <strong>with</strong> few zones.
Similar run times can be confirmed by checking the design capacity. Ifdesigns <strong>with</strong> both high and low precipitation-rate heads use the maximumflow rate available for the project (design capacity) then both projects willhave similar total run times.Sprinkler RadiusDistance of throw is one of the most important criteria in sprinklerselection. Since the area to be irrigated cannot be changed, the sprinklersmust fit the area. It is usually more cost effective to use fewer sprinklers,so the sprinklers <strong>with</strong> the largest radius that can be used is a majorconsideration. For example, when the smaller of the two dimensions of anarea to be watered is 35 feet, a sprinkler <strong>with</strong> a radius that cannot beadjusted to 35 feet or less would be deleted from the list of possible headsfor the area.Head Selection Criteria With Regard to Radius. The following<strong>questions</strong> should be answered in order to select the best sprinkler for aproject. What is the largest radius head that can be used in this area? Is the perimeter straight or curved and irregular? Is there sufficient pressure to operate large radius sprinkler heads?Large Radius vs. Small Radius Sprinklers. As a general rule, usinglarge radius sprinklers on a project will result in less initial system cost.For example using several valves and numerous 15 ft. radius fixed sprayheads on a football field would be considerably more expensive than usinghalf-a-dozen valves and a few 60 ft. radius full-size gear drive rotors.Since using the head <strong>with</strong> the largest possible radius generally savesmoney on system installation, one of the main steps in selecting asprinkler is to determine the largest sprinkler radius that can be used onthe area <strong>with</strong>out excessive over-spray; small radius sprinklers tend toprovide coverage <strong>with</strong> less over-spray in small areas or areas <strong>with</strong>irregular perimeters. To determine the largest radius that can be used in anarea, the dimension of the shorter side should be considered.Generally, for larger areas a larger radius sprinkler is chosen. In somecases, large areas <strong>with</strong> irregular perimeters may have large radiussprinklers in the interior <strong>with</strong> smaller radius sprinklers along the edges.If the sprinklers in the smaller areas have a different precipitation rate thanthose in the larger area they must be valved separately so sprinkler runtimes can be adjusted to provide equal water application.The range of radius covered is, in part, determined by the type ofsprinkler. Small area spray heads are limited to <strong>about</strong> 17 feet while fullsized gear rotors have a radius range of up to 100 feet.
Sprinkler Watering PatternsMost sprinklers distribute water in a circular pattern. For these sprinklersthe “pattern” refers to the portion of a circle covered by the sprinkler. Thespray patterns typically available for sprinklers are as follows:1) Fixed Arc - The fixed arc patterns are set portions of a circlesuch as: full is 360°; three-quarter is 270°; two-thirds is 240°; half is 180°;one-third is 120°; and quarter is 90°. Some manufacturers include otherarcs in addition to these common patterns while other sprinklers may notbe available in as many settings.2) Adjustable Arc - Adjustable arc sprinklers can be adjusted toaccommodate any landscape including the popular meandering, or curvedlawns and ground covers. <strong>Hunter</strong>’s adjustable arc patterns are available ineither the smaller area spray sprinklers or the larger area gear drive rotors.This adjustable arc feature provides additional flexibility in obtainingcoverage in odd shaped landscape areas.Many contractors now use 100% adjustable arc products on their sites toassure custom-tailored watering and to reduce the need to stock multipleparts.3) Strip Spray Patterns - Fixed pattern spray heads are alsoavailable in rectangular patterns. While a rectangular pattern may seemideal for small, narrow landscape areas it is difficult to maintainsatisfactory water distribution when using strip spray heads. These headsshould be used <strong>with</strong> this potential drawback in mind.4) Stream Spray Patterns - Stream sprays distribute the water assmall distinct streams as opposed to solid spray patterns. The advantage ofthe stream spray is a lower precipitation and flow rate as well as a slightlylarger radius than fixed spray heads. Caution should be used where plantmaterial might disrupt the small streams.Angles of TrajectoryThe trajectory range for most sprinklers is from 0° to 35°. <strong>Hunter</strong> offerssprinklers <strong>with</strong> standard trajectories ranging from 18° to 28° and low angletrajectories from 13° to 15°, depending on the model sprinkler. Someconsiderations for choosing low angle trajectory sprinklers are as follows:1) Distance of throw - Low angle heads typically have a smallerradius and higher precipitation rate than standard trajectories for the samehead or nozzle.2) Wind - The amount of spray pattern distortion caused by wind isless <strong>with</strong> a low angle head than one <strong>with</strong> a standard trajectory.
3) Spraying under barriers - Low angle heads are sometimes usedwhere the objective is to have the spray pattern below the low hangingbranches and foliage of trees or large shrubs.Special Sprinkler FeaturesMany times the installation will require a sprinkler <strong>with</strong> a special featuresuch as side inlets, variable arcs, or a built-in check valve to reduce lowhead drainage. The following are some of the most popular specialfeatures on many sprinklers and should be reviewed when choosingsprinklers. Built-in Check Valves - This feature will prevent water drainage orpuddling at heads located at the lowest elevation on the circuit or zone.Check valves in these sprinklers typically provide low head drainageprotection for heads from 7 to 15 feet below the highest head. Reclaimed Water Identifier - Purple identification caps may beadded to identify the sprinkler water source as reclaimed water. Built-in Filter - Filters built into the body of the sprinkler are commonin sprinklers <strong>with</strong> small water flows or small orifices. Multiple Pop-up Heights - The choice of sprinkler pop-up heightsallows selection of a pop-up height from 2 inches to 12 inches. Higherpop-up heights facilitate irrigating in ground covers or low shrubs. Side/Bottom Inlets - On higher pop-up models (typically 6 inch ormore) a side inlet may be available. The side inlet allows the tallerpop-up body to be installed <strong>with</strong> the lateral line buried at a shallowerdepth than the overall height of the sprinkler body. Adjustable Arc - Adjustable arcs have been standard features of geardrive and impact drive rotors for years. More recently, manufacturershave developed adjustable arc spray heads. The adjustable arc reducesthe need for numerous sprinklers of various arc patterns, therebysimplifying inventories, installation and maintenance. Adjustable Radius - Most sprinklers are designed <strong>with</strong> radiusadjustment. Sprinkler radius can be adjusted from 75% to 99% ofnormal full radius and is useful in reducing over-spray. A note ofcaution: reducing the radius may alter the uniformity of waterdistribution.
Choosing Nozzles for Gear Driven RotorsWhen designing an irrigation system, it is important to ensure that theprecipitation is even over each zone of coverage. Matched precipitation ina landscaped area is best achieved by zoning like arcs together (quarterheads <strong>with</strong> only quarter heads, half <strong>with</strong> only half, and full <strong>with</strong> only full,for example), and then matching the precipitation rate by adjusting thecontroller run times.Matched precipitation can be accomplished by selecting the appropriatenozzles. When zoning together sprinklers that will have different arcs, thetwo criteria to consider are a sprinkler’s flow and area of coverage.Although you cannot achieve exact matched precipitation when mixingarcs, you can get very close by choosing nozzles according to the GPM,and spacing all the heads on a system the same distance apart (reducingthe radius on the half and full to the approximate radius of the quarter).The illustration depicts three different sprinkler heads <strong>with</strong> matchedprecipitation. In each case, one gallon per minute is applied to each quartercircle, and each quarter circle is the same size - precipitation is thereforematched.NOZZLE SIZE NOZZLE SIZE NOZZLE SIZE1 GPM 2 GPM 4 GPM1 GPM 1 GPM 1 GPM 1 GPM 1 GPM1 GPM 1 GPMFigure 25So, for heads <strong>with</strong> the same radius of throw, as the arc is increased, theflow rate of the nozzle should increase proportionally.
For nozzle selection in areas that will require odd arcs, such as 35º or 270º,use the following formula.Where:GPM UARC UARC KGPM KGPM U = (ARC U /ARC K ) x GPM Kis the flow rate (in GPM) of the unknown headis the arc (in degrees) of the unknown headis the arc (in degrees) of the known headis the flow rate (in GPM) of the known headPrecipitation rates will be more thoroughly discussed in a later section.SummaryThe list of sprinklers available for designing a sprinkler system is huge.Throughout this section we have discussed various criteria for selectingthe proper sprinkler for a particular use.Use the product catalog and the following seven points to choosesprinklers. Remember, these are general rules-of-thumb; there will alwaysexceptions to these guidelines.1) Pressure Limitations - If the sprinkler’s operating pressure is greaterthan the estimated dynamic pressures available, the sprinkler must beeliminated from the list of sprinklers to use. On higher pressureprojects, pressure regulation may be necessary.2) Flow Limitations - The Design Capacity that was determined earliermay limit the selection further. Efficient irrigation designs will usuallyhave at least 3 or more heads per control valve. Using that rule-ofthumb,those sprinklers (or nozzles)<strong>with</strong> flow rates in excess of 1/3 ofthe design capacity should be dropped from consideration.3) Precipitation Rate - Site conditions including slope and slow soilinfiltration rates may require low precipitation rates (less than 0.50in./hr.). If low precipitation rates are necessary for the area, eliminatethe high precipitation rate heads such as sprays.4) Sprinkler Radius - Since it is usually more cost effective to use lesssprinklers, the sprinklers <strong>with</strong> the largest radius that can beaccommodated in an area are considered first. Sprinklers <strong>with</strong> a radiusthat cannot be adjusted to the shortest distance in an area would not beplaced on the list of possible heads for that area. (Large area rotors aretypically used in areas that are larger than 25 feet, while small arearotors and sprays are usually placed in areas smaller than 25 feet.)
5) Sprinkler Watering Patterns - Be sure all heads remaining on the listhave the necessary spray patterns for the area being watered.6) Trajectory - If flat or low angle trajectories are necessary, furtherlimit the list to those heads <strong>with</strong> optional low angle trajectories.7) Special Sprinkler Features - The remaining heads should bereviewed to check for those needed special features such as side inlets,variable arcs or built-in check valves.The list of sprinklers that meet the needed criteria for the area has nowbeen narrowed to only the appropriate heads. Selection at this point willdepend on your past experience, manufacturer warranty and support, andproject budget.The seven step checklist approach to head selection will take less time asyou gain experience. With the added experience, you will often know thesprinkler to choose for a given area from the first glance at a design.What You Need to Know Do not exceed the systems pressure or flow limitations when choosingsprinklers. Never mix sprinklers <strong>with</strong> different precipitation rates on the samezone. Consider the sprinkler’s precipitation rate verses the soil’s infiltrationrate when choosing heads. Use the largest sprinkler available to cover the area. Using too manyheads unnecessarily increases installation costs, while using too fewheads leads to poor results and inadequate coverage in dry periods. The adjustable arc reduces the need for numerous sprinklers of variousarc patterns, thereby simplifying inventories, installation andmaintenance. Use sprinklers <strong>with</strong> low angle trajectories in areas where wind can be aproblem, or where it is necessary to spray under low growing treebranches.
Sprinkler PlacementIntroductionThe importance of proper sprinkler placement can not be overemphasized.Once installed, if an irrigation system performs inefficiently,changing the nozzles or even the sprinklers may not be sufficient tocorrect the problem. And changing the sprinkler spacing after installationrequires a great deal of additional time and money.This section is designed to give an overview of head placement. Becausedesign criteria and preferences vary from one geographical region to thenext, no two designers will arrive at exactly the same placement pattern.The design criteria on some projects may emphasize sprinkler uniformity<strong>with</strong> minimal overspray while other projects may not be as concerned <strong>with</strong>uniformity and overspray as <strong>with</strong> system installation cost. Because of thevarying design criteria and designer preferences, this section will providea starting point for learning the art and science of head placement.Key FactorsWhile there are different approaches to sprinkler head layout and spacing,certain factors must be considered for any placement plan. Key amongthese is the type and size of the planting areas (also called hydrozones),the manufacturer’s maximum spacing ratings and the designers choice ofspacing methods, and the effect of wind on those spacing values.
HydrozonesA hydrozone is a portion of the landscape that has similar plants and/orwater requirements. The hydrozone is irrigated by one or more valvesusing a common irrigation schedule. Before head placement can begin thedesigner must establish hydrozones, or areas <strong>with</strong> plants that wouldlogically be watered on a similar irrigation schedule. Examples ofhydrozones include an area of turf grass, a shrub bed, or a slope <strong>with</strong>ground cover.The purpose of establishing hydrozones is to divide the landscape intoareas that would use similar sprinkler equipment and can later besubdivided into circuits or zones. These circuits or zones are areas <strong>with</strong> theidentical irrigation requirements. Subdividing the hydrozone into circuitsor zones is presented later in the System Layout section. Once thehydrozones are established, the process of head spacing and layout begins.Maximum Spacing RatingsTraditional head spacing methods try to balance the need for uniformcoverage and sufficient sprinkler overlap <strong>with</strong> the financial advantagegained by installing the fewest number of heads possible. This usuallymeans installing the sprinkler <strong>with</strong> largest radius possible. (Large arearotors are typically used in areas that are larger than 15 feet, while smallarea sprays are usually placed in areas smaller than 15 feet.) Therecommended sprinkler radius information is found in the <strong>Hunter</strong><strong>Irrigation</strong> Products Catalog.The traditional spacing methods are based on either square or triangularspacing patterns. The distance between sprinklers in a row and thedistance between rows of sprinklers is based on the sprinkler’s radius ofthrow. The distance is reduced as the average wind speed increases or asrequired by the distribution pattern of the sprinkler.
Square Spacing PatternsIn a square spacing pattern the sprinklers in a row are the same distanceapart as the rows of sprinklers. It is sometimes considered that squarespacing provides less uniform coverage than equilateral triangle spacing.However, in many small landscape areas it provides the best protectionagainst overspray, and therefore is the preferred spacing pattern.Figure 26Triangular Spacing PatternsIn a triangular spacing pattern, the heads are placed at the corners of anequilateral triangle as shown. With triangular head spacing, the uniformityof coverage will be slightly higher than <strong>with</strong> square spacing patterns.Figure 27
Triangular spacing is usually the preferred spacing pattern for largelandscape areas. The major drawback to triangular head spacing is thetendency for more overspray along the perimeter, therefore it is seldomused in residential or other small area systems.Square Spacing:Triangle Spacing:Figure 28In both the square and the triangular methods, a minimum of head-toheadspacing is recommended (Figure 29).Figure 29
The Effects of WindSprinkler manufacturers recommend no more than head-to-head spacing inmost situations. Additionally, manufacturers recommend watering in theearly morning hours when the wind speed is at its lowest. The realityhowever, is that avoiding the wind may not be an option in all cases, andthe spacing may have to be reduced to achieve even coverage.Generally speaking, spacing at the manufacturer’s recommended radiuswill provide even water distribution in light breezes of up to <strong>about</strong> 5 milesper hour. In areas where the wind is stronger than that, the spray patternbecomes distorted. A general rule of thumb is that for prevailing winds ofmore than 5 miles per hour, reduce the spacing by 1% for every 1 mile perhour.In many areas where wind is a concern, low angle nozzles help to reducewind drift and the resulting waste of water and uneven distribution.Initial Sprinkler LayoutWhether based on square or triangular spacing methods, nearly everyirrigated area will need some modification to the head and/or row spacingpatterns. Achieving final head placement is the result of a process thatincludes:A) initial head layout based on the traditional head spacingmethods and manufacturer recommendations.B) compression of head and/or row spacing as necessary toconform to site conditionsC) placement of fill-in or supplemental heads, or heads <strong>with</strong> alarger or smaller radiusSprinkler Placement ConsiderationsA) Consider the size of the hydrozone to find a placement patternthat provides uniform coverage while limiting the number of rows ofsprinklers so that the cost of the installation is not prohibitive. Forexample, there may be sufficient pressure available to utilize a sprinklerthat would cover the area <strong>with</strong> a single row placed in the middle of thearea, but single row spacing results in poor water distribution uniformityand excessive overspray.Distribution uniformity increases when two or more rows of sprinklers areused, but system installation cost increases <strong>with</strong> the additional rows. Agood design will provide a balance of uniform coverage <strong>with</strong>out anexcessive number of sprinklers.B) The flow and pressure available for the system will restrict theoptions available for sprinkler spacing. The lower the available pressure
and flow rate, the smaller the sprinkler radius. A smaller sprinkler radiusresults in shorter head and row spacing.C) Selection of the sprinkler pattern that provides minimaloverspray increases in importance if the irrigated area is bounded by publicwalkways, roadways, or parking areas, or if water conservation is animportant consideration.Placing the SprinklersBegin placing the sprinklers by locating appropriate part-circle sprinklersat all of the critical points of the area to be irrigated. Critical points are thecorners of the area. For example, a relatively small square area has fourcritical points, where four quarter-circle heads would be located (seeFigure 30).Figure 30
The next step is to measure the distance between adjacent critical points. Ifthe distance between two sprinklers is <strong>with</strong>in the spacing criteriaestablished by the manufacturer, then no additional heads are necessary(head-to-head coverage). If the distance exceeds these spacing criteria,place a head <strong>with</strong>in the recommended distance of one of the critical points(see Figure 31). Repeat this process around the edge of the entire area untilthere are enough part-circle heads to satisfy the spacing criteria.Figure 31Now, if the coverage of the part-circle heads across the width of the areaalso does not meet the spacing criteria, then full-circle sprinklers need tobe added along the length of the area. Locate these points by drawing aperpendicular line from each part-circle head, across the area, to theopposite head. Place full-circle sprinklers at the intersections of these gridlines (see Figure 32). Be sure to check the spacing along both the verticaland horizontal grid lines to ensure the spacing criteria are met in bothdirections.Draw perpendicular lines from ahalf-circle head to the one acrossfrom it to easily determine thelocation of the full-circle head.Figure 32This method can be used to produce triangular spacing patterns as well.However, in this case, the grid lines will be diagonal instead of
perpendicular (see Figure 33). Many designers believe that triangularlayouts provide better uniformity, but this may not always be the case. Forexample, a triangular pattern used in a rectangular area can reduceuniformity at the boundaries of the area.So, a good rule of thumb when selecting a shape pattern is to userectangular patterns for areas <strong>with</strong> right-angle corners, and triangularpatterns for areas <strong>with</strong> odd-angle corners.Note in Figure 33 that heads are placed at the intersection of two arcs.Figure 33
Curved LandscapesThe previous placing method is good for achieving uniformity in areas<strong>with</strong> definite corners. However, standard geometrical spacing is notsuitable for all landscaped areas, especially those <strong>with</strong> curved shapes. Inthese cases, the critical points are the edges.To design an irrigation system in a curved area, begin by placingsprinklers at the edges of the area, and then move inward toward its center.To determine these locations, convert the curved edge to a series ofstraight lines (see Figure 34); the length of the lines is determined by thesprinkler radius.Figure 34Next, place part-circle heads at each intersection of two lines. When this isdone, full-circle heads are placed inside the area, from the perimetertoward the center of the area. Instead of using grid lines to place theseinterior heads, draw the circular spray pattern of each edge sprinkler, andevaluate its position using the spacing criteria of the manufacturer.Continue this process while moving toward the center of the area (see Figure35).Figure 35Most of the sprinklers placed inside the edges of the area will be fullcircles. If this does not provide adequate coverage, “back-up” heads maybe required to achieve uniformity. These heads are not part of a
“symmetrical” layout, and they are placed to water areas that do notreceive sufficient overlapping coverage from the other sprinklers.Square, rectangular, and slightly curving landscape areas <strong>with</strong> noobstructions are the exception rather than the rule. Most landscape areascontain curves, obstructions, or size variations that make head placementmore challenging. No two designers approach head placement for an areain the same way. With that in mind, the following are some typicalproblems faced by irrigation designers.Solutions to the Design ProblemsThere are many solutions to every design problem. All of the solutions,however, will be undesirable to some degree depending on the designcriteria. When designing for minimum cost, uniformity is jeopardized. When trying to reduce head count, overspray becomes aconcern. Designing for maximum coverage <strong>with</strong> minimal oversprayresults in additional sprinklers and higher installation cost(lower operating costs may offset higher installation costswhere water rates are high).Sprinkler head layout is a process of selecting between conflicting designcriteria and reaching a compromise. The following design solutionsemphasize minimal overspray and maximum uniformity at the expense ofadditional sprinklers and higher initial expense.Special SituationsShrub Beds - Shrub beds where plants are spaced close together presentthe designer <strong>with</strong> the problem of dense foliage which blocks spraypatterns.With dense shrub beds the design options include: 1) shrub heads on tallrisers to spray top of the foliage, 2) low angle trajectory nozzles to sprayunder the foliage, 3) bubblers in level areas <strong>with</strong> contained borders, or 4)drip irrigation. All of these solutions have their own limitations butrepresent possible options.
Protected Areas - Protected areas include: walks, patios, low windows,fences and walls.For walks and patios the object is to minimize water onto these surfaces tolimit safety hazards and reduce water waste. Depending on the size of thearea, in general, smaller radius heads will result in less overspray thanlarger radius heads. In some cases where there are irregular boundaries onlarge landscape areas, small radius heads are used at the perimeter toprotect the walks or other surfaces.Windows that extend to the floor line present a special problem fordesigners. The window must be protected from spray drift or excessivemaintenance will be required to remove accumulation or water spots. Tominimize drift, 180° low angle spray heads are placed against the wall,spraying away from the window. This minimizes the drift of water backonto the window. If this is not sufficient, drip or bubbler irrigation in theseareas is another option.Fences and walls should be protected from direct spray to prevent fadingor discoloration. Placing sprinklers 6 to 12 inches away from the fence orwall, and adjusting the sprinkler's pattern to spray out into the landscapewill minimize the amount of water that comes into direct contact <strong>with</strong>them, and will reduce the amount of discoloration.The Narrow Planter - A designer may be faced <strong>with</strong> a narrow planterthat is smaller than the radius of most sprinklers. These areas are typical ofplanting strips around buildings and walkways where overspray can be aproblem.In a narrow area of turf, head placement can be difficult because of thenumber of heads that must be used in a small area to achieve uniformcoverage. Because of the large number of heads in this small area theprecipitation rate will be very high, which will require multiple shortirrigation cycles to prevent runoff.In shrub or ground cover areas, the number of heads needed can bereduced from the same sized turf area. This reduced-head layout may notprovide adequate coverage for turf, but it can be appropriate for someground covers and shrub beds.
Head spacing in narrow areas is determined by the size of the narrow area.Measure both areas, then divide the length of the narrow area into thelength of the long area. This is the number of spaces between heads.Simply add 1 to the number of spaces to establish the number of headsneeded for the area. When placing heads on the plan, place the firstsprinkler along one side of the planter and place every other head on theopposite side of the planter.A Wider Planter - A planting area of 15 to 20 ft. along the narrow side ismore in line <strong>with</strong> the radius of throw for small rotors. The head layoutwould be similar to the narrow planter except that you can use small rotors(<strong>Hunter</strong> PGM). With this larger area the head count and precipitation ratewould be acceptable.The Curved Strip - A narrow curved area similar to a median area alonga curving roadway can present a problem because the distance along theinside of the curve is less than the distance along the outside of the curve.In a curved strip the head layout would be approached similar to the widerplanter discussed above. The difference is the curve’s inside radius isshorter than the outside radius. The designer would start by selecting ahead that could cover the dimension across the narrow side of the area.The heads would then be placed along the inside curve at the appropriatespacing as determined by manufacturers recommendation, or bytraditional spacing distances. The opposing row of heads placed along theoutside edge of the curve would be placed using the same spacing (orcompressed if necessary) <strong>with</strong>out any attempt to keep the inside andoutside heads aligned in a square or triangular pattern. Because of thedifference in length of the inside and outside radii there may be fewerheads along the inside than along the outside of the curve. This type ofplacement provides for head-to-head coverage even though it is neither atrue square or triangular pattern.Figure 36
The Radius Edge - This type of area presents a problem because only oneside is a radius. Normal head spacing must be adjusted or sprinklers <strong>with</strong>larger or smaller radius must be used.Head placement in an area <strong>with</strong> a radius does not represent a true square orrectangular area either. Head placement must be adjusted to fit the curvededge while still maintaining head-to-head coverage.Figure 37Short Radius Corner - This problem represents a portion of a larger turfarea. The problem area is the corner that has a short radius.Figure 38
Head placement is complicated because the corner of this area is roundedinstead of square. The designer must make a decision to either place ahead outside of the planting area in a normal corner area position, centerthe head on the radius, or eliminate the sprinkler head.A larger radius sprinkler can be very successful in a tight radius situation.Simply place an adjustable arc head in the corner, centered on the radius.While this does not provide perfect coverage, it delivers acceptablecoverage for turf <strong>with</strong> minimal overspray. If the area is planted <strong>with</strong>shrubs, the head in the corner could be eliminated.The Angled Border - In this situation the area starts out as a rectangle butthe border on one side angles in to a narrower dimension. The challengehere is to use reduced radius heads to complete the head layout.The head layout in this type of area can use rotor heads such as the PGP orI-20, <strong>with</strong> the radius reduced in the narrow end. Smaller nozzles can beused to obtain the reduced radius while maintaining a relatively uniformprecipitation rate. If the area is too small for a reduced radius nozzle, aPGJ may be used on the same system. In order to maintain uniformapplication rates, the sprinklers along the perimeter may be placed on aseparate valve(s) from the sprinklers in the middle of the area. Separatevalves allow for longer sprinkler run-times for the heads in the middlewhich can contribute to an even distribution of water throughout the entireplanting area.Figure 39In a smaller angled landscape area, spray nozzles <strong>with</strong> a shorter radius canbe installed in the narrower end.The Curved Border - This problem includes a curving border thatrequires changing radius and/or types of heads in order to provide uniformcoverage minimal overspray.
A possible solution for this problem would be to use fixed spray heads(<strong>Hunter</strong> PS or SRS) to provide uniform coverage <strong>with</strong> minimal overspray.Another solution if the area is large <strong>with</strong> a tight curved border would be touse a combination of <strong>Hunter</strong> PGP or I-20 rotors and PGJ rotors on thesame zone, or even Pro-Spray or I-Spray spray heads on a separate zonefrom the rotors. If you would need to use the spray heads, the use of therotor heads in the same area substantially reduced the overall cost for thelarger area even though the spray and rotor heads would have to be onseparate valves. The difficult portion of this solution is to decide where tostop the spray heads and start the rotors.PGP
Figure 40PGJ
The Irregular Border - In this problem the border is neither straight nor afixed radius. This wavy area forces the designer to make multiple nozzleselections and adjustments to head placement to accommodate theirregular boundary.Figure 41Like the Curved Border, because of the irregular boundary reduced radiusheads would be implemented using smaller nozzles to maintain uniformprecipitation rates. And, in order to maintain uniform application rates, thesprinklers along the perimeter would be on a separate valve from thesprinklers in the middle of the area. Separate valves allows for longersprinkler run-times for the heads in the middle.The Slope - In most sloped areas there are two challenges: the slope of thearea and the fact the slope narrows at one end. This type of area is typicalwhere a driveway enters an elevated property from a roadway. The narrowarea requires an adjustment in the head spacing or radius of the heads.Additionally, the slope increases the potential for run-off and erosion.Normally, the designer would choose low precipitation rate rotors for useon a slope. In some cases, a slope that is narrowed at one end makes theuse of rotors impractical. Small radius spray heads can be used on theslope in order to accommodate those narrowing areas. Because sprayheads have a high precipitation rate, the system would need a controllercapable of watering using multiple short cycles to prevent excessive runoffand erosion (such as a <strong>Hunter</strong> ICC).
On larger slopes, a combination of rotors in the larger areas and sprays inthe smaller areas <strong>with</strong> separate valves controlling the application of watercan be a possible solution.In order to provide greater control, three separate valves would beinstalled on the slope; one controlling the heads at the top of the slope, onefor the middle heads, and one for the heads at the bottom of the slope.Obstructions in the Landscape - With obstructions in the landscape,such as tree trunks, light poles or signs, care must be taken to prevent dryspots behind the obstruction caused by a blocked spray pattern. Whenobstructions are present, design options include: 1) adjusting headplacement so the obstruction is at equal distance between adjoining headsor, 2) placing an additional fill-in head next to the obstruction sprayinginto the area where the spray pattern is blocked or 3) selecting largerradius heads where pattern is blocked in order to reach the dry spot.Solutions to the problem of obstructions in the landscape require: 1)adjusting head placement so the obstruction is at equal distance betweenadjoining heads or, 2) placing additional fill-in heads near the obstructionspraying into the area where the spray pattern is blocked or, 3) selectinglarger radius heads where pattern is blocked to reach the dry spot.Residential Landscape: Adjoining Large and Small Areas - With thisresidential yard the designer is presented <strong>with</strong> the typical problem of alawn area that has a small narrow area attached to a larger lawn area. Inthese situations, the designer must either maintain uniform precipitationrates in the large and small areas or separate valves must be used toaccommodate the different precipitation rates when using different typesof heads.The small and large adjoining areas problem presents a difficult designsituation which is common on small residential areas. The designer isfaced <strong>with</strong>: 1) turf areas <strong>with</strong> east and west exposure which will requiredifferent irrigation schedules, 2) large and small turf areas that requiredifferent sprinkler types, 3) challenges to maintain uniform coverage <strong>with</strong>minimal overspray.
One solution to these problems is to use spray heads and rotors. Pro-Sprayor I-Spray spray heads can be used in the smaller areas, while PGJ, PGP,or I-20 rotors can be in the larger areas. Separate valves are required forsprays and rotors.If the smaller area is large enough (12 feet to 30 feet), PGJ rotors can beplaced in that area <strong>with</strong> the PGP and I-20 rotors designed into the largerarea. Because the two rotors have similar precipitation rates, both thesmall area and the large area rotors can be installed on one valve.20 ftPGJ20 ftPGP40 ft40 ftFigure 42
SummarySprinkler head placement is the most difficult and one of the mostimportant steps in sprinkler system design. System uniformity, andinstallation and operating costs are determined by head placement plans.Improved head placement will occur when:1. manufacturer’s recommendations are followed2. careful analysis of head layout is included in the design process3. head placement plans are compared <strong>with</strong> field installationsWhile no head placement plan will result in perfect water distributionuniformity, well thought out placement patterns will result in improvedsystem performance and plant health over the lifetime of the irrigationsystem.What You Need to Know Decide where you will be installing large area sprinklers and where youwill be installing small area sprinklers. Always design your sprinkler systems <strong>with</strong> head-to-head coverage. Design the system by placing sprinklers in one area at a time. The critical points are the corners. Mark the corners to receiveheads, then using a compass, draw an arc showing thesprinkler’s pattern. If the quarter circle heads will not spray each other, placesprinklers along the perimeters. Draw these sprinkler’s wateringpatterns. If the perimeter heads will not spray across the area to the headson the other side, add full circle heads in the middle. Draw thesesprinkler’s watering patterns. Minimal overspray and maximum uniformity is achieved at the expenseof additional sprinklers and higher initial expense.Sprinkler head layout is a process of selecting between conflicting designcriteria and reaching a compromise. Your design solutions will be drivenby the budget – <strong>with</strong> a higher the budget, your design can be moreefficient.
ExerciseTransfer following two areas to your <strong>Hunter</strong> graph paper. Then, using<strong>Hunter</strong> PGJ rotors, place sprinklers in the appropriate locations.Remember to start at the corners, then add heads as necessary. Assumingthe available dynamic pressure at the sprinkler is 40 PSI, use the catalog todetermine which nozzles to use.Problem 115 ft.30 ft.Problem 215 ft.30 ft.15 ft.15 ft.
Backflow PreventionIntroductionBackflow in sprinkler systems is the reversal of the flow of water from thesprinkler system back into the potable water system. This undesirablereversal of flow can draw contaminated water back into the drinking watersystem. There are many case studies where the backflow of contaminatedwater has caused severe and widespread illnesses, and in some casesdeaths.The intent of this section is to make you aware of the need for backflowprevention on all projects. Additionally, because you will understand theneed of reducing this risk, you will have a better understanding of properinstallation practices.The following booklet on backflow preventers is very well written andincludes a thorough discussion of what backflow is, and case studies tosupport the use of backflow prevention devices.Various types of backflow prevention devices are discussed in the booklet.The Device Selection portion will help you decide which backflowpreventer to use, and the Installation section provides you <strong>with</strong> details forthe proper installation of each device.As the various municipalities will require different types of devices, werecommend that in each separate area where you plan on installing asprinkler system, you check the requirements for that area.
System Layoutand Pipe SizingIntroductionMany hydrozone areas on a property will require more water than theproperty has available (system design capacity). The design pressure andflow must not exceed the calculated system design capacity and thepressure available for sprinkler selection and operation.When backflow preventers, valves, or main line or lateral line pipe is sizedtoo small, the system may experience water hammer. Severe waterhammer will cause the pipes to vibrate or create a pounding noise. Inextreme conditions, damage to the system may occur.When the components are sized too large, the initial cost of the system ishigher than necessary. Automatic control valves which are sized too largemay not close due to the slow moving water.This section discusses the procedures for correctly laying out and sizingthe pipe and other components that go into a sprinkler system.
System LayoutLaying out a system begins <strong>with</strong> the information learned in the SprinklerSelection and the Sprinkler Placement sections. Once the sprinklerlocations for each hydrozone have been established, circuit the sprinklersinto zones based on the design capacity as determined in the DesignCapacity section. After the individual sprinkler zones have beenestablished, connect the sprinklers together <strong>with</strong> pipe, size the pipe, andlayout and size the valves and backflow preventer.Circuiting Sprinklers Into ZonesDividing the area into zones so that the design capacity is not exceeded isan easy process.Working in one area at a time, write individual sprinkler GPMrequirement next to each sprinkler in the area. Add up the GPMrequirements for all sprinklers in one hydrozone, and divide by the totalGPM (Design Capacity) available.: =total GPM of all heads in one area design capacity in GPM number of zones in this areaIf the “number of zones in this area” is not a whole number, round thenumber up to establish how many zones there will be. (1.2 zones becomes2 zones.) This is the total number of valves needed for the sprinklers inthat area.If more than one zone will be needed for the area, divide up the sprinklersso that all zones in the area will have approximately the same GPM flowrequirement. Don’t place too many heads on the same zone; stay <strong>with</strong>inthe system’s design capacity.Repeat this process for each area on the property.
Locating the Lateral LineThe two most common types of pipe used in sprinkler systems are PVC(polyvinyl chloride) and Poly (polyethylene). Check <strong>with</strong> your local<strong>Hunter</strong> Distributor to find out which type of pipe is used in your area.Draw a line connecting all sprinklers in each individual zone, one zone ata time. Be sure to draw each system using the most direct route, <strong>with</strong> thefewest turns or changes in direction as possibleRIGHTWRONGFigure 43Control Valve LocationsAutomatic control valves are usually placed in groups, or manifolds.Determine where you will want the manifold for each area. You may wantone manifold in the front yard, and one manifold in the back yard, or youmay want more locations. Generally, manifolds are placed near the areathe valves will serve, but where the user will not get wet when activatingthe valve using the manual bleed.Draw and label the zone valves for each individual area. (Zone 1, Zone 2,etc.). Draw the most direct line possible from the valve to the sprinklerlateral. Repeat the process of dividing up areas and sprinklers in an area,and connecting the sprinklers to the valve for all areas on the design.
Backflow Preventer LocationLocal plumbing codes govern the installation of backflow preventers.Usually, you will be required to place them in a position on the propertywhere they are a minimum of 12” above the highest head. Check yourlocal codes. Draw the location for the backflow preventer on the plan.Main Line LocationIn most systems, the main line will be under continuous pressure. Class315 or Sch 40 PVC is the most common choice for main line pipe in thesesituations.Determine the location for the point of connection (POC). Draw a lineconnecting all of the zone valve manifolds together, and then draw a lineconnecting this line to the backflow preventer, and then to the POC.If the installation is in a freezing climate and the POC is in a basement,install a gate valve and a boiler drain immediately after the POC to drainthe system in the winter. Install a slip x slip x 1 inch threaded tee <strong>with</strong> ariser and a threaded cap after the backflow preventer to be used forblowing out the system before the first deep freeze.Copper pipe may be required between the POC and the backflowpreventer. Always check the local plumbing codes for the requirements inyour area. In general, above ground connections to backflow preventersshould use metal pipe and fittings for durability and sunlight resistance.Isolation Valve LocationsIsolation valves are great to use when performing maintenance on the zonecontrol valves. On large commercial properties, it is not uncommon toplace an isolation valve at each control valve manifold. On smallerproperties, it is usually sufficient to place one main shutoff valve at thePOC only. Many times, residential designers place isolation valves at thePOC, and at both sides of a tee in a main line system for ease ofmaintenance.Today’s low cost PVC ball valves make isolation valves for residentialinstallations economically feasible easy to install. Note all isolation valvelocations on the design.
Controller Placement and Wire RoutingControllers (sometimes called clocks) are available in indoor mount andoutdoor mount. Indoor mount controllers such as a <strong>Hunter</strong> SRC should bein a weatherproof enclosure or in an indoor location, such as a garage,shed, or covered porch, which is protected from moisture and directsunlight. Outdoor-approved controllers can be mounted outside <strong>with</strong>out anadditional enclosure. An example of an outdoor-approved controller is a<strong>Hunter</strong> ICC-PL or a <strong>Hunter</strong> ICC-MIndoor controllers should be mounted near a 120 volt AC outlet where the24 volt plug-in transformer is connected. Outdoor controllers arefrequently “hard wired” from the 120 volt source to the controller location.Hard wiring often requires the use of conduit – check local electrical codesfor the type of wire and wire conduit to use.For new construction, the controller location can be pre-planned and the120 volt wiring can be installed in the wall before the wall is finished. Thewire can then be installed through the back of the controller, in most caseseliminating the need for a conduit. Note the controller location and the 120volt source on the plan.The low voltage wire which runs from the controller to the valves isusually installed in the main line trench. You may want to indicate wireruns on your plan.Wire connectors which are not exposed to moisture can be electrical “wirenuts” or insulated electrical connectors. Connections that will be located atthe valves or in other areas subject to moisture should always bewaterproof direct burial type. The low voltage control wire running fromthe controller to the valves should be rated for direct burial. This type ofwire is available as an insulated single strand or as a jacketed multiconductor.Either is acceptable for small irrigation systems, but thejacketed multi-conductor is generally less expensive.Remote Control/Remote ProgrammerA remote control can save time during installation and routine systemmaintenance. A receiver is installed at the controller, and a transmitteractivates the sprinklers from a location on the property some distance fromthe controller. This allows the contractor or property owner to remotelyactivate a manual watering or system blow-out <strong>with</strong>out the need to visitthe controller.There are a few different models of remotes available at various pricepoints. The <strong>Hunter</strong> ICR receiver is plugged into an easy to hook-up wiringharness and can be used at up to 450 feet away from the receiver.Watering can be remotely controlled for all stations, or for one station at a
time. Station run time can be temporarily changed to permit customoperation. The ICR is very affordable and is available for use on <strong>Hunter</strong>SRC and ICC controllers.Rain SensorRain sensors are small sensing units which collect rainfall. They are usedto stop the controller from sending the low voltage signal to the controlvalves during periods of rain.Rain sensors are usually mounted near the controller on the eaves of aroof, or on a fence, away from possible irrigation interruption due tosprinkler water. Be sure to install the sensor away from obstructions sothat rain can freely fall onto the sensor.If a <strong>Hunter</strong> controller is not being installed, it is helpful to wire-in a bypassswitch to turn off a sensor when its operation is undesirable (e.g. testing asystem after rainfall). <strong>Hunter</strong> controllers have a built-in feature toaccommodate this.
Pipe SizingYou are now ready to begin sizing the pipe throughout the system. Aspreviously mentioned, sizing pipes is a matter of friction lossmanagement.In many areas of the country, when installing a sprinkler system on a smallresidence, it is a standard practice to use just one size of polyethylene(poly) or PVC pipe for all lateral lines. This practice saves installationtime, reduces fitting inventory costs, and in most cases will not presentany problems as long as the installer does not exceed the maximum flowrate for the size of the pipe used.The larger the project however, the more important it becomes to managethe system’s friction losses. When installing larger systems, sizing alllateral lines the same can be quite wasteful. The material costs are higher,and the amount of water required to fill an over-sized pipe, which is thenlost to low head drainage, can be significant.Here, we are going to discuss pipe sizing so that you are familiar <strong>with</strong> theprocedure. Many times when a sprinkler is not performing according tomanufacturer’s specifications, it is because of improper pressure or flow.Correct pipe sizing will uncover potential pressure or flow problems insprinkler systems.When sizing pipes, you can use the friction loss tables developed from theHazen-Williams formula, or you can use the Friction Factor formula.
Pipe Sizing Using the Friction Loss TablesLateral Lines. Refer to the <strong>Hunter</strong> Friction Loss Tables in the back ofthis Design Manual and begin sizing the pipe:1. Start at the head furthest from the zone valve. The pipeconnecting the last head to the second to the last head should be3/4”. (It is acceptable to use 1/2” PVC pipe, but do so <strong>with</strong>caution; watch the sprinkler’s flow requirements.)2. Add the GPM requirements of the last head and the second tothe last head together to size the next pipe.3. On the Friction Loss Table for the type of pipe you havedesigned, find the GPM total from step 2 in the far left column.4. On that row, go across to the first column that is not shaded*.At the top of this column is the pipe size necessary to carry theflow for these two heads.5. Add the GPM requirements of the next head to the last GPMtotal.6. Find this total in the Friction Loss Tables.7. Continue to do this until you get to the zone valve. Do not try tosize a pipe smaller than the chart indicates.8. Repeat steps 1 through 7 for each zone.Main Lines. Refer to the <strong>Hunter</strong> Friction Loss Tables for sizing the mainline. The main line should be sized large enough to handle therequirements of the zone valves it is serving; use the zone <strong>with</strong> the largestflow requirements. (Note: This assumes only one valve will be operatingat one time on an automatic system.)*Note: The shaded area on the chart designates those flow rates that exceed 5 fps.It is recommended that caution be used <strong>with</strong> flow rates exceeding 5 fps in pipes.
Pipe Sizing Using the Friction Factor FormulaThe Friction Factor formula is used to determine the maximum flow ingallons per minute through any section of lateral line pipe while notexceeding a predetermined pressure loss variation. In order to minimizeuneven distribution, sprinklers on a zone should operate <strong>with</strong> pressurevariation between sprinklers of not more than10% to 20 % of the desired sprinkler operating pressure.Friction Factor = sprinkler operating pressure x allowable % of PSI variationcritical length of pipe from the valve to the furthest head(in hundreds of feet)Once the acceptable PSI loss has been calculated, refer to the <strong>Hunter</strong>Friction Loss Tables to size the pipe.1. Beginning <strong>with</strong> the smallest sized pipe on the friction loss chartfor the pipe you are using, locate the calculated Friction Factorunder the column labeled “P.S.I. LOSS”2. Now go across the row at this point to the left hand column tofind how much water should be allowed to flow through thissize pipe.3. Repeat step one and step two for all sizes of pipe until you havereached your design capacity.4. Starting at the head furthest from the zone valve, begin sizingthe pipe based on the numbers obtained in steps 1 through 3.The pipe connecting the last head to the second to the last headshould be 3/4”. (It is acceptable to use 1/2” PVC pipe, but do so<strong>with</strong> caution; watch the sprinkler’s flow requirements.)5. Add the GPM requirements of those two heads together, andnote how it compares to the allowable GPM in steps 1 through3.6. Add the GPM requirements of the next head to the last GPMtotal. Again note how the total GPM requirement compares tothe allowable GPM in steps 1 through 3.7. Continue to do this until you get to the zone valve. Do not try tosize a pipe smaller than the Friction Formula indicates.8. Repeat steps 4 through 7 for each zone.The Friction Factor formula is the most accurate method of pipe sizing,and will provide the most uniform application of water. <strong>Hunter</strong>’sHandbook of Technical <strong>Irrigation</strong> Information (LIT-194) has a sectiontitled Friction Factor Short Cuts. In this section, pipe sizing charts areprovided for various types of pipe and Friction Factors.
Backflow Preventer and Valve SizingBackflow preventers and automatic control valves can be large pressureconsumers. Sizing these valves is easy – simply use the manufacturer’spressure loss charts. Isolation valves can be great tools if valvemaintenance is necessary, and are mandatory for winterization if thesystem is installed in freezing climates.Backflow PreventersBackflow preventers are generally sized the same size as, or one sizesmaller than the mainline. Check the pressure loss chart in themanufacturer’s product catalog to be sure it is not sized too small. Usecaution when sizing backflow preventers. If they are sized too small, highfriction losses may occur.Isolation Valve SizingIsolation valves (gate valves or ball valves) should be line size. In otherwords, if the main line is 1”, the isolation valve should be 1”; if the mainline is 1-1/4”, the isolation valve should be 1-1/4”.Automatic Zone Control Valve SizingSize automatic control valves according to the zone flow raterequirements. Generally speaking, automatic control valves can be sizedas small as one size smaller than the lateral line it is serving. Check thepressure loss chart in the product catalog to be sure it is not sized toosmall. Use caution when sizing control valves. If the valves are sized toosmall, high friction losses are inevitable, and water hammer is likely.
SummaryWhen designing a system it is important to stay <strong>with</strong>in the system’s designcapacity and working pressure as calculated in the Design Capacitysection. Trying to use more water than is available will result in a systemthat will not perform efficiently.The majority of new system failures is a direct result of not designing tothe volume and pressure available. By not exceeding the system’s designcapacity when circuiting the sprinklers into zones, and staying <strong>with</strong>in theallowable friction loss when sizing pipe and valves, the system’sperformance will be just as you expected when you began your design.What You Need to KnowDivide the individual areas into zones so that the design capacity is notexceeded; don’t place too many heads on the same zone.When backflow preventers, valves, or pipe are sized too small, the systemmay experience water hammer. Severe water hammer will cause the pipesto vibrate or create a pounding noise. In extreme conditions, damage to thesystem may occur.When the components are sized too large, the initial cost of the system ishigher than necessary. Automatic control valves which are sized too largemay not close due to the slow moving water.Follow the pipe sizing instructions in this section on page 109 (using the<strong>Hunter</strong> Friction Loss Tables), or on page 110 (using the Friction Factorformula). For fast small-system pipe sizing, you can use the followingchart. The pipe sizes for this chart are based on flow rates of five feet persecond.PIPE SIZING CHARTMaximum Flow Rates For Sprinkler PipesPipe PVC PVC Class PolyethyleneSize Schedule 40 200Pipe3/4 in. 8 GPM 10 GPM 8 GPM1 in 13 GPM 16 GPM 13 GPM1 1/4 in. 23 GPM 26 GPM 23 GPMFigure 44
Friction LossesIntroductionCalculating the friction losses on your design is a critical step in providingan accurately completed plan. In the Design Capacity section, weestimated how much pressure would be available at a particular flow. Inthe System Layout section, those estimates were used to design thesystem. This system design establishes the actual flow that will be used towater the landscaped area. But remember, the system was designed usingestimates; the plan must be checked to verify that the sprinkler system willoperate as designed.Excessive friction losses results in a system that may not work efficiently,or a system that may fail in the future due to pressure changes occurring inthe neighborhood. This section will lead you through the process ofchecking the design to make sure that the friction losses will not beexcessive.
Most Critical ZoneWhile checking the friction losses for each zone on the plan is a goodidea, it is not always a requirement. For example, if one zone on theproperty has a 15 GPM flow rate, it may not be necessary to check thezone <strong>with</strong> a flow rate of 10 GPM.If, however, the 10 GPM zone is several feet higher than the 15 GPMzone, then it would be wise to check the friction losses on that zone aswell. Additionally, the zone <strong>with</strong> the highest flow rate may not be thefurthest away from the POC, and as previously discussed, distance is afactor in friction losses.So, when deciding which zone is the most critical zone for calculatingfriction losses, consider the following factors: the most GPM, or highest flow rate highest head(s) furthest distance from the POCThis may mean that the friction losses must be calculated on several, or allof the zones.Calculating Friction LossesUsing the completed plan <strong>with</strong> the sprinkler’s GPM requirements markedat each head location, and the Friction Loss Tables located in the back ofthis design manual, begin calculating the PSI losses on the critical zones.Calculate one zone at a time.PSI Losses in Lateral Line PipeTurn to the <strong>Hunter</strong> Friction Loss Tables in the back of this designworkbook for the type of lateral line pipe used in the design. On the plan,note the GPM requirement for the last head on the zone that you havechosen to calculate.1. Look in the “FLOW G.P.M.” column on the friction losschart and read down to the GPM for the last head.2. Now, read across the top of the chart looking for the size ofthe pipe that supplies water to this head.3. Read down this column, under the “P.S.I. LOSS” heading,and across the row for the GPM (6 GPM)4. Where the two intersect is the PSI loss per 100 feet of pipe.Divide this number by 100 for the pressure loss per foot.
5. Multiply your answer by the length of pipe supplying thissprinkler only (just to the next head on the zone).6. Write this number down.On the plan, note the GPM requirement for the next to the last head on thezone which you have chosen to calculate. Add the two GPM rates together(the last head and the next to the last head). This number is the amount ofwater that will flow through the next length of pipe. Repeat steps 1 - 6 tocalculate the friction loss for this section of pipe.Repeat this process for all lengths of pipe on the zone back to the valve.Losses Through Main Line PipeContinuing toward the POC, use the total GPM for the zone, and calculatethe friction losses in the main line. Don’t forget, you may have changedthe type of pipe for the main line, so use the appropriate friction loss chart.Friction Losses for FittingsThe friction losses for couplings, elbows, and tees can be high. Use thechart on page 10, in the <strong>Hunter</strong> Friction Loss Tables to figure the losses.An acceptable pressure loss figure to use if you don’t want to calculateeach fitting is 10% of the losses established for the pipe. It isrecommended that you calculate several systems first to see if a 10%figure is accurate to your designs.Losses Through Valves and Other ComponentsSee the manufacturer’s catalog for the friction loss through valves andother components: control valves isolation valves backflow preventer pressure regulator filterTotal System LossesAdd the friction losses for all of the pipe and other components all the wayback to the irrigation POC. Remember to include pressure losses forelevation gain from the highest head in the system to the POC (or pressuregains for heads which are lower than the POC).Refer back to the original calculation for design capacity and dynamicpressure. Make sure the system requirements that you just added up are<strong>with</strong>in the calculated design capacity. Subtract the system’s friction loss
from the dynamic pressure at design capacity at the POC (line #20 on theworksheet for metered and unmetered systems, line #17 for pumpsystems). Make sure the final dynamic pressure is sufficient to operate thesprinklers chosen for the project.Repeat this process for each critical zone, and for the critical zone(s) foreach different type of sprinkler chosen.Sample ProblemHere, we will use the following simple example to calculate friction lossesas we have just discussed.Note in the example that the pipe connecting Sprinkler A and B will onlysupply water to Sprinkler A, while the pipe between Sprinkler D and Ewill supply water to four sprinklers: D, C, B, and A. In other words, eachlength of pipe will supply a different amount of water than the next length.Therefore, we will calculate the friction losses separately for each lengthof pipe.E6 GPMD6 GPMC6 GPMB6 GPMA6 GPMValve:1-1/2 in. ICV1-1/2 in.50 ft1-1/4 in.50 ft1-1/4 in.50 ft1 in.50 ft3/4 in.50 ftLateral Line:Cl 200 PVCMain Line:300 ft. 1-1/2 in. Class 315 PVCThere is no elevation changeon this examplePOC
Friction Loss CalculationsZone NumberProjectDesign CapacityDynamic Pressure(at Design Capacity, at the POC -Line #20 on the Design Capacity Worksheet)Lateral LineLateral LineLateral LineType ofPipeSize ofSizeGPMFlowLoss per100 ft.Loss perFootLengthof PipeLoss perLengthNotes:Lateral LineLateral LineLateral LineLateral LineLateral LineLateral LineLateral LineLateral LineLateral LineMain LineMain LineMain LineSubtotal Pressure Losses in Pipe (above)ZoneGPMSizeFittings - Subtotal of the Pressure Losses in Pipe __________ x 10%Control ValveIsolation ValveIsolation ValveBackflow PreventerPressure RegulatorFilterMiscellaneousMiscellaneousMiscellaneousLoss or (Gain) - ElevationPSILossTotal Pressure LossPressure Required at the HeadMinimum Pressure Required for Sprinkler Operation as Designed(Compare to Dynamic Pressure at Design Capacity at the POC, above)
Turn to the <strong>Hunter</strong> Friction Loss Tables located in the back of this designworkbook for the type of lateral line pipe used in the design.Sample Problem:Class 200 PVC, page 4Figure 45Calculate the friction losses in the pipe between Sprinklers A and B:1. Look in the “FLOW G.P.M.” column on the friction losschart and read down to the GPM for the last head on the zone inour design (Sprinkler A).Sample Problem:6 GPM2. Now, read across the top of the chart looking for the size ofthe pipe that supplies water to this head.Sample Problem:3/4 in.3. Read down this column, under the “P.S.I. LOSS” heading,and across the row for the GPM (6 GPM).Sample Problem:1.67 PSI loss4. Where the two intersect (in Step 3) is the PSI loss per 100 feetof pipe. Divide this number by 100 for the pressure loss per footof pipe.
Sample Problem:1.67= 0.0167 psi loss per ft.1005. Multiply your answer by the length of pipe supplying thissprinkler only (just to the next head on the zone).Sample Problem:0.0167 x 50 ft. = 0.846. Write this number down.Sample Problem:0.84 PSI loss in the pipebetween Sprinkler A and Sprinkler BOn the example, note the GPM requirement for the next to the last head (Sprinkler B)on the zone we are calculating. Add the two GPM rates together (the last head, A, andthe next to the last head, B). This total is the amount of water that will flow throughthe next length of pipe.Repeat steps 1 - 6 to calculate the friction loss for this section of pipe.Calculate the friction losses in the pipe between Sprinklers B and C:Sample Problem:Step 1Sprinkler A: 6 GPMSprinkler B: 6 GPMTotal A/B: 12 GPMStep 2Step 3Step 4Step 5Step 61 in.1.83 PSI loss1.83100= 0.0183 psi loss per ft.0.0183 PSI loss x 50 ft. = 0.9150.92 PSI loss in the pipe between Sprinkler B and Sprinkler C
Calculate the friction losses in the pipe between Sprinklers C and D:Sample Problem:Step 1Sprinkler A: 6 GPMSprinkler B: 6 GPMSprinkler C: 6 GPMTotal A/B/C: 18 GPMStep 2Step 3Step 4Step 5Step 61-1/4 in.1.24 PSI loss1.24100= 0.0124 psi loss per ft.0.0124 PSI loss x 50 ft. = 0.620.62 PSI loss in the pipe between Sprinkler C and Sprinkler DCalculate the friction losses in the pipe between Sprinklers D and E:Sample Problem:Step 1Sprinkler A: 6 GPMSprinkler B: 6 GPMSprinkler C: 6 GPMSprinkler D: 6 GPMTotal A/B/C/D: 24 GPMStep 2Step 3Step 4Step 5Step 61-1/4 in.2.12 PSI loss2.12100= 0.0212 psi loss per ft.0.0212 PSI loss x 50 ft. = 1.061.06 PSI loss in the pipe between Sprinkler D and Sprinkler ECalculate the friction losses in the pipe between Sprinklers E and theAutomatic Control Valve:Sample Problem:Step 1
Step 2Step 3Step 4Step 5Step 6Sprinkler A: 6 GPMSprinkler B: 6 GPMSprinkler C: 6 GPMSprinkler D: 6 GPMSprinkler E: 6 GPMTotal A/B/C/D/E: 30 GPM1-1/2 in.1.66 PSI loss1.65100= 0.0165 psi loss per ft.0.0165 PSI loss x 50 ft. = 0.830.83 PSI loss in the pipe between Sprinkler E and the ValveIf the zone you have designed has more heads and lengths of pipe, simplycontinue this process back to the automatic control valve.We have completed our calculations for the friction losses in the lateralline pipe back to the valve in the example on page 116, so we will nowbegin calculating the main line pipe losses.
Calculate the friction losses in the main line:Continuing toward the POC, use the total GPM for the zone, and calculate the frictionlosses in the main line. Don’t forget, you may have changed the type of pipe for themain line, so use the appropriate friction loss chart.Sample Problem:300 ft. 1-1/2 in. Class 315 PVC(<strong>Hunter</strong> Friction Loss Charts, page 3)Step 130 GPMStep 2Step 3Step 4Step 5Step 61-1/2 in.2.23 PSI loss2.23100= 0.0223 psi loss per ft.0.0223 PSI loss x 300 ft. = 6.696.69 PSI loss in the Main Line pipe between the Valve and POCCalculate the friction losses in the fittings:The friction losses for couplings, elbows, and tees can be high. Use thechart on page 10, in the <strong>Hunter</strong> Friction Loss Tables to figure the losses.An acceptable pressure loss figure to use if you don’t want to calculateeach fitting is 10% of the losses established for the pipe. It isrecommended that you calculate several systems first to see if a 10%figure is accurate to your designs.Sample Problem:Losses between Sprinkler A and B:0.84 PSILosses between Sprinkler B and C:0.92 PSILosses between Sprinkler C and D:0.62 PSILosses between Sprinkler D and E:1.06 PSILosses between Sprinkler E and the Valve: 0.83 PSILosses on the Main Line due to this zone: 6.69 PSITotal losses through pipe due to this zone: 10.96 PSI
Using the acceptable 10% allowance:10.96 x 10% = 1.096PSI loss through fittings, based on 10% allowance: 1.1 PSICheck the friction losses through the valves and other components:See the manufacturer’s catalog for the friction losses through valves andother components: control valves isolation valves backflow preventer pressure regulator filterSample Problem:30 GPM flows through this zone control valve.The zone control valve is an 1-1/2 <strong>Hunter</strong> ICV.In the <strong>Hunter</strong> catalog on page 21, is the ICV pressure loss chart.Find 30 GPM in the left hand column of the blue chart.Locate the column for the 1-1/2 in. valve.Where the 30 GPM row intersects the 1-1/2 in. columnis the pressure loss through the valve: 1.5 PSIThere are no isolation valves on this system.We will not calculate the friction loss for the backflowpreventer in this example.*There is no pressure regulator or filter in this example.*Note: friction losses through backflow preventers can be substantial -always include the friction loss for the backflow in your calculations.Add up all of the losses you have just calculated:Add the friction losses for all of the pipe and other components all the wayback to the irrigation POC. Remember to include pressure losses forelevation gain from the highest head in the system to the POC (or pressuregains for heads which are lower than the POC).Sample Problem:Total losses through pipe due to this zone: 10.96 PSITotal PSI loss through fittings1.10 PSITotal PSI loss through valves1.50 PSITotal PSI loss through elevation change 0.00 PSITotal losses for this zone:13.56 PSI
Check to be sure that the PSI losses do not exceed the available PSIfor the system.Refer back to the original calculation for design capacity and dynamicpressure. Make sure the system requirements that you just added up are<strong>with</strong>in the calculated design capacity. Subtract the system’s friction lossfrom the dynamic pressure at design capacity at the POC (line #20 on theDesign Capacity worksheet for metered and unmetered systems, line #17for pump systems). Make sure the final dynamic pressure is sufficient tooperate the sprinklers chosen for the project.Many designers will add the PSI requirement for the sprinkler to the totalPSI losses. (For instance: if the operating pressure for the head in ourexample is 50 PSI, then you would add 50 PSI to the 13.56 PSI losscalculated, for a total of 63.56 minimum PSI requirement.)Total losses for this zone:Operating pressure required for headMinimum PSI requirement for system13.56 PSI50.0 PSI63.56 PSIIf the dynamic pressure at design capacity at the POC (line #20 on theDesign Capacity worksheet) is 70 PSI, then you have sufficient pressure tooperate this system.If however, the pressure on your Design Capacity worksheet is 60 PSI,then you will need to resize the pipe, valves, and/or other components, orreduce the number of heads in order to lower the friction losses throughthe system.Repeat this friction loss calculation process for each critical zone, and forthe critical zone(s) for each different type of sprinkler chosen.
SummaryCalculating the friction losses for each zone may not be necessary, butcalculating the losses for each critical zone is. This step may be thedifference between a system that works efficiently after installation, andone that doesn’t work at all.Catching a mistake while in the design process means simply redesigningthe system. Finding a mistake during installation which causes theaddition of zones not included in the estimate can mean lost profits. Andworse yet, being called back onto a project <strong>with</strong> a sprinkler system thatfails shortly after completion can be very costly.Calculating the actual dynamic pressure as designed is an important partof the design process. The more accurate the design and the friction losscalculations, the more likely the system will operate efficiently.What You Need to Know Check to be sure that the PSI losses on your designs do not exceed theavailable PSI for the system (see line #20, Dynamic Pressure at DesignCapacity, at the POC, in the Design Capacity section). If the pressure losses do exceed the available dynamic pressure, resizethe pipe, valves, and other components as necessary. After resizing, be sure to recalculate the system’s friction losses. If resizing does not bring the system into the correct operating pressure,you may need to eliminate heads from the zones, and add more zones. Friction Loss Calculations worksheets are included (next few pages) tomake these calculations easier for you.
Friction Loss CalculationsZone NumberProjectDesign CapacityDynamic Pressure(at Design Capacity, at the POC -Line #20 on the Design Capacity Worksheet)Lateral LineLateral LineLateral LineType ofPipeSize ofSizeGPMFlowLoss per100 ft.Loss perFootLengthof PipeLoss perLengthNotes:Lateral LineLateral LineLateral LineLateral LineLateral LineLateral LineLateral LineLateral LineLateral LineMain LineMain LineMain LineSubtotal Pressure Losses in Pipe (above)ZoneGPMSizeFittings - Subtotal of the Pressure Losses in Pipe __________ x 10%Control ValveIsolation ValveIsolation ValveBackflow PreventerPressure RegulatorFilterMiscellaneousMiscellaneousMiscellaneousLoss or (Gain) - ElevationPSILossTotal Pressure LossPressure Required at the HeadMinimum Pressure Required for Sprinkler Operation as Designed(Compare to Dynamic Pressure at Design Capacity at the POC, above)
Friction Loss CalculationsZone NumberProjectDesign CapacityDynamic Pressure(at Design Capacity, at the POC -Line #20 on the Design Capacity Worksheet)Lateral LineLateral LineLateral LineType ofPipeSize ofSizeGPMFlowLoss per100 ft.Loss perFootLengthof PipeLoss perLengthNotes:Lateral LineLateral LineLateral LineLateral LineLateral LineLateral LineLateral LineLateral LineLateral LineMain LineMain LineMain LineSubtotal Pressure Losses in Pipe (above)ZoneGPMSizeFittings - Subtotal of the Pressure Losses in Pipe __________ x 10%Control ValveIsolation ValveIsolation ValveBackflow PreventerPressure RegulatorFilterMiscellaneousMiscellaneousMiscellaneousLoss or (Gain) - ElevationPSILossTotal Pressure LossPressure Required at the HeadMinimum Pressure Required for Sprinkler Operation as Designed(Compare to Dynamic Pressure at Design Capacity at the POC, above)
Friction Loss CalculationsZone NumberProjectDesign CapacityDynamic Pressure(at Design Capacity, at the POC -Line #20 on the Design Capacity Worksheet)Lateral LineLateral LineLateral LineType ofPipeSize ofSizeGPMFlowLoss per100 ft.Loss perFootLengthof PipeLoss perLengthNotes:Lateral LineLateral LineLateral LineLateral LineLateral LineLateral LineLateral LineLateral LineLateral LineMain LineMain LineMain LineSubtotal Pressure Losses in Pipe (above)ZoneGPMSizeFittings - Subtotal of the Pressure Losses in Pipe __________ x 10%Control ValveIsolation ValveIsolation ValveBackflow PreventerPressure RegulatorFilterMiscellaneousMiscellaneousMiscellaneousLoss or (Gain) - ElevationPSILossTotal Pressure LossPressure Required at the HeadMinimum Pressure Required for Sprinkler Operation as Designed(Compare to Dynamic Pressure at Design Capacity at the POC, above)
Friction Loss CalculationsZone NumberProjectDesign CapacityDynamic Pressure(at Design Capacity, at the POC -Line #20 on the Design Capacity Worksheet)Lateral LineLateral LineLateral LineType ofPipeSize ofSizeGPMFlowLoss per100 ft.Loss perFootLengthof PipeLoss perLengthNotes:Lateral LineLateral LineLateral LineLateral LineLateral LineLateral LineLateral LineLateral LineLateral LineMain LineMain LineMain LineSubtotal Pressure Losses in Pipe (above)ZoneGPMSizeFittings - Subtotal of the Pressure Losses in Pipe __________ x 10%Control ValveIsolation ValveIsolation ValveBackflow PreventerPressure RegulatorFilterMiscellaneousMiscellaneousMiscellaneousLoss or (Gain) - ElevationPSILossTotal Pressure LossPressure Required at the HeadMinimum Pressure Required for Sprinkler Operation as Designed(Compare to Dynamic Pressure at Design Capacity at the POC, above)
Friction Loss CalculationsZone NumberProjectDesign CapacityDynamic Pressure(at Design Capacity, at the POC -Line #20 on the Design Capacity Worksheet)Lateral LineLateral LineLateral LineType ofPipeSize ofSizeGPMFlowLoss per100 ft.Loss perFootLengthof PipeLoss perLengthNotes:Lateral LineLateral LineLateral LineLateral LineLateral LineLateral LineLateral LineLateral LineLateral LineMain LineMain LineMain LineSubtotal Pressure Losses in Pipe (above)ZoneGPMSizeFittings - Subtotal of the Pressure Losses in Pipe __________ x 10%Control ValveIsolation ValveIsolation ValveBackflow PreventerPressure RegulatorFilterMiscellaneousMiscellaneousMiscellaneousLoss or (Gain) - ElevationPSILossTotal Pressure LossPressure Required at the HeadMinimum Pressure Required for Sprinkler Operation as Designed(Compare to Dynamic Pressure at Design Capacity at the POC, above)
Precipitation RatesIntroductionToday's irrigation designer or system manager faces a multitude ofconcerns including:• increased costs for water• higher bills for pumping• excessive runoff• too much or too little water applied• wet spots that do not allow use of a turf or landscape• dry spots that are unsightly or cause lost plant material• increased pests and diseasesEach of these concerns can be related to precipitation rates. Thus,understanding precipitation rates can help you avoid these commonproblems, leading to improved landscapes and reduced costs throughbetter irrigation design and management.What Is “Precipitation Rate?”If someone said they were caught in a rainstorm that dropped one inch ofwater in an hour you would have some idea of how “hard” or “heavily”the rain came down. A rainstorm that covers an area <strong>with</strong> one inch ofwater in one hour has a “precipitation rate” of one inch per hour (1 in./hr).Similarly, if a sprinkler system applies enough water to cover the irrigatedarea <strong>with</strong> one inch of water in one hour, the sprinkler system also has aprecipitation rate of 1 in./hr. Thus, the precipitation rate is the speed atwhich a sprinkler or an irrigation system applies water.
Are All Precipitation Rates the Same?Landscape irrigation systems and individual sprinklers themselves havewidely varying precipitation rates. The rates typically vary from:• Low – 0.5 in./hr and below• Medium – 0.5 to 1.0 in./hr• High – 1.0 in./hr and aboveThese precipitation rates reflect the typical soil infiltration rates. Use ofsprinklers <strong>with</strong> high precipitation rates on soils <strong>with</strong> low infiltration rateswould result in excessive runoff.Sprinkler Type and Expected Precipitation RateWhile the correlation between sprinkler type and precipitation rate is notabsolute, the following chart provides a general indication of theprecipitation rates you can expect <strong>with</strong> different types of sprinkler heads.As you can see, sprinklers may fall into more than one category.BUBBLERSFIXED SPRAYSGEAR DRIVE ROTORSTYPICAL PRECIPITATION RATE RANGESLOW MODERATE HIGH0.1 to 1.0 in./hr.1-1/2 to 12 in./hr.1 to 5 in./hr.0.1 1.0 2.0Figure 46High Precipitation Rates – More than 1.0 in./hrSprinklers <strong>with</strong> these precipitation rates would be best suited for use onlevel, coarse-textured soils <strong>with</strong> high infiltration rates and little hazard oferosion. If used in other conditions they must be operated in short cyclesto avoid excessive runoff and soil erosion.Moderate Precipitation Rates – Between 0.5 and 1.0 in./hrSprinklers <strong>with</strong> these precipitation rates should be used under conditionssimilar to those described for high precipitation-rate sprinklers. However,these could be operated for somewhat longer cycles than the highprecipitation-rate heads.Low-Precipitation Rates – 0.5 in./hr or LessLow precipitation-rate sprinklers have the advantage in that they can beused <strong>with</strong> a wider variety of slope and soil textures <strong>with</strong>out excessiverunoff or soil erosion.
Sprinkler Precipitation RatesVersus System Precipitation RatesDepending on the construction of the irrigation system, the precipitationrate may be quoted as either a “sprinkler” or a “system” rate.The precipitation rate of a system is inversely related to head spacing androw spacing. With the sprinkler flow rate remaining the same, increasinghead or row spacing decreases the precipitation rate while reducing heador row spacing increases the precipitation rate.Sprinkler Precipitation RatesThe precipitation rate for a “sprinkler” refers to the rate for a system inwhich only one specific type of head and nozzle is used. The precipitationrate for a single sprinkler is calculated using the Sprinkler SpacingMethod. This method calculates the precipitation rate for those sprinklerheads <strong>with</strong> the same spacing, rate of flow (in gallons per minute, or GPM)and arc of spray.System Precipitation RatesThe precipitation rate for a “system” is the average precipitation rate of allsprinklers in an area regardless of the arc, spacing, or flow rate for eachhead. The system precipitation rate is calculated using the Total AreaMethod. The area for which the calculation is made usually correspondsto all the heads on one irrigation control valve, but can include manyvalves in an area. While individual heads in an area may have differentprecipitation rates, this method gives you an average over the entire area.The Total Area Method is most useful and accurate when all the heads inthe area have similar precipitation rates. Where the precipitation rates ofthe sprinkler heads vary considerably, the average precipitation rate can bemisleading. Where there are differences in precipitation rates, theirrigation system may have applied enough water to the “average” area,but there very likely will be dry spots and wet spots as well.Note: It is important to remember that precipitation rates andsystem uniformity are two completely separate issues. Calculatedprecipitation rates do not reflect how uniformly the water is beingapplied. System uniformity is an important variable and shouldalways be taken into account when scheduling irrigation systemsor determining minimum water supply requirements.
Matched Precipitation RatesA system or zone in which all the heads have similar precipitation rates is said to havematched precipitation rates. A sprinkler by itself does not have a matched precipitationrate. Only when it is used <strong>with</strong> other sprinklers of similar precipitation rates wouldthey be considered matched (matched implies two or more). When designing sprinklersystems, matching precipitation rates can help to avoid wet and dry spots andexcessive run times which leads to high water bills, increased pumping costs, or both.Wet and dry areas can be caused by applying water at different precipitation rates. Thearea <strong>with</strong> the low precipitation rate becomes a dry spot and the area <strong>with</strong> the highprecipitation rate becomes too wet. Where heads that apply water at substantiallydifferent precipitation rates must be used, they should be zoned separately– dividedinto circuits that are operated by different control valves. Separate control zones canbe used to schedule an increase in run times for lower precipitation rate heads in orderto equalize the amount of water applied.Achieving Matched Precipitation RatesAs discussed earlier, head and row spacing directly affect system precipitation rates.There are two other related factors that also affect precipitation rate: the head’s arc ofcoverage and its flow rate in GPM. (In this section, we assume that head and rowspacing remain the same.)The following diagram depicts a sprinkler <strong>with</strong> threedifferent arcs of coverage <strong>with</strong> matched precipitation rates.MATCHED PRECIPITATION RATE HEADSQuarter-circle head Half-circle head Full-circle head1 GPM 1 GPM 1 GPM 1 GPM 1 GPM1 GPM 1 GPMArea Covered Area Covered Area Covered78.5 sq. ft. 78.5 sq. ft. 78.5 sq. ft.1 GPM 2 GPM 4 GPMFigure 47With matched precipitation rates, as the arc of the sprinkler increases, theflow rate also increases. In the previous illustration, the half-circle headcovers twice the area of the quarter-circle head, <strong>with</strong> a flow rate twice thatof the quarter-circle head. The full-circle head covers twice the area of thehalf-circle head and four times the area of a quarter-circle head, and has aflow rate twice that of the half-circle head and four times that of thequarter-circle head.If the heads in the example all have a 10-ft radius, the arc, area covered,and rate of flow for each would be:
Area CoveredArc by Sprinkler Flow90° 78.5 sq. ft 1 GPM180° 157 sq. ft 2 GPM360°û 314 sq. ft 4 GPMAs the spray arc doubles, so does the flow. This is a quick way to checkfor matching precipitation-rate heads or nozzles. The flow rate of halfcircleheads must be two times the flow rate of the quarter-circle heads,and the full-circle heads must have two times the flow rate of the halfcircleheads. Manufacturers’ specifications often specifically indicate thesprinklers <strong>with</strong> doubling arcs and flow rates; i.e., the sprinklers consideredto have matched precipitation rates. (While exact doubling of flow rates isideal, heads <strong>with</strong> GPM values <strong>with</strong>in + 10% of the ideal is considered tohave matched precipitation rates.)This principle can be applied to nozzle selection, as well as head selection.Sprinklers <strong>with</strong> multiple nozzle options can deliver matched precipitationrates if the installer follows the principle of doubling the flow as the arcdoubles.Proper Use of Matched Precipitation-Rate HeadsUse of matched precipitation-rate heads simplifies the design process byeliminating the need to separate full-circle heads from quarter-circle andhalf-circle heads.When all heads or nozzles on one zone have the same GPM value asillustrated below, precipitation is not matched and poor coverage willresult.
SPRINKLERS HEADS THAT DO NOT HAVEMATCHED PRECIPITATION RATESQuarter-circle head Half-circle head Full-circle head4 GPM 2 GPM 2 GPM 1 GPM 1 GPM1 GPM 1 GPMArea Covered Area Covered Area Covered78.5 sq. ft. 78.5 sq. ft. 78.5 sq. ft.4 GPM 4 GPM 4 GPMFigure 48The area covered by the quarter-circle head is receiving four times asmuch water as the area covered by the full-circle head. If these heads wereused on the same control valve, the areas covered by the quarter-circleheads would be too wet or the areas covered by the full-circle heads wouldbe too dry. The use of sprinkler heads on the same valve <strong>with</strong> widelyvarying precipitation rates results in poor distribution uniformity and lowsystem efficiency.The Dry Spot Drives the SystemWhen heads that do not have matched precipitation rates are used in thesame zone, dry spots develop, and dry spots usually lead to lengthening ofsprinkler run times. Since most turf managers or home owners arereluctant to allow dry areas of their lawn to die, the entire area is wateredlonger to ensure that sufficient water is applied to keep the dry spot alive.Determining Precipitation RatesAs mentioned earlier, there are two primary methods used to determine theprecipitation rate: the Sprinkler Spacing Method and the Total AreaMethod.
The Sprinkler Spacing MethodThis method is used to determine the precipitation rate for a singlesprinkler. The rate is calculated assuming the sprinkler is used inconjunction <strong>with</strong> other sprinklers of the same kind (i.e., same arc, flow,and spacing). With this method, one can compare the precipitation rate ofsimilar types of sprinkler heads <strong>with</strong> each other.The following Sprinkler Spacing Method formula is applicable to heads ofany arc.P r =34650 x GPM (for any arc)Degrees of Arc x Head Spacing x RowSpacingWhere:P ris the precipitation rate in inches per hour.34650 is a constant that converts gallons per minute to inches perhour for sprinklers <strong>with</strong> any arc. It is derived from 60 min/hrdivided by 7.48 gallons per cu ft, multiplied by 12 in. per ft times360 degrees. (Note: If the flow of the head is in gallons per hour(GPH), instead of gallons per minute (GPM), the constant should bechanged to 577.5).GPM is the rated flow of the head used, regardless of its arc, ingallons per minute.Degrees of Arc is the arc of the spray pattern, in degrees, forthe sprinkler selected (full circle = 360°, half circle = 180°, etc.).Head Spacing is the distance in feet between heads in the samerow.Row Spacing is the distance in feet between the rows ofsprinklers.While this information is helpful when comparing the precipitation rate ofsimilar types of sprinkler heads <strong>with</strong> each other, extreme caution should beexercised when using the manufacturer’spublished precipitation rate information for a single sprinkler.1. Often these are calculated for different degrees of arc (e.g.360° vs. 180°) from manufacturer to manufacturer.2. The manufacturer’s stated precipitation rate is calculated at anexact pressure and spacing. Most layouts have specificconditions that are different from one job to another.We recommend you always calculate the precipitation rate for yoursituation using the Total Area Method.
The Total Area MethodThis calculation is best suited for determining the average precipitationrate for a system, or portion of a system, that uses sprinklers <strong>with</strong> differingarcs, flow rates, and spacings. The formula for the Total Area Method is:P r =96.25 x Total GPMTotal AreaWhere:P ris the precipitation rate in inches per hour.96.25 is a constant that converts gallons per minute to inches perhour. It is derived from 60 min/hr divided by 7.48 gallons per cu fttimes 12 inches per foot.Total GPM is the cumulative flow from all sprinklers in thespecified area, in gallons per minute.Total Area is the area irrigated, in square feet.Example Problem 12 sprinkler heads Arcs varying from 90° to 360° Flow from 2.0 to 8.0 GPM40 ftTotal gpm2 Full circle x 8.0 gpm = 16 gpm6 Half circle x 4.0 gpm = 24 gpm4 Quarter circle x 2.0 gpm = 8 gpmTotal 48 gpmTotal Area40 ft x 60 ft = 2400 sq ft60 ftP = 96.25 x 48 GPM rP r == 46202400 sq ft2400Pr= 1.93 in/hr
Use of Precipitation Rates in Landscape <strong>Irrigation</strong>Precipitation rate is critical to the selection of sprinkler heads for a systemand scheduling sprinkler run times.When selecting sprinkler heads, it is necessary to limit the amount ofwater applied to the infiltration rate of the soil. The infiltration rate isaffected by the soil texture, soil structure, plant material, and the slope.Failure to limit the amount of water applied to the infiltration rate of thesoil can result in excessive runoff and erosion. Matching the amount ofwater applied to the soil’s infiltration rate can be done either by selecting asprinkler according to its precipitation rate or by scheduling the sprinklersystem’s run time.This concept will be further discussed in the section on <strong>Irrigation</strong>Scheduling.Precipitation Rate versus Sprinkler Run Time. As previously stated,the amount of time required to irrigate a project is not typically affected bythe sprinkler precipitation rate. While it is true that lower precipitation rateheads must be run for a longer periods of time, more heads can beinstalled on a zone and, therefore, the total irrigation time for an entireproject will be the same for high precipitation-rate heads <strong>with</strong> many zones,and low precipitation-rate heads <strong>with</strong> few zones.Similar run times can be confirmed by checking the design capacity. Ifdesigns <strong>with</strong> both high and low precipitation-rate heads use the maximumflow rate available for the project (design capacity) then both projects willhave similar total run times.SummaryScheduling sprinkler run times <strong>with</strong>out knowing the precipitation rate islike trying to estimate your arrival time <strong>with</strong>out knowing how fast you aretraveling. The precipitation rate represents the speed at which an amountof water is applied. Knowing this is important because it helps us estimatehow long it will take to apply the water needed by the plants in thelandscape. The precipitation rate is also required for proper irrigationscheduling to prevent dry or wet areas. If the precipitation rate is notknown, the tendency is to over water to be sure enough water is applied.
What You Need to Know Precipitation rate, measured in inches per hour (in./hr.), is the speed atwhich a sprinkler or an irrigation system applies water. Matched precipitation means that all of the sprinklers on one zone havesimilar precipitation rates. In other words, as the arc of a sprinklerincreases, the flow should increase proportionally. The formula for determining the precipitation rate for a given area is:P r =96.25 x Total GPMTotal Area
<strong>Irrigation</strong> SchedulingIntroductionUltimately, the goal of the landscape manager is to apply only the amountof water needed, and to apply that water only when it is needed. Plantshave an effective root zone (RZ), and water in the soil below that rootzone is unusable by the plants. The effective root zone for turf grass, forinstance, is <strong>about</strong> six inches to a foot deep.A basic truth of plant irrigation is this: <strong>Irrigation</strong> is not meant to water theplants; rather, it is meant to refill the reservoir from which those plantswill draw the water they need. If the reservoir gets too “empty,” the plantsbegin to wilt. When they are deprived of water for too long, a “permanentwilting point” is reached, and permanent plant damage occurs.If the reservoir is allowed to get “too full,” the soil may reach “fieldcapacity” at levels below the plant’s effective root zone, and water wouldgo unused. Field capacity is the upper limit of storable water in a layer ofsoil after the water has drained through.It might seem that a slow and constant supply of water would be the bestway to fulfill the watering requirement. However, in most circumstances,daily watering is wasteful. Water evaporates quite rapidly from the topfew inches of soil; the rate of evaporation can reach as much as 50% perday. The deeper the moisture level in the soil, the lower the dailyevaporation rate.It becomes important then, to manage the amount of water in the root zoneto maximize application efficiency. When scheduling irrigation, provideenough water, at the proper times to keep the moisture level at the rootzone between the permanent wilting point, and the field capacity.
Available Water Holding CapacityThis balance of moisture level in the root zone between the permanentwilting point, and the field capacity is referred to as “available waterholding capacity” (AWHC), and is the water that can be used by theplants. Generally, AWHC is expressed as “inches of water available perfoot of soil,” or inches/foot.Determining How Much Water is NeededIn order to properly manage the AWHC level and program the controller<strong>with</strong> the correct watering schedule, you need just a few pieces ofinformation: The amount of water needed for the turf to be healthy. The acceptable level of depletion of the water applied. The rate at which the irrigation system applies the water. The efficiency of the irrigation system.With this information and some simple math, you will have the tools toproperly schedule the application of water to the landscaped area.Amount of Water NeededEvapotranspiration Rate. The amount of water needed by a plant is thesum of the amount lost through the evaporation of moisture at the soil’ssurface and the transpiration of water through the plant. The dailyevapotranspiration or “ET” rate for a specific area may be available fromthe local extension agent or weather service, or can be determined usingthe approximate daily values.Climate Type** Daily Loss (in inches)Cool Humid 0.10-0.15Cool Dry 0.15-0.20Warm Humid 0.15-0.20Warm Dry 0.20-0.25Hot Humid 0.20-0.30Hot Dry 0.30-0.40Potential Evapotranspiration Rates for Various ClimatesFigure 49* These evapotranspiration (ET) rates are approximate. Actual ET rates may be obtainedfrom an extension agent. If the rate obtained from the agent is expressed as a monthlyfigure, divide the number by 30 for the average daily rate.** “Cool” applies to areas <strong>with</strong> average high summer temperatures in mid-summer of under70 o F. “Warm” refers to mid-summer highs between 70 o F and 90 o F. “Hot” indicatesmid-summer averages over 90 o F. Areas in which the average relative humidity is over50% in mid-summer qualify as “Humid”, while under 50% is considered “Dry”.
Crop coefficient. Different plants have specific watering requirements.The “crop coefficient” allows for the expression of this variation inmoisture needs. Figure 50 provides a guide of the crop coefficients forvarious categories of common plants.Vegetation Type CoefficientMature Trees 0.80Shrubs (taller than 4 ft.) 0.70Shrubs (shorter than 4 ft.) 1.00Warm Season Turf 0.50-0.70Cool Season Turf 0.60-0.80Crop Coefficient (K C ) For Common PlantsFigure 50Acceptable Level of DepletionAvailable Water Holding Capacity (AWHC). It is best to irrigate asinfrequently as possible because of the high evaporation rate at the surfaceof the soil. Deeper, less frequent watering gets more water to the rootzone. However, to avoid damage to the turf due to AWHC falling to apermanent wilting point, the turf manager must schedule irrigation runtime before all of the AWHC is depleted. The acceptable level ofdepletion, called “Management Allowable Depletion” (MAD), can vary bysoil type, compaction, root depth, and the stress tolerance of the plant. Inmost applications, a MAD of 50% of the AWHC will sustain healthy turf.AWHC guidelines for a few soil textural classes are as follows:Inches of AvailableSoil Texture Water Per Foot of SoilSandy Soils 0.50-1.00Loamy Soils 1.00-1.75Clay Soils 1.75-2.50AWHC for Various Soil TexturesFigure 51
Rate at Which Water is AppliedPrecipitation Rate. The “precipitation rate” (PR) for an individualsprinkler or an entire sprinkler system is the depth of water applied in agiven area, expressed in inches per hour. The precipitation rate of asprinkler is determined by multiplying the gallons per minute output ofthat sprinkler by a conversion factor of 96.25 (which converts cubicinches of water to inches per square foot per hour), and then dividing bythe area the sprinkler covers. The precipitation rate of an irrigation systemis found by multiplying the total gallons per minute of the system by 96.25and dividing by the total area the system covers .PR =GPM Applied x 96.25_Area Covered(Gallons per minute can be approximated using themanufacture’s published nozzle data.)Efficiency of the <strong>Irrigation</strong> SystemApplication Efficiency. Application efficiency (EA) is a measure of howmuch of the applied water is available for use in the effective root zone. Itis also an indication of how well the system was designed and installed,and how well it has been maintained. Application efficiency is determinedby dividing the amount of water in the root zone by the amount of waterapplied.A perfect irrigation system where all of the water sprayed out goes directlyand evenly to the turf’s root zone is unachievable. In fact, while it isfeasible to achieve an application efficiency (EA) rating as high as 80%,an irrigation system <strong>with</strong> an efficiency rating of 70% is considered verygood. <strong>Irrigation</strong> water can be lost through excessive evaporation (wateringduring the heat of the day), wind drift, incorrect adjustments, improperdesigns, high pressure, low pressure, run-off, percolation past the effectiveroot zone, or through the use of the wrong size nozzles or otherequipment.There are several steps and calculations needed to determine irrigationsystem EA. While these calculations can be very accurate, because of theeffects of wind, temperature, humidity, water pressure, soil type, and rootdepth, EA remains an informed estimate. For general purposes, ascheduler can expect to achieve an EA of 60% to 80%.Calculating the <strong>Irrigation</strong> Run TimeWe now have all of the information necessary to schedule the applicationof water. The following is a recap of the values that are used in thescheduling equation:RZ Root Zone is the effective depth of the roots, in feet.
ET Evaporation of soil surface water plus Transpiration of waterthrough the plant. (Figure 49)K C Crop coefficient is the specific water requirement of the plant.(Figure 50)AWHC Available Water Holding Capacity is the moisture level inthe soil (expressed in inches per foot) which is above the plant’spermanent wilting point, and below the soil’s field capacity. (Figure 51)MAD Management Allowable Depletion of water from theAWHC. (In most applications, a MAD of 50% will sustain ahealthy landscape.)PR Precipitation Rate is the depth of water per unit of time.(Multiply the total gallons per minute of the system by 96.25and divide by the total area the system covers.)EA Application Efficiency is a measure of the overall efficiencyof the sprinkler system. (60% to 80%)The frequency (F), or “Set Days To Water”, is calculated using thefollowing formula:F =AWHC x RZ x MADET x K CThe amount of run time (RT) or “Set Station Run Times” each watering iscalculated:RT = 60 x F x ET x K CPR x EA
Example: A valve in your system is irrigating established warm seasonturf which is growing in a sandy loam on a slight slope. The averageprecipitation rate is 0.49 inches/hour. The system is located in SanMarcos, CA, where the daily moisture loss (ET) to be replenished is 0.20inches. The system application efficiency is approximately 65%.Answer:Watering FrequencyF = 1.0” x 0.75” x 50% = 1.0 x 0.75 x 0.50 = 0.375 = 2.680.20 x 0.70 0.20 x 0.70 0.14The answer is a 2 or 3 day watering interval. The scheduler may decide touse a 3 day interval (water on day #1, wait day #2 and day #3, and thenbegin the watering interval again on the next day), and monitor the turf’scondition.Run Time per FrequencyRT = 60 x 3 x 0.20 x 0.70 = 180 x 0.14 = 25.2 = 790.49 x 65% 0.49 x 0.65 0.319Water 79 minutes each watering.
Soil Intake RateSoil texture will provide a general idea of the rate at which water can beabsorbed <strong>with</strong>out runoff. Many times, the precipitation rate and run timewill be more than the soil intake rate. As the soil reservoir is refilled andreaches field capacity, the additional, or free water is pulled through thesoil by gravity and capillary action. If the water is applied faster than theintake rate, the water will run off and be wasted, and may cause damage tothe landscaped area.In order to determine if the watering run time must be cycled into multiplerun times, look at the system’s precipitation rate and compare it to the ratein Figure 52.SOIL INTAKE RATES (inches per hour)SOIL TEXTURE 0 to 5% slope 5 to 8% slope 8 to 12% slope 12%+ slopeCover Bare Cover Bare Cover Bare Cover BareCoarse sandy soils 2.00 2.00 2.00 1.50 1.50 1.00 1.00 0.50Coarse sandy soils over compact subsoils 1.75 1.50 1.25 1.00 1.00 0.75 0.75 0.40Uniform light sandy loams 1.75 1.00 1.25 0.80 1.00 0.60 0.75 0.40Light sandy loams over compact subsoils 1.25 0.75 1.00 0.50 0.75 0.40 0.50 0.30Uniform silt loams 1.00 0.50 0.80 0.40 0.60 0.30 0.40 0.20Silt loams over compact subsoil 0.60 0.30 0.50 0.25 0.40 0.15 0.30 0.10Heavy clay or clay loam 0.20 0.15 0.15 0.10 0.12 0.08 0.10 0.06Soil Intake Rates for Various Soil TexturesFigure 52The maximum precipitation-rate values listed are as suggested by the UnitedStates Department of Agriculture. The values are average and may vary <strong>with</strong>respect to actual soil conditions and condition of the ground cover.In the previous example, the precipitation rate was calculated as 0.49inches per hour. Comparing that to the soil intake chart, you can see thatone cycle may or may not soak into the sandy loam before runoff(depending on the severity of the slope), and the turf area in this exampleshould be monitored. If runoff is evident, the 79 minutes should be brokeninto two 40 minute applications, on the same day. In some cases, it maynecessary to break the run times into four 20 minute run times, etc.
SummaryProper irrigation technique is important in developing a deep root system.Replenishing the AWHC <strong>with</strong> frequent light watering is the least desirableway to water. This method never allows the soil profile to be wetted to anydepth, encouraging shallow root growth and leading to plant materialwhich is easily damaged and dependent on frequent watering.The best method of producing a deep root system is through cyclicalwatering. Deeply rooted plants are less susceptible to damage from stressdue to high midsummer temperatures and evaporation rates.Scheduling irrigation according to the process described in this section isthe most efficient method of watering landscape. Once you havecompleted a couple of scheduling programs using the formulas found onpage 145, you will find that the formulas are not as complicated as theyfirst appear.Many of the numbers will not change from one type of plant or one projectto another. For instance, once you have determined what kind of depletionyou will allow (MAD), this number becomes a constant and you can use itfrom one schedule to another. Or, you may discover that you are working<strong>with</strong> many plants <strong>with</strong> the same root zone depth from one job to another,so this number (RZ) could easily become a constant. Additionally, eventhough the evapotranspiration rate will vary daily, you may find itsufficient to change the ET number that you use in the formula only fourto six times a year.For an application formula to determine howmuch water to apply each week:Inches of Water per Week =7 x ET x K cEATo determine how long to run the zone to placethat amount of water each week, divide youranswer by the precipitation rate of the zone.
What You Need to KnowAs previously stated, scheduling irrigation according to the processdescribed in this section is the most efficient method of wateringlandscape. Watering application rates will vary <strong>with</strong> different types ofplants, soil, and climates. New lawn must be kept moist, and newlytransplanted shrubs need watering every day or two until established.Established plants will need deeper, less frequent watering.The following guidelines will get you started until you can calculate theproper schedule. The run times in the chart are approximate and are basedon an average precipitation rate at optimum pressure and spacing. A controller program consists of three pieces of information: What days do you want to water. What time do you want to start all zones watering. How long do you want each zone to run. Lawns require more water each week than do most shrubs. Apply 1 inch of water per week on lawns in cool, non-arid climates. Apply 2 inches of water per week on lawns in hot, arid climates.SPRINKLER RUN TIME SCHEDULE - OVER 7 DAYSWater to ApplyEach WeekSpraySprinklersPGJRotorsPGPRotorsI-20Rotors1 in. 40 min. 130 min. 150 min. 150 min.2 in. 80 min. 260 min. 300 min. 300 min.Clay Soils- fine particles- absorbs water slowlyWATERING GUIDELINES· program the controller <strong>with</strong> shorter run times;· increase the number of start times per day;· decrease the number of water days per week.Loam Soils- medium sized particles- average absorption rateSandy Soils- larger particles- absorbs water rapidly· program the controller <strong>with</strong> longer run times;· program <strong>with</strong> fewer start times per week.· program the controller <strong>with</strong> shorter run times;· increase the number of start times per day;· increase the number of water days per week.