SIA-Smaart Pro External Device Notes - JBL Professional
SIA-Smaart Pro External Device Notes - JBL Professional
SIA-Smaart Pro External Device Notes - JBL Professional

You also want an ePaper? Increase the reach of your titles
YUMPU automatically turns print PDFs into web optimized ePapers that Google loves.
Controlling the <strong>JBL</strong> <strong>Pro</strong>fessional DSC260System Controller Using <strong>SIA</strong>-<strong>Smaart</strong> ® <strong>Pro</strong><strong>SIA</strong> SoftwareCompany, Inc.an EAW CompanyThe <strong>SIA</strong>-<strong>Smaart</strong> <strong>Pro</strong> Real-Time module can control crossover and delay functionson the DSC260 as well as output EQ, limiter, gain and phase compensation. Thisdocument discusses details of the Real-Time module’s external device controlinterface specific to the DSC260. More general information about controllingexternal devices from <strong>Smaart</strong> <strong>Pro</strong> can be found in the <strong>SIA</strong>-<strong>Smaart</strong> <strong>Pro</strong> user’smanual or the Real-Time Module help file.Preparing a DSC260 for Remote ControlThe first step in preparing a DSC260 system controller for remote control using<strong>SIA</strong>-<strong>Smaart</strong> <strong>Pro</strong> is to check the version number of the firmware (device-specificsoftware stored in nonvolatile memory) currently running on the unit you want tocontrol. The firmware version shipped with most DCS260s currently in the fielddoes not support external control of this device and will need to be updated.The DSC260, the firmware version, actually consisting of two separate numbers,appears briefly on the front panel display during boot-up. When you first power theunit up, you should see something like this:<strong>JBL</strong> DSC-260B0.12 A1.01The number beginning with “B” is the boot version. The number beginning with “A”is the application version — the field-updatable software. Make a note of bothnumbers. If the application number is 1.05b or later, the DSC260 is ready forremote control and you can skip ahead to Making control connections on page 2. Ifthe application number is earlier than 1.05b, you will need to update the firmware.Updating the FirmwareTo update the firmware in the DSC260, you will need the following three items:1. An RS-232 serial null modem cable. RS-232 is the serial communicationstandard used in virtually all Windows/IBM compatible computers. A nullmodem cable is a special type serial cable with the “terminal ready” and “modemready” lines crossed so that the port is held “open” at all times when twodevices are connected. The DSC260’s serial input (labeled RS232) requires a9-pin female D connector. The serial (COM) port on your computer, could be a9- or 25-pin, male or female D connector (only 9 of the pins in a 25-pin serialport are actually used). You should be able to purchase the cable and/oradapters you need from virtually any computer store.2. The "Flash" loader application, 626loadr.exe, used to load the new firmwareprogram into the DSC260's nonvolatile memory3. The new firmware file for the DSC260The Flash loader program and updated firmware file for the DSC260 are availablefor download from the <strong>JBL</strong> <strong>Pro</strong>fessional web site (www.jblpro.com) or the downloadssection of the <strong>SIA</strong> Software Company, Inc. web site (www.siasoft.com).
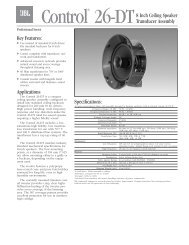
Controlling the <strong>JBL</strong> <strong>Pro</strong>fessional DSC260 System Controller Using <strong>SIA</strong>-<strong>Smaart</strong> <strong>Pro</strong> revision 1, 8/99 — Page 2Once you have obtained the necessary software and cable, follow the steps below to upload the newprogram to the DSC260.Step 1: Connect the DSC260 to your computer.Connect the serial port (labeled RS232) on the rear panel of the DSC260 to a serial (COM) port on yourcomputer using the null modem cable. If the Boot version number (the number beginning with “B” displayedon the DSC260’s front panel display on power up) is B0.13 or later you can skip to Step 2 below. Ifthe Boot software is B0.12 or earlier then you will have to disconnect the DSC260’s power cable andreconnect it while holding down the Recall and Mute4 keys. The unit will step through an led test patternon power up then display a message similar to:OK 0000000 Check:D993The DSC260 is now waiting for the PC software to run.Step 2: Uploading the new program.Double-click on the file 626loadr.exe to start the flashloader application. If the path and file name for the newfirmware file (626v105b.a21 or later) is not alreadyentered in the Transfer File field, click the Browsebutton, select the file you want to upload and click OK.Now select the number of the computer’s serial portyou connected to the DSC260 in the From Comm Portfield, select the All option in the To MIDI Channel field,and click the Go button.The DSC260 will display the message Running Loader.. and the loader program will indicate theprogress of the file transfer by displaying the percentage sent as the file is uploaded. The DSC260 willrestart when the transfer is completed and display the following message:<strong>JBL</strong> DSC 260B0.1x UpdatedThe DSC260 should now be enabled for remote control through MIDI or serial connection (using the nullmodem cable) from <strong>Smaart</strong> <strong>Pro</strong>. You will need to configure an <strong>External</strong> <strong>Device</strong> definition and select theproper serial port or MIDI channel in the Real-Time module as you would any other supported externaldevice.Note: Depending on how you have Windows’ file display options set on your computer, 626loadr.hlp and626loadr.exe may both appear as just "626loadr" in file folder windows. You can tell which is which by theicons used to represent the file type (the help file will be the one with the book icon).Making Control ConnectionsIf you want to control the DSC260 via serial connection, use the same setup you used to upload the newfirmware program. To control the DSC260 via MIDI connection from your computer, the computer mustbe equipped with a Windows-compatible MIDI I/O hardware interface — typically a joystick-to-MIDI
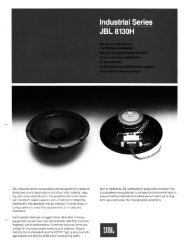
Controlling the <strong>JBL</strong> <strong>Pro</strong>fessional DSC260 System Controller Using <strong>SIA</strong>-<strong>Smaart</strong> <strong>Pro</strong> revision 1, 8/99 — Page 3adapter cable or an add-on MIDI I/O box that connects to a serial or parallel port. MIDI connectionsbetween the computer and the EQ are made with outputs to inputs and inputs to out puts as in the figurebelow. An advantage to using a MIDI connection is that up to 16 units can be connected together in a“daisy chain” and controlled from a single MIDI port on the computer. The two figures below show connectiondiagrams for MIDI control of a single DSC260 and a chain of two or more units.Computer<strong>JBL</strong> DSC260ComputerTwo (or more) <strong>JBL</strong> DSC260sMIDI InMIDI OutMIDI In MIDI Thru MIDI OutMIDI InMIDI OutMIDI In MIDI Thru MIDI OutTo MIDI Mixer orSwitcher (Optional)To MIDI Mixer orSwitcher (Optional)MIDI In MIDI Thru MIDI OutOn the left is a single DSC260 connected to a computer for MIDI control.The figure on the right illustrates a “Daisy-chain” of 2 (or more) DSC260s.Up to 16 DSC260s can be controlled from one computer MIDI port.Configuring the DSC260 in <strong>Smaart</strong> <strong>Pro</strong>Once the physical control connections are made, each DSC260 youwant to control through <strong>Smaart</strong> <strong>Pro</strong> must be configured as an externaldevice in the Real-Time module. The first step is to add a devicedefinition for each unit.Start Real-Time module and click the <strong>External</strong> <strong>Device</strong> Infobutton (shown at the left) on the top toolbar or select <strong>External</strong><strong>Device</strong>s from the Options menu to open the <strong>External</strong> <strong>Device</strong>Information dialog box. Click the Add button at bottom left of thedialog box window. When the Add <strong>External</strong> <strong>Device</strong> dialog popsup, select “<strong>JBL</strong> DSC260” from the drop down list and click OK.A device definition for a DSC260 is created and the <strong>JBL</strong> DSC260Configuration dialog box (shown on the right) opens automatically. Inthis dialog box, you need to select the audio I/O mode (2-Channel 3-Way, 3-Channel 2-Way, or Mono) and the PC serial (COM) port orMIDI channel number you will use to control this device. If you areusing a MIDI connection, the MIDI channel selected here must matchthe MIDI Channel number set on the DSC 260 itself (using the front panel controls). When multipleDSC260s are chained together you will need to add a new device definition for each unit in the chain andthe MIDI channel setting for each unit must be unique.The <strong>Device</strong> Name appears only on the list of configured (physical) devices in the <strong>External</strong> <strong>Device</strong> Informationdialog box and in the System Controllers list in Delay Locator mode. The Other Names section iswhere you set the output channel names you want to appear in the drop-down lists of available deviceson the external control panel and in the System Presets dialog box. You can choose which channels willappear in these lists by checking or un-checking the “Show in drop-down lists” box next to each of the sixoutput channel name fields. For example, if you were operating this DSC260 in a “stereo linked” configuration,you might want to see only “master” channels listed and would leave “slave” channels unchecked.
Controlling the <strong>JBL</strong> <strong>Pro</strong>fessional DSC260 System Controller Using <strong>SIA</strong>-<strong>Smaart</strong> <strong>Pro</strong> revision 1, 8/99 — Page 4The DSC260 Control Panel, Top to BottomOnce an DSC260 is physically connected and configured internally, put theReal-Time module in Transfer Function mode and click the <strong>External</strong> <strong>Device</strong> Modebutton (shown on the left). The external device control panel will replace the TraceInformation Area that normally appears to the right of the main plot area and theReal-Time module will attempt to establish communication with the “device” selectedin the drop-down list of available devices at the top of the control panel. Makesure one of the names you set up for a connected DSC260 output channel isselected in the list.When communication is established with the remote device, a set of markers appears onthe plot to indicate positions of any filters assigned on the current output channel. Crossover(high/lowpass) filter positions are indicated by triangular markers, EQ (bell and shelf)filters show up as square boxes with cross-hairs appended. If you do not see any filtermarkers within a few seconds after selecting the device and you know there are filtersassigned on the selected channel, check all the cables, connections, and configurationsettings. If you are controlling the DSC260 via MIDI, make sure you have the correct MIDIIn and MIDI Out “devices” selected on the <strong>Device</strong>s Tab of the Options dialog box.After the markers appear, select a filter by clicking it’s marker with your mouse.The settings for the filter will appear in first three fields of the Filters section of theDSC260 Control Panel (shown on the left). The DSC260 features several differenttypes of filters and the information displayed in the Filters section of the controlpanel will vary based on the type selected. For bell (parametric) EQ filters, thecontrol panel displays the center frequency (Hz), bandwidth (Oct) and cut/boost (dB)value. For (High and Low) shelf EQ filters the 3 dB down point (Freq) and cut/boostvalue are displayed — the bandwidth (Oct) parameter is not applicable to this typeof filter and so the field is disabled (grayed out). For crossover filters, only the 3 dBdown point (Freq) parameter is variable and the other two fields are disabled.The drop-down list box below the three filter parameter fields controls the type offilter associated with the currently selected marker. Again, the choices vary based on thetype of filter selected. For EQ filters, the available options are Bell (parametric), and High or Low shelfwith either 6 or 12 dB/octave slope. For crossover filters, the options are a Butterworth (But) filter with aslope of 12, 18, 24 or 48 dB/octave or Linkwitz-Riley (L-R) with 12, 24 or 48 dB/octave slope.The name or number of the of the currently-selected filter is displayed below the filter type list box. Crossoverfilters are identified as Low Edge or High Edge. When an EQ filter is selected, the filter number isdisplayed along with the number of Free (unassigned) filters available.Clicking the New button will assign a new EQ filter to the selected channel (assuming there are free filtersavailable) and cause an marker to appear on the 1 kHz line at -0.5 dB. A shortcut for creating a new EQfilter is to hold down the Shift key and click on the plot with your mouse at a point where you want a filter.Clicking the Flat button in the Filters section will set a selected EQ filter to 0 dB cut/boost. The All Flatbutton flattens all EQ filters on selected the output channel. On the DSC260, a flattened EQ filter isconsidered unassigned so the filter marker will disappear completely when a filter is set flat. Please notethat the Flat and All Flat buttons affect only EQ filters. The crossover filters can only be assigned andunassigned through the DSC260 System Control dialog box (see page 7 for more information).
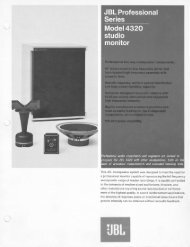
Controlling the <strong>JBL</strong> <strong>Pro</strong>fessional DSC260 System Controller Using <strong>SIA</strong>-<strong>Smaart</strong> <strong>Pro</strong> revision 1, 8/99 — Page 5The <strong>SIA</strong>-<strong>Smaart</strong> <strong>Pro</strong> Real-Time module shown controlling a <strong>JBL</strong> DSC260 digital system controller. The unit isshown in a two channel, three-way, stereo linked configuration. The light blue signal trace is a real-time frequencyresponse measurement of output channel 5, the “master” channel for the high-frequency section currently undercontrol. The magenta and yellow traces are stored response curves for the mid- and low-frequency bands. Notethat two different types of filter markers are visible on the plot. The square markers control EQ (bell or shelf)filters. Triangular markers indicate the 3 dB down point for High and Low Edge (crossover) filters.The last control in the Filters section is the Show Inverted check box. This option is normally used onlywhen the response curve of the selected output channel is inverted (using <strong>Smaart</strong> <strong>Pro</strong>’s Swap TransferFunction Inputs feature) to facilitate using a room/system response measurement as a guide for settingfilters. The unit’s audio I/O mode and the output channel number(s) currently under control are displayedimmediately below the filters section.Storing and Recalling <strong>Pro</strong>gramsBelow the Filters section, in the <strong>Pro</strong>gram section of the control panel, are two buttons labeled Recalland Store. Clicking the Recall button pops up a dialog box that allows you to retrieve a program for theDSC260 stored either on the controller itself or in a file on disk. Clicking the Store button pops up asimilar dialog box that allows you to save the current settings as a program stored in memory on thecontroller or as a file on disk. Note that this feature can be used to copy filter settings from one unit toanother since <strong>Smaart</strong> <strong>Pro</strong> DSC260 programs stored on disk can be loaded into any connected DSC260.The DSC260’s front panel display normally shows the name of the last program recalled from memoryon the controller itself and so will the title line above the Transfer Function plot in the <strong>Smaart</strong> <strong>Pro</strong>. If anycontroller settings have been changed since the program was recalled, an asterisk will appear after theprogram name to indicate that the current control states no longer reflect the stored settings. The plot titleand the 260’s front panel display will only change when a different program is recalled on the DSC260 orwhen the current settings in <strong>Smaart</strong> <strong>Pro</strong> are saved to a memory slot on the controller.
Controlling the <strong>JBL</strong> <strong>Pro</strong>fessional DSC260 System Controller Using <strong>SIA</strong>-<strong>Smaart</strong> <strong>Pro</strong> revision 1, 8/99 — Page 6The DSC260 has three basic types of security; program locking, Lock Out and OEM Lock. <strong>Smaart</strong> <strong>Pro</strong>always stores programs on the DSC260 using the program lock feature. This helps prevent accidentalchanges to current controller settings from overwriting the settings stored in the program. <strong>Pro</strong>gramlocking does not prevent you from making changes to any controller setting in <strong>Smaart</strong> <strong>Pro</strong> after a programis recalled or from overwriting the stored program. <strong>Smaart</strong> <strong>Pro</strong> can overwrite locked programswithout requiring you to unlock them. It does mean that the stored program is held intact in memory andcan be recalled after changes are made. It also means that any changes you make after recalling aprogram will only be applied to the program stored in memory if you overwrite the existing program. Ifyou recall a different program without storing your revised settings, your changes will be lost.<strong>Smaart</strong> <strong>Pro</strong> ignores Lock Out mode on the DSC260. You can make any changes you like to currentsettings and store and recall programs whether Lock Out is on or off. OEM Lock security is another story.Most of the same restrictions that apply to working with OEM Locked programs using the 260’s frontpanel controls also apply when controlling the unit using <strong>Smaart</strong> <strong>Pro</strong>. When you recall OEM Lockedprograms on the DSC260, controls for locked parameters are disabled but visible. You will be able to seeall the settings but you cannot change any locked parameters while OEM Lock is on.If you turn the OEM Lock of for an OEM locked program, using the DSC260’s front panel controls (apassword is required), you can make changes to current controller settings but your changes will notaffect the program stored in memory and you will not be allowed to overwrite the stored program withyour revised settings. <strong>Smaart</strong> <strong>Pro</strong> cannot overwrite an OEM Locked program on the DSC260 even ifOEM Lock is turned off. To use a memory slot containing an OEM Locked program to store your ownprogram, you would first need to delete the existing program using the 260’s front panel controls.<strong>Smaart</strong> <strong>Pro</strong> also does not support OEM Locking when storing DSC260 programs. When you store aprogram using <strong>Smaart</strong> <strong>Pro</strong>, either on the 260 or as a file on disk, no OEM Lock tags are set on anyparameters. If you recall an OEM Locked program and store it to another available memory slot (i.e., onethat does not contain an OEM Locked program) or to a file disk, you can make any changes you like tothe copy and store the revised settings as your own program. If you want to protect a program created by<strong>Smaart</strong> <strong>Pro</strong> with OEM Lock security, you will need to use the DSC260’s front panel controls to set it up.<strong>Smaart</strong> <strong>Pro</strong> programs stores programs on the DSC260 with the OEM password set to all blank spaces.When setting up OEM locks for a program created using <strong>Smaart</strong> <strong>Pro</strong>, just press the Store/Enter button onthe DSC260 when it asks for the Password to enter OEM Lock mode. In OEM Lock mode, you can thenset locks and change the password for unlocking the program to anything you like.All <strong>Smaart</strong> <strong>Pro</strong> external device program files (stored on disk) are given the file name extension “.eqp.”When you save a program to disk, you have the option of attaching a descriptive text comment to the file.When you select an EQP file to be loaded from disk, the type of device the program is for, the type ofprogram (if applicable) and the text comment (if any) are displayed at the bottom of the Open file dialogbox. Since this is really the only way to tell EQP file for different devices apart, it’s agood idea to store files for different devices and/or for different jobs in separatefolders.The lower portion of the DSC260 control panel, below the <strong>Pro</strong>gram section, hasseveral additional controls. The Gain control, sets the overall output gain of theselected output channels in decibels (dB). You can mute or un-mute any of the 260’soutput channels by checking or un-checking the appropriate check box under Mutes(checked = muted). The Stereo Link box links controls for adjacent output channels(1- 2, 3 -4, and 5 -6) when checked so that changes made to the settings on one
Controlling the <strong>JBL</strong> <strong>Pro</strong>fessional DSC260 System Controller Using <strong>SIA</strong>-<strong>Smaart</strong> <strong>Pro</strong> revision 1, 8/99 — Page 7output channel are also applied to the linked channel. If the settings on the two linked channels are notidentical, changes are applied incrementally to the linked channel. For example adding 2 dB of boost tofilter number three on channel one will also add 2 dB of boost to filter number three on channel two.When adjusting EQ filters in Stereo Linked mode, be aware that the linking relationship follows filternumber and not necessarily frequency order. Care should be exercised to use like-numbered filters forsimilar frequency ranges on linked channels.At the bottom of the DSC260 control bar are two buttons labeled Config and Sys Control. The Configbutton pops up the DSC260 Configuration dialog box (discussed on page 3) to allow you to makechanges to the device and channel names and I/O configuration. The Sys Control button opens theSystem Control Options dialog box. This is where you will find controls for most system controller functionsnot shown on the DSC260 control bar.The DSC260 System Control Options Dialog BoxThe System Control Options dialog box allows you to control input assignment, delay time, crossover(highpass and lowpass) filter parameters, polarity, limiter threshold, gain and mutes for all output channelson the DSC260 currently under control, regardless of which output channel is currently selected.You can also set the delay time for the input channels and turn the Stereo Link feature on and off fromthis dialog box. The System Control Options dialog box is resizable, so you can shrink it to a convenientsize to show just the information you wan to see, and “modeless,” meaning you can leave it open whileyou continue to work in the main Real-Time module program window.When you make change to the settings in the dialog box, you will see the changes reflected in any associatedon-screen controls. For example, if you click the spinner (up/down) buttons next to the Lo Freq fieldfor the currently selected output channel. This changes the 3 dB down point for the highpass filter andyou will see the triangular marker for that filter move on the Transfer Function plot to reflect the change.Type the word “Out” in the same field then click the Apply button and the marker on the plot will disappear.Note that whenever you see the Apply button activate itself, it means some action is required from you tosend the change you just made to the DSC260. If you change a value using the spinner buttons, selectsomething from a list, or check or un-check a check box, the changes are sent immediately and the Applybutton will not activate. When you type a value in a text field, you have to press the Enter key on yourkeyboard, select another control, or click the Apply button to actually send the change.At the top of the System Control Options dialog box on the left, the current base audio I/O configuration(2-Channel 3-Way, 3-Channel 2-Way, or Mono) is displayed. The I/O mode selection does not prevent you
Controlling the <strong>JBL</strong> <strong>Pro</strong>fessional DSC260 System Controller Using <strong>SIA</strong>-<strong>Smaart</strong> <strong>Pro</strong> revision 1, 8/99 — Page 8from sending the signal from either input (or the mono sum of the signal from both inputs) to any combinationof the six outputs however the DSC260 regards these as separate operating modes. This is also aquick way to set a number of parameters so it’s a good idea to start with the configuration that mostclosely approximates how you will be using the 260. Just below the I/O configuration is a check box toturn on the Stereo Link feature. To the right are three text fields where you can set delay times independentlyfor each of the two input channels and for the mono sum of both inputs.The center of the dialog box is devoted to a table consisting of six rows of identical controls — one row foreach output channel. At the left of the table in the column labeled Output, the channel number and thename assigned to each output channel is displayed. The first column of actual controls is a set of listboxes that allow you to select the input Source for each channel (in A, In B, or In A+B). Next comes theDelay time for each output (specified in milliseconds).The next two columns control the 3 dB down frequencies for each output’s highpass and lowpass crossoverfilters (labeled Lo Freq and Hi Freq respectively). If the word “Out” appears in any of these fields, itmeans that filter is not currently assigned on the corresponding channel. You can turn on an unassignedcrossover filter using the spinner buttons to the right of the input field or by typing in a value (in Hertz) andpressing the Enter key on your keyboard. To de-assign any of these filters, simply type “Out” in the correspondingfield and press Enter or click the Apply button.The next two columns to the right (Lo Shape and Hi Shape) are list boxes for selecting the type and slopefor the crossover filters. Again, the available options are a Butterworth (But) filter with a slope of 12, 18,24 or 48 dB/octave or a Linkwitz-Riley (L-R) filter with 12, 24 or 48 dB/octave slope.The Polarity for each output channel is set in the next column to the right. The options are normal (Norm)or inverted (Inv). The next two columns, second and third from the right, set the limiter (Limit) threshold indBu, and the output Gain (in dB) for each channel. The column of check boxes on the far right sets theMute for each output (checked = muted).The Close button at the bottom of the window below the control table closes the dialog box. Please notethat this does not a cancel any changes you have made to the controller settings. Config opens the <strong>JBL</strong>DSC260 Configuration dialog box (see page 3 for more information). The Apply button is used to sendchanges entered by typing values into text fields.A Publication of <strong>SIA</strong> Software Company, Inc.One Main StreetWhitinsville, MA 01588USA<strong>SIA</strong> — An EAW Companytelephone: 508-234-6158e-mail: support@siasoft.comwww.siasoft.comCopyright 1999 <strong>SIA</strong> Software Company, Inc. All rights reserved.