SIA-Smaart Pro External Device Notes - JBL Professional
SIA-Smaart Pro External Device Notes - JBL Professional
SIA-Smaart Pro External Device Notes - JBL Professional

You also want an ePaper? Increase the reach of your titles
YUMPU automatically turns print PDFs into web optimized ePapers that Google loves.
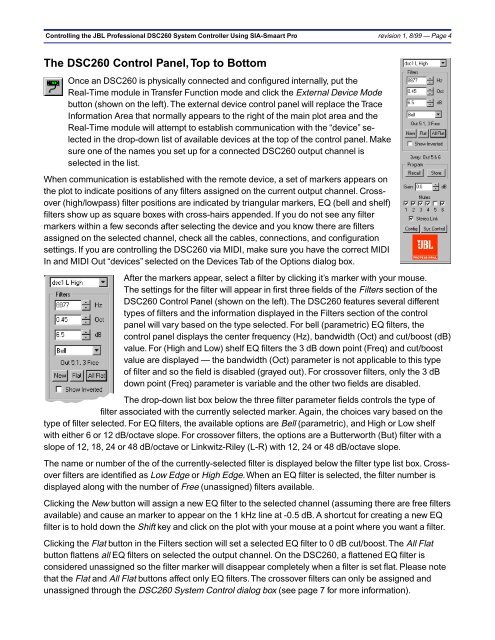
Controlling the <strong>JBL</strong> <strong>Pro</strong>fessional DSC260 System Controller Using <strong>SIA</strong>-<strong>Smaart</strong> <strong>Pro</strong> revision 1, 8/99 — Page 4The DSC260 Control Panel, Top to BottomOnce an DSC260 is physically connected and configured internally, put theReal-Time module in Transfer Function mode and click the <strong>External</strong> <strong>Device</strong> Modebutton (shown on the left). The external device control panel will replace the TraceInformation Area that normally appears to the right of the main plot area and theReal-Time module will attempt to establish communication with the “device” selectedin the drop-down list of available devices at the top of the control panel. Makesure one of the names you set up for a connected DSC260 output channel isselected in the list.When communication is established with the remote device, a set of markers appears onthe plot to indicate positions of any filters assigned on the current output channel. Crossover(high/lowpass) filter positions are indicated by triangular markers, EQ (bell and shelf)filters show up as square boxes with cross-hairs appended. If you do not see any filtermarkers within a few seconds after selecting the device and you know there are filtersassigned on the selected channel, check all the cables, connections, and configurationsettings. If you are controlling the DSC260 via MIDI, make sure you have the correct MIDIIn and MIDI Out “devices” selected on the <strong>Device</strong>s Tab of the Options dialog box.After the markers appear, select a filter by clicking it’s marker with your mouse.The settings for the filter will appear in first three fields of the Filters section of theDSC260 Control Panel (shown on the left). The DSC260 features several differenttypes of filters and the information displayed in the Filters section of the controlpanel will vary based on the type selected. For bell (parametric) EQ filters, thecontrol panel displays the center frequency (Hz), bandwidth (Oct) and cut/boost (dB)value. For (High and Low) shelf EQ filters the 3 dB down point (Freq) and cut/boostvalue are displayed — the bandwidth (Oct) parameter is not applicable to this typeof filter and so the field is disabled (grayed out). For crossover filters, only the 3 dBdown point (Freq) parameter is variable and the other two fields are disabled.The drop-down list box below the three filter parameter fields controls the type offilter associated with the currently selected marker. Again, the choices vary based on thetype of filter selected. For EQ filters, the available options are Bell (parametric), and High or Low shelfwith either 6 or 12 dB/octave slope. For crossover filters, the options are a Butterworth (But) filter with aslope of 12, 18, 24 or 48 dB/octave or Linkwitz-Riley (L-R) with 12, 24 or 48 dB/octave slope.The name or number of the of the currently-selected filter is displayed below the filter type list box. Crossoverfilters are identified as Low Edge or High Edge. When an EQ filter is selected, the filter number isdisplayed along with the number of Free (unassigned) filters available.Clicking the New button will assign a new EQ filter to the selected channel (assuming there are free filtersavailable) and cause an marker to appear on the 1 kHz line at -0.5 dB. A shortcut for creating a new EQfilter is to hold down the Shift key and click on the plot with your mouse at a point where you want a filter.Clicking the Flat button in the Filters section will set a selected EQ filter to 0 dB cut/boost. The All Flatbutton flattens all EQ filters on selected the output channel. On the DSC260, a flattened EQ filter isconsidered unassigned so the filter marker will disappear completely when a filter is set flat. Please notethat the Flat and All Flat buttons affect only EQ filters. The crossover filters can only be assigned andunassigned through the DSC260 System Control dialog box (see page 7 for more information).