Controlling the <strong>JBL</strong> <strong>Pro</strong>fessional DSC260 System Controller Using <strong>SIA</strong>-<strong>Smaart</strong> <strong>Pro</strong> revision 1, 8/99 — Page 6The DSC260 has three basic types of security; program locking, Lock Out and OEM Lock. <strong>Smaart</strong> <strong>Pro</strong>always stores programs on the DSC260 using the program lock feature. This helps prevent accidentalchanges to current controller settings from overwriting the settings stored in the program. <strong>Pro</strong>gramlocking does not prevent you from making changes to any controller setting in <strong>Smaart</strong> <strong>Pro</strong> after a programis recalled or from overwriting the stored program. <strong>Smaart</strong> <strong>Pro</strong> can overwrite locked programswithout requiring you to unlock them. It does mean that the stored program is held intact in memory andcan be recalled after changes are made. It also means that any changes you make after recalling aprogram will only be applied to the program stored in memory if you overwrite the existing program. Ifyou recall a different program without storing your revised settings, your changes will be lost.<strong>Smaart</strong> <strong>Pro</strong> ignores Lock Out mode on the DSC260. You can make any changes you like to currentsettings and store and recall programs whether Lock Out is on or off. OEM Lock security is another story.Most of the same restrictions that apply to working with OEM Locked programs using the 260’s frontpanel controls also apply when controlling the unit using <strong>Smaart</strong> <strong>Pro</strong>. When you recall OEM Lockedprograms on the DSC260, controls for locked parameters are disabled but visible. You will be able to seeall the settings but you cannot change any locked parameters while OEM Lock is on.If you turn the OEM Lock of for an OEM locked program, using the DSC260’s front panel controls (apassword is required), you can make changes to current controller settings but your changes will notaffect the program stored in memory and you will not be allowed to overwrite the stored program withyour revised settings. <strong>Smaart</strong> <strong>Pro</strong> cannot overwrite an OEM Locked program on the DSC260 even ifOEM Lock is turned off. To use a memory slot containing an OEM Locked program to store your ownprogram, you would first need to delete the existing program using the 260’s front panel controls.<strong>Smaart</strong> <strong>Pro</strong> also does not support OEM Locking when storing DSC260 programs. When you store aprogram using <strong>Smaart</strong> <strong>Pro</strong>, either on the 260 or as a file on disk, no OEM Lock tags are set on anyparameters. If you recall an OEM Locked program and store it to another available memory slot (i.e., onethat does not contain an OEM Locked program) or to a file disk, you can make any changes you like tothe copy and store the revised settings as your own program. If you want to protect a program created by<strong>Smaart</strong> <strong>Pro</strong> with OEM Lock security, you will need to use the DSC260’s front panel controls to set it up.<strong>Smaart</strong> <strong>Pro</strong> programs stores programs on the DSC260 with the OEM password set to all blank spaces.When setting up OEM locks for a program created using <strong>Smaart</strong> <strong>Pro</strong>, just press the Store/Enter button onthe DSC260 when it asks for the Password to enter OEM Lock mode. In OEM Lock mode, you can thenset locks and change the password for unlocking the program to anything you like.All <strong>Smaart</strong> <strong>Pro</strong> external device program files (stored on disk) are given the file name extension “.eqp.”When you save a program to disk, you have the option of attaching a descriptive text comment to the file.When you select an EQP file to be loaded from disk, the type of device the program is for, the type ofprogram (if applicable) and the text comment (if any) are displayed at the bottom of the Open file dialogbox. Since this is really the only way to tell EQP file for different devices apart, it’s agood idea to store files for different devices and/or for different jobs in separatefolders.The lower portion of the DSC260 control panel, below the <strong>Pro</strong>gram section, hasseveral additional controls. The Gain control, sets the overall output gain of theselected output channels in decibels (dB). You can mute or un-mute any of the 260’soutput channels by checking or un-checking the appropriate check box under Mutes(checked = muted). The Stereo Link box links controls for adjacent output channels(1- 2, 3 -4, and 5 -6) when checked so that changes made to the settings on one
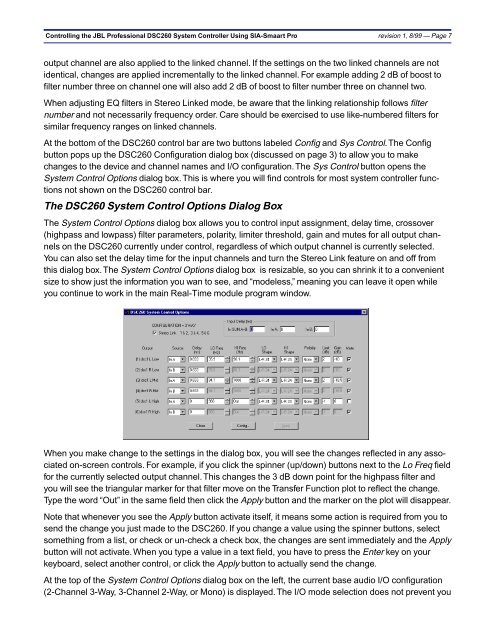
Controlling the <strong>JBL</strong> <strong>Pro</strong>fessional DSC260 System Controller Using <strong>SIA</strong>-<strong>Smaart</strong> <strong>Pro</strong> revision 1, 8/99 — Page 7output channel are also applied to the linked channel. If the settings on the two linked channels are notidentical, changes are applied incrementally to the linked channel. For example adding 2 dB of boost tofilter number three on channel one will also add 2 dB of boost to filter number three on channel two.When adjusting EQ filters in Stereo Linked mode, be aware that the linking relationship follows filternumber and not necessarily frequency order. Care should be exercised to use like-numbered filters forsimilar frequency ranges on linked channels.At the bottom of the DSC260 control bar are two buttons labeled Config and Sys Control. The Configbutton pops up the DSC260 Configuration dialog box (discussed on page 3) to allow you to makechanges to the device and channel names and I/O configuration. The Sys Control button opens theSystem Control Options dialog box. This is where you will find controls for most system controller functionsnot shown on the DSC260 control bar.The DSC260 System Control Options Dialog BoxThe System Control Options dialog box allows you to control input assignment, delay time, crossover(highpass and lowpass) filter parameters, polarity, limiter threshold, gain and mutes for all output channelson the DSC260 currently under control, regardless of which output channel is currently selected.You can also set the delay time for the input channels and turn the Stereo Link feature on and off fromthis dialog box. The System Control Options dialog box is resizable, so you can shrink it to a convenientsize to show just the information you wan to see, and “modeless,” meaning you can leave it open whileyou continue to work in the main Real-Time module program window.When you make change to the settings in the dialog box, you will see the changes reflected in any associatedon-screen controls. For example, if you click the spinner (up/down) buttons next to the Lo Freq fieldfor the currently selected output channel. This changes the 3 dB down point for the highpass filter andyou will see the triangular marker for that filter move on the Transfer Function plot to reflect the change.Type the word “Out” in the same field then click the Apply button and the marker on the plot will disappear.Note that whenever you see the Apply button activate itself, it means some action is required from you tosend the change you just made to the DSC260. If you change a value using the spinner buttons, selectsomething from a list, or check or un-check a check box, the changes are sent immediately and the Applybutton will not activate. When you type a value in a text field, you have to press the Enter key on yourkeyboard, select another control, or click the Apply button to actually send the change.At the top of the System Control Options dialog box on the left, the current base audio I/O configuration(2-Channel 3-Way, 3-Channel 2-Way, or Mono) is displayed. The I/O mode selection does not prevent you