SIA-Smaart Pro External Device Notes - JBL Professional
SIA-Smaart Pro External Device Notes - JBL Professional
SIA-Smaart Pro External Device Notes - JBL Professional

You also want an ePaper? Increase the reach of your titles
YUMPU automatically turns print PDFs into web optimized ePapers that Google loves.
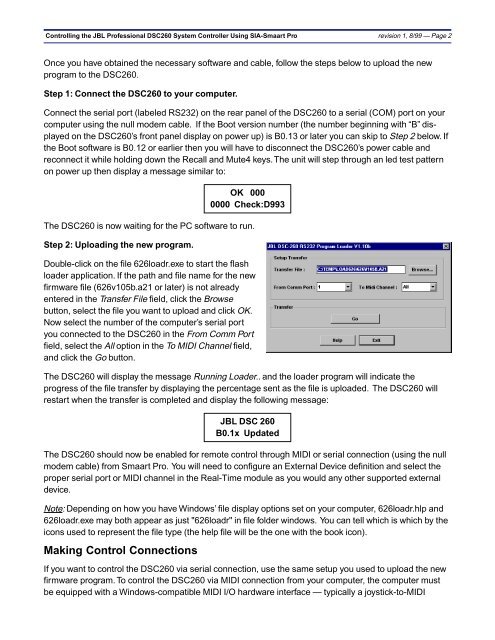
Controlling the <strong>JBL</strong> <strong>Pro</strong>fessional DSC260 System Controller Using <strong>SIA</strong>-<strong>Smaart</strong> <strong>Pro</strong> revision 1, 8/99 — Page 2Once you have obtained the necessary software and cable, follow the steps below to upload the newprogram to the DSC260.Step 1: Connect the DSC260 to your computer.Connect the serial port (labeled RS232) on the rear panel of the DSC260 to a serial (COM) port on yourcomputer using the null modem cable. If the Boot version number (the number beginning with “B” displayedon the DSC260’s front panel display on power up) is B0.13 or later you can skip to Step 2 below. Ifthe Boot software is B0.12 or earlier then you will have to disconnect the DSC260’s power cable andreconnect it while holding down the Recall and Mute4 keys. The unit will step through an led test patternon power up then display a message similar to:OK 0000000 Check:D993The DSC260 is now waiting for the PC software to run.Step 2: Uploading the new program.Double-click on the file 626loadr.exe to start the flashloader application. If the path and file name for the newfirmware file (626v105b.a21 or later) is not alreadyentered in the Transfer File field, click the Browsebutton, select the file you want to upload and click OK.Now select the number of the computer’s serial portyou connected to the DSC260 in the From Comm Portfield, select the All option in the To MIDI Channel field,and click the Go button.The DSC260 will display the message Running Loader.. and the loader program will indicate theprogress of the file transfer by displaying the percentage sent as the file is uploaded. The DSC260 willrestart when the transfer is completed and display the following message:<strong>JBL</strong> DSC 260B0.1x UpdatedThe DSC260 should now be enabled for remote control through MIDI or serial connection (using the nullmodem cable) from <strong>Smaart</strong> <strong>Pro</strong>. You will need to configure an <strong>External</strong> <strong>Device</strong> definition and select theproper serial port or MIDI channel in the Real-Time module as you would any other supported externaldevice.Note: Depending on how you have Windows’ file display options set on your computer, 626loadr.hlp and626loadr.exe may both appear as just "626loadr" in file folder windows. You can tell which is which by theicons used to represent the file type (the help file will be the one with the book icon).Making Control ConnectionsIf you want to control the DSC260 via serial connection, use the same setup you used to upload the newfirmware program. To control the DSC260 via MIDI connection from your computer, the computer mustbe equipped with a Windows-compatible MIDI I/O hardware interface — typically a joystick-to-MIDI