238-47104-00A - Bradford White
238-47104-00A - Bradford White
238-47104-00A - Bradford White

Create successful ePaper yourself
Turn your PDF publications into a flip-book with our unique Google optimized e-Paper software.
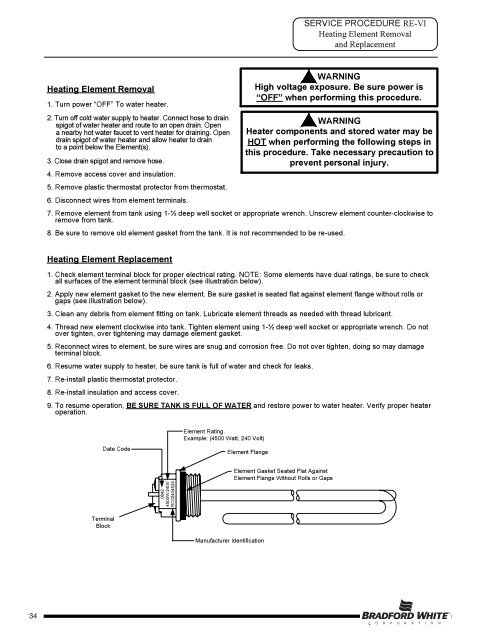
SERVICE PROCEDURE RE-VIHeating Element Removaland ReplacementHeating Element Removal1. Turn power “OFF” To water heater.2. Turn off cold water supply to heater. Connect hose to drainspigot of water heater and route to an open drain. Opena nearby hot water faucet to vent heater for draining. Opendrain spigot of water heater and allow heater to drainto a point below the Element(s).3. Close drain spigot and remove hose.4. Remove access cover and insulation.5. Remove plastic thermostat protector from thermostat.6. Disconnect wires from element terminals.WARNINGHigh voltage exposure. Be sure power is“OFF” when performing this procedure.WARNINGHeater components and stored water may beHOT when performing the following steps inthis procedure. Take necessary precaution toprevent personal injury.7. Remove element from tank using 1-½ deep well socket or appropriate wrench. Unscrew element counter-clockwise toremove from tank.8. Be sure to remove old element gasket from the tank. It is not recommended to be re-used.Heating Element Replacement1. Check element terminal block for proper electrical rating. NOTE: Some elements have dual ratings, be sure to checkall surfaces of the element terminal block (see illustration below).2. Apply new element gasket to the new element. Be sure gasket is seated flat against element flange without rolls orgaps (see illustration below).3. Clean any debris from element fitting on tank. Lubricate element threads as needed with thread lubricant.4. Thread new element clockwise into tank. Tighten element using 1-½ deep well socket or appropriate wrench. Do notover tighten, over tightening may damage element gasket.5. Reconnect wires to element, be sure wires are snug and corrosion free. Do not over tighten, doing so may damageterminal block.6. Resume water supply to heater, be sure tank is full of water and check for leaks.7. Re-install plastic thermostat protector.8. Re-install insulation and access cover.9. To resume operation, BE SURE TANK IS FULL OF WATER and restore power to water heater. Verify proper heateroperation.Date CodeElement Rating.Example: (4500 Watt, 240 Volt)Element FlangeElement Gasket Seated Flat AgainstElement Flange Without Rolls or Gaps06424500W 240VRC02404524TerminalBlockManufacturer IdentificationPage 3434