FORD RANGER MAZDA B2500 W21-760-3454 - Offroad obchod
FORD RANGER MAZDA B2500 W21-760-3454 - Offroad obchod
FORD RANGER MAZDA B2500 W21-760-3454 - Offroad obchod

Create successful ePaper yourself
Turn your PDF publications into a flip-book with our unique Google optimized e-Paper software.
Unit 626 Kilshane Avenue, North West Business Park, Ballycoolin, Dublin 15, IrelandTelephone: +353 1 8612 632 Fax: +353 1 8612 647<strong>FORD</strong> <strong>RANGER</strong><strong>MAZDA</strong> <strong>B2500</strong><strong>W21</strong>-<strong>760</strong>-<strong>3454</strong>INSTALLATION INSTRUCTIONSemail:sales@driveriteltd.comAll work should be carried out in a properly equipped workshop with due regard to Health andSafety Regulations. No further reference to Health and Safety Regulations will be made, butthey must be considered at all times.The kit should be opened and the contents checked against the parts list provided.Identify the various components and familiarise yourself with them using drawings andinformation provided.WARNINGDo not inflate this assembly when it is unrestricted. When installed, a minimum of 10psi should be maintained in the air springs at all times to avoid damage. Do notinflate beyond 100 psi.IMPORTANTThis kit is not designed to increase the GVW of your vehicle. For your safety and toprevent possible damage to your vehicle, do not exceed the maximum loadrecommended by the vehicle manufacturer.Note: The assembly of this kit should be carried out by trained technical personnel. This is necessary, as auxiliary tools arerequired for assembly.1
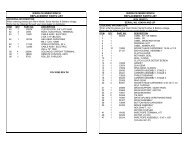
PREPARATION:In order for the kit to be installed on the vehicle, it is necessary firstly to provide free spacewithin the range of the rear axle. There must be 20 mm clearance around each airspring.Usually, there are no additional components which could interfere with installing the kits in thisspace. However, if components are interefering with mounting the kit, then it must be clarifiedwhether it is still possible to mount this kit or whether these additional parts can be movedaccordingly. You must always take care not to interfere with the vehicle parts, e.g. brakehoses, cables etc. These could be jammed or damaged while assembling the kit. In order toensure this does not occur, they must be partially shifted.Parts ListDescription Quantity Description QuantityBottom Bracket 2 18 ft. 1/4" Tubing 1Top Bracket 2 3/8-16 Flange Locknut 4Bail Clamp 2 3/8-16 x 3/4 C,sunk Bolt 23/8” Locknuts 4 1/4” Elbow 23/8” Spring Washers 4 1/4” Inflation Valve 2Cable Ties 10 5/16 Flat Washer 4Thermal Sleeves 2 1/4” Tee Piece 1267C 1/4” NPT Air Bellows 22
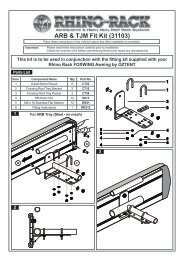
INSTALLATIONAttach the top and bottom brackets to theairsprings as shown.Use the flange locknuts on the topbracket and the countersunk bolts on thebottom bracket.Insert the elbow air fittings into the top ofthe airsprings. The use of thread sealantis recommended here.Raise the body of the vehicle until thewheels are approximately 50 mm abovethe ground, to allow space to insert thespring assemblies, which are mountedbehind the rear axle. Support the rearaxle with a jack.Loosen the four original U bolt nuts eachside. Place the assembled airspringsbetween the chassis and the axle, andslide the extended side of the bottombracket underneath the clamp plate untilthe spring centre pin is located in the sloton the bracket.Do not tighten the U bolt nuts yet.3
Attach the top bracket to the frameworkof the vehicle directly above the bottombracket by means of the bail clampsprovided, securing with nuts andwashers.Note: In order to prevent damage to theairsprings, the threads may have to beshortened (see photo.)Check the vertical alignment of theairsprings. Check particularly that theairsprings are not in contact with anyother component of the vehicle.Tighten the U bolt nuts.Decide which side of the vehicle tomount the inflation valve: a suggestedlocation is at the front or rear of the rearwheel arch. It should be easily accessiblebut protected, and on the same side ofthe vehicle as you intend to mount thepressure gauge (if applicable): a suitablelocation for this is inside the rear of thevehicle.4
Cut a generous length of air tubing to reach from the inflation valve to the top of the nearestairspring, following the line of the inner wheel arch and across to the top of the airspring, withsufficient slack to allow suspension movement. Insert one end of this tube into the air fitting inthe airspring.Cut another generous length of air tubing to reach from the top of one airspring to the top ofthe other, routing it along the chassis so that it can be neatly held in place. Insert one end ofthis tube into the air fitting in the second airspring.Cut the tube between the inflation valve and the first airspring squarely close to the airspringand insert a T fitting between the 2 ends. Connect the tube from the airspring on the otherside of the vehicle into the T fitting.Drill an 8 mm (5/16”) hole and mount theinflation valve as shown in the diagram,pushing the valve through the hole frombehind and attaching with 2 washers anda nut.Cut the air tube to length, making surethe end is cut squarely, and push the endas far as possible into the back of theinflation valve.OPTION: To mount a pressure gauge inside the rear of the vehicle. Cut the air tube squarelya short distance back from the inflation valve, and insert the ends of the tubes into a Teefitting. Cut a length of tube long enough to reach from the T fitting to the gauge. Feed the airtube up from below and connect the tube into the gauge and the Tee fitting.IMPORTANT:Do not attach to brake lines.Protect the tube with the sleeving provided where there are any sharp edges or sources ofheat.Examination:After assembly, inflate air bellows and check all mounting bolts are tight. Screw allconnections tight again. It must be ensured that the mounting brackets can not move. If theplates touch the brake hose at the air spring, then these must be moved by suitable means.Check for air leaks, using soapy water if necessary.5