Orion® EQ-1 Equatorial Mount
Orion® EQ-1 Equatorial Mount
Orion® EQ-1 Equatorial Mount
Create successful ePaper yourself
Turn your PDF publications into a flip-book with our unique Google optimized e-Paper software.
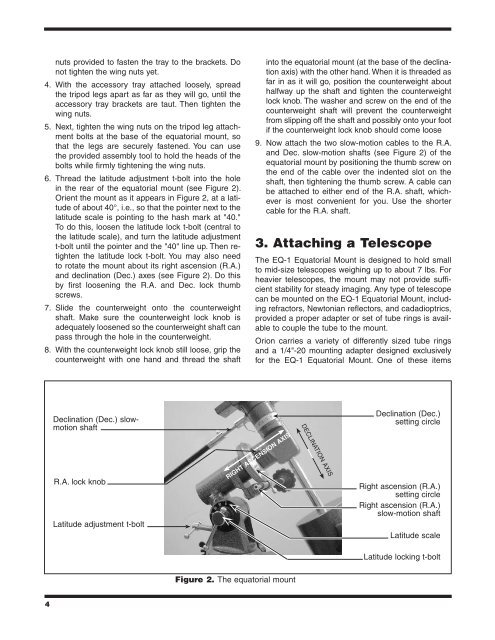
nuts provided to fasten the tray to the brackets. Donot tighten the wing nuts yet.4. With the accessory tray attached loosely, spreadthe tripod legs apart as far as they will go, until theaccessory tray brackets are taut. Then tighten thewing nuts.5. Next, tighten the wing nuts on the tripod leg attachmentbolts at the base of the equatorial mount, sothat the legs are securely fastened. You can usethe provided assembly tool to hold the heads of thebolts while firmly tightening the wing nuts.6. Thread the latitude adjustment t-bolt into the holein the rear of the equatorial mount (see Figure 2).Orient the mount as it appears in Figure 2, at a latitudeof about 40°, i.e., so that the pointer next to thelatitude scale is pointing to the hash mark at "40."To do this, loosen the latitude lock t-bolt (central tothe latitude scale), and turn the latitude adjustmentt-bolt until the pointer and the "40" line up. Then retightenthe latitude lock t-bolt. You may also needto rotate the mount about its right ascension (R.A.)and declination (Dec.) axes (see Figure 2). Do thisby first loosening the R.A. and Dec. lock thumbscrews.7. Slide the counterweight onto the counterweightshaft. Make sure the counterweight lock knob isadequately loosened so the counterweight shaft canpass through the hole in the counterweight.8. With the counterweight lock knob still loose, grip thecounterweight with one hand and thread the shaftinto the equatorial mount (at the base of the declinationaxis) with the other hand. When it is threaded asfar in as it will go, position the counterweight abouthalfway up the shaft and tighten the counterweightlock knob. The washer and screw on the end of thecounterweight shaft will prevent the counterweightfrom slipping off the shaft and possibly onto your footif the counterweight lock knob should come loose9. Now attach the two slow-motion cables to the R.A.and Dec. slow-motion shafts (see Figure 2) of theequatorial mount by positioning the thumb screw onthe end of the cable over the indented slot on theshaft, then tightening the thumb screw. A cable canbe attached to either end of the R.A. shaft, whicheveris most convenient for you. Use the shortercable for the R.A. shaft.3. Attaching a TelescopeThe <strong>EQ</strong>-1 <strong>Equatorial</strong> <strong>Mount</strong> is designed to hold smallto mid-size telescopes weighing up to about 7 lbs. Forheavier telescopes, the mount may not provide sufficientstability for steady imaging. Any type of telescopecan be mounted on the <strong>EQ</strong>-1 <strong>Equatorial</strong> <strong>Mount</strong>, includingrefractors, Newtonian reflectors, and cadadioptrics,provided a proper adapter or set of tube rings is availableto couple the tube to the mount.Orion carries a variety of differently sized tube ringsand a 1/4"-20 mounting adapter designed exclusivelyfor the <strong>EQ</strong>-1 <strong>Equatorial</strong> <strong>Mount</strong>. One of these itemsDeclination (Dec.) slowmotionshaftR.A. lock knobLatitude adjustment t-boltRight ascension axisDeclination axisDeclination (Dec.)setting circleRight ascension (R.A.)setting circleRight ascension (R.A.)slow-motion shaftLatitude scaleLatitude locking t-boltFigure 2. The equatorial mount4


