Orion® AccuFocus⢠Electronic Focuser Parts List Installation for ...
Orion® AccuFocus⢠Electronic Focuser Parts List Installation for ...
Orion® AccuFocus⢠Electronic Focuser Parts List Installation for ...

Create successful ePaper yourself
Turn your PDF publications into a flip-book with our unique Google optimized e-Paper software.
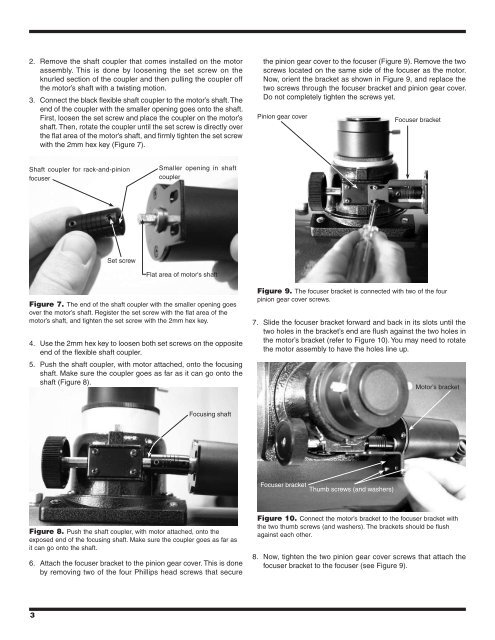
2. Remove the shaft coupler that comes installed on the motorassembly. This is done by loosening the set screw on theknurled section of the coupler and then pulling the coupler offthe motor’s shaft with a twisting motion.3. Connect the black flexible shaft coupler to the motor’s shaft. Theend of the coupler with the smaller opening goes onto the shaft.First, loosen the set screw and place the coupler on the motor’sshaft. Then, rotate the coupler until the set screw is directly overthe flat area of the motor’s shaft, and firmly tighten the set screwwith the 2mm hex key (Figure 7).the pinion gear cover to the focuser (Figure 9). Remove the twoscrews located on the same side of the focuser as the motor.Now, orient the bracket as shown in Figure 9, and replace thetwo screws through the focuser bracket and pinion gear cover.Do not completely tighten the screws yet.Pinion gear cover<strong>Focuser</strong> bracketShaft coupler <strong>for</strong> rack-and-pinionfocuserSmaller opening in shaftcouplerSet screwFlat area of motor's shaftFigure 7. The end of the shaft coupler with the smaller opening goesover the motor’s shaft. Register the set screw with the flat area of themotor’s shaft, and tighten the set screw with the 2mm hex key.4. Use the 2mm hex key to loosen both set screws on the oppositeend of the flexible shaft coupler.5. Push the shaft coupler, with motor attached, onto the focusingshaft. Make sure the coupler goes as far as it can go onto theshaft (Figure 8).Figure 9. The focuser bracket is connected with two of the fourpinion gear cover screws.7. Slide the focuser bracket <strong>for</strong>ward and back in its slots until thetwo holes in the bracket’s end are flush against the two holes inthe motor’s bracket (refer to Figure 10). You may need to rotatethe motor assembly to have the holes line up.Motor’s bracketFocusing shaft<strong>Focuser</strong> bracket Thumb screws (and washers)Figure 8. Push the shaft coupler, with motor attached, onto theexposed end of the focusing shaft. Make sure the coupler goes as far asit can go onto the shaft.6. Attach the focuser bracket to the pinion gear cover. This is doneby removing two of the four Phillips head screws that secureFigure 10. Connect the motor’s bracket to the focuser bracket withthe two thumb screws (and washers). The brackets should be flushagainst each other.8. Now, tighten the two pinion gear cover screws that attach thefocuser bracket to the focuser (see Figure 9).3