Install Guide
Install Guide
Install Guide

Create successful ePaper yourself
Turn your PDF publications into a flip-book with our unique Google optimized e-Paper software.
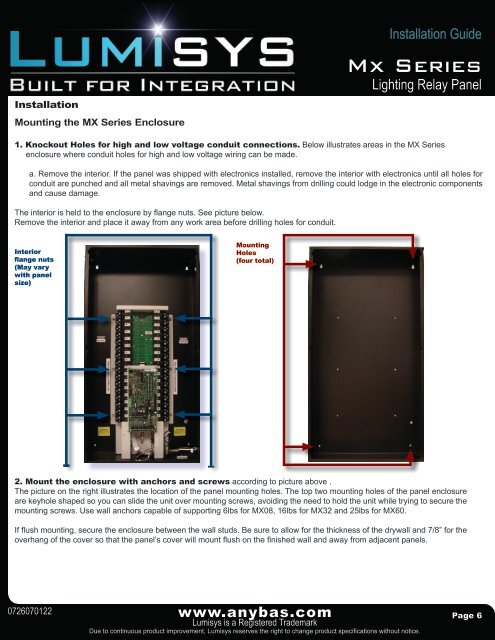
<strong>Install</strong>ationMounting the MX Series Enclosure<strong>Install</strong>ation <strong>Guide</strong>Mx SeriesLighting Relay Panel1. Knockout Holes for high and low voltage conduit connections. Below illustrates areas in the MX Seriesenclosure where conduit holes for high and low voltage wiring can be made.a. Remove the interior. If the panel was shipped with electronics installed, remove the interior with electronics until all holes forconduit are punched and all metal shavings are removed. Metal shavings from drilling could lodge in the electronic componentsand cause damage.The interior is held to the enclosure by flange nuts. See picture below.Remove the interior and place it away from any work area before drilling holes for conduit.Interiorflange nuts(May varywith panelsize)MountingHoles(four total)2. Mount the enclosure with anchors and screws according to picture above .The picture on the right illustrates the location of the panel mounting holes. The top two mounting holes of the panel enclosureare keyhole shaped so you can slide the unit over mounting screws, avoiding the need to hold the unit while trying to secure themounting screws. Use wall anchors capable of supporting 6lbs for MX08, 16lbs for MX32 and 25lbs for MX60.If flush mounting, secure the enclosure between the wall studs. Be sure to allow for the thickness of the drywall and 7/8” for theoverhang of the cover so that the panel’s cover will mount flush on the finished wall and away from adjacent panels.0726070122www.anybas.comLumisys is a Registered TrademarkDue to continuous product improvement, Lumisys reserves the right to change product specifications without notice.Page 6