
You also want an ePaper? Increase the reach of your titles
YUMPU automatically turns print PDFs into web optimized ePapers that Google loves.
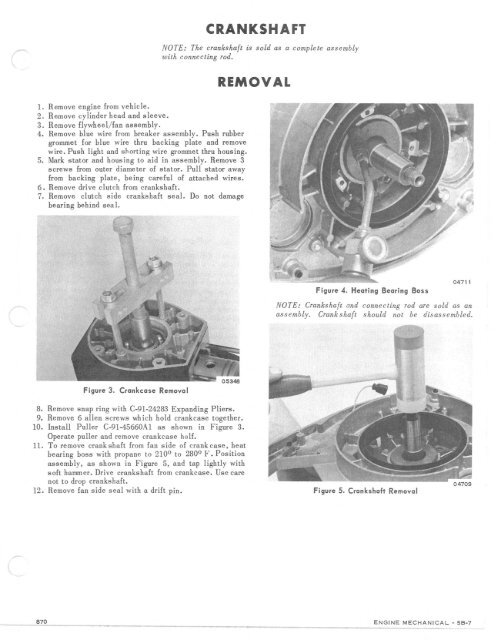
CRANKSH A FTNOTE: The crankshaft is sold as a comple te assemblywith connecting rod.REMOV A L1. Remove engine from vehicle.2 . Remove cylinder head and sleeve.3 . Remove flywheel/fan assembly.4. Remove bl ue wire from breaker assembly. P ush rubbergrommet for blue wire thru ba ck ing plate and removewire. Push light and shorting wire grommet thru housing .5. Mark s tat or and housing to aid in assembly. Remove 3s crews from outer diameter of stator. P ull s tator awayfrom backing plate, be ing careful of attached wire s .6. Remove drive clutch from cranks haft.7. Remove clutch side crankshaft s e a l. Do not dama gebearing behind seal.Figure 4. Heating Bearing BossNOTE: Crankshoi« and connecting rod are so ld as anas s embly. Crankshaft shoul d not be dis assemble d.F igure 3. Crankcase Remova l8. Re move snap ring with C-91-24283 Expanding Pliers.9. Remove 6 allen s crews which hold crankc as e togethe r.10. Install Puller C-91-45660Al as shown in Figure 3.Operate puller and remove crankcas e ha lf .Ll . To re move crankshaft from fan side of cra nk cas e , heatbe ar ing boss with propane to 210 0 t o 280 0 F . Pos itionas sembly, as s hown in Figure 5, and tap lightly withsoft hammer. Drive crankshaft from crankcase. Use carenot to drop crankshaft.12. Remove fan side s eal with a drift pin.Figure 5. Crankshaft Removal870E N G I N E M E CH ANICA L - 58-7