Assembly Instruction 485-8900 CRIB ENCHANTMENT - Cribs.com
Assembly Instruction 485-8900 CRIB ENCHANTMENT - Cribs.com
Assembly Instruction 485-8900 CRIB ENCHANTMENT - Cribs.com

Create successful ePaper yourself
Turn your PDF publications into a flip-book with our unique Google optimized e-Paper software.
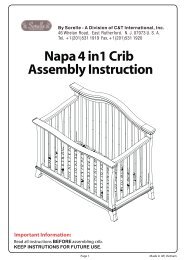
<strong>Assembly</strong> <strong>Instruction</strong><strong>485</strong>-<strong>8900</strong> <strong>CRIB</strong> <strong>ENCHANTMENT</strong>09-004WARNING:Do not use this crib if the enclosed or attached instructions cannot be strictlyadhered to. Do not use this crib if the child is able to climb out unaided or istaller than 90 cm. Do not place cords, straps or similar items that couldbe<strong>com</strong>e wound around the child’s neck in or near this crib. The mattressused with this crib should not be more than 15 cm thick and should be ofsuch length and width that the gap between the mattress and the sides of thecrib is not more than 3 cm when the mattress is pushed into the corner of thecrib.WARNING:Failure to follow these warnings and assembly instructions could result in seriousinjury or death. Read all instructions before assembling crib. KEEP INSTRUCTIONS FORFUTURE USE. Before each usage or assembly, inspect crib for damaged hardware, loosejoints, missing parts or sharp edges. DO NOT use crib if any parts aremissing or broken. Telephone or write to Legacy Classic Kids forreplacement parts and instructional literature if needed. DO NOT substituteparts. DO NOT use a water mattress with this crib. DO NOT place crib near window where cords from blinds or drapes maystrangle a child. When child is able to pull to standing position, set mattress to lowestposition and remove bumper pads, large toys and other objects that couldserve as steps for climbing out. Infants can suffocate on soft bedding. Never add a pillow, <strong>com</strong>forter, orpadding. If refinishing, use a non-toxic finish specified for children’s products. Never use plastic shipping bags or other plastic film as mattress coversbecause they can cause suffocation. Strings can cause strangulation! Do not place items with a string around achild’s neck, such as hood strings or pacifier cords. Do not suspend stringsover a crib or attach strings to toys. To help prevent strangulation, tighten all fasteners. A child can trap partsof the body or clothing on loose fasteners. Infants can suffocate in gapsbetween the crib sides and a mattress that is too small. To reduce the risk of SIDS, pediatricians re<strong>com</strong>mend healthy infants beplaced on their backs to sleep, unless otherwise advised by yourphysician. When child is able to climb out or reaches the height of 35 inches (90 cm),the crib must be replaced with a Toddler Bed or larger bed09-005Page 1 of 6
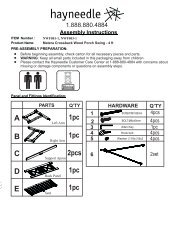
<strong>Assembly</strong> <strong>Instruction</strong><strong>485</strong>-<strong>8900</strong> <strong>CRIB</strong> <strong>ENCHANTMENT</strong>HARDWARE ENCLOSED:(F) Hex bolt screws: M6 x 40 – 8pcs(G) Bottom head bolt M6 x 16 – 4pcsNOTE: Store all hardware out of child’s reach.TOOLS REQUIRED:(H) Hex Allen Wrench with Ball tip -1pc (included)Phillips Screwdriver (not included)PRE- ASSEMBLY: Remove all parts and hardware from the box and lay out on a clear carpeted or scratch-free worksurface, as this will avoid damaging parts during assembly. The shipping box provides an ideal worksurface. Do not dispose of any packaging or contents of the shipping carton until assembly is <strong>com</strong>pleted to avoidaccidentally discarding small parts or hardware. Use the parts and hardware lists above to identify and separate each of the pieces included. The illustrations provided allow for easier assembly when used in conjunction with the assemblyinstructions. The use of power tools for assembly is not re<strong>com</strong>mended. Power tools can damage hardware or splitwood.ASSEMBLY INSTRUCTIONS:1. Remove the assembly instructions from the envelope attached to the Crib and review. Keep them handyfor referring to the part and hardware descriptions2. Assemble the Left Side Gate (A) and Right Side Gate (B) to the Mattress Metal Base Brackets (C) with 4Bolts (G) using the Hex Allen Wrench (H). Adjust the brackets of the Mattress Metal Base (C) to fit thehole of Side Gate once assembling (See Fig 1)NOTE: The Mattress support base may be at the highest level when the child is born. It must be at thelowest level by the time the child can stand up.Page 3 of 6
<strong>Assembly</strong> <strong>Instruction</strong>Fig (1)<strong>485</strong>-<strong>8900</strong> <strong>CRIB</strong> <strong>ENCHANTMENT</strong>3. To change the position of the Mattress Metal Base (C), unscrew the 4 bolts (G), line up the MattressMetal Base (C) with the holes at the desired height and re-attach the Mattress Metal Base (C) with thesame bolts (G).4. Assemble the Crib Back (D) to the Left Side Gate (A) and to the Right Side Gate (B) with 4 Bolts (F),using the Hex Allen Wrench (H) (see Fig 2).Fig (2)4. Assemble the Front Gate (E) to the crib using 4 same Bolts (F). Tighten using the Hex Allen Wrench (H). (SeeFig 3)Page 4 of 6
<strong>Assembly</strong> <strong>Instruction</strong><strong>485</strong>-<strong>8900</strong> <strong>CRIB</strong> <strong>ENCHANTMENT</strong>Fig (3)5. Tighten all connections. <strong>Assembly</strong> is <strong>com</strong>plete.Fig (4)NOTE:As this Crib is designed to grow with your child, please retain these instructions as well as all hardwarefor future use. Always keep all small parts and hardware out of children’s reach.With the addition of this Crib Conversion Kit (sold separately), your Legacy Classic crib will be<strong>com</strong>e aToddler Bed/Daybed. Please see the <strong>Assembly</strong> <strong>Instruction</strong>s included with the Legacy Classic ToddlerBed/Daybed for detailsCARE INSTRUCTIONS Dust often using a clean, soft, dry lint-free cloth. Blot spills immediately, and wipe with a clean, damp, cloth. We do not re<strong>com</strong>mend the use of chemical cleansers, abrasives, or furniture polish on our lacqueredfinish. If the crib is to be stored, store in cool dry place and carefully package all original hardware to protectfrom loss or damage. Check fasteners periodically for tightness. DO NOT over tighten. This may cause distortion or breakagePage 5 of 6
<strong>Assembly</strong> <strong>Instruction</strong><strong>485</strong>-<strong>8900</strong> <strong>CRIB</strong> <strong>ENCHANTMENT</strong>This Crib can be converted to a Full Size Bed with the purchase of Legacy Classic Bed rail. You will be provided4pcs flat head bolt M6 x 15, 8pcs bolt M6 x 76mm, to attach the Bed rail into your Crib. Follow the instructionbelow with two adults:PARTS INCLUDED:(R) Flat head bolts M6 x 15 – 4pcs(Q) Hex bolt screws: M6 x 76 – 8pcsASSEMBLY INSTRUCTIONS:1. Disassemble your Crib or Toddler Bed/Daybed and set all pieces and hardware aside in an organizedmanner.2. Keep the Headboard and the Footboard upright.3. Assemble the Side Rail to the Headboard and the Footboard with 8 bolts (Q). To change the position ofthe side rail, unscrew 4 bolts (Q), line up the Side rail with the holes at the desired height and re-attachthe Side rail with the same bolts (Q).4. Insert the flat head bolts (R) into the upper hole of the Headboard and the Footboard to keep out of thechildren’s reach5. Tighten all connections. <strong>Assembly</strong> is <strong>com</strong>plete.THANK YOU FOR YOUR PURCHASE.www.legacyclassickids.<strong>com</strong>High Point, NC. 336 449 – 4600Page 6 of 6