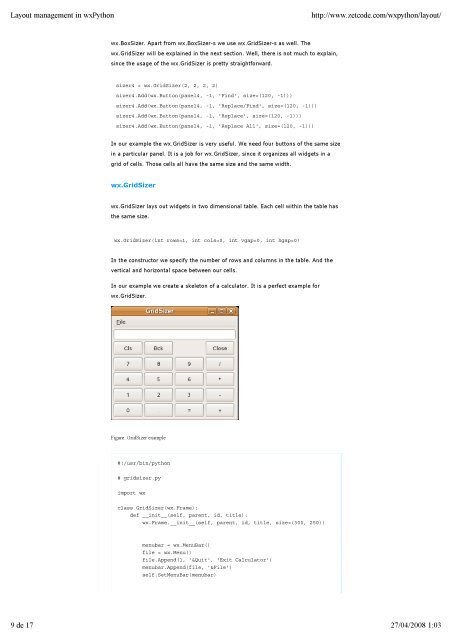
Layout management in <strong>wxPython</strong>http://www.zetcode.com/wxpython/layout/wx.BoxSizer. Apart from wx.BoxSizer-s we use wx.GridSizer-s as well. <strong>The</strong>wx.GridSizer will be explained in the next section. Well, there is not much to explain,since the usage of the wx.GridSizer is pretty straightforward.sizer4 = wx.GridSizer(2, 2, 2, 2)sizer4.Add(wx.Button(panel4, -1, 'Find', size=(120, -1)))sizer4.Add(wx.Button(panel4, -1, 'Replace/Find', size=(120, -1)))sizer4.Add(wx.Button(panel4, -1, 'Replace', size=(120, -1)))sizer4.Add(wx.Button(panel4, -1, 'Replace All', size=(120, -1)))In our example the wx.GridSizer is very useful. We need four buttons of the same sizein a particular panel. It is a job for wx.GridSizer, since it organizes all widgets in agrid of cells. Those cells all have the same size and the same width.wx.GridSizerwx.GridSizer lays out widgets in two dimensional table. Each cell within the table hasthe same size.wx.GridSizer(int rows=1, int cols=0, int vgap=0, int hgap=0)In the constructor we specify the number of rows and columns in the table. And thevertical and horizontal space between our cells.In our example we create a skeleton of a calculator. It is a perfect example forwx.GridSizer.Figure: GridSizer example#!/usr/bin/python# gridsizer.pyimport wxclass GridSizer(wx.Frame):def __init__(self, parent, id, title):wx.Frame.__init__(self, parent, id, title, size=(300, 250))menubar = wx.MenuBar()file = wx.Menu()file.Append(1, '&Quit', 'Exit Calculator')menubar.Append(file, '&File')self.SetMenuBar(menubar)9 de 17 27/04/2008 1:03
Layout management in <strong>wxPython</strong>http://www.zetcode.com/wxpython/layout/self.Bind(wx.EVT_MENU, self.OnClose, id=1)sizer = wx.BoxSizer(wx.VERTICAL)self.display = wx.TextCtrl(self, -1, '', style=wx.TE_RIGHT)sizer.Add(self.display, 0, wx.EXPAND | wx.TOP | wx.BOTTOM, 4)gs = wx.GridSizer(4, 4, 3, 3)gs.AddMany( [(wx.Button(self, -1, 'Cls'), 0, wx.EXPAND),(wx.Button(self, -1, 'Bck'), 0, wx.EXPAND),(wx.StaticText(self, -1, ''), 0, wx.EXPAND),(wx.Button(self, -1, 'Close'), 0, wx.EXPAND),(wx.Button(self, -1, '7'), 0, wx.EXPAND),(wx.Button(self, -1, '8'), 0, wx.EXPAND),(wx.Button(self, -1, '9'), 0, wx.EXPAND),(wx.Button(self, -1, '/'), 0, wx.EXPAND),(wx.Button(self, -1, '4'), 0, wx.EXPAND),(wx.Button(self, -1, '5'), 0, wx.EXPAND),(wx.Button(self, -1, '6'), 0, wx.EXPAND),(wx.Button(self, -1, '*'), 0, wx.EXPAND),(wx.Button(self, -1, '1'), 0, wx.EXPAND),(wx.Button(self, -1, '2'), 0, wx.EXPAND),(wx.Button(self, -1, '3'), 0, wx.EXPAND),(wx.Button(self, -1, '-'), 0, wx.EXPAND),(wx.Button(self, -1, '0'), 0, wx.EXPAND),(wx.Button(self, -1, '.'), 0, wx.EXPAND),(wx.Button(self, -1, '='), 0, wx.EXPAND),(wx.Button(self, -1, '+'), 0, wx.EXPAND) ])sizer.Add(gs, 1, wx.EXPAND)self.SetSizer(sizer)self.Centre()self.Show(True)def OnClose(self, event):self.Close()app = wx.App()GridSizer(None, -1, 'GridSizer')app.MainLoop()Notice how we managed to put a space between the Bck and the Close buttons. Wesimply put an empty wx.StaticText there. Such tricks are quite common.In our example we used the AddMany() method. It is a convenience method foradding multiple widgets at one time.AddMany(list items)Widgets are placed inside the table in the order, they are added. <strong>The</strong> first row is filledfirst, then the second row etc.wx.FlexGridSizerThis sizer is similar to wx.GridSizer. It does also lay out it's widgets in a twodimensional table. It adds some flexibility to it. wx.GridSizer cells are of the samesize. All cells in wx.FlexGridSizer have the same height in a row. All cells have thesame width in a column. But all rows and columns are not necessarily the sameheight or width.wx.FlexGridSizer(int rows=1, int cols=0, int vgap=0, int hgap=0)rows and cols specify the number of rows and columns in a sizer. vgap and hgap addsome space between widgets in both directions.Many times developers have to develop dialogs for data input and modification. I findwx.FlexGridSizer suitable for such a task. A developer can easily set up a dialog10 de 17 27/04/2008 1:03