Access All Areas - Ron Francis Wiring
Access All Areas - Ron Francis Wiring
Access All Areas - Ron Francis Wiring

You also want an ePaper? Increase the reach of your titles
YUMPU automatically turns print PDFs into web optimized ePapers that Google loves.
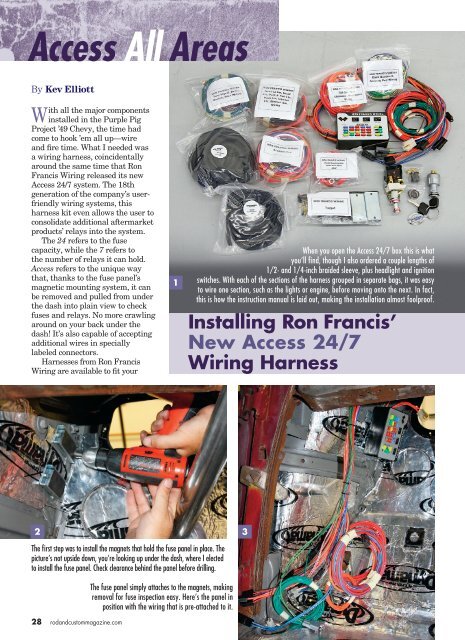
<strong>Access</strong> <strong>All</strong> <strong>Areas</strong>By Kev ElliottWith all the major componentsinstalled in the Purple PigProject ’49 Chevy, the time hadcome to hook ’em all up—wireand fire time. What I needed wasa wiring harness, coincidentallyaround the same time that <strong>Ron</strong><strong>Francis</strong> <strong>Wiring</strong> released its new<strong>Access</strong> 24/7 system. The 18thgeneration of the company’s userfriendlywiring systems, thisharness kit even allows the user toconsolidate additional aftermarketproducts’ relays into the system.The 24 refers to the fusecapacity, while the 7 refers tothe number of relays it can hold.<strong>Access</strong> refers to the unique waythat, thanks to the fuse panel’smagnetic mounting system, it canbe removed and pulled from underthe dash into plain view to checkfuses and relays. No more crawlingaround on your back under thedash! It’s also capable of acceptingadditional wires in speciallylabeled connectors.Harnesses from <strong>Ron</strong> <strong>Francis</strong><strong>Wiring</strong> are available to fit your1When you open the <strong>Access</strong> 24/7 box this is whatyou’ll find, though I also ordered a couple lengths of1/2- and 1/4-inch braided sleeve, plus headlight and ignitionswitches. With each of the sections of the harness grouped in separate bags, it was easyto wire one section, such as the lights or engine, before moving onto the next. In fact,this is how the instruction manual is laid out, making the installation almost foolproof.Installing <strong>Ron</strong> <strong>Francis</strong>’New <strong>Access</strong> 24/7<strong>Wiring</strong> Harness23The first step was to install the magnets that hold the fuse panel in place. Thepicture’s not upside down, you’re looking up under the dash, where I electedto install the fuse panel. Check clearance behind the panel before drilling.28 rodandcustommagazine.comThe fuse panel simply attaches to the magnets, makingremoval for fuse inspection easy. Here’s the panel inposition with the wiring that is pre-attached to it.
<strong>Access</strong> <strong>All</strong> <strong>Areas</strong>1716Powermaster suppliedthe alternator, a CS130-style 140A one-wireversion. Dependingon the current drawrequirement of your car,you’ll have to decideon the output of thealternator required,by adding up the draweach component israted at. There’s auseful chart on thePowermaster website tohelp determine this.With the engine section of the harnesscomplete, I moved inside the Chevy. Whenyou order a harness from <strong>Ron</strong> <strong>Francis</strong>, they’llwant to know all the major components usedin your build. I have a Flaming River steeringcolumn, which uses a GM-style connectorfor the turn signals, horn, etc. <strong>Ron</strong> <strong>Francis</strong>supplies the necessary terminal block to plugdirectly into the Flaming River block; all youhave to do is push the correct wire terminalinto its corresponding hole, which is alldescribed clearly in the instructions.20Here you can see the wires for each section orcircuit, hanging from the fuse panel (via the lineclamp), each with a plastic terminal block. One byone each section is wired. Wires that weren’t to beused immediately but may well be wanted in thefuture (such as a stereo in my case) are coiled andcable tied neatly.With the exception of theground wire, the lightswitch supplied by <strong>Ron</strong><strong>Francis</strong> was connectedusing a terminal block.The knob and shaft hasto be removed to fit theswitch assembly, whichis achieved by pressingthe button (arrow) andremoving the shaft.1918 It’s a similar situation with other plugs thatconnect to pre-wired circuits in the harness.One part of the connector for each was alreadyattached to the wires coming from the fusepanel, while the wires (as seen in the plasticbags in the picture of the complete kit) aresupplied with the necessary terminals. Followthe instructions and push them into the correctterminal blocks.21Difficult to see I know, but this is the top ofthe A-pillar. I ran the interior light wire up thispillar and along the top of the door aperture, tothe dome light. A simple trick to assist pullingthe wire through a pillar is to feed a length ofwelding rod down the pillar, then tape the wireto it and pull it back through.The braided sleeve overlaps itself to retain the wiresinside. I used the sleeving to run groups of wiresfrom the fusebox to the rear of the car, and also forthe engine components section of the harness.2234 rodandcustommagazine.com December 2010 • Rod & Custom 35