
You also want an ePaper? Increase the reach of your titles
YUMPU automatically turns print PDFs into web optimized ePapers that Google loves.
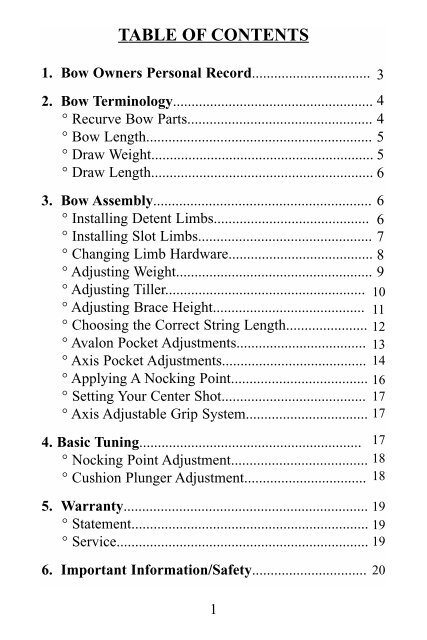
TABLE OF CONTENTS1. Bow Owners Personal Record................................ 32. Bow Terminology...................................................... 4° <strong>Recurve</strong> Bow Parts.................................................. 4° Bow Length............................................................. 5° Draw Weight............................................................ 5° Draw Length............................................................ 63. Bow Assembly...........................................................° Installing Detent Limbs..........................................° Installing Slot Limbs...............................................° Changing Limb Hardware.......................................° Adjusting Weight.....................................................° Adjusting Tiller......................................................° Adjusting Brace Height.........................................° Choosing the Correct String Length......................° Avalon Pocket Adjustments...................................° Axis Pocket Adjustments.......................................° Applying A Nocking Point.....................................° Setting Your Center Shot.......................................° Axis Adjustable Grip System.................................4. Basic Tuning............................................................ 17° Nocking Point Adjustment..................................... 18° Cushion Plunger Adjustment................................. 185. Warranty.................................................................. 19° Statement................................................................ 19° Service.................................................................... 196. Important Information/Safety............................... 201667891011121314161717
Congratulations! You have just purchased the world’s finestrecurve bow. <strong>Hoyt</strong>’s recurve bows have been designed for theserious recurve archer. <strong>Hoyt</strong> bows have brought home moreOlympic and World medals than any other bow in the world.With your new <strong>Hoyt</strong> bow you get the support of a companywhich has been making bows for almost 70 years. From wellcrafted limbs to precise risers, we are sure you will be happywith your new purchase. And, <strong>Hoyt</strong> <strong>USA</strong> backs you up with themost comprehensive warranty program in the industry.The following information provides helpful instruction on thevarious parts and components of your new bow as well as a helpfulguide to getting your bow set-up and ready to shoot.<strong>Hoyt</strong> <strong>USA</strong>543 N. Neil Armstrong RoadSalt Lake City, UT. 84116(801) 363-2990 phone(801) 537-1470 Faxwww.hoytusa.com2
BOW OWNER’S PERSONAL RECORD<strong>Hoyt</strong> Bow Model________________________________Limb Type_____________________________________Length ______________ Weight _____________ #Purchased From_________________________________Purchase Date__________________________________Important Note: Save your sales receipt. The receipt is yourproof of date-of-purchase. Proof of date-of-purchase is requiredshould your bow ever need warranty service.The following space is reserved for your sales receipt. Pleaseattach it for safe keeping.IMPORTANT!Staple or tape yoursales receipt herefor safekeeping.3
RECURVE BOW TERMINOLOGYUnderstanding recurve bow terminology and measuring techniquesis very important in setting up your new bow. Pleasefamiliarize yourself with the following terms and measurements.Refer to them as needed.“Back” Side of Bow“Face” or “Front”Side of Bow4
Bow LengthBow length is the distance from the tip of the top limb to the tipof the bottom limb of a strung bow. Depending on which riserlength and limb length you choose, you can tailor your bow toyour specific needs. Refer to the following chart to determineyour bow length.Riser Length Long Limbs Medium Limbs Short LimbsShort Riser (23") 68" 66" 64"Long Riser (25") 70" 68" 66"The recommended bow lengths are usually determined by yourdraw length. The following chart suggests the best match fordraw length to bow length.Draw Length Bow Lengthup to 27"64"24 - 29"66"27" - 31" 68"29" and up 70"Draw WeightTo determine the weight on your <strong>Hoyt</strong> bow, refer to the limbspecifications located on the bottom limb. The numbers are readhorizontally. Example: a 25" riser with a long limb produces a70" bow with a drawweight of 34 pounds at a28" draw length. If theselimbs are used on a 23"riser, the combinationwould produce a 68"bow with a draw weightof 36 pounds at a 28"draw length.5
<strong>Hoyt</strong> limbs are available in marked weights from 22# to 50# intwo pound increments. The weight marked on the lower limb ismeasured at a 28” standard A.M.O. (Archery Manufacturers andMerchants Organization) draw length. A.M.O. draw length ismeasured at 26 1/4” to the throat of the bow grip plus 1 3/4”.This produces an industry standard by which recurve bows aremeasured.Note: Your draw weight will change due to draw length. Add orsubtract approximately two pounds for each inch your drawlength is over or under the 28” standard.BOW ASSEMBLYInstalling Detent Limbs (Standard Risers)Install one limb in each pocket (the limb noting specifications isthe bottom limb). Carefully insert the limb bushing into thedovetail groove in the pocket. Push the limb forward until thedetent button engages. You should hear a “click” indicating thelimb is fully seated.6
Standard <strong>Hoyt</strong> DovetailLimb ButtPocketInstalling Slot Limbs (Axis Riser)The Axis pocket system is designed specifically for limbs containingthe slot system. It is not compatible with a traditionaldetent limb system. To attach the limb using a slot system pocket,snap the butt of the limb into the pocket. Then, pull the limbslightly away from the riser. While looking from above, into thepocket, screw the thumb screw through the riser until the tip isvisible inside the pocket. Then align the tip of the thumb screwwith the slot in the limb. Do not screw thumb screw in limb yet.Next, firmly snap limb back into pocket. The limb will bottomout on the alignment dowel. Anapprox. 1/16” gap will appearbetween the limb and pocketitself. At this time begin screwingthumb screw into limb slotuntil finger tight. The thumbscrew should screw in withoutextra force. If extra force isneeded adjust the alignmentuntil the thumb screw screwsinto the slot easily. You maywant to snug up the thumb screwafter stringing the bow.7
Changing the Limb HardwareAll <strong>Hoyt</strong> limbs are shipped with the standard dovetail detent systeminstalled (Step #1). This configuration is used on the <strong>Hoyt</strong>GM, Elan and Avalon Plus risers as well as many other manufacturer’smodels. In order to use the limbs on a hard lock pocket system(i.e. Axis), <strong>Hoyt</strong> provides a convenient, quick-change system.To remove the detent system (Step #2), turn the cap screw counter-clockwiseto loosen. Once the cap is removed, pull the dovetail,detent and spring from the limb. You may wish to keepthese in a safe place for future use.To install the slot system (Step #3), insert the slot cylinder wherethe detent system was previously. Replace the cap and securelytighten to ensure a solid fit.With the slot system installed (Step #4), your limbs can be shotwith the Axis riser. To change the limbs back to the detent system,just follow the above instructions in reverse. Be sure toinclude the detent and the spring when changing back to thedetent system.Step #1 Step #2DovetailCapDetentSpringStep #3Step #4Slot SystemCapNote: If your limbs were purchased prior to the <strong>2000</strong> product year, you will needto purchase a limb conversion kit for your limbs in order to shoot the limbs withthe hard lock system.8
Adjusting Weight and Tiller<strong>Hoyt</strong> bows are equipped with a unique limb weight/tiller adjustmentsystem. The limb weight/tiller adjustment bolt is used toadjust bow weight and limb balance (tiller).WeightThe weight on most <strong>Hoyt</strong> bowsis adjustable in a range ofapproximately 10%.Warning: Do not adjust weight on anyadjustable bow beyond the limit shown inthe drawing above. The weight/tiller boltshould never go above flush with the riser.Standard <strong>Hoyt</strong> DovetailIf you are using the traditionaldetent system, adjust weight byloosening the weight/tiller locking screw. Do this by using oneof the allen wrenchesprovided to hold theweight/tiller adjustmentbolt in place, and theother wrench to loosenthe weight/tiller lockingscrew. Once the lockingscrew is loose, you canadjust the weight/tilleradjustment bolt to thedesired weight. Turningthe weight/tiller adjustmentbolt clockwise will increase bow weight. Turning the samebolt counter-clockwise will decrease bow weight. Be sure tolock down the weight/tiller locking screw before shooting thebow.If using the hard lock system like that used on the Axis, followthe directions for the detent system above, but be sure to loosenthe thumb screw and alignment locking screw (Do not remove,just loosen.) before adjusting the weight/tiller bolt.9
Then, adjust the weight up anddown with the weight/tiller boltAlignment Locking Screwuntil the weight is where youdesire. Then simply tighten theweight/tiller locking screw, alignmentlocking screw and thumb ScrewThumbscrew finger tight, and you areready to shoot.WARNING: ALWAYS loosenthe thumb screw and alignment locking screw when adjustingweight or tiller on the Axis riser. Failure to comply willcause damage to the pocket. NOTE: To loosen the thumbscrew after shooting, you may use a coin in the screw slot.TillerTiller is the difference in draw weight between the upperand lower limbs. This is easily measured by noting thedifference in distance between the top limb butt to thestring, and the lower limb butt to the string. To settiller, measure the distance from the base of the limbpockets to the bow string on both the top and bottombow limbs. The main function of tiller is toallow the archer to more easily and comfortablyaim during the draw and release of the shot. Wheninitially putting your bow together, we recommendyou begin with 1/8”-1/4” positive tiller. (Bottommeasurement 1/8”-1/4” less than top measurement.)TopTillerBraceHeightTiller can then be adjusted to fit each individual. Ifyou find your sight moving up as you are drawing,increase the bottom limb poundage slightly, ordecrease the top limb poundage. If the sight is movingdown as you draw, make the opposite adjustments.To adjust the tiller without affecting bowBottomTiller10
weight, adjust both the top and the bottom weight/tiller adjustmentbolts in equal but opposite directions. NOTE: A tilleradjustment will move the nocking point position.Adjusting Brace Height (“Fistmele”)Brace height, or “fistmele” is the perpendicular distance from thebowstring to the pivot point of the handle. This height is animportant aspect of tuning. The following chart gives you therecommended brace height range for your <strong>Hoyt</strong> recurve bow.The FX Limb has a unique design requiring different braceheight and string lengths than traditionally used.Brace Height Range Chart (Standard Limbs)Riser Length Long Limbs Medium Limb Short LimbsShort Riser (23") 8 1/2 - 9 1/4” 8 1/4 - 9” 8 - 8 3/4”21.5 - 23.5 cm 21 - 22.8 cm 20.5 - 22 cmLong Riser (25") 8 3/4 - 9 1/2” 8 1/2 - 9 1/4” 8 1/4 - 9”22 - 24 cm 21.5 - 23.5 cm 21 - 22.8 cmFX Brace Height Range ChartRiser Length Long Limbs Medium Limb Short LimbsShort Riser (23") 8 1/4 - 8 3/4” 8 - 8 1/2” 7 3/4 - 8 1/4”21 - 22 cm 20.5 - 21.5 cm 20 - 21 cmLong Riser (25") 8 1/2 - 9” 8 1/4 - 8 3/4” 8 - 8 1/2”21.5 - 22.8 cm 21 - 22 cm 20.5 - 21.5 cmSlight adjustments can be made to the string to adjust brace11
height. Adding twists will increase the brace height whileremoving twist will decrease the brace height. If there are notwists in the string at the brace height you want, a longer stringwill be needed. Generally, <strong>Hoyt</strong> does not recommend more than30 or less than five twists in a string. Optimum brace height isone that gives a smooth bow action, good arrow flight, tightgrouping and a quiet shot.Choosing the Correct String LengthDepending on the length of your riser/limb combination, A.M.O.recommends the following string lengths. String length isapproximately three inches shorter than the bow length.String Length RecommendationsRiser Length Long Limbs Medium Limbs Short LimbsShort Riser (23”) 65” 63” 61”165cm 160 cm 155 cmLong Riser (25”) 67“ 65” 63”170 cm 165 cm 160 cmFX String Length RecommendationsRiser Length Long Limbs Medium Limbs Short LimbsShort Riser (23”) 65 3/4” 63 3/4” 61 3/4”167 cm 162 cm 157 cmLong Riser (25”) 67 3/4 “ 65 3/4” 63 3/4”172 cm 167 cm 162 cm12
Aligning Your Pocket Adjustments (Select models)An adjustable pocket system allows you to adjust the limb pocketsto achieve perfect limb/riser alignment. This allows archersto more easily determine centershot, but has little effect onshootability. The limb pockets are set at the factory andshould therefore be very close if not exact. Need for adjustmentshould be very minor, if at all. If the pocket needs someadjusting, first string the riser and limbs only. Check the limbalignment of both the top and bottom limbs by viewing down thebowstring from end to end on the face of the bow. While lookingdown the string line, check the location of the tip you areholding to the face of the limb in your hand. The limb tip shouldbe reasonably close to the center of the limb.Condition ACondition BNeed to adjustlimb tip to theright.Need to adjustlimb tip to theleft.Adjusting Your Avalon PlusAdjusting a Limb Tip to the Right: (Condition A)Viewing from the rear or bowstring side (the face), loosen theLock Down Screw, then loosen the right Pocket AdjustmentScrew by turning it counter-clockwise and tighten the opposite(left) Pocket Adjustment Screw by turning it clockwise. Makeadjustments in small increments (1/8 to 1/4 turn at a time). Besure to tighten the lock down screw before shooting. After eachadjustment, draw the bow a couple of times to allow the string toseat before checking again.13
Adjusting a Limb Tip to the Left: (Condition B)Viewing from the bowstringside (the riserface), loosen the lockdown screw, then loosenthe left pocket adjustmentscrew by turning itcounter-clockwise andtighten the opposite(right) pocket adjustmentscrew by turning inclockwise. After eachadjustment, draw thebow a couple of times toallow the string to seat before checking again. Make adjustmentsin small increments (1/8 to 1/4 turn at a time). Be sure to tightenthe lock down screw before shooting. After each adjustment,draw the bow a couple of times to allow the string to seat beforechecking again. Warning: Do not over tighten the adjustmentscrews! They only need to be snug to the riser.Adjusting the Hard Lock Pocket System(Axis type system)The Axis type hard lock limb locking system is the mostadvanced pocket alignment and weight adjustment system availabletoday. It features a positive locking limb alignment systemthat maintains its settings in all conditions. You can adjust yourlimb alignment to make it perfectly compatible to the riser simplyby removing or adding the supplied brass washers to thealignment dowel.To adjust your pocket follow these directions:1. With the bow unstrung and limbs removed from the riser,unscrew the thumb screw and washer completely out of the14
RiserAxis Hard lock SystemLocking Screw(Opposite Side ofSight Window)Alignment Dowel(Sight Window Side)WasherAlignment WashersThumb Screwalignment dowel.2. Unscrew the alignment locking screw and remove the alignmentcap and washers. Pull the alignment dowel and washersout from the sight windowside of the pocket. (Do notlose any parts !).Adding washers to the dowel moves your limbtip to the right, as removing them moves thetip to the left. Refer to page 13 for alignment.153. (Refer to the limb visualon page 13) If your limb isshowing Condition A: Simply ADD washers to the SIGHT WIN-DOW SIDE (MAXIMUM OF 4) of the alignment dowel. Ifyour limb is showing Condition B: REMOVE WASHERS fromthe sight window side of the dowel. Limit your adjustments toone washer at a time. You can store any unused washers betweenthe riser and alignment cap because the washers on the alignmentcap (non-sight window) side of the pocket do not affect thealignment.4. To reassemble the pocket, first insert the alignment dowel andwashers in the riser (be sure to always put the alignment dowel
in on the sight window side of the riser). Place the washers,alignment cap and alignment locking screw in the dowel but donot completely tighten. Be sure washers are not caught onthreads of alignment locking screw. They must be flat againstdowel shoulder. Looking from above, into the pocket, align andscrew the thumb screw into the slot in the alignment dowel.Snap the limb into the pocket and pull the limb slightly awayfrom the riser. Then, turn the thumb screw in onlyabout two or three turns until you can just see the tipthrough the alignment dowel. Then rotate the dowelusing the thumb screw as a lever until the limb slotaligns with the tip of the thumb screw. After youachieve alignment, snap the limb back against thethumb screw and flush with the pocket. If properlyaligned, the thumb screw should engage the limb easilywithout binding. Tighten the thumb screw fingersnug and finish by securely tightening the dowellocking screw with the supplied allen wrench.After the limb tips are adjusted, align the string downthe center of the limbs, riser and stabilizer. Moveboth the top and bottom pocket adjustments the sameamount in the same direction, as you have already setthem for the center of each limb. Continue to makeadjustments until the string runs down the center ofall three alignment points.Applying a Nocking PointA nocking point marks the exact position of the arrow on thebowstring for each shot. To apply your nocking point, slip anadjustable nock set on the center serving, and slide it into position.Initially, set the nocking point at approximately 3/8" abovethe level point of the rest. Close the nock set with nocking pliersso it is firm, but do not over tighten the nock set as it couldbreak your serving.16
Setting Your Center ShotThe final step before shooting is to position your centershot. The objective is to position the arrow slightlyoffset of the power stroke of the bowstring. To dothat, begin by nocking an arrow and placing it on thearrow rest. Do not draw the bow, but position yourselfbehind the string side of the bow, looking down thearrow. Align the string down the center of the limbsand riser and check to see the position of the arrow tiprelative to this line. Adjust the plunger or arrow rest until theinside edge of the arrow shaft aligns with this line.Axis Adjustable Grip Section<strong>Hoyt</strong>’s Axis grip is designed with an adjustable gip section thatcan be laterally adjusted to the archer’s preference. Two positionsare selectable, center (traditional, recommended) and 1/8”inside center. The grip is shipped from thefactory in the traditional center position. Tochange the position of the grip, simplyremove the two button head screws on bothsides of the grip with the supplied wrench,and remove the grip section. To move thegrip to the 1/8” inside position remove thecomposite shims and place them opposite ofthe sight window side of the grip. One shimon each side of the grip will return the grip tothe traditional center alignment.TuningTuning is the process of adjusting your bow to optimize its accuracy.Optimum tuning matches the arrow to the bow, to achievethe best arrow flight and grouping. The following is a simpletuning process that can be done the first time you set-up yourbow. Re-tuning is suggested after any change in arrow size or17Grip SectionShimsShims need to be placedopposite of sight windowon the grip for the 1/8”inside position.
change in components.To tune your bow, have on hand three fletched arrows and threebare shafts (arrows without fletching), all identical and straight.From about 15 to 20 yards, shoot your fletched arrows at a target(aiming at the same place on all shots). Follow the threefletched arrows with three bare shafts and note where the groupof the bare shafts impact compared to the fletched arrows.Nocking Point/Cushion Plunger AdjustmentsThe first consideration is your nocking point position. If the bareshafts are grouping below the fletched shafts, lower the nockingpoint. If the bare shafts are grouping above, move the nockingpoint up. Be sure to only move in small increments (never morethat a 1/16” at a time). Each time the nocking point is moved itwill affect your sight setting, so you will need to reset your sightsafter each move. Continue to make adjustments until the twogroups of arrows impact at the same height.Next, work on the left/right impact. For right handed shooters,if the bare shafts hit to the right of the fletched shafts, increasethe spring tension on the cushion plunger or decrease bowweight. Should the bare shafts hit to the left of the fletchedarrows, loosen the spring tension or increase bow weight. Witheach change in spring tension or bow weight, re-adjust the sightbefore shooting the bare shafts.Note: Left handed shooters need to reverse these instructions!For advanced methods, see your local dealer an additional sourceof detailed information is the Easton Arrow Tuning andMaintenance Guide, available for a nominal fee from EastonTechnical Products, 5040 W. Harold Gatty Drive, Salt Lake City,UT 84116 (801) 539-1400.18
Warranty<strong>Hoyt</strong> <strong>USA</strong> recurve bows are backed by a solid two year limitedwarranty. For the first year from date of purchase, <strong>Hoyt</strong> recurvebows are fully warranted against factory defects in materials andworkmanship. For the second year from date of purchase, allwarranty repairs or replacements on <strong>Hoyt</strong> recurve bows will bemade at a charge of 50% of manufacturers suggested retail price.A copy of your retail sales receipt, establishing date of purchaseis required for all warranty service.There are no other warranties, expressed or implied, that extendbeyond those written here. No agent, employee or representativeof <strong>Hoyt</strong> or its dealers has the authority to bind <strong>Hoyt</strong> to any agreementnot herein stated. Buyer agrees that the sole and exclusiveremedies for breach on any warranty concerning <strong>Hoyt</strong> bowsshall be repair or replacement of defective parts. <strong>Hoyt</strong> shall notbe liable for injury or property other than the bows themselves.Warranty ServiceTo obtain warranty service, you should return to the <strong>Hoyt</strong> Dealerwhere you purchased your <strong>Hoyt</strong> bow. The dealer can help youdetermine if <strong>Hoyt</strong> factory service is required or if the repair canbe completed by the dealer. If the bow must be returned to thefactory, the bow owner is responsible for the return postage to<strong>Hoyt</strong>. <strong>Hoyt</strong>, in turn, will pay the postage for reshipping therepaired bow.<strong>Hoyt</strong> bows requiring <strong>Hoyt</strong> factory warranty service should besent to:<strong>Hoyt</strong> <strong>USA</strong>543 N. Neil Armstrong RoadSalt Lake City, UT 84116-288719
Note: Before any bow is returned to the <strong>Hoyt</strong> factory for warrantyservice, a <strong>Hoyt</strong> Return Authorization Number must beobtained by calling <strong>Hoyt</strong> <strong>USA</strong> at (801) 363-2990.Any bow returned must have the following:° Must be sent postage paid.° Must include a copy of the dated sales receipt.° Must include a short note explaining the nature of the problem.° Must include a <strong>Hoyt</strong> Return Authorization number.° Should not include accessories unless otherwise instructedwhen the Return Authorization Number is obtained.IMPORTANT INFORMATION1. Never Dry Fire Your Bow. Dry fire means to draw and releaseyour bow without an arrow. Shooting without an arrow, whichabsorbs most of the bow’s stored energy, could cause severedamage to the bow and possible injury.2. Never Expose Your Bow to Extreme Heat or ProlongedMoisture. Excessive heat, such as could be experienced on asunny day inside of a closed vehicle, could cause limb failure.Prolonged storage in a hot, dry attic or damp basement couldalso be damaging and will void your warranty.3. Carefully Inspect Your Bow Before And During EachShooting Session. Carefully note condition of bowstring, limbsand riser before you shoot. Frayed bowstrings should bereplaced. Damaged or suspect limbs should be reported to thedealer where you purchased your bow.4. Inspect All Arrows. Before Shooting, inspect your arrows fordefects. Replace cracked nocks and loose fletch and discardfractured or dented arrows.WARNING: This bow is a deadly weapon. Always abide by allsafety advisements. Children should be supervised by an adult.20