

Scale - O Scale Trains Magazine Online
Scale - O Scale Trains Magazine Online
Scale - O Scale Trains Magazine Online

Create successful ePaper yourself
Turn your PDF publications into a flip-book with our unique Google optimized e-Paper software.
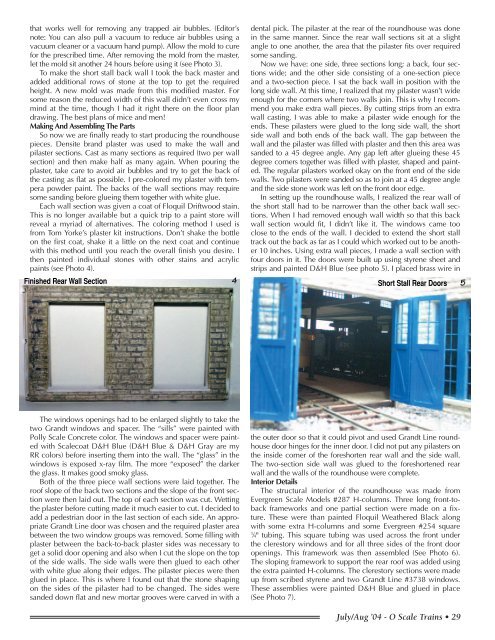
that works well for removing any trapped air bubbles. (Editor’snote: You can also pull a vacuum to reduce air bubbles using avacuum cleaner or a vacuum hand pump). Allow the mold to curefor the prescribed time. After removing the mold from the master,let the mold sit another 24 hours before using it (see Photo 3).To make the short stall back wall I took the back master andadded additional rows of stone at the top to get the requiredheight. A new mold was made from this modified master. Forsome reason the reduced width of this wall didn’t even cross mymind at the time, though I had it right there on the floor plandrawing. The best plans of mice and men!Making And Assembling The PartsSo now we are finally ready to start producing the roundhousepieces. Densite brand plaster was used to make the wall andpilaster sections. Cast as many sections as required (two per wallsection) and then make half as many again. When pouring theplaster, take care to avoid air bubbles and try to get the back ofthe casting as flat as possible. I pre-colored my plaster with temperapowder paint. The backs of the wall sections may requiresome sanding before glueing them together with white glue.Each wall section was given a coat of Floquil Driftwood stain.This is no longer available but a quick trip to a paint store willreveal a myriad of alternatives. The coloring method I used isfrom Tom Yorke’s plaster kit instructions. Don’t shake the bottleon the first coat, shake it a little on the next coat and continuewith this method until you reach the overall finish you desire. Ithen painted individual stones with other stains and acrylicpaints (see Photo 4).dental pick. The pilaster at the rear of the roundhouse was donein the same manner. Since the rear wall sections sit at a slightangle to one another, the area that the pilaster fits over requiredsome sanding.Now we have: one side, three sections long; a back, four sectionswide; and the other side consisting of a one-section pieceand a two-section piece. I sat the back wall in position with thelong side wall. At this time, I realized that my pilaster wasn’t wideenough for the corners where two walls join. This is why I recommendyou make extra wall pieces. By cutting strips from an extrawall casting, I was able to make a pilaster wide enough for theends. These pilasters were glued to the long side wall, the shortside wall and both ends of the back wall. The gap between thewall and the pilaster was filled with plaster and then this area wassanded to a 45 degree angle. Any gap left after glueing these 45degree corners together was filled with plaster, shaped and painted.The regular pilasters worked okay on the front end of the sidewalls. Two pilasters were sanded so as to join at a 45 degree angleand the side stone work was left on the front door edge.In setting up the roundhouse walls, I realized the rear wall ofthe short stall had to be narrower than the other back wall sections.When I had removed enough wall width so that this backwall section would fit, I didn’t like it. The windows came tooclose to the ends of the wall. I decided to extend the short stalltrack out the back as far as I could which worked out to be another10 inches. Using extra wall pieces, I made a wall section withfour doors in it. The doors were built up using styrene sheet andstrips and painted D&H Blue (see photo 5). I placed brass wire inFinished Rear Wall Section4 Short Stall Rear Doors 5The windows openings had to be enlarged slightly to take thetwo Grandt windows and spacer. The “sills” were painted withPolly <strong>Scale</strong> Concrete color. The windows and spacer were paintedwith <strong>Scale</strong>coat D&H Blue (D&H Blue & D&H Gray are myRR colors) before inserting them into the wall. The “glass” in thewindows is exposed x-ray film. The more “exposed” the darkerthe glass. It makes good smoky glass.Both of the three piece wall sections were laid together. Theroof slope of the back two sections and the slope of the front sectionwere then laid out. The top of each section was cut. Wettingthe plaster before cutting made it much easier to cut. I decided toadd a pedestrian door in the last section of each side. An appropriateGrandt Line door was chosen and the required plaster areabetween the two window groups was removed. Some filling withplaster between the back-to-back plaster sides was necessary toget a solid door opening and also when I cut the slope on the topof the side walls. The side walls were then glued to each otherwith white glue along their edges. The pilaster pieces were thenglued in place. This is where I found out that the stone shapingon the sides of the pilaster had to be changed. The sides weresanded down flat and new mortar grooves were carved in with athe outer door so that it could pivot and used Grandt Line roundhousedoor hinges for the inner door. I did not put any pilasters onthe inside corner of the foreshorten rear wall and the side wall.The two-section side wall was glued to the foreshortened rearwall and the walls of the roundhouse were complete.Interior DetailsThe structural interior of the roundhouse was made fromEvergreen <strong>Scale</strong> Models #287 H-columns. Three long front-tobackframeworks and one partial section were made on a fixture.These were than painted Floquil Weathered Black alongwith some extra H-columns and some Evergreen #254 square1⁄4" tubing. This square tubing was used across the front underthe clerestory windows and for all three sides of the front dooropenings. This framework was then assembled (See Photo 6).The sloping framework to support the rear roof was added usingthe extra painted H-columns. The clerestory sections were madeup from scribed styrene and two Grandt Line #3738 windows.These assemblies were painted D&H Blue and glued in place(See Photo 7).July/Aug ’04 - O <strong>Scale</strong> <strong>Trains</strong> • 29


