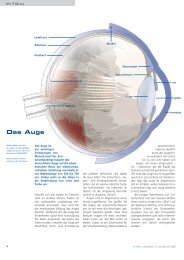
IOLMaster - A Practical Operation Guide - Carl Zeiss
IOLMaster - A Practical Operation Guide - Carl Zeiss
IOLMaster - A Practical Operation Guide - Carl Zeiss

Create successful ePaper yourself
Turn your PDF publications into a flip-book with our unique Google optimized e-Paper software.
4-24Taking MeasurementsNew with 5.01 software: <strong>IOLMaster</strong> Advanced TechnologyPlausibility ChecksDRAFT/PRE-RELEASE/CONFIDENTIAL4/23/07In this feature, the computer checks the plausibility of your results. Plausibilitychecks of OD/OS AL and K values provide additional safety, especially onproblematic eyes.After axial length and keratometry measurements, the system checks the followingconditions and gives appropriate warnings:• AL < 22 mm = short eye!• AL > 25 mm = long eye!• R > 8,4 mm = very flat corneal curvature, keratoglobus possible!• R < 7,2 mm = very steep corneal curvature!• R < 7,0 mm = keratoconus possible!• [R1 - R2] > 0,5 mm = high astigmatism!If both eyes are measured the system will check consistency between both eyes:• AL difference between OD and OS > 0.3 mm = Axial length of right eye is[X] mm smaller/larger than axial length of left eye – check plausibility!• R / K difference between OD and OS > 0.2 mm / 1dpt = Mean cornealradius/K of right eye is [X] smaller/larger than mean corneal radius/K of lefteye – check plausibility!In all cases the following warning is shown:• Examine that no pathological changes are present!This warning will also be added to the Remark field of the examined patient.Part 5: Calibration Check✐Best Practice: It is important to check the calibration of your <strong>IOLMaster</strong> at thebeginning of every day you will be using the instrument. This confirms that the<strong>IOLMaster</strong> is operating properly, and helps ensure that the measurements you takewill be accurate.1. Get the calibration eye from its gray carrying case. The test eye looks like asmall black box sitting on top of metal posts.2.Place the metal pins at either side of the patient’s chinrest, and insert themetal prongs of the calibration eye into the holes.3.Rotate the black box so that the calibration eye, the side that looks like a small“spy camera” lens, is directly facing the <strong>IOLMaster</strong> lens.<strong>IOLMaster</strong>: A <strong>Practical</strong> <strong>Operation</strong> <strong>Guide</strong> PN 64365 Rev. A IOL.1411 2007.06