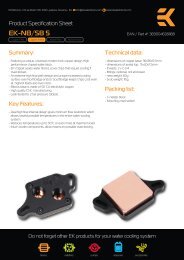
STEP 1: GENERAL INFORMATION ON PRODUCT ... - EKWB
STEP 1: GENERAL INFORMATION ON PRODUCT ... - EKWB
STEP 1: GENERAL INFORMATION ON PRODUCT ... - EKWB

Create successful ePaper yourself
Turn your PDF publications into a flip-book with our unique Google optimized e-Paper software.
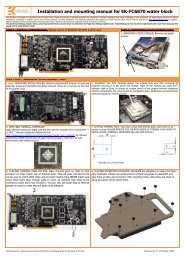
<strong>STEP</strong> 5: INSTALLING THE WATER BLOCK:<strong>STEP</strong> 5a: Intel LGA-775, -1366 and AMD socket motherboard:1) Place motherboard on an even surface with front facing down.2) Install backplate rubber gasket - depending on your CPU platform (see <strong>STEP</strong> 4) -and place metal backplate for Intel LGA-1366 and AMD socket to the back of yourmotherboard. Align the holes on the motherboard with holes on rubber gasketand backplate.3) Carefully rotate motherboard assembly with front side facing up with one handwhile holding the backplate and rubber in place with the other hand.4) Install the rest of mounting system as per installation manual (see <strong>STEP</strong> 6)<strong>STEP</strong> 5b: Intel LGA-115x socket motherboard:1) Place motherboard on an even surface with front facing down.2) Install backplate rubber gasket - depending on your CPU platform (see <strong>STEP</strong> 4) -and place metal backplate for Intel LGA-115x socket to the back of yourmotherboard. Align the holes on the motherboard with holes on rubber gasketand backplate. Make sure to orientate the rubber gasket to fit past theCPU socket ILM backplate.3) Carefully rotate motherboard assembly with front side facing up with onehand while holding the backplate and rubber in place with the other hand.4) Install the rest of mounting system as per installation manual (see <strong>STEP</strong> 6)Metal backplateRubber gasketMetal backplateRubber gasketMotherboardPCBMotherboardPCBfigure 1: Isometric view of backplate assembly for LGA-1366<strong>STEP</strong> 5c: Installing the mounting system:Intel Socket LGA-115x/1366 and AMD sockets:Install the M4 thumb screws of the PreciseMount mounting system onto yourmotherboard. It is mandatory to put 0.7mm plastic washer underneath each ofthe M4 thumb screws. Tighten the M4 thumb screw to the metal backplate withyour hands until you reach the end of the thread. Using tools (such as pliers) isnot recommended!Intel Socket LGA-2011:Install four (4) specific LGA-2011 M4 thumb screws into four M4 threaded stubson the LGA-2011 socket integrated latch mechanism (ILM). The screws are to beinstalled using no tools (i.e. pliers).LGA 2011 M4thumb screwM4 thumb screwPVC washerfigure 2: Isometric view of backplate assembly for LGA-115x<strong>STEP</strong> 5d: Preparing your CPU and applying EK-TIM Indigo Extreme:Please consult the enclosed EK-TIM Indigo Extreme installation manual andinstall the thermal interface material as per installation manual. Improperinstallation may will result in poor thermal properties of your EK-Supremacy EliteEdition series water block!Remember, EK-TIM Indigo Extreme is not re-usable once reflow process isstarted.<strong>STEP</strong> 5e: Fastening the waterblock:Install the waterblock on your CPU. Place an enclosed compression spring andthumb nut over each M4 thumb screw. Start fastening two thumb nuts at a time,preferably in cross pattern and do not tighten them fully until all of them arepartially screwed in. Then - using your fingers only - screw in all four thumb nutsuntil you reach the end of the thread.Thumb nutCoiled spring<strong>STEP</strong> 6: C<strong>ON</strong>NECTING WATER BLOCK TO THE COOLING CIRCUITCarefully identify the direction of the flow in your circuit. For the EK-Supremacyseries water block to operate properly the G1/4 port nearest to the center of thewater block MUST BE USED AS THE INLET PORT. EK recommends the use ofEK-PSC fittings. When using fittings other than EK-PSC series please use hoseclamps or appropriate substitute to secure the tubing to the barb. The use ofbiocide containing and corrosion inhibiting coolant is always recommended forany liquid cooling system.EK-PSC fittingTubingREQUIRED TOOLS- allen key 2.5mm (enclosed)All disclosures, notices and warranty conditions are being written on the back of the box. Revision 1.0. Released on 29 th of August, 2012.