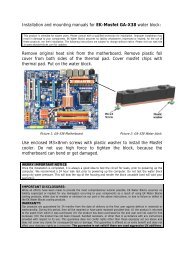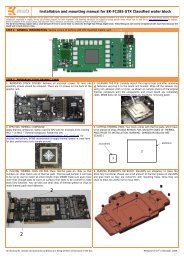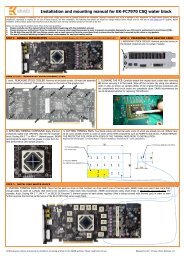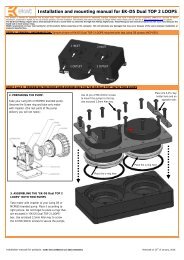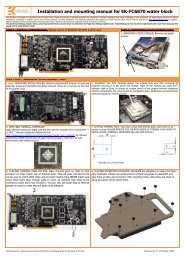
STEP 1: GENERAL INFORMATION ON PRODUCT ... - EKWB
STEP 1: GENERAL INFORMATION ON PRODUCT ... - EKWB
STEP 1: GENERAL INFORMATION ON PRODUCT ... - EKWB

You also want an ePaper? Increase the reach of your titles
YUMPU automatically turns print PDFs into web optimized ePapers that Google loves.
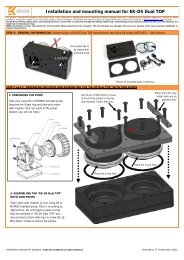
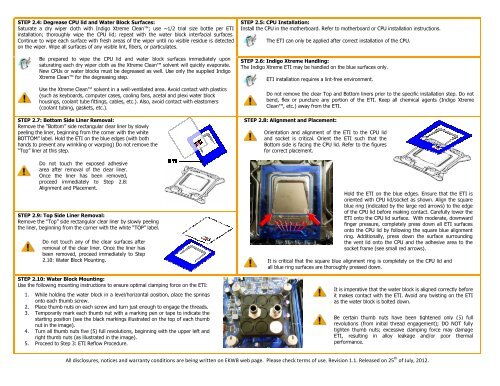
<strong>STEP</strong> 2.4: Degrease CPU lid and Water Block Surfaces:Saturate a dry wiper cloth with Indigo Xtreme Clean; use ~1/2 trial size bottle per ETIinstallation; thoroughly wipe the CPU lid; repeat with the water block interfacial surfaces.Continue to wipe each surface with fresh areas of the wiper until no visible residue is detectedon the wiper. Wipe all surfaces of any visible lint, fibers, or particulates.Be prepared to wipe the CPU lid and water block surfaces immediately uponsaturating each dry wiper cloth as the Xtreme Clean solvent will quickly evaporate.New CPUs or water blocks must be degreased as well. Use only the supplied IndigoXtreme Clean for the degreasing step.Use the Xtreme Clean solvent in a well-ventilated area. Avoid contact with plastics(such as keyboards, computer cases, cooling fans, acetal and plexi water blockhousings, coolant tube fittings, cables, etc.). Also, avoid contact with elastomers(coolant tubing, gaskets, etc.).<strong>STEP</strong> 2.7: Bottom Side Liner Removal:Remove the “Bottom” side rectangular clear liner by slowlypeeling the liner, beginning from the corner with the whiteBOTTOM” label. Hold the ETI on the blue edges (with bothhands to prevent any wrinkling or warping) Do not remove the“Top” liner at this step.Do not touch the exposed adhesivearea after removal of the clear liner.Once the liner has been removed,proceed immediately to Step 2.8:Alignment and Placement.<strong>STEP</strong> 2.9: Top Side Liner Removal:Remove the “Top” side rectangular clear liner by slowly peelingthe liner, beginning from the corner with the white “TOP” label.Do not touch any of the clear surfaces afterremoval of the clear liner. Once the liner hasbeen removed, proceed immediately to Step2.10: Water Block Mounting.<strong>STEP</strong> 2.10: Water Block Mounting:Use the following mounting instructions to ensure optimal clamping force on the ETI:1. While holding the water block in a level/horizontal position, place the springsonto each thumb screw.2. Place thumb nuts on each screw and turn just enough to engage the threads.3. Temporarily mark each thumb nut with a marking pen or tape to indicate thestarting position (see the black markings illustrated on the top of each thumbnut in the image).4. Turn all thumb nuts five (5) full revolutions, beginning with the upper left andright thumb nuts (as illustrated in the image).5. Proceed to Step 3: ETI Reflow Procedure.<strong>STEP</strong> 2.5: CPU Installation:Install the CPU in the motherboard. Refer to motherboard or CPU installation instructions.The ETI can only be applied after correct installation of the CPU.<strong>STEP</strong> 2.6: Indigo Xtreme Handling:The Indigo Xtreme ETI may be handled on the blue surfaces only.ETI installation requires a lint-free environment.Do not remove the clear Top and Bottom liners prior to the specific installation step. Do notbend, flex or puncture any portion of the ETI. Keep all chemical agents (Indigo XtremeClean, etc.) away from the ETI.<strong>STEP</strong> 2.8: Alignment and Placement:Orientation and alignment of the ETI to the CPU lidand socket is critical. Orient the ETI such that theBottom side is facing the CPU lid. Refer to the figuresfor correct placement.Hold the ETI on the blue edges. Ensure that the ETI isoriented with CPU lid/socket as shown. Align the squareblue ring (indicated by the large red arrows) to the edgeof the CPU lid before making contact. Carefully lower theETI onto the CPU lid surface. With moderate, downwardfinger pressure, completely press down all ETI surfacesonto the CPU lid by following the square blue alignmentring. Additionally, press down the surface surroundingthe vent lid onto the CPU and the adhesive area to thesocket frame (see small red arrows).It is critical that the square blue alignment ring is completely on the CPU lid andall blue ring surfaces are thoroughly pressed down.It is imperative that the water block is aligned correctly beforeit makes contact with the ETI. Avoid any twisting on the ETIas the water block is bolted down.Be certain thumb nuts have been tightened only (5) fullrevolutions (from initial thread engagement); DO NOT fullytighten thumb nuts; excessive clamping force may damageETI, resulting in alloy leakage and/or poor thermalperformance.All disclosures, notices and warranty conditions are being written on <strong>EKWB</strong> web page. Please check terms of use. Revision 1.1. Released on 25 th of July, 2012.