Create successful ePaper yourself
Turn your PDF publications into a flip-book with our unique Google optimized e-Paper software.
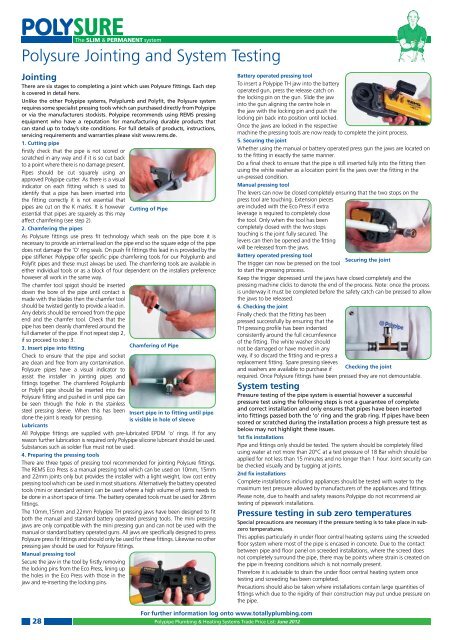
<strong>The</strong> SLIM & PERMANENT systemPolysure Jointing and System TestingJointing<strong>The</strong>re are six stages to completing a joint which uses Polysure fittings. Each stepis covered in detail here.Unlike the other <strong>Polypipe</strong> systems, Polyplumb and Polyfit, the Polysure systemrequires some specialist pressing tools which can purchased directly from <strong>Polypipe</strong>or via the manufacturers stockists. <strong>Polypipe</strong> recommends using REMS pressingequipment who have a reputation for manufacturing durable products thatcan stand up to today’s site conditions. For full details of products, instructions,servicing requirements and warranties please visit www.rems.de.1. Cutting pipeFirstly check that the pipe is not scored orscratched in any way and if it is so cut backto a point where there is no damage present.Pipes should be cut squarely using anapproved <strong>Polypipe</strong> cutter. As there is a visualindicator on each fitting which is used toidentify that a pipe has been inserted intothe fitting correctly it is not essential thatpipes are cut on the K marks. It is howeveressential that pipes are squarely as this mayaffect chamfering (see step 2).2. Chamfering the pipesAs Polysure fittings use press fit technology which seals on the pipe bore it isnecessary to provide an internal lead on the pipe end so the square edge of the pipedoes not damage the ‘O’ ring seals. On push fit fittings this lead in is provided by thepipe stiffener. <strong>Polypipe</strong> offer specific pipe chamfering tools for our Polyplumb andPolyfit pipes and these must always be used. <strong>The</strong> chamfering tools are available ineither individual tools or as a block of four dependent on the installers preferencehowever all work in the same way.<strong>The</strong> chamfer tool spigot should be inserteddown the bore of the pipe until contact ismade with the blades then the chamfer toolshould be twisted gently to provide a lead in.Any debris should be removed from the pipeend and the chamfer tool. Check that thepipe has been cleanly chamfered around thefull diameter of the pipe. If not repeat step 2,if so proceed to step 3.3. Insert pipe into fittingCheck to ensure that the pipe and socketare clean and free from any contamination.Polysure pipes have a visual indicator to fittings together. <strong>The</strong> chamfered Polyplumbor Polyfit pipe should be inserted into thePolysure fitting and pushed in until pipe canbe seen through the hole in the stainlesssteel pressing sleeve. When this has beenLubricantsAll <strong>Polypipe</strong> fittings are supplied with pre-lubricated EPDM ‘o’ rings. If for anyreason further lubrication is required only <strong>Polypipe</strong> silicone lubricant should be used.Substances such as solder flux must not be used.4. Preparing the pressing tools<strong>The</strong> REMS Eco Press is a manual pressing tool which can be used on 10mm, 15mmpressing tool which can be used in most situations. Alternatively the battery operatedbe done in a short space of time. <strong>The</strong> battery operated tools must be used for 28mmfittings.both the manual and standard battery operated pressing tools. <strong>The</strong> mini pressingPolysure press fit fittings and should only be used for these fittings. Likewise no otherManual pressing toolthe locking pins from the Eco Press, lining upthe holes in the Eco Press with those in theCutting of PipeChamfering of PipeInsert pipe in to fitting until pipeis visible in hole of sleeveBattery operated pressing tooloperated gun, press the release catch oninto the gun aligning the centre hole inlocking pin back into position until locked.5. Securing the jointto the fitting in exactly the same manner.Do a final check to ensure that the pipe is still inserted fully into the fitting thenun-pressed condition.Manual pressing tool<strong>The</strong> levers can now be closed completely ensuring that the two stops on thepress tool are touching. Extension piecesare included with the Eco Press if extraleverage is required to completely closethe tool. Only when the tool has beencompletely closed with the two stopslevers can then be opened and the fittingBattery operated pressing toolSecuring the joint<strong>The</strong> trigger can now be pressed on the toolto start the pressing process.pressing machine clicks to denote the end of the process. Note: once the processis underway it must be completed before the safety catch can be pressed to allow6. Checking the jointFinally check that the fitting has beenpressed successfully by ensuring that theTH pressing profile has been indentedconsistently around the full circumferenceof the fitting. <strong>The</strong> white washer shouldnot be damaged or have moved in anyway, if so discard the fitting and re-press areplacement fitting. Spare pressing sleevesand washers are available to purchase ifChecking the jointrequired. Once Polysure fittings have been pressed they are not demountable.System testingPressure testing of the pipe system is essential however a successfulpressure test using the following steps is not a guarantee of completeand correct installation and only ensures that pipes have been insertedinto fittings passed both the ‘o’ ring and the grab ring. If pipes have beenscored or scratched during the installation process a high pressure test asbelow may not highlight these issues.1st fix installationsPipe and fittings only should be tested. <strong>The</strong> system should be completely filledusing water at not more than 20°C at a test pressure of 18 Bar which should beapplied for not less than 15 minutes and no longer than 1 hour. Joint security can2nd fix installationsComplete installations including appliances should be tested with water to themaximum test pressure allowed by manufacturers of the appliances and fittings.Please note, due to health and safety reasons <strong>Polypipe</strong> do not recommend airtesting of pipework installations.Pressure testing in sub zero temperaturesSpecial precautions are necessary if the pressure testing is to take place in subzerotemperatures.This applies particularly in under floor central heating systems using the screededfloor system where most of the pipe is encased in concrete. Due to the contactbetween pipe and floor panel on screeded installations, where the screed doesnot completely surround the pipe, there may be points where strain is created onthe pipe in freezing conditions which is not normally present.<strong>The</strong>refore it is advisable to drain the under floor central heating system oncetesting and screeding has been completed.Precautions should also be taken where installations contain large quantities offittings which due to the rigidity of their construction may put undue pressure onthe pipe.For further information log onto www.totallyplumbing.com28 <strong>Polypipe</strong> <strong>Plumbing</strong> & Heating Systems Trade Price List: June 2012


