II PRO PLUS Snowplow #74750/75600/75610/76901/76974/76980
II PRO PLUS Snowplow #74750/75600/75610/76901/76974/76980
II PRO PLUS Snowplow #74750/75600/75610/76901/76974/76980

Create successful ePaper yourself
Turn your PDF publications into a flip-book with our unique Google optimized e-Paper software.
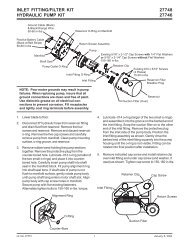
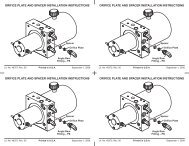
OPERATIONAL TESTS AND FINAL ADJUSTMENTSBLADE DROP SPEED ADJUSTMENTWARNINGKeep 8' clear of the blade when it is beingraised, lowered or angled. Do not standbetween the vehicle and blade or directly infront of the blade. If the blade hits or drops onyou, you could be seriously injured.The quill in the top of the valve manifold on thepassenger-side front corner of the hydraulic unitadjusts the blade drop speed.1. Move the driver-side lift chain from the lift armhook to the cable boot bracket on the side of theupper lift frame.3. Pivot the lift arm and lift ram forward and removethe hydraulic unit cover.4. Replace the two clevis pins, washers and hairpincotters to reattach the lift arm to the lift frame.5. Turn the quill IN (clockwise) to decrease dropspeed.Turn the quill OUT (counterclockwise) to increasedrop speed.QuillMove chainto here6. Stand 8 feet clear of the blade drop zone whenchecking the adjustment.7. Remove and retain the two hairpin cotters,washers and pins attaching the lift arm to thelift frame.2. Remove and retain the two hairpin cotters,washers and pins attaching the lift arm to thelift frame.8. Replace the hydraulic unit cover. Pivot the lift armand lift ram up.9. Replace the two clevis pins, washers and hairpincotters to reattach the lift arm to the lift frame.10. Move the driver-side lift chain back to the lift armhook.Lit. No. 49585, Rev. 02 13 December 1, 2011