NGC-UIT-ORD to NGC-UIT2-ORD - Pentair
NGC-UIT-ORD to NGC-UIT2-ORD - Pentair
NGC-UIT-ORD to NGC-UIT2-ORD - Pentair
Create successful ePaper yourself
Turn your PDF publications into a flip-book with our unique Google optimized e-Paper software.
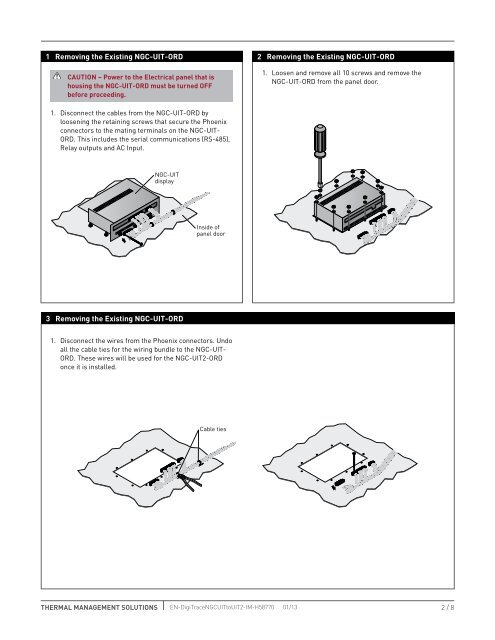
1 Removing the Existing <strong>NGC</strong>-<strong>UIT</strong>-<strong>ORD</strong> 2 Removing the Existing <strong>NGC</strong>-<strong>UIT</strong>-<strong>ORD</strong>Caution – Power <strong>to</strong> the Electrical panel that ishousing the <strong>NGC</strong>-<strong>UIT</strong>-<strong>ORD</strong> must be turned OFFbefore proceeding.1. Loosen and remove all 10 screws and remove the<strong>NGC</strong>-<strong>UIT</strong>-<strong>ORD</strong> from the panel door.1. Disconnect the cables from the <strong>NGC</strong>-<strong>UIT</strong>-<strong>ORD</strong> byloosening the retaining screws that secure the Phoenixconnec<strong>to</strong>rs <strong>to</strong> the mating terminals on the <strong>NGC</strong>-<strong>UIT</strong>-<strong>ORD</strong>. This includes the serial communications (RS-485),Relay outputs and AC Input.<strong>NGC</strong>-<strong>UIT</strong>displayInside ofpanel door3 Removing the Existing <strong>NGC</strong>-<strong>UIT</strong>-<strong>ORD</strong>1. Disconnect the wires from the Phoenix connec<strong>to</strong>rs. Undoall the cable ties for the wiring bundle <strong>to</strong> the <strong>NGC</strong>-<strong>UIT</strong>-<strong>ORD</strong>. These wires will be used for the <strong>NGC</strong>-<strong>UIT</strong>2-<strong>ORD</strong>once it is installed.Cable tiesTHERMAL MANAGEMENT SOLUTIONS EN-DigiTrace<strong>NGC</strong><strong>UIT</strong><strong>to</strong><strong>UIT</strong>2-IM-H58770 01/13 2 / 8


