Arduino Fio Programming
Arduino Fio Programming
Arduino Fio Programming

You also want an ePaper? Increase the reach of your titles
YUMPU automatically turns print PDFs into web optimized ePapers that Google loves.
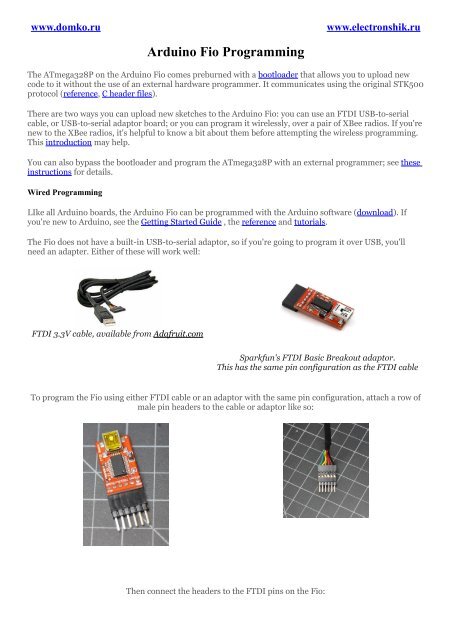
www.domko.ruwww.electronshik.ru<strong>Arduino</strong> <strong>Fio</strong> <strong>Programming</strong>The ATmega328P on the <strong>Arduino</strong> <strong>Fio</strong> comes preburned with a bootloader that allows you to upload newcode to it without the use of an external hardware programmer. It communicates using the original STK500protocol (reference, C header files).There are two ways you can upload new sketches to the <strong>Arduino</strong> <strong>Fio</strong>: you can use an FTDI USB-to-serialcable, or USB-to-serial adaptor board; or you can program it wirelessly, over a pair of XBee radios. If you'renew to the XBee radios, it's helpful to know a bit about them before attempting the wireless programming.This introduction may help.You can also bypass the bootloader and program the ATmega328P with an external programmer; see theseinstructions for details.Wired <strong>Programming</strong>LIke all <strong>Arduino</strong> boards, the <strong>Arduino</strong> <strong>Fio</strong> can be programmed with the <strong>Arduino</strong> software (download). Ifyou're new to <strong>Arduino</strong>, see the Getting Started Guide , the reference and tutorials.The <strong>Fio</strong> does not have a built-in USB-to-serial adaptor, so if you're going to program it over USB, you'llneed an adapter. Either of these will work well:FTDI 3.3V cable, available from Adafruit.comSparkfun's FTDI Basic Breakout adaptor.This has the same pin configuration as the FTDI cableTo program the <strong>Fio</strong> using either FTDI cable or an adaptor with the same pin configuration, attach a row ofmale pin headers to the cable or adaptor like so:Then connect the headers to the FTDI pins on the <strong>Fio</strong>:
Using the adaptor to program a <strong>Fio</strong>Using the FTDI cable to program a <strong>Fio</strong>These are alternative ways to program a <strong>Fio</strong> with a L-shaped plug and low-profile sockets:Using a L-shaped plug and soldered low-profilesockets to program a <strong>Fio</strong>Using a L-shaped plug without soldered low-profilesockets to program a <strong>Fio</strong>If your headers don't fit snugly in the holes (and most won't), you should hold the connector firmly so thatthe metal of the pins touches the metal of the holes while you're programming.When your cable is connected to the <strong>Fio</strong>, open the <strong>Arduino</strong> programming environment, choose <strong>Fio</strong> fromthe Tools-->Board menu. Then choose your serial port from the serial port menu, and you're ready toprogram If you're using the FTDI adaptor, you'll see the TX and RX lights flicker. You won't see any visiblesign on the <strong>Fio</strong>, but you will see the following in the IDE when you've successfully uploaded code:NOTE: Please remove a XBee modem from a <strong>Fio</strong> board while uploading sketches.
DL FFFF or <strong>Fio</strong>'s MY value programmer's MY valueD3 3 5IC 8 not setRR 3 not setIU not set 0IA not set FFFFRO 10 10Note: If you set the programmer's destination address (DL) to FFFF, it will re-program all <strong>Fio</strong>s in its PANID. To program one <strong>Fio</strong> at a time wirelessly while others are on, set the programmer's DL to that <strong>Fio</strong>'s MYaddress.Modifying the serial port settings (Windows only)If you're running Windows, you have to make a slight change to the driver preferences. In the DeviceManager, select the USB COM port. Then right click and select Properties. Click on the Port Settingstab, and click on Advanced..., then make Set RTS On Close is selected and click OK to apply settings.How to configure XBee modemsYou can configure your radios using a terminal application, or using X-CTU on Windows, or you can usethe <strong>Fio</strong> XBee Config Tool. This is a modified version of Shigeru Kobayashi's XBeeConfigTool.Using <strong>Arduino</strong> <strong>Fio</strong> XbeeConfigTool1. Choose a proper serial port2. Choose a proper mode (Programmer or <strong>Fio</strong>)3. Choose a proper baud rate (57600bps)4. Set a proper PAN ID (e.g. 1234, should be same on both)5. Set a proper MY ID (e.g. 1, for end devices, 0 for programmer)6. Press the Configure button to configure the XBee modem
Configuring the radios using a serial terminal applicationIf you prefer to set your settings manually, you can set them using any Serial terminal application, such asCoolTerm. Connect the adapter to your computer, and open its serial port at 9600 bps using your favoriteserial terminal application.Set your terminal application's termination string to be a carriage return (ASCI 0x0D) only. Then open theport, and type:+++The XBee will respond:OKFor the programmer radio, type:ATRE,BD6,ID1234,MY0,DLFFFF,D33,IC8, RR3,RO10,WRThe XBee will respond:OKOKOKOKOKOKOKOKOKFor the <strong>Fio</strong> radio, type:ATRE,BD6,ID1234,MY1,DL0,D35,IU0,IAFFFF,RO10,WRThe XBee will respond:OK
OKOKOKOKOKOKOKOKOKThat's it! Now connect the <strong>Fio</strong> radio to your <strong>Fio</strong>, leave the programming radio in the XBee adapter, andyou're ready to upload sketches to your <strong>Fio</strong>.Uploading sketches from an <strong>Arduino</strong> IDE to a <strong>Fio</strong> boardUploading sketches to the <strong>Fio</strong> is similar to other <strong>Arduino</strong> boards.1. Choose Tools/Board/<strong>Arduino</strong> <strong>Fio</strong> or Tools/Board/<strong>Arduino</strong> Pro or Pro Mini (8MHz)2. Choose a proper serial port in Tools/Serial Port3. Write a sketch and press the Upload buttonAs you upload, you should see the green RSSI light on the <strong>Fio</strong> light up. If you're using an XBee Explorer,you'll also see the TX and RX lights on it flicker as the sketch uploads.If the <strong>Fio</strong> does not respond, here are the most common causes of error:1. make sure the <strong>Fio</strong> is powered. You can use USB power if you don't have a battery.2. make sure the slider switch on the <strong>Fio</strong> is turned ON3. Check your radio configurations. Did you miss a setting? This is particularly common if youconfgured them using a serial terminal application.When in doubt, check the <strong>Fio</strong> by programming it over a wired connection as described above.