Classic Shaker Side Table - Popular Woodworking Magazine
Classic Shaker Side Table - Popular Woodworking Magazine
Classic Shaker Side Table - Popular Woodworking Magazine

You also want an ePaper? Increase the reach of your titles
YUMPU automatically turns print PDFs into web optimized ePapers that Google loves.
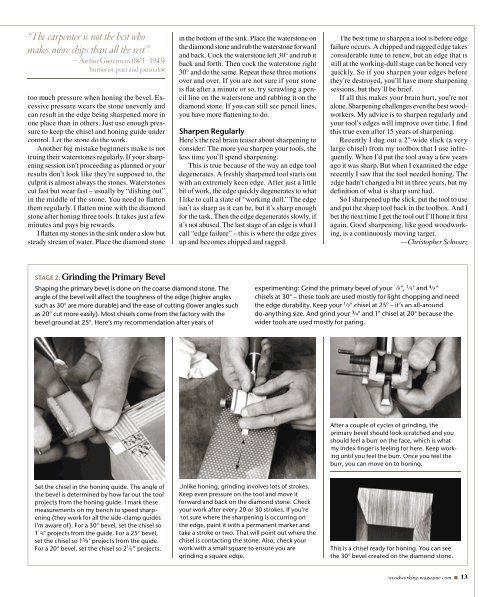
“The carpenter is not the best whomakes more chips than all the rest.”— Arthur Guiterman (1871 - 1943)humorist, poet and journalisttoo much pressure when honing the bevel. Excessivepressure wears the stone unevenly andcan result in the edge being sharpened more inone place than in others. Just use enough pressureto keep the chisel and honing guide undercontrol. Let the stone do the work.Another big mistake beginners make is nottruing their waterstones regularly. If your sharpeningsession isn’t proceeding as planned or yourresults don’t look like they’re supposed to, theculprit is almost always the stones. Waterstonescut fast but wear fast – usually by “dishing out”in the middle of the stone. You need to flattenthem regularly. I flatten mine with the diamondstone after honing three tools. It takes just a fewminutes and pays big rewards.I flatten my stones in the sink under a slow butsteady stream of water. Place the diamond stonein the bottom of the sink. Place the waterstone onthe diamond stone and rub the waterstone forwardand back. Cock the waterstone left 30° and rub itback and forth. Then cock the waterstone right30° and do the same. Repeat these three motionsover and over. If you are not sure if your stoneis flat after a minute or so, try scrawling a pencilline on the waterstone and rubbing it on thediamond stone. If you can still see pencil lines,you have more flattening to do.Sharpen RegularlyHere’s the real brain teaser about sharpening toconsider: The more you sharpen your tools, theless time you’ll spend sharpening.This is true because of the way an edge tooldegenerates. A freshly sharpened tool starts outwith an extremely keen edge. After just a littlebit of work, the edge quickly degenerates to whatI like to call a state of “working dull.” The edgeisn’t as sharp as it can be, but it’s sharp enoughfor the task. Then the edge degenerates slowly, ifit’s not abused. The last stage of an edge is what Icall “edge failure” – this is where the edge givesup and becomes chipped and ragged.The best time to sharpen a tool is before edgefailure occurs. A chipped and ragged edge takesconsiderable time to renew, but an edge that isstill at the working-dull stage can be honed veryquickly. So if you sharpen your edges beforethey’re destroyed, you’ll have more sharpeningsessions, but they’ll be brief.If all this makes your brain hurt, you’re notalone. Sharpening challenges even the best woodworkers.My advice is to sharpen regularly andyour tool’s edges will improve over time. I findthis true even after 15 years of sharpening.Recently I dug out a 2"-wide slick (a verylarge chisel) from my toolbox that I use infrequently.When I’d put the tool away a few yearsago it was sharp. But when I examined the edgerecently I saw that the tool needed honing. Theedge hadn’t changed a bit in three years, but mydefinition of what is sharp sure had.So I sharpened up the slick, put the tool to useand put the sharp tool back in the toolbox. And Ibet the next time I get the tool out I’ll hone it firstagain. Good sharpening, like good woodworking,is a continuously moving target.—Christopher SchwarzSTAGE 2: Grinding the Primary BevelShaping the primary bevel is done on the coarse diamond stone. Theangle of the bevel will affect the toughness of the edge (higher anglessuch as 30° are more durable) and the ease of cutting (lower angles suchas 20° cut more easily). Most chisels come from the factory with thebevel ground at 25°. Here’s my recommendation after years ofexperimenting: Grind the primary bevel of your 1 ⁄ 8 ", 1 ⁄ 4 " and 3 ⁄ 8 "chisels at 30° – these tools are used mostly for light chopping and needthe edge durability. Keep your 1 ⁄ 2 " chisel at 25° – it’s an all-arounddo-anything size. And grind your 3 ⁄ 4 " and 1" chisel at 20° because thewider tools are used mostly for paring.After a couple of cycles of grinding, theprimary bevel should look scratched and youshould feel a burr on the face, which is whatmy index finger is feeling for here. Keep workinguntil you feel the burr. Once you feel theburr, you can move on to honing.Set the chisel in the honing guide. The angle ofthe bevel is determined by how far out the toolprojects from the honing guide. I mark thesemeasurements on my bench to speed sharpening(they work for all the side-clamp guidesI’m aware of). For a 30° bevel, set the chisel so1 1 ⁄ 4 " projects from the guide. For a 25° bevel,set the chisel so 1 5 ⁄ 8 " projects from the guide.For a 20° bevel, set the chisel so 2 1 ⁄ 8 ” projects.Unlike honing, grinding involves lots of strokes.Keep even pressure on the tool and move itforward and back on the diamond stone. Checkyour work after every 20 or 30 strokes. If you’renot sure where the sharpening is occurring onthe edge, paint it with a permanent marker andtake a stroke or two. That will point out where thechisel is contacting the stone. Also, check yourwork with a small square to ensure you aregrinding a square edge.This is a chisel ready for honing. You can seethe 30° bevel created on the diamond stone.woodworking-magazine.com ■ 13