Simple & Fast Rabbeted DrawersIt takes only one setupon the table saw to cutevery joint you need to makea solid drawer. Without adoubt, this is as easy as it gets.AAlong the road to comfortably referring toyourself as a “woodworker,” there are a few importantmilestones you must reach. One of theseis building your first drawer. For some reason,this project causes more antacid-popping thanalmost any other project.A drawer is just a box. The tricky part is thatthe box must fit accurately into a hole and movesmoothly. There are three steps to a successfuldrawer: precise measuring, accurate joining andcareful fitting. This article shows you the tricks weuse to successfully complete all three steps.Measuring Like a ProLet’s say you’re building an end table with adrawer. Knowing the size of the drawer’s holeis the first critical piece of information. Seeinghow that space is made and understanding howthe drawer will “run” in the table is the next step.In traditional case construction, the drawer is justslightly smaller than its hole (which is the techniquewe’re showing here). In modern cabinets,the drawer is considerably smaller than its hole tomake room for mechanical slides or glides.In our traditional case, the drawer hole mustbe clear of obstructions or corners that the drawercan hang up on. For that reason, the sides of thedrawer are traditionally kept in check by “drawerguides,” which are simply pieces of wood insidethe carcase that are parallel to the sides of thedrawer. Essentially, the guides create a smoothsleeve for the drawer to run in and out of.With the guides in place, you’re ready to measurethe opening for the drawer. You want to builda drawer that fits the largest part of its opening.First measure the height of the drawer openingat the left side, right side and in the middleto make sure your case is square. The drawer forthe “Simple <strong>Shaker</strong> End <strong>Table</strong>” on page 16 is an“inset drawer,” which means the drawer frontdoesn’t have a lip that covers the gap between thedrawer and case. (Drawers with a lip are called“overlay” drawers, by the way.) Because this is aninset drawer, you should end up with a small gapall the way around the drawer front, called the“reveal.” The reveal must be equal on all four sidesof the drawer front. Next, measure the width ofthe drawer opening at the top and bottom. Finally,measure the depth of the drawer space.Now comes a tricky decision: Do you buildthe drawer to fit the space exactly and then trim itdown with a hand plane to allow for proper movement?Or do you trust yourself to build the drawerso that there is exactly 1 ⁄ 16 " of space between thedrawer and its guides?We like to err on the side of caution. Buildyour drawer to fit the opening exactly and trim itto fit. If your drawer opening happens to be out ofsquare, trimming the drawer is the easiest way tocompensate. So build to fill the space, then workdown to a smooth operational size.PHOTO BY AL PARRISH24 ■ woodworking magazine Autumn 2004
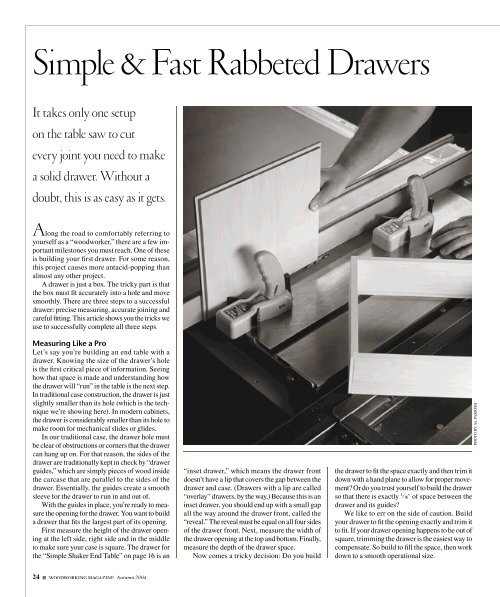
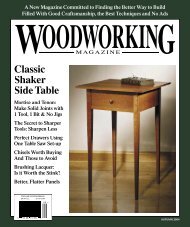
One Setup Cuts All the JointsNow that you know the size of your drawer, you’reready to build it. Mill all your stock to size (seethe cutting list on page 18 for the <strong>Shaker</strong> end tabledrawer), paying particular attention to its thickness.The thickness of the sides and bottom mustbe exactly 1 ⁄ 2 " for this operation to work well.We’re going to build our drawer exactly thesize of our opening, except for the depth. Thedrawer’s depth will be 1 ⁄ 2 " shy of the depth of theopening to allow us to fit the drawer flush with itsopening, which we’ll explain shortly.The drawings on page 26 show how we buildsimple drawers using one setup on the table saw.You won’t have to change the blade height or movethe fence as you cut these three joints:■ The 1 ⁄ 2"-wide x1 ⁄ 4"-deep rabbets that join thesides to the front and back.■ The 1 ⁄ 4 " x 1 ⁄ 4 " groove on the sides and frontthat holds the bottom in place.■ And the 1 ⁄ 4 " x 1 ⁄ 4 " rabbets on the bottom thatallows it to slip neatly into the grooves.It may not be the way you’ll build all yourdrawers, but it’s simple and nearly foolproof. The1 ⁄ 2 "-wide x 1 ⁄ 4 "-deep rabbets at the corners – whenreinforced with brads – make the drawer resistracking and tension. While this can’t compare toa stout dovetailed drawer, it’s more than adequatefor most furniture applications.To make the drawer a one-setup operation,you’ll need a dado stack. Dado stacks traditionallyhave two 6"- or 8"-diameter saw blades thatcut a 1 ⁄ 8 " kerf – plus a variety of “chippers” thatcan be inserted between the two outside blades toadjust the width of the groove to be cut. For our“Yes, risk-taking is inherentlyfailure-prone. Otherwise, it wouldbe called sure-thing-taking.”— Tim McMahan (1949 – )international business speaker, author, photographerdrawer, we’re going to use only the two 1 ⁄ 8 " outsideblades to achieve a 1 ⁄ 4 " groove.(Note: If you don’t have a dado stack, you canuse an 1 ⁄ 8 "-kerf rip blade. You’ll have to make afew extra passes over the blade, and you will needto move the fence, but only once.)Now install a new zero-clearance throat insertto be used for this operation alone. (You canbuy one from any tool supplier or make one usingyour saw’s stock insert as a template; your saw’smanual should show you how.) Without this newinsert, rabbeting the bottom using your stock insertcan be dangerous, especially with a left-tiltsaw. The opening will be too big and your workcould tip into the blades.With the two dado blades installed on yoursaw’s arbor, raise them so they are exactly 1 ⁄ 4 "above the new insert. Set your saw’s rip fence so itis exactly 1 ⁄ 4 " away from the dado stack. Confirmyour setup with some test cuts and dial calipers.Use the drawings to walk through the simplerabbeting steps for the front and back, and thegrooves for the bottom.If you use a 1 ⁄ 4 "-thick plywood bottom insteadof solid wood, you’re done at the saw. If you’reusing a 1 ⁄ 2"-thickhardwood bottom, you need tocut the rabbet on its edges so it slides in place.We’ve shown two different ways to make abottom here. In the drawings, we show a bottomthat actually extends past the back. The back iscut 1 ⁄ 2" narrowerthan the front. This has severaladvantages: You can remove the drawer bottomfor finishing and easily replace it if it ever getsdamaged. It’s necessary to build drawers thisway when they are deeper than 12" to allow thesolid-wood bottom to expand and contract withoutbinding or busting the drawer.Second, in the photos we’ve shown a bottomthat is completely captured by the groove on thesides, front and bottom. In small drawers such asthis one, wood expansion isn’t a major concernand this method allows all the drawer pieces tobe the same width.Fine-tuning and AssemblyBefore assembling the drawer, dry-fit the partsto ensure everything will go together easily. Therabbets should fit easily, but the bottom needs toslide into its groove without forcing, and you needto make sure the bottom isn’t keeping the cornerrabbet joints from closing tightly.If the bottom is too tight you have a few options.You can head back to the saw and movethe fence a little closer ( 1 ⁄ 32 ", or at most 1 ⁄ 16 ") tothe dado stack and rerun the four edges to thinthe rabbet. A couple of passes with a bullnoseor shoulder plane will also thin down the rabbetquickly. If the bottom is holding the corner jointsopen, raise the height of the dado stack ( 1 ⁄ 16 " isfine) and, re-run the edges of the bottom. Thenkeep checking your fit and adjusting until you’reready to assemble.Drawer guidesBrad locationDrawer runnersHere I’m measuring the height of the drawer opening near the center. Youshould also measure the height at both ends of the opening. The width alsoneeds to be measured at top and bottom. Also shown in the photo are thedrawer guides and runners in a typical case.When building a drawer with a captured bottom, clamps are placed to applypressure in both directions with the bottom in place. Note that the clampsare placed just behind the rabbet to apply as much direct pressure to the joint(without interfering with it) as possible. Brads add strength.woodworking-magazine.com ■ 25