Classic Shaker Side Table - Popular Woodworking Magazine
Classic Shaker Side Table - Popular Woodworking Magazine
Classic Shaker Side Table - Popular Woodworking Magazine

You also want an ePaper? Increase the reach of your titles
YUMPU automatically turns print PDFs into web optimized ePapers that Google loves.
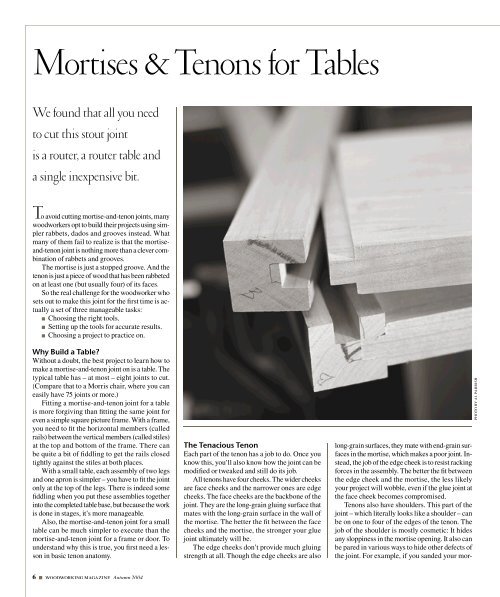
Mortises & Tenons for <strong>Table</strong>sWe found that all you needto cut this stout jointis a router, a router table anda single inexpensive bit.TTo avoid cutting mortise-and-tenon joints, manywoodworkers opt to build their projects using simplerrabbets, dados and grooves instead. Whatmany of them fail to realize is that the mortiseand-tenonjoint is nothing more than a clever combinationof rabbets and grooves.The mortise is just a stopped groove. And thetenon is just a piece of wood that has been rabbetedon at least one (but usually four) of its faces.So the real challenge for the woodworker whosets out to make this joint for the first time is actuallya set of three manageable tasks:■ Choosing the right tools.■ Setting up the tools for accurate results.■ Choosing a project to practice on.Why Build a <strong>Table</strong>?Without a doubt, the best project to learn how tomake a mortise-and-tenon joint on is a table. Thetypical table has – at most – eight joints to cut.(Compare that to a Morris chair, where you caneasily have 75 joints or more.)Fitting a mortise-and-tenon joint for a tableis more forgiving than fitting the same joint foreven a simple square picture frame. With a frame,you need to fit the horizontal members (calledrails) between the vertical members (called stiles)at the top and bottom of the frame. There canbe quite a bit of fiddling to get the rails closedtightly against the stiles at both places.With a small table, each assembly of two legsand one apron is simpler – you have to fit the jointonly at the top of the legs. There is indeed somefiddling when you put these assemblies togetherinto the completed table base, but because the workis done in stages, it’s more manageable.Also, the mortise-and-tenon joint for a smalltable can be much simpler to execute than themortise-and-tenon joint for a frame or door. Tounderstand why this is true, you first need a lessonin basic tenon anatomy.The Tenacious TenonEach part of the tenon has a job to do. Once youknow this, you’ll also know how the joint can bemodified or tweaked and still do its job.All tenons have four cheeks. The wider cheeksare face cheeks and the narrower ones are edgecheeks. The face cheeks are the backbone of thejoint. They are the long-grain gluing surface thatmates with the long-grain surface in the wall ofthe mortise. The better the fit between the facecheeks and the mortise, the stronger your gluejoint ultimately will be.The edge cheeks don’t provide much gluingstrength at all. Though the edge cheeks are alsolong-grain surfaces, they mate with end-grain surfacesin the mortise, which makes a poor joint. Instead,the job of the edge cheek is to resist rackingforces in the assembly. The better the fit betweenthe edge cheek and the mortise, the less likelyyour project will wobble, even if the glue joint atthe face cheek becomes compromised.Tenons also have shoulders. This part of thejoint – which literally looks like a shoulder – canbe on one to four of the edges of the tenon. Thejob of the shoulder is mostly cosmetic: It hidesany sloppiness in the mortise opening. It also canbe pared in various ways to hide other defects ofthe joint. For example, if you sanded your mor-PHOTO BY AL PARRISH6 ■ woodworking magazine Autumn 2004